
Check Your Display Settings
Before you start troubleshooting why your apps are not opening on the second monitor, it’s crucial to check your display settings. Here’s how to make sure your settings are configured correctly:
- Check the physical connection: Ensure that your second monitor is properly connected to your computer. Make sure the cables are securely plugged into the respective ports on both the monitor and the computer.
- Verify monitor detection: Go to your computer’s display settings and ensure that the second monitor is detected. If it doesn’t appear, try restarting your computer and checking again. Sometimes a simple restart can resolve this issue.
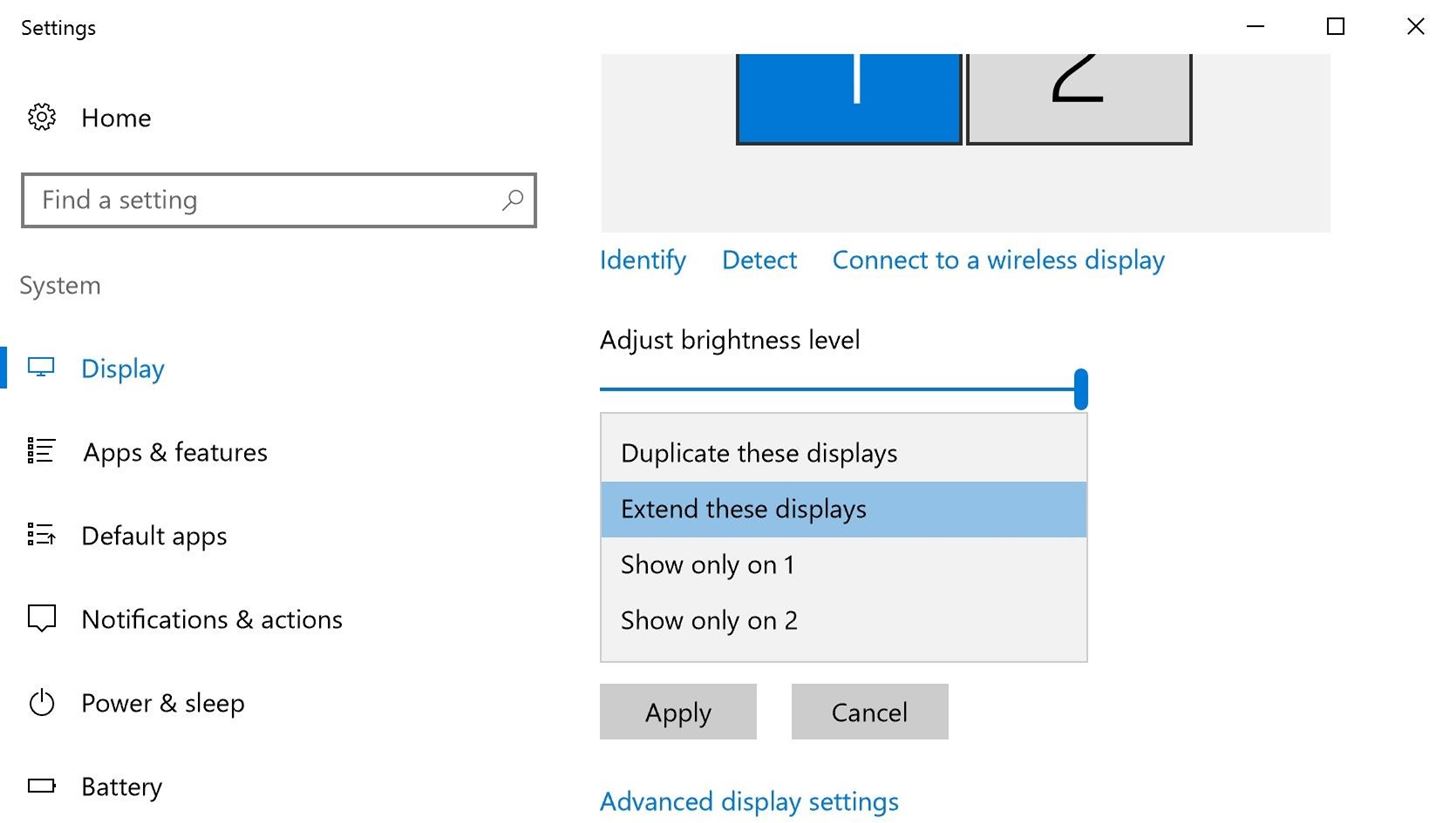
- Check display mode: Verify that your computer is set to extend the display rather than duplicate it. In the display settings, select “Extend these displays” to enable the second monitor as an extended desktop.
- Adjust display resolution: Make sure that the resolution settings for both monitors are compatible. If the resolution of the second monitor is too high, it may not display properly. Adjust the resolution settings to ensure optimal performance.
- Update display drivers: Outdated or incompatible display drivers can cause issues with the second monitor. Visit the manufacturer’s website to download and install the latest drivers for your graphics card.
By carefully checking your display settings and ensuring that everything is correctly configured, you can eliminate any potential issues that may be preventing your apps from opening on the second monitor. Taking these steps can help you make the most of your dual monitor setup and enhance your productivity.
Adjust Your App Window Settings
Once you’ve confirmed that your display settings are correct, the next step is to adjust your app window settings to ensure they open on the second monitor. Here are a few methods to help you achieve this:
- Manually drag the app window: When you open an app, you can click and drag the window to the second monitor manually. Position it on the desired screen and adjust its size for optimal viewing.
- Maximize the app on the second monitor: If you want an app to always open on the second monitor, you can maximize the window on that screen. Right-click on the app’s icon in the taskbar, select “Move,” and then choose “Maximize.” The next time you open the app, it will automatically open on the second monitor.
- Use the Windows key + Shift + Left/Right arrow: If you have a keyboard shortcut preference, you can use the Windows key along with the Shift key and the left or right arrow key to move the active window between monitors quickly. This method allows you to easily switch the app window from one screen to another.
- Utilize the app’s settings: Some apps have built-in settings that allow you to choose the default monitor on which they should open. Check the preferences or settings menu within the app to see if this option is available. It can save you time and effort in manually moving the app window every time you launch it.
- Try third-party window management software: If the above methods do not work for you, you can explore third-party window management software. These tools provide advanced features for managing app windows across multiple monitors, allowing you to set specific rules and configurations for each app.
By adjusting your app window settings, you can ensure that your apps consistently open on the second monitor, streamlining your workflow and enhancing your multitasking capabilities.
Use Window Management Software
If you’re looking for more advanced options to manage your app windows on multiple monitors, using window management software can be a game-changer. These tools provide additional features and customization options to enhance your productivity. Here’s why you should consider using window management software:
- Custom window layouts: Window management software allows you to create custom window layouts tailored to your specific needs. You can predefine the size, position, and arrangement of app windows on different monitors. This feature is especially useful if you have a preferred setup for specific tasks or projects.
- Hotkeys and shortcuts: With window management software, you can assign hotkeys or shortcuts to quickly move and resize app windows across monitors. These shortcuts can significantly speed up your workflow, saving you time and effort in manually adjusting windows.
- Automatic window placement: Window management software can automatically place app windows based on user-defined rules. For example, you can set certain apps to open on specific monitors or arrange them in a grid layout. This automation eliminates the need for manual adjustments every time you launch an app.
- Virtual desktops: Some window management software offers virtual desktop functionality, allowing you to create multiple desktop spaces. You can switch between different desktops to keep your work organized and decluttered, especially when dealing with numerous open app windows across multiple monitors.
- Snap assist: Window management tools often provide snap assist features that make it easier to align app windows on different monitors. You can snap windows to specific screen areas or snap them side by side for seamless multitasking.
Investing in window management software can significantly enhance your multi-monitor experience. These tools offer advanced capabilities, allowing you to customize your app window arrangements, improve workflow efficiency, and boost productivity.
Directly Move the App Window to the Second Monitor
Sometimes, you may want to manually move an app window to the second monitor without relying on default settings or additional software. Here’s how you can directly move an app window to the second monitor:
- Click and drag: Begin by clicking on the title bar or border of the app window you want to move. Hold down the left mouse button and drag the window towards the edge of the first monitor in the direction of the second monitor. Once the cursor reaches the edge of the screen, the window will move to the second monitor.
- Keyboard shortcuts: Some operating systems offer keyboard shortcuts to move windows between monitors. For example, on Windows, you can use the Win + Shift + Arrow key combination to move the active window to the next monitor in that direction. Experiment with these shortcuts to find the one that works best for you.
- Window menu options: In certain apps, you can find a “Move” or “Move to Monitor” option in the window menu. Right-click on the app window’s title bar to access the menu and choose the appropriate option to move the window to the second monitor.
- Taskbar context menu: On some operating systems, you can access a context menu for the app on the taskbar. Right-click on the app’s taskbar icon, and you may find an option like “Move to” or “Move to Another Desktop/Monitor”. Select this option and choose the second monitor to move the app window.
Directly moving app windows to the second monitor gives you more control and flexibility over your multitasking setup. Whether you prefer click and drag methods or utilizing keyboard shortcuts, these options allow you to conveniently position the app windows exactly where you want them.
Configure Multiple Displays in Your Operating System
If you’re encountering issues with your second monitor and app windows, it’s worth checking your operating system’s display settings to ensure proper configuration. Here’s how you can configure multiple displays in some popular operating systems:
- Windows: To configure multiple displays in Windows, right-click on the desktop and select “Display settings” from the context menu. In the display settings, you can choose between different display modes such as “Extend” (which enables the second monitor as an extended desktop), “Duplicate” (which mirrors the primary monitor on the second monitor), or “Second Screen Only” (which only displays content on the second monitor). Adjust the settings to suit your preference and make sure the second monitor is correctly recognized.
- macOS: In macOS, click on the Apple menu and select “System Preferences.” Then, choose “Displays” to access the display settings. On the “Arrangement” tab, you can drag and position the display icons to match the physical placement of your monitors. Tick the “Mirror Displays” option if you want to duplicate the primary monitor on the second screen. Ensure that the resolutions and refresh rates are set correctly for both monitors as well.
- Linux (Ubuntu): In Ubuntu, open the Activities overview and type “Displays” in the search bar. Click on “Displays” to access the display settings. You can choose between “Join Displays” (which extends the desktop) or “Mirror Displays” (which duplicates the primary monitor). Drag and rearrange the displays to match their physical locations and adjust the resolutions if necessary.
- Chrome OS: On a Chromebook, click on the clock in the bottom right corner of the screen, then click on the gear icon to access the settings. Scroll down and click on “Connected devices” and select “Displays.” Here, you can adjust the display mode, resolution, and orientation of the second monitor.
By properly configuring multiple displays in your operating system, you can ensure that your second monitor is recognized, resolutions are set correctly, and the desired display mode is activated. This will help you optimize the use of your dual monitor setup and resolve any issues you may have encountered with app windows on the second monitor.
Enable Extended Desktop Mode
Extended desktop mode is a display setting that allows you to utilize your second monitor as an extension of your primary monitor, providing you with additional screen real estate for multitasking and organizing your workspace. Enabling extended desktop mode can be a game-changer for productivity. Here’s how you can do it:
- Windows: Right-click on the desktop and select “Display settings” from the context menu. In the display settings, scroll down to the “Multiple displays” section and choose the “Extend these displays” option. Ensure that the second monitor is set up correctly and aligned according to your physical setup. You can also drag and drop the displays in the settings to match their relative positions in real life.
- macOS: Access the display settings by clicking on the Apple menu and selecting “System Preferences.” Choose “Displays” and navigate to the “Arrangement” tab. Make sure the “Mirror Displays” option is unchecked, then drag and arrange the displays to match their physical arrangement. This will enable the extended desktop mode.
- Linux (Ubuntu): Open the Activities overview and type “Displays” in the search bar. Click on “Displays” to access the display settings. Under “Display Mode,” select “Join Displays” to enable extended desktop mode. Drag and rearrange the displays to match their physical placement for a seamless experience.
- Chrome OS: On a Chromebook, click on the clock in the bottom right corner of the screen, then click on the gear icon to access the settings. Scroll down and click on “Connected devices” and select “Displays.” Choose “Extended display” to enable extended desktop mode.
Once extended desktop mode is enabled, you can freely move app windows between monitors, organize your workspace, and take advantage of the extra screen space for increased productivity. It allows you to have different applications running simultaneously on separate monitors, making it easier to multitask and work efficiently.
Set the Second Monitor as the Primary Display
By default, most operating systems designate the first monitor as the primary display. However, if you primarily use your second monitor and want to make it the main display, you can easily change this setting. Here’s how to set the second monitor as the primary display:
- Windows: Right-click on the desktop and select “Display settings” from the context menu. In the display settings, scroll down to the “Multiple displays” section. Click on the second monitor in the diagram and check the box that says “Make this my main display,” then click on the “Apply” button. The second monitor will now become the primary display, and the taskbar and desktop icons will appear on this monitor.
- macOS: Access the display settings by clicking on the Apple menu and selecting “System Preferences.” Choose “Displays” and navigate to the “Arrangement” tab. On the top of the window, click and drag the white bar (representing the menu bar) from the primary monitor to the desired second monitor. The second monitor will now become the primary display.
- Linux (Ubuntu): Open the Activities overview and type “Displays” in the search bar. Click on “Displays” to access the display settings. Under “Display Mode,” select “Join Displays” to enable extended desktop mode. Then, click on the second monitor and toggle the “Primary Display” switch to make it the primary monitor.
- Chrome OS: On a Chromebook, click on the clock in the bottom right corner of the screen, then click on the gear icon to access the settings. Scroll down and click on “Connected devices” and select “Displays.” Click on the second monitor, and a checkbox labeled “Set as primary” will appear. Check this box to make the second monitor the primary display.
By setting the second monitor as the primary display, you can customize your workstation to suit your preferred workflow. This can be especially beneficial if you use the second monitor as your main workspace or if you prefer to have the taskbar and main applications readily accessible on that screen.
Troubleshooting Common Issues with Second Monitor Apps
While using multiple monitors can greatly enhance productivity, there may be instances where you encounter issues with apps not functioning correctly on your second monitor. Here are some common problems and troubleshooting steps to resolve them:
- App launching on the wrong monitor: If an app consistently opens on the wrong monitor, try adjusting the app window settings as mentioned earlier in this article. You can also check the app’s preferences or settings to see if there are any options to designate the default monitor for opening the app.
- Rearranged app windows: Sometimes, after disconnecting and reconnecting the second monitor or changing the display settings, app windows may appear off-screen or in a different configuration. You can resolve this by right-clicking on the app’s taskbar icon, selecting “Move,” and using the arrow keys to move the window back to the visible area of the screen.
- Incompatible resolutions: Incompatibilities between the resolution settings of the app and the second monitor can cause display issues. Ensure that the resolution settings of the second monitor match or are compatible with the native resolution of the app. Adjust the resolution accordingly in the display settings for a proper fit.
- Driver or software updates: Outdated display drivers or incompatible software can lead to problems with app compatibility on the second monitor. Check for updates from the manufacturer’s website and install the latest drivers and software to ensure proper functionality.
- Conflicts with third-party software: Some third-party software, such as antivirus programs or screen capture tools, may interfere with the proper functioning of apps on the second monitor. Temporarily disable or uninstall such software to see if it resolves the issue. You can also try running the apps in compatibility mode or exclusion lists of such software.
If you continue to experience problems with apps on the second monitor, it’s recommended to consult the documentation or support resources for your specific operating system, display drivers, or the apps themselves. Additionally, searching online forums or contacting technical support for assistance can provide further insights and solutions to resolve persistent issues.