
Recommended Apps for Using Your iPad as a Second Monitor
If you’re looking to maximize your productivity and make the most of your iPad’s capabilities, using it as a second monitor can be a game-changer. However, to achieve this, you’ll need to have the right apps installed on both your computer and your iPad. Here are some recommended apps that will help you seamlessly connect your iPad as a second monitor:
1. Duet Display: Duet Display is a popular app that turns your iPad into an external monitor for your Mac or PC. It offers a smooth and lag-free experience, allowing you to extend your desktop or mirror your primary screen. Duet Display also supports touch input, making it ideal for artists and designers.
2. Luna Display: Luna Display offers a wireless solution for using your iPad as a second monitor. It works with both Mac and PC and provides high-resolution support for a crystal-clear display. With Luna Display, you can enjoy a seamless integration between your iPad and computer, allowing you to easily drag and drop files or use touch gestures.
3. iDisplay: iDisplay is another app that lets you extend or mirror your computer screen onto your iPad. It supports both Mac and PC and offers a range of customization options to suit your preferences. iDisplay also includes a virtual touchpad feature, enabling you to control your computer directly from your iPad.
4. Splashtop Wired XDisplay: Splashtop Wired XDisplay is a straightforward app that connects your iPad to your computer via a lightning or USB-C cable. It provides a responsive and fluid experience, allowing you to seamlessly use your iPad as a second monitor. Splashtop Wired XDisplay is available for both Mac and PC.
5. Air Display: Air Display allows you to wirelessly connect your iPad to your computer and use it as an additional display. It offers a simple and intuitive interface, making it easy to set up and customize your display settings. Air Display is compatible with both Mac and PC.
These are just a few of the recommended apps for using your iPad as a second monitor. Each app has its own unique features and compatibility, so be sure to choose the one that best suits your needs and devices. With the right app, you can significantly boost your productivity by expanding your workspace and utilizing your iPad’s display to its full potential.
Connecting Your iPad to Your Computer
Connecting your iPad to your computer is the first step in utilizing it as a second monitor. Here are the steps to establish a connection:
1. Check Compatibility: Ensure that your computer and iPad are compatible for this setup. Most apps support both Mac and PC, but it’s always good to verify before proceeding.
2. Use a Cable or Wireless Connection: Depending on the app you’re using, you can either connect your iPad to your computer using a cable or establish a wireless connection.
3. Cable Connection: If you’re using an app like Duet Display or Splashtop Wired XDisplay, you’ll need a lightning or USB-C cable to connect your iPad to your computer. Simply plug one end of the cable into your iPad and the other end into an available USB port on your computer.
4. Wireless Connection: If you prefer a wireless setup, apps like Luna Display and Air Display enable you to connect your iPad to your computer over Wi-Fi. Make sure both devices are connected to the same Wi-Fi network and follow the app’s instructions to establish the connection.
5. Install and Configure the App: Once your iPad is connected to your computer, download and install the recommended app on both devices. Follow the app’s setup instructions to configure the connection settings. This may involve installing additional drivers or software on your computer.
6. Test the Connection: After configuring the app, test the connection by opening the app on your iPad and computer. You should see your iPad screen appear as a second monitor on your computer.
By following these steps, you can easily connect your iPad to your computer and set it up as a second monitor. Whether you prefer a cable or wireless connection, the process is straightforward and only takes a few minutes. Once connected, you’ll be ready to extend your desktop and enjoy the benefits of a dual-screen setup.
Setting Up and Configuring Your iPad Screen
Setting up and configuring your iPad screen as a second monitor allows you to optimize the display and tailor it to your specific needs. Here’s how to get started:
1. Open the App: Launch the app you installed on your iPad and computer to establish the connection between the devices.
2. Display Options: Depending on the app you’re using, you’ll have different display options. Some apps allow you to extend your desktop, while others offer the option to mirror your primary screen. Choose the desired display mode that suits your workflow.
3. Resolution: Adjust the resolution of your iPad’s display to ensure a clear and crisp image. Higher resolutions provide more screen real estate for your apps and content, but bear in mind that it may impact performance, especially if you are using an older iPad model.
4. Orientation: Determine whether you want your iPad to be in landscape or portrait orientation. Some apps allow you to switch between the two, giving you more flexibility in arranging your workspace.
5. Touch and Gestures: If you’re using an app that supports touch input, configure the touch and gesture settings to your preference. This can include options such as enabling or disabling touch input on your iPad, adjusting the sensitivity of touch gestures, or customizing multi-touch gestures.
6. Audio and Other Settings: Explore additional settings provided by the app, such as audio streaming from your computer to your iPad, color and brightness adjustments, or advanced features like pressure sensitivity support for stylus input.
By following these steps, you can set up and configure your iPad screen as a second monitor according to your preferences. Take the time to explore different settings and options provided by the app to optimize your workflow and create a customized dual-screen setup that enhances your productivity.
Extending Your Desktop to Your iPad
One of the key benefits of using your iPad as a second monitor is the ability to extend your desktop, giving you more screen real estate to work with. Here’s how you can extend your desktop to your iPad:
1. Choose the Extend Mode: Open the app on your computer and select the option to extend your desktop. This will enable you to have separate displays, with your iPad acting as an extension of your computer screen.
2. Drag and Drop: Once your desktop is extended, you can drag and drop windows, files, and applications between your computer screen and your iPad. This allows you to spread out your work and easily access different applications without having to switch between tabs or windows.
3. Organize Your Workspace: With an extended desktop, you have the flexibility to arrange your workspace in a way that suits your workflow. For example, you can place your primary working window on your computer screen while keeping reference materials, communication tools, or additional applications on your iPad.
4. Utilize Multi-Monitor Features: Some apps offer advanced multi-monitor features that enhance productivity. For example, you may be able to use your iPad as a dedicated display for specific applications, such as video editing software or design tools. Explore the app’s settings and features to make the most of this extended setup.
5. Customize Display Preferences: Adjust display preferences like screen resolution, orientation, and scaling to ensure a seamless visual experience. Fine-tune these settings to match the size and position of your iPad with your primary display, creating a cohesive and unified workspace.
By extending your desktop to your iPad, you can significantly enhance your productivity by having more screen space to work with. Experiment with different arrangements and utilize the flexibility of an extended desktop to optimize your workflow and increase your efficiency.
Using Your iPad as an Extended Display
When utilizing your iPad as an extended display, you can take advantage of its touchscreen capabilities and create a more interactive and immersive workspace. Here are some tips for using your iPad effectively as an extended display:
1. Touch Input: With its touchscreen functionality, your iPad becomes a versatile input device. Use it to interact directly with content on your extended display. You can navigate websites, scroll through documents, and manipulate graphics with intuitive touch gestures.
2. Apple Pencil Integration: If you have an Apple Pencil, your iPad’s extended display becomes even more powerful. Take advantage of pressure sensitivity and precision control to sketch, annotate, or edit images seamlessly. This is particularly valuable for artists, designers, and creatives.
3. Task Management: Use your iPad as a dedicated space for managing tasks. Keep your to-do list, calendar, or project management tool open on your extended display. This way, you can easily view and interact with your tasks while working on your main screen.
4. Reference Materials: Keep reference materials, like PDFs, research articles, or design inspiration, open on your iPad. This allows you to refer to them without cluttering your primary display. You can easily swipe, scroll, or zoom in on the material while simultaneously working on your computer screen.
5. Communication and Collaboration: Utilize your extended iPad display for communication and collaboration apps. Keep your messaging platform, email client, or video conferencing tool open on your iPad to stay connected with colleagues or clients without interrupting your workflow on the main screen.
6. Multitasking: Take advantage of your iPad’s multitasking capabilities to work on multiple applications simultaneously. With the extended display, you can have different apps open on each screen, boosting your productivity and efficiency.
By using your iPad as an extended display, you can leverage its touchscreen functionality, Apple Pencil integration, and multitasking features to create a more interactive and efficient workspace. Experiment with different use cases and find the setup that works best for your specific tasks and workflow.
Adjusting Display Settings for Your iPad as a Second Monitor
When using your iPad as a second monitor, it’s important to configure the display settings to ensure optimal visual quality and usability. Here are some key display settings you can adjust for your iPad:
1. Display Resolution: Adjusting the display resolution can have a significant impact on the clarity and sharpness of the content on your iPad. Higher resolutions provide more screen real estate and sharper details, but bear in mind that it may affect performance, especially on older iPad models. Find a resolution that strikes a balance between visual quality and performance.
2. Orientation: Decide whether you want your iPad to be in landscape or portrait orientation. Certain apps may work better or require a specific orientation. For example, landscape orientation might be preferable for viewing spreadsheets or multimedia content, while portrait orientation may be better for reading documents or browsing websites.
3. Scaling: Scaling settings control the size of the content displayed on your iPad. You can adjust the scaling to make text and icons appear larger or smaller, depending on your preferences and visual acuity. Experiment with different scaling options until you find a comfortable balance between readability and content density.
4. Brightness and Color: Adjusting the brightness and color settings can significantly impact the visual experience on your iPad. Ensure that the brightness is set to a comfortable level for extended use. Additionally, you may want to calibrate the color settings to match the color profile of your computer display for a more consistent viewing experience.
5. Touch and Gesture Settings: Some apps allow you to configure touch and gesture settings specific to using your iPad as a second monitor. This may include options like touch sensitivity, gesture customization, or multi-touch functionality. Customize these settings based on your preferences and how you plan to interact with your iPad’s extended display.
6. Auto-Lock and Power Settings: Consider adjusting the auto-lock and power settings to prevent your iPad from going to sleep or dimming the screen during extended periods of idle time. This ensures that your second monitor remains active and accessible whenever you need it.
By adjusting these display settings, you can optimize the visual quality, usability, and ergonomics of your iPad’s extended display. Take the time to experiment with different settings to create a comfortable and personalized viewing experience that enhances your productivity.
Organizing and Arranging Apps on Your iPad
When using your iPad as a second monitor, organizing and arranging your apps is crucial for a clutter-free and efficient workspace. Here are some tips to help you organize and arrange apps on your iPad:
1. Create App Categories: Group similar apps together by creating categories. For example, you can have categories for communication apps, productivity tools, design software, or reference materials. This makes it easier to locate specific apps and keeps your workspace organized.
2. Use App Folders: If you have a large number of apps, consider creating folders to further organize your apps. For instance, you can have a folder for social media apps, another for creative tools, and one for utility apps. Simply drag and drop one app onto another to create a folder.
3. Prioritize Most Used Apps: Place your most frequently used apps within easy reach on your iPad’s home screen. This saves time and allows for quick access to essential tools without having to dig through folders. You can move apps by pressing and holding on an app icon until it starts to jiggle, then drag it to the desired location.
4. Customize App Layout: On your iPad, you can arrange apps in various ways. For example, you can organize them in a grid layout, or have them centered around a specific app that you frequently use as your main working window. Experiment with different layouts to find what works best for your workflow.
5. Utilize App Dock: Take advantage of the app dock on your iPad. The dock remains accessible regardless of which app is currently open, allowing you to quickly switch between apps or access your favorite and most frequently used apps. Customize the app dock by dragging and dropping apps onto it.
6. Adjust App Sizes: Some apps allow you to resize or adjust their display sizes on your iPad. This feature can be helpful when you want to have multiple apps open simultaneously, allowing you to allocate screen space based on their importance or the tasks at hand.
By organizing and arranging your apps effectively, you can create a well-structured workspace on your iPad as a second monitor. This will enhance your productivity, make it easier to locate and access your apps, and ensure a clutter-free workflow environment.
Optimizing Your Workflow with Your iPad as a Second Monitor
Using your iPad as a second monitor offers tremendous potential for optimizing your workflow and boosting productivity. By implementing a few strategies, you can make the most out of this setup. Here are some tips to help you optimize your workflow:
1. Identify Tasks for Your iPad: Determine which tasks or applications would benefit from being moved to your iPad’s extended display. For example, you might use your iPad for email, chat applications, reference materials, or project management tools. Identify tasks that can be easily managed on your iPad while keeping your primary screen dedicated to more intensive work.
2. Customize Display Setup: Experiment with different display setups and arrangements that suit your workflow. Find the right balance between your computer screen and iPad to maximize productivity. This might involve having your main working window on your primary screen, while using your iPad for peripheral tasks or reference materials.
3. Take Advantage of Multi-Tasking: Multitasking features on your iPad allow you to work on multiple apps simultaneously. Utilize split-screen functionality to have two apps open side by side, enabling you to perform tasks without switching between apps. This is especially useful when referencing information, writing content while researching, or comparing data.
4. Use iPad-Specific Features: Leverage the unique features of your iPad, such as its touchscreen, Apple Pencil integration, or gesture controls. Take advantage of touch input for navigation, editing, or drawing. Use the Apple Pencil for precise annotations or creative tasks. These features can enhance your workflow and make tasks more intuitive and efficient.
5. Streamline File Management: Set up seamless file management between your computer and iPad. Utilize cloud storage services or file-sharing apps to easily transfer files between devices. This ensures that you have access to your work files regardless of the device you are using.
6. Establish a Routine: Develop a routine that integrates your iPad seamlessly into your workflow. This might involve starting each work session by setting up your extended display, organizing your apps, and configuring your display settings in a consistent manner. Having a routine helps you transition smoothly and ensures a productive workflow.
By optimizing your workflow with your iPad as a second monitor, you can enhance productivity, streamline tasks, and create a seamless and efficient work environment. Explore different strategies and techniques that align with your specific needs and preferences to maximize the benefits of this extended display setup.</p
Troubleshooting Common Issues
While using your iPad as a second monitor can greatly improve your productivity, you may encounter some common issues along the way. Here are some troubleshooting tips to help you resolve these issues:
1. Ensure App Compatibility: Verify that the app you are using to connect your iPad as a second monitor is compatible with your computer’s operating system. Check for any available updates for both the app and your devices to ensure compatibility.
2. Check Connection Settings: Double-check that your iPad and computer are connected to the same Wi-Fi network if you are using a wireless connection. If you’re using a cable connection, make sure the cable is securely plugged into both the iPad and the computer.
3. Restart Devices: Sometimes, restarting your iPad and computer can resolve minor connectivity or performance issues. Power off both devices, wait a few seconds, and then power them back on.
4. Review Firewall Settings: If you’re experiencing trouble establishing a connection between your iPad and computer, check your firewall settings. Make sure that the necessary ports are open, or temporarily disable the firewall to determine if it’s causing the issue.
5. Update Software and Drivers: Ensure that your iPad’s software, as well as your computer’s operating system and graphics drivers, are up to date. Outdated software can cause compatibility issues or functionality limitations.
6. Check Display Preferences: If there are display-related issues, such as incorrect resolution, mismatched orientation, or scaling problems, review your display preferences within the app or system settings. Adjust these settings to match the requirements of your specific setup.
7. Quit and Relaunch the App: If the app you’re using becomes unresponsive or exhibits unexpected behavior, try quitting and relaunching the app. This can help resolve temporary glitches or memory-related issues.
8. Consult App Support: When facing persistent issues, check the app’s support documentation or website for troubleshooting guides, FAQs, or forums. You might find specific solutions or recommendations for resolving common issues.
9. Contact Customer Support: If you’ve exhausted all troubleshooting options and continue to experience problems, reach out to the app’s customer support team. Provide them with detailed information about the issue, including any error messages received, for targeted assistance.
By following these troubleshooting tips, you can overcome common issues that may arise when using your iPad as a second monitor. Remember to stay patient and persistent in resolving these issues to ensure a smooth and efficient workflow.
The Benefits of Using Your iPad as a Second Monitor
Using your iPad as a second monitor offers numerous benefits that can greatly enhance your productivity and workflow. Here are some key advantages of utilizing your iPad in this way:
1. Expanded Screen Real Estate: By extending your desktop to your iPad, you gain additional screen space to spread out your work. This allows you to have multiple applications, documents, or reference materials open simultaneously without overcrowding your primary screen.
2. Seamless Integration: Many apps designed for using your iPad as a second monitor offer seamless integration with your computer. This ensures a smooth and lag-free experience, enabling you to effortlessly drag and drop files or interact with content on your extended display.
3. Customizable Workspace: With your iPad acting as a second monitor, you have the flexibility to arrange and customize your workspace to suit your preferences. You can position apps, windows, and tools on your extended display, optimizing your workflow and creating an organized and efficient workspace.
4. Touchscreen and Apple Pencil Compatibility: Leveraging your iPad’s touchscreen capabilities and Apple Pencil integration provides a more intuitive and interactive experience. You can directly interact with content, manipulate images, make annotations, or take notes, bringing an additional level of versatility to your workflow.
5. Portable Productivity: Using your iPad as a second monitor allows you to harness the power of dual-screen productivity while on the go. Whether you’re working from a coffee shop, a client’s office, or while traveling, you can take advantage of the portability of your iPad and maintain a productive workflow.
6. Task Management and Organization: Your iPad’s extended display can be dedicated to specific tasks, such as managing emails, tracking project progress, or monitoring real-time data. By assigning specific functions to your iPad, you can streamline your workflow, keep important information easily accessible, and improve overall task management.
7. Enhanced Multitasking: Utilizing your iPad as a second monitor enables efficient multitasking. You can view reference materials, communicate with colleagues, or monitor live data on your iPad while focusing on your primary work screen. This setup reduces the need to constantly switch between windows, resulting in improved efficiency and productivity.
8. Flexibility and Adaptability: Your iPad’s extended display offers flexibility and adaptability to accommodate various tasks and work styles. Whether you’re a designer, writer, programmer, or business professional, using your iPad as a second monitor provides the versatility to tailor your workspace to your specific needs.
By embracing the benefits of using your iPad as a second monitor, you can maximize productivity, optimize your workflow, and enjoy a more efficient and organized work environment. Explore the possibilities and discover how this setup can enhance your overall work experience.
Advanced Tips and Tricks for Using Your iPad as a Second Monitor
Once you’ve mastered the basics of using your iPad as a second monitor, you can explore advanced tips and tricks to further enhance your experience. Here are some tips to maximize the potential of your iPad as a second monitor:
1. Use Gestures: Take advantage of touch gestures on your iPad to navigate and interact with content on your extended display. Experiment with gestures like pinch-to-zoom, swipe, or three-finger gestures to streamline your workflow and improve efficiency.
2. Customize Keyboard Shortcuts: Some apps allow you to create custom keyboard shortcuts for specific actions or functions. This can significantly speed up your workflow by reducing the need for manual interactions and mouse clicks. Check the app’s settings to see if this feature is available.
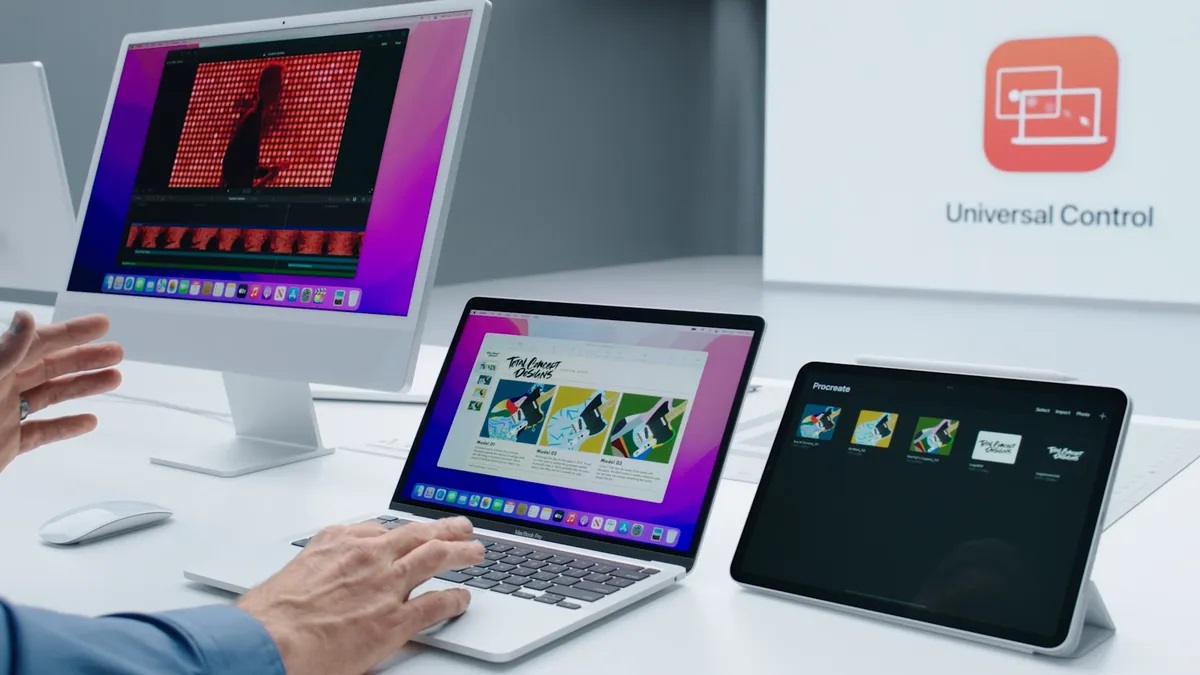
3. Enable Sidecar (For Mac Users): If you’re using a Mac, consider utilizing the built-in Sidecar feature. This feature allows you to seamlessly connect your iPad as a second display without the need for additional third-party apps. Enable Sidecar in your Mac’s System Preferences and enjoy a native dual-screen experience.
4. Explore Split View mode (For iPadOS): iPadOS offers a Split View mode, allowing you to have two apps open side by side on your iPad’s extended display. You can adjust the split screen ratio based on your task requirements, enabling you to multitask efficiently and work seamlessly between apps.
5. Leverage App-specific Features: Many apps have unique features designed specifically for using your iPad as a second monitor. Explore the settings and documentation of the app you’re using to discover any additional tools or functionalities that can further enhance your productivity and workflow.
6. Utilize Keyboard and Mouse Support: If you prefer using a physical keyboard and mouse with your iPad, take advantage of the keyboard and mouse support available in iPadOS. Connect a Bluetooth keyboard and use a mouse for more precise control while working on your extended display.
7. Experiment with Third-Party Apps: While there are recommended apps for using your iPad as a second monitor, don’t hesitate to explore other third-party options available in the App Store. Different apps might offer unique features or capabilities that align better with your specific needs and workflow.
8. Combine with Desktop Organization Apps: Consider using desktop organization apps or window management tools on your computer to further enhance your dual-screen setup. These tools allow you to easily organize and manage windows on your computer screen, making it easier to work alongside your extended iPad display.
By incorporating these advanced tips and tricks, you can take full advantage of your iPad as a second monitor. Push the boundaries of productivity and customization to create a personalized dual-screen setup that fits your unique needs and working style.
Alternatives to Using Your iPad as a Second Monitor
While using your iPad as a second monitor is a popular option, there are alternative methods to enhance your productivity and expand your workspace. Here are a few alternatives you might consider:
1. External Monitors: Instead of using your iPad as a second monitor, you can invest in an external monitor. External monitors offer larger screen sizes, higher resolutions, and more advanced display settings. They can be connected to your computer through HDMI, DisplayPort, or USB-C, providing a dedicated and customizable second screen.
2. All-in-One Computers: If you’re in the market for a new computer, consider an all-in-one model. These computers feature built-in screens that are typically larger and offer better performance than an iPad. They eliminate the need for an external monitor while providing a versatile and powerful computing experience.
3. Virtual Desktop Infrastructure (VDI): VDI technology allows you to access a virtual desktop environment from any device, including your iPad. With VDI, you can connect to a remote computer or server that hosts your desktop and access it through a secure internet connection. This provides the flexibility to work from anywhere without the need for physical connections or multiple monitors.
4. Multiple Desktops: Operating systems like Windows and macOS offer built-in support for multiple virtual desktops. This feature allows you to create separate desktops with different sets of applications and windows. You can switch between these virtual desktops to organize and manage your work without the need for additional hardware.
5. Laptop Docking Stations: If you already have a laptop, using a docking station can transform it into a powerful workstation. Docking stations provide multiple ports for connecting external monitors, keyboards, mice, and other peripherals. This allows you to extend your laptop’s display onto one or more external monitors for a multi-screen setup.
6. Software Solutions: There are software solutions available that simulate a dual-monitor experience without the need for additional hardware. These solutions allow you to split your existing screen into multiple virtual monitors. Examples include software like SplitView, DisplayFusion, or AquaSnap.
While using your iPad as a second monitor is a popular choice, exploring these alternatives can provide different options based on your specific requirements and preferences. Consider factors like budget, screen size, connectivity options, and mobility to determine the best solution to enhance your productivity and create an efficient workstation.