
Ingredients Needed
To make a Potion of Harming in Minecraft, you will need the following ingredients:
- Water Bottles: You will need at least one Water Bottle to begin the brewing process. You can obtain Water Bottles by right-clicking on a Water source block with Glass Bottles.
- Nether Warts: Nether Warts are a key ingredient in brewing potions. You can find them in Nether Fortresses, which are generated structures in the Nether dimension. Harvest Nether Warts by breaking the fully grown Nether Warts blocks.
- Gunpowder: Gunpowder is used to turn an Awkward Potion into a Potion of Harming. You can obtain Gunpowder as a drop from Creepers, which are hostile mobs that spawn in the Overworld.
- Fermented Spider Eye: Fermented Spider Eye is an optional ingredient used to create a more potent version of the Potion of Harming called Potion of Harming II. You can craft Fermented Spider Eye by combining a Spider Eye, Sugar, and Brown Mushroom in the Crafting Table.
Once you have gathered all the necessary ingredients, you’ll be ready to start brewing your Potion of Harming.
Step 1: Gathering the necessary materials
Before you can begin brewing a Potion of Harming, you need to gather all the necessary materials. Here’s what you’ll need:
- Water Bottles: To start the brewing process, you’ll need at least one Water Bottle. These can be easily obtained by right-clicking on a Water source block with Glass Bottles. Make sure you have enough Glass Bottles to hold the desired quantity of potion.
- Nether Warts: Nether Warts are a crucial ingredient in brewing potions. They can be found in Nether Fortresses, which are generated structures in the dangerous Nether dimension. Explore the corridors and rooms of the fortress until you come across patches of Nether Warts. Break the fully grown Nether Wart blocks to obtain them.
- Gunpowder: Gunpowder is the key ingredient that will transform an Awkward Potion into a Potion of Harming. It can be obtained as a drop from Creepers, so you’ll need to venture out into the Overworld and track down these hostile mobs. Defeat Creepers to collect their precious Gunpowder.
- Fermented Spider Eye (optional): If you want to create a more potent version of the Potion of Harming, known as the Potion of Harming II, you’ll need a Fermented Spider Eye. Craft this by combining a Spider Eye, Sugar, and Brown Mushroom in the Crafting Table. Although optional, it’s worth the effort for those seeking a more powerful potion.
Take the time to gather all the necessary materials and ensure you have enough of each item to make the desired quantity of potions. Once you have everything, you’re ready to move on to the next step: crafting the Brewing Stand.
Step 2: Crafting the Brewing Stand
Now that you have gathered all the necessary materials, it’s time to craft the Brewing Stand. Follow these steps:
- Open your Crafting Table: Right-click on a Crafting Table to open it.
- Arrange the materials: In the crafting grid, place 3 Cobblestones in the bottom row and 1 Blaze Rod in the center square. This recipe will result in a Brewing Stand.
- Obtain the Brewing Stand: Once you have arranged the materials correctly in the crafting grid, click on the Brewing Stand to move it to your inventory.
The Brewing Stand is a necessary tool for brewing potions. It provides the platform where water bottles, ingredients, and fuel will be combined to create different potions. Make sure to place it in a location that is easily accessible for your brewing activities.
Now that you have successfully crafted the Brewing Stand, you’re ready to move on to the next step: obtaining Nether Warts.
Step 3: Obtaining Nether Warts
With the Brewing Stand ready, it’s time to obtain the crucial ingredient for brewing potions – Nether Warts. Follow these steps to acquire Nether Warts:
- Enter the Nether: Prepare yourself for a dangerous journey and venture into the Nether dimension.
- Locate Nether Fortresses: Nether Warts can be found in Nether Fortresses, large structures that generate in the Nether. Explore the vast expanse of the Nether until you come across one of these fortresses.
- Search for Nether Warts: Once inside a Nether Fortress, navigate through its twisting corridors and rooms. Keep an eye out for patches of Nether Warts, which appear as small, dark red plants. Break the fully grown Nether Warts blocks to obtain the Nether Warts.
- Collect the Nether Warts: As you come across Nether Warts, gather them by mining the fully grown blocks. Each block will yield multiple Nether Warts.
It’s important to stay cautious and be prepared to face the hostile creatures that inhabit the Nether. Arm yourself with suitable weapons, armor, and food to ensure your survival during this expedition.
Once you have collected enough Nether Warts, you can proceed to the next step: brewing the Awkward Potion.
Step 4: Brewing the Awkward Potion
Now that you have obtained the Nether Warts, it’s time to brew the first potion in the process – the Awkward Potion. Follow these steps:
- Prepare the Brewing Stand: Place the Brewing Stand in a convenient location and right-click on it to open the brewing interface.
- Add Blaze Powder as Fuel: Since the Brewing Stand requires fuel to operate, add Blaze Powder to the top-left slot of the brewing interface. Each Blaze Powder will fuel the brewing process for three potions.
- Add Water Bottles: Take three Water Bottles and place them in the bottom slots of the brewing interface. These will serve as the base for the Awkward Potion.
- Add Nether Warts: Take the Nether Warts that you have collected and place one in the top slot of the brewing interface. This will start the brewing process.
- Wait for Brewing Process: The brewing process will take time, and you’ll see bubbles rising in the brewing stand while it’s active. Once the brewing process is complete, the Water Bottles will transform into Awkward Potions.
- Collect the Awkward Potions: Take the Awkward Potions from the brewing stand by left-clicking and dragging them to your inventory. You now have the base potion to create various potions.
The Awkward Potion serves as a starting point for brewing different types of potions. It doesn’t have any specific effects on its own but acts as a crucial ingredient for creating more potent potions.
With the Awkward Potions brewed, you’re now ready to move on to the next step: adding Gunpowder to create the Potion of Harming.
Step 5: Adding Gunpowder to create Potion of Harming
Now that you have brewed the Awkward Potion, it’s time to create the Potion of Harming by adding Gunpowder. Follow these steps:
- Prepare the Brewing Stand: Make sure the Brewing Stand is accessible and open the brewing interface by right-clicking on it.
- Add Blaze Powder as Fuel: If the Blaze Powder from the previous step has depleted, add more to the top-left slot of the brewing interface as fuel for the brewing process.
- Add Awkward Potion: Take the Awkward Potion you brewed earlier and place it in one of the bottom slots of the brewing interface.
- Add Gunpowder: Take Gunpowder, which can be obtained as drops from Creepers, and place it in the top slot of the brewing interface. This will start the brewing process to transform the Awkward Potion into a Potion of Harming.
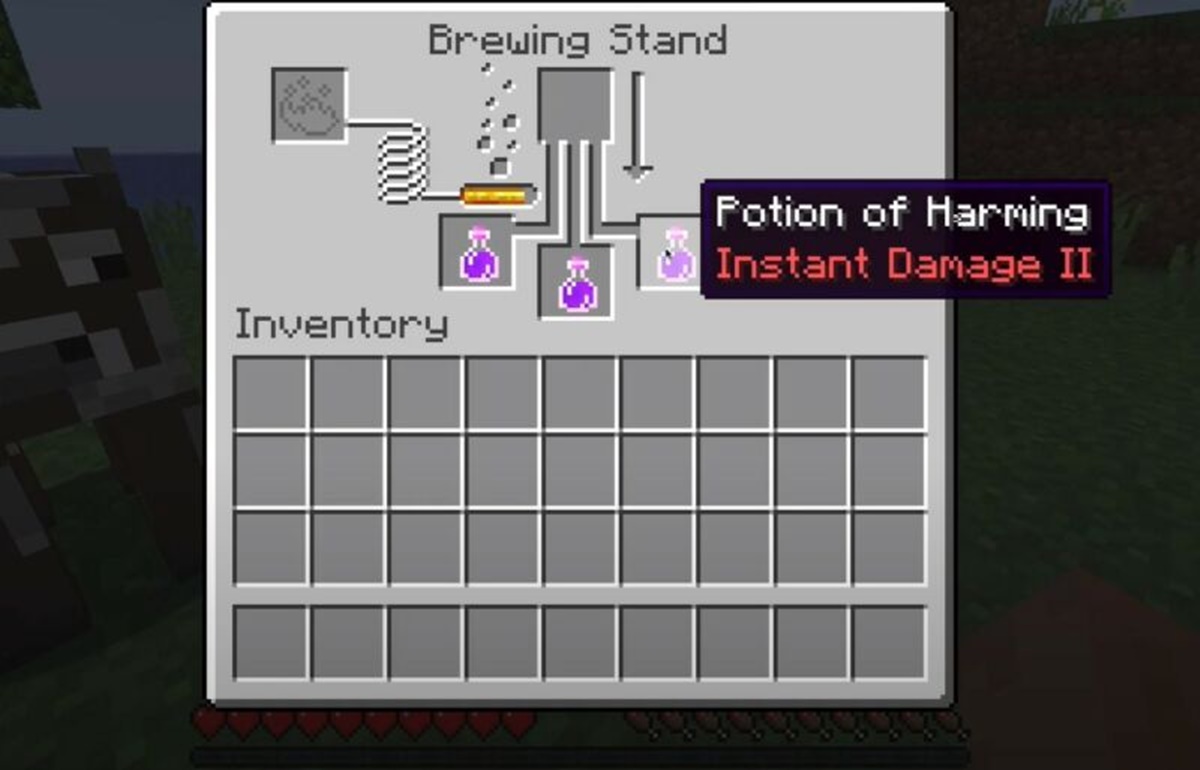
- Wait for Brewing Process: Allow the brewing process to complete. As the process progresses, you will see bubbles and particles in the brewing stand. Once the process is complete, the Awkward Potion will turn into a Potion of Harming.
- Collect the Potion of Harming: Left-click and drag the Potion of Harming from the brewing stand to your inventory, completing the brewing process.
Congratulations! You have successfully created a Potion of Harming. This potion, when thrown or consumed, will inflict damage upon the target.
With the Potion of Harming now in your possession, you can use it in battles and to deal damage to enemies. However, if you want to further enhance its effects, you can continue to the next step: collecting Fermented Spider Eye to create the Potion of Harming II.
Step 6: Collecting Fermented Spider Eye
If you want to create a more potent version of the Potion of Harming, known as the Potion of Harming II, you’ll need to collect Fermented Spider Eye. Follow these steps to obtain it:
- Find Spiders: Search for spiders in caves, forests, or at night, as they commonly spawn in these areas. Spiders can either be normal spiders or cave spiders.
- Defeat Spiders: Use your weapons and tactics to defeat the spiders and acquire their drops.
- Collect the Spider Eyes: Spider Eyes are the primary drop from spiders. Ensure you collect a sufficient number of Spider Eyes for your brewing needs.
- Combine Ingredients: In your Crafting Table, combine the Spider Eye with Sugar and a Brown Mushroom. Place the Spider Eye in the center slot, Sugar in the lower-left slot, and Brown Mushroom in the upper-right slot. This will craft the Fermented Spider Eye.
- Collect the Fermented Spider Eye: Once crafted, left-click and drag the Fermented Spider Eye into your inventory.
Congratulations! You have successfully collected the Fermented Spider Eye. This ingredient is used to enhance the Potion of Harming, creating the more powerful Potion of Harming II.
With the Fermented Spider Eye in your possession, you can now move on to the final step: brewing the Potion of Harming II.
Step 7: Brewing Potion of Harming II
With the ingredients gathered, it’s time to brew the Potion of Harming II, a more potent version of the Potion of Harming. Follow these steps:
- Prepare the Brewing Stand: Make sure the Brewing Stand is accessible and open the brewing interface.
- Add Blaze Powder as Fuel: If needed, add Blaze Powder to the top-left slot of the brewing interface to provide fuel for the brewing process.
- Add Potion of Harming: Take the Potion of Harming you crafted and place it in one of the bottom slots of the brewing interface.
- Add Fermented Spider Eye: Take the Fermented Spider Eye you collected and place it in the top slot of the brewing interface. The brewing process will now begin.
- Wait for Brewing Process: Allow the brewing process to complete. As the ingredients combine, bubbles and particles will appear in the brewing stand. Once the process is finished, the Potion of Harming II will be ready.
- Collect the Potion of Harming II: Left-click and drag the Potion of Harming II from the brewing stand into your inventory.
Well done! You have successfully brewed the Potion of Harming II. This enhanced potion inflicts more damage than the regular Potion of Harming when thrown or consumed, making it a valuable asset in battles against tough enemies.
Remember, potions can be further modified and customized through the addition of other ingredients and extenders. Experiment with different combinations to create a range of useful and powerful potions for your Minecraft adventures.
Tips and Tricks
Creating a Potion of Harming in Minecraft requires a careful understanding of the brewing process. Here are some tips and tricks to help you in your potion-making endeavors:
- Efficient Gathering: When collecting ingredients like Nether Warts or Fermented Spider Eye, it’s helpful to bring a Silk Touch enchanted tool. This tool allows you to gather the block intact and ensures that you obtain the maximum amount of the ingredient.
- Fuel Management: Blaze Powder serves as fuel for the Brewing Stand. It’s wise to keep a good supply of Blaze Powder on hand to ensure uninterrupted brewing sessions. Blaze Powder can be obtained by defeating Blaze mobs in Nether Fortresses.
- Extended Duration: The duration of a Potion of Harming can be extended by adding Redstone Dust to the brewing process. This increases the potency of the potion and extends its effects, making it more effective in battles.
- Brewing Stand Placement: Consider placing your Brewing Stand near a water source for easy access to the required Water Bottles. This can save time and streamline the brewing process.
- Potion Effects: Brewing different potions opens up a world of possibilities for enhancing gameplay. Experiment with various ingredients, such as adding Glowstone Dust to increase the potion’s strength or using Golden Carrots to create Potion of Harming II that has a longer duration.
- Labeling: With a wide variety of potions at your disposal, it’s helpful to label your potions to keep track of their effects. You can use an Anvil to rename the potions and store them in labeled Chests, making it easier to locate the desired potion when needed.
Remember, mastering the art of potion-making in Minecraft takes practice and experimentation. Don’t be afraid to explore different combinations and techniques to create unique and powerful potions tailored to your gameplay style.