
Materials Needed
In order to make a brewing stand in Minecraft, you will need the following materials:
- Blaze Rods: These are obtained by defeating Blazes, which are hostile mobs found in Nether Fortresses.
- Cobblestone: This is a common and easily obtainable material that serves as the main building block for the brewing stand.
- Blaze Powder: This is crafted from Blaze Rods and is used as a fuel source for the brewing stand.
- Nether Wart: This is a plant that can be found in Nether Fortresses and is used as a base ingredient for brewing various types of potions.
- Water Bottles: These are used to hold the potions that you brew. Empty bottles can be crafted from glass.
- Glass Bottles: These are used to hold water, which is then used to create the initial water bottles for brewing potions.
- Glowstone Dust: This is an optional ingredient that can be used to enhance certain potions.
- Sugar: This is an optional ingredient that can be used to create some types of potions.
- Spider Eyes: This is an optional ingredient that can be used to create potions with negative effects.
- Fermented Spider Eye: This is crafted from a Spider Eye, Brown Mushroom, and Sugar and is used to create potions with different effects.
Having these materials at your disposal will allow you to embark on your journey of potion-making in Minecraft. So, gather your supplies and get ready to brew some magical concoctions!
Step 1: Gathering Ingredients
The first step in making a brewing stand in Minecraft is to gather the necessary ingredients. Here’s what you’ll need to do:
- Find a Nether Fortress: Nether Fortresses are structures that can be found in the Nether, a dangerous and hostile dimension. Explore the Nether until you come across a Nether Fortress. These fortresses are usually made of dark brick-like blocks and have distinct balconies and spires.
- Obtain Nether Wart: Once you’ve located a Nether Fortress, search for Nether Wart. Nether Wart is a plant that grows in soul sand patches inside Nether Fortresses. Break the Nether Wart blocks using any tool or even your bare hands to collect them.
- Craft Blaze Powder: To craft Blaze Powder, you’ll need Blaze Rods. Blaze Rods are drops from Blazes, which are fiery mobs found inside Nether Fortresses. Defeat the Blazes by attacking them with weapons or using other strategies and collect their Blaze Rod drops.
- Find Water: Water is an essential ingredient in brewing potions. Look for a water source such as a lake, river, or create a water source by using a bucket to collect water from a nearby source.
- Craft Glass Bottles: To hold the water and create potions, you’ll need Glass Bottles. These can be crafted from glass blocks. Glass blocks themselves can be obtained by smelting sand in a furnace.
Once you’ve gathered the necessary ingredients, you’ll be well on your way to brewing your own potions. Make sure to keep them safe and handy as we move on to the next steps!
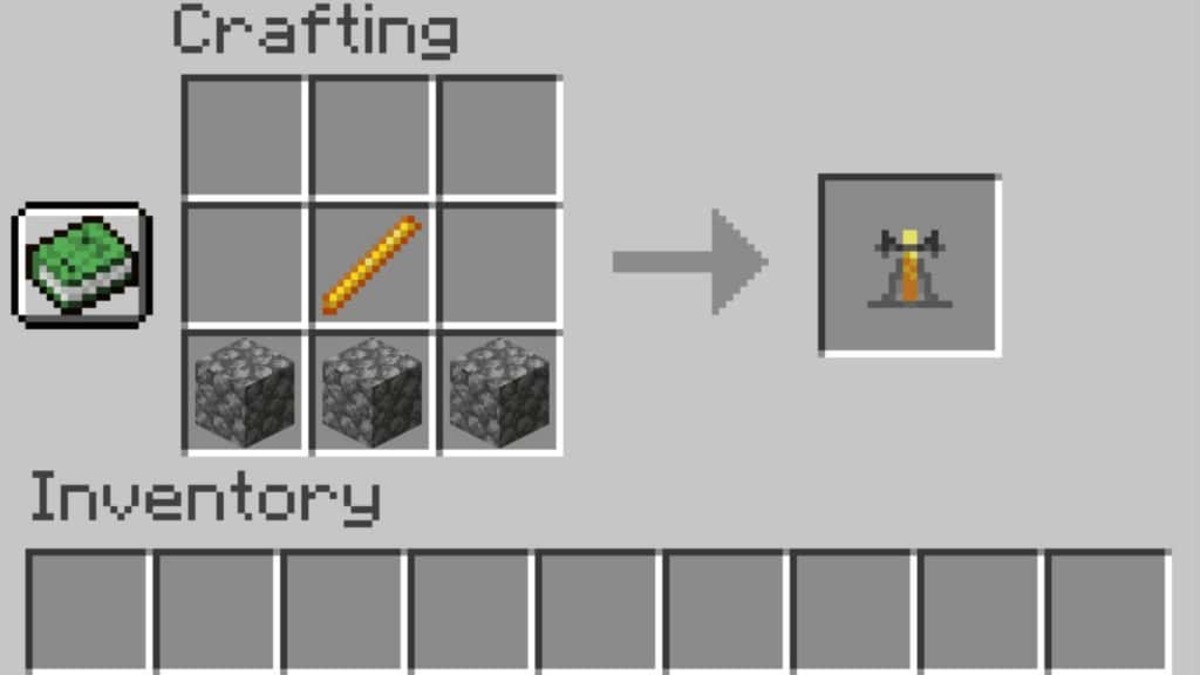
Step 2: Crafting the Brewing Stand
Now that you’ve gathered the required ingredients, it’s time to craft the brewing stand. Follow these steps to create your very own brewing stand:
- Open the Crafting Table: Right-click on a placed crafting table or open your inventory to access the crafting grid.
- Arrange the Ingredients: In the crafting grid, place 1 Blaze Rod in the bottom-middle square, and surround it with 3 Cobblestone blocks in the top row and 1 Cobblestone block in the middle row. This pattern will create the brewing stand.
- Transfer to Inventory: Once you’ve arranged the ingredients in the correct pattern, the brewing stand will appear in the result box of the crafting grid. Click on it to transfer it to your inventory.
Now, you have successfully crafted a brewing stand! Make sure to keep it in a safe place, as it will be used for brewing your potions.
Note: The brewing stand can also be found naturally generated in Nether Fortresses. So, if you don’t want to craft one, you can search for it in these structures as well.
With the brewing stand in hand, you’re one step closer to becoming a master potion brewer in Minecraft. On to the next step!
Step 3: Finding Blaze Rods
In order to craft Blaze Powder and power your brewing stand, you’ll need to obtain Blaze Rods. Blaze Rods are dropped by a mob called Blaze, found exclusively in Nether Fortresses. Follow these steps to find and defeat Blazes:
- Equip Appropriate Gear: Before venturing into Nether Fortresses, it’s crucial to equip yourself with armor, weapons, and food. Nether Fortresses are dangerous places, so make sure you’re well-prepared for combat.
- Enter the Nether: Craft and activate a Nether Portal using Obsidian blocks to transport yourself to the Nether. Once you step through the portal, be prepared for a hostile environment filled with fiery landscapes and dangerous creatures.
- Locate a Nether Fortress: Search for a Nether Fortress in the Nether. These structures are relatively rare but can be identified by their dark brick-like blocks and unique architectural features such as balconies and spires.
- Battle the Blazes: Inside the Nether Fortress, keep an eye out for Blaze spawners. These appear as cage-like structures with a spinning blaze mob inside. Stand at a safe distance and range attack the Blazes using arrows or magic projectiles.
- Collect Blaze Rods: After successfully defeating a Blaze, it will drop Blaze Rods as loot. Collect the Blaze Rods by walking over them, and if you’re lucky, you may receive multiple rods from a single Blaze.
Repeat these steps to gather more Blaze Rods if needed. Remember to exercise caution while battling Blazes, as they shoot fireballs that can deal significant damage.
Once you have obtained enough Blaze Rods, you can proceed to the next step of crafting Blaze Powder to fuel your brewing adventures!
Step 4: Crafting the Blaze Powder
With the Blaze Rods you’ve obtained from defeating Blazes, it’s time to craft Blaze Powder. Blaze Powder serves as the fuel source for the brewing stand and is also used in various potion recipes. Follow these steps to craft Blaze Powder:
- Open the Crafting Table: Right-click on a placed crafting table or open your inventory to access the crafting grid.
- Arrange the Ingredients: In the crafting grid, place the Blaze Rod that you obtained in the center square. This will yield 2 Blaze Powder.
- Transfer to Inventory: Once you’ve placed the Blaze Rod in the center square, the Blaze Powder will appear in the result box of the crafting grid. Click on it to transfer it to your inventory.
Now you have successfully crafted Blaze Powder! It’s a valuable ingredient for brewing potions and will provide the necessary fuel for your brewing stand.
Note: Each Blaze Rod will yield 2 Blaze Powder, so plan accordingly and craft the desired amount needed for your brewing endeavors.
With the Blaze Powder in hand, you’re ready to power your brewing stand and dive into the exciting world of potion-making in Minecraft. Onward to the next step!
Step 5: Building a Nether Portal
In order to access the Nether, where you can find Nether Fortresses and Blazes, you’ll need to construct a Nether Portal. Follow these steps to build your very own portal:
- Gather Obsidian: To build a Nether Portal, you will need a total of 10 Obsidian blocks. Obsidian can be obtained by mining it with a Diamond or Netherite Pickaxe. It is a dark, sturdy block that can only be found naturally near lava sources.
- Create a Portal Frame: Lay out a rectangular frame on the ground or a wall using Obsidian blocks. The dimensions of the frame should be 4 blocks wide and 5 blocks tall, leaving an empty space in the middle. Make sure the corners of the frame are filled as well.
- Activate the Portal: To activate the Nether Portal, use a Flint and Steel item on the inside of the portal frame. Right-click on one of the Obsidian blocks in the frame, and if done correctly, the portal will ignite in a purple swirling effect.
Once you’ve activated the Nether Portal, step through it to be transported to the Nether dimension. Be prepared for a challenging and dangerous environment filled with hostile mobs, but also the opportunity to find valuable resources and structures like Nether Fortresses.
Note: The portal will create a destination in the Nether that is linked to a specific location in the Overworld. The return portal in the Nether will take you back to the corresponding location in the Overworld, so remember where you placed your portal for easy navigation.
With your Nether Portal constructed and activated, you’re ready to venture into the Nether and search for powerful Blaze mobs and Nether Fortresses to continue your brewing journey. Good luck!
Step 6: Entering the Nether
Entering the Nether is an exciting and perilous endeavor in Minecraft. It is a hostile dimension filled with dangerous creatures and unique resources. Follow these steps to safely venture into the Nether:
- Create a Nether Portal: Refer to the previous step for instructions on how to build a Nether Portal. This portal will serve as the gateway between the Overworld and the Nether.
- Gather Supplies: Before entering the Nether, prepare yourself with essential supplies. Bring sufficient food, armor, weapons, and tools for protection and exploration. Additionally, consider bringing blocks like Cobblestone or Netherrack to build simple structures for safety and navigation.
- Step through the Portal: Stand in front of the active Nether Portal and walk straight into it. You will be instantly transported to the Nether dimension.
Upon entering the Nether, you’ll be greeted by a hostile and harsh environment. Keep the following points in mind for a successful Nether expedition:
- Be Prepared for Danger: The Nether is filled with aggressive mobs like Ghasts, Zombie Pigmen, and Blazes. Stay alert and be ready to defend yourself.
- Watch Your Step: The terrain in the Nether is treacherous, with lava lakes, precarious bridges, and dangerous drops. Exercise caution while exploring and watch your step to avoid fatal accidents.
- Use Landmarks: Create landmarks or torch paths to mark your way in the Nether. The landscape can be disorienting, and having navigational aids will help you find your way back to the portal.
- Take Note of Coordinates: Before venturing too far, take note of the coordinates of your portal in the Overworld. This will ensure that you can easily return when you’re ready.
Remember, the Nether is a challenging dimension that requires careful planning and resourcefulness. Stay focused and adapt to survive the harsh conditions.
Now that you’re in the Nether, it’s time to continue your quest for Nether Fortresses and the valuable Blaze Rods within. Proceed with caution and make the most of your Nether adventure!
Step 7: Locating a Nether Fortress
Locating a Nether Fortress is a vital step in obtaining Blaze Rods and advancing your brewing journey in Minecraft. Follow these steps to search for and find a Nether Fortress:
- Explore the Nether: Start venturing out into the Nether, keeping an eye out for distinct fortress structures. The Nether is a vast dimension, so be prepared for a potentially long search.
- Look for Visual Cues: Nether Fortresses have a unique and recognizable appearance. They are typically made of dark, brick-like blocks and feature detailed balconies, bridges, and spires. Scan the horizon and look for these visual cues while exploring.
- Consider Terrain Features: Nether Fortresses tend to generate in certain terrain features, such as crossing lava lakes or near open areas. Keep an eye out for these features as they may indicate the presence of a fortress nearby.
- Use Coordinates: If you’re equipped with coordinates or using mods that display coordinates in the game, you can use them to navigate through the Nether. Look for coordinates that are in line with the spawn point or the general direction you’re heading.
It’s important to note that Nether Fortresses can be quite rare and may require significant exploration. Be patient and persistent in your search, as finding a fortress may take some time.
Once you’ve successfully located a Nether Fortress, you’re one step closer to obtaining Blaze Rods and unlocking the potential of brewing in Minecraft. Proceed inside the fortress with caution, as it is filled with dangerous mobs and challenging obstacles.
Good luck in your search for the Nether Fortress, and may your adventures be fruitful in your brewing endeavors!
Step 8: Battling Blaze Mobs
Blaze mobs are formidable creatures that inhabit Nether Fortresses in Minecraft. To obtain Blaze Rods, which are crucial for brewing, you’ll need to confront and defeat these fiery foes. Follow these steps to effectively battle Blaze mobs:
- Approach with Caution: When you spot a Blaze, exercise caution and approach it carefully. Blazes are hostile mobs that will attack you on sight, so be prepared for a fight.
- Use Ranged Attacks: Blazes are ranged attackers, shooting fireballs at their targets. Engaging them in close combat can be risky, so it’s recommended to use ranged attacks. Bow and arrows or crossbows work well, as they allow you to keep a distance while dealing damage.
- Timing is Key: Watch the Blaze’s fireball attacks and time your dodges accordingly. Strafe side to side or jump to avoid getting hit. Utilize cover and structures within the fortress to shield yourself from their projectiles.
- Strategize with Armor: Wear protective armor and enchantments to reduce the damage taken from Blaze attacks. Fire Protection enchantments, in particular, offer an advantage against the Blaze’s fiery nature.
- Keep Healing Items Ready: During the battle, be sure to have healing items such as food or potions in your hotbar, ready to replenish your health when necessary.
- Be Patient: Blazes have unique attack patterns and can be challenging to defeat. Stay patient and persistent, focusing on accuracy and avoiding damage. Don’t rush the battle; take breaks to heal, then resume the fight.
By following these steps and implementing effective strategies, you’ll increase your chances of successfully defeating Blaze mobs and collecting valuable Blaze Rods.
Remember, battling Blazes requires skill and resilience. With practice and perseverance, you’ll become adept at taking down these fiery adversaries and securing the coveted Blaze Rods needed for brewing.
Good luck, brave adventurer, in your encounters with Blaze mobs!
Step 9: Collecting Blaze Rods
Blaze Rods are essential items required for brewing potions in Minecraft. To collect Blaze Rods, you’ll need to defeat Blazes, fiery mobs found within Nether Fortresses. Follow these steps to gather these valuable resources:
- Locate Blaze Spawners: Inside the Nether Fortress, keep an eye out for Blaze spawners. These are cage-like structures with a spinning Blaze mob inside. Blaze spawners are often found in open, fortress-like areas.
- Approach with Caution: Approach the Blaze spawner carefully, taking note of the surrounding Blaze mobs. Make sure you’re equipped with appropriate armor, weapons, and healing items to withstand the battle.
- Engage in Combat: Attack the Blaze mobs using ranged or melee weapons, depending on your playstyle and available resources. Aim for direct hits, allowing you to deal damage and increase your chances of obtaining Blaze Rods.
- Collect the Drops: As you defeat Blazes, they will drop Blaze Rods as loot. Collect the dropped Blaze Rods by simply walking over them. Each Blaze has a chance to drop one or more Blaze Rods, so be sure to pick up all the loot.
- Repeat the Process: If you need more Blaze Rods, continue engaging Blaze mobs and collecting their drops. Explore different sections of the Nether Fortress to locate more spawners and mobs to battle.
It’s important to note that Blaze mobs can be challenging to defeat, so make sure you’re adequately prepared for the encounters. Utilize tactics such as ranged attacks, dodging fireballs, and strategizing with armor and healing items to maximize your chances of success.
Once you’ve collected a sufficient number of Blaze Rods, you’ll be well on your way to expanding your potion-brewing capabilities in Minecraft.
Good luck in your endeavors to gather Blaze Rods and harness their power for the art of brewing!
Step 10: Returning to the Overworld
After collecting the necessary Blaze Rods and exploring the Nether, it’s time to return to the safety of the Overworld. Follow these steps to make a successful journey back:
- Locate Your Nether Portal: To return to the Overworld, you’ll need to find the Nether Portal that you initially entered through. If you did not take note of its location, use landmarks or coordinates to guide you.
- Prepare for Departure: Before stepping into the Nether Portal, ensure that you have sufficient inventory space to carry all the items you’ve acquired in the Nether.
- Step into the Portal: Approach and step through the Nether Portal. As you do so, you’ll be transported back to the corresponding portal in the Overworld. A loading screen will appear during the transition.
- Reorient Yourself: Once you’ve arrived in the Overworld, take a moment to reorient yourself and confirm that you have returned to a familiar location. Check your coordinates or surroundings if needed.
Congratulations! You have successfully returned from the Nether to the safety of the Overworld.
Ensure that you take stock of your inventory and gather any resources you may have collected during your expedition. Now, you can continue your brewing journey with the valuable Blaze Rods you’ve obtained.
Remember to safely store any other items you acquired in the Nether, such as Nether Quartz or Nether Wart, for future brewing endeavors.
With the return to the Overworld complete, you’re ready to move on to the next step of crafting potions using your brewing stand. Enjoy your adventures and the potions you’ll create!
Step 11: Crafting Blaze Powder from Blaze Rods
Blaze Powder is a crucial ingredient for fueling the brewing stand and crafting various types of potions in Minecraft. Follow these steps to craft Blaze Powder from the Blaze Rods you’ve collected:
- Access the Crafting Table: Open a crafting table by right-clicking on it or opening your inventory to access the 3×3 crafting grid.
- Arrange the Blaze Rods: In the crafting grid, place one Blaze Rod anywhere on the grid.
- Craft Blaze Powder: Once you’ve placed the Blaze Rod, the result box in the crafting grid will display two Blaze Powder. Click on the Blaze Powder to transfer it to your inventory.
Repeat these steps if you have additional Blaze Rods and need more Blaze Powder. Each Blaze Rod yields two Blaze Powder.
Blaze Powder serves as fuel for the brewing stand, allowing you to activate and utilize its brewing functionality. It is also used in the crafting recipes of various potions, such as Eye of Ender, Magma Cream, and certain types of strength and fire resistance potions.
Keep your Blaze Powder stored safely until you’re ready to use it in the brewing process. With this valuable resource in hand, you’re now equipped to create potent potions using your brewing stand!
Good luck, and may your potion-making adventures be successful!
Step 12: Crafting Potions on the Brewing Stand
With your brewing stand fueled and ready to go, it’s time to dive into the art of potion brewing in Minecraft. Follow these steps to craft potions using the brewing stand:
- Place Brewing Stand: Place the brewing stand on the ground by right-clicking on a suitable surface. Ensure that there is enough space around the brewing stand for potion ingredients.
- Fuel the Brewing Stand: Right-click on the brewing stand to open its interface. Position Blaze Powder in the ingredient slot on the left to provide fuel for the brewing process. Each Blaze Powder can fuel the brewing stand for multiple batches.
- Add Water Bottles: Place up to three glass bottles filled with water in the bottom three slots of the brewing stand’s interface. These will serve as the base for your potions.
- Add Ingredients: Above the water bottles, there are three ingredient slots. Depending on the desired effects, add the appropriate ingredients such as Nether Warts, various plants, or other components. Each ingredient will contribute to the potion’s effects.
- Begin Brewing: Close the brewing stand interface and wait for the brewing process to complete. The progress bar above the brewing stand will fill up, indicating that the potions are being brewed.
- Retrieve the Potions: Once the brewing process is complete, the water bottles will transform into potions. Collect them from the brewing stand to add them to your inventory.
Experimentation and combination of different ingredients are key to discovering a wide range of potion effects. Some ingredients may produce positive effects, while others may create negative or even harmful effects.
Remember, the brewing stand can be used for multiple rounds of brewing, allowing you to create multiple potions in a single session. Just make sure to replenish the water bottles and add new ingredients as needed.
With your newfound skill in potion brewing, you can create potions that enhance your abilities, provide protection, and assist you in various challenges you may face in Minecraft.
Enjoy the process of crafting unique and powerful potions, and may your adventures be enhanced by the magic of alchemy!
Step 13: Experimenting with Different Ingredients
One of the most exciting aspects of potion brewing in Minecraft is the ability to experiment with various ingredients. By combining different items, you can create a wide range of potions with unique effects. Follow these steps to unleash your creativity and discover new potion recipes:
- Gather Ingredients: Collect a variety of ingredients from your adventures, such as Nether Wart, various plants, monster drops, and other rare items. Each ingredient has the potential to contribute different effects to the potions you create.
- Learn About Ingredient Effects: Familiarize yourself with the effects that each ingredient can impart. Some ingredients may boost your speed, increase your strength, grant temporary invisibility, or provide other helpful abilities.
- Combine Ingredients: Use the brewing stand to combine different ingredients and water bottles. Place the desired ingredients in the ingredient slots of the brewing stand and wait for the brewing process to complete.
- Observe Potion Effects: Once the brewing process is finished, collect the brewed potions and examine their effects. Drink or splash them to experience the unique benefits or drawbacks they provide.
- Take Notes: Keep a record of the ingredients you combine and the resulting effects. This will help you remember successful potion recipes and avoid negative combinations in the future.
- Continue Experimenting: Don’t be afraid to try different combinations of ingredients and experiment with different brewing times. Mixing ingredients in different orders or using additional brewing modifiers like Redstone or Glowstone can also alter the resulting potion.
Through trial and error, you’ll uncover powerful potions that can aid you in combat, exploration, and various challenges. Some potion effects can even be extended or amplified by combining them with Redstone or Glowstone Dust.
Keep exploring, gather more ingredients, and let your imagination guide you as you delve into the intriguing world of potion brewing. There’s always something new to discover!
Enjoy the thrill of experimentation, and may your potions bring you great success in your Minecraft adventures!
Step 14: Tips and Tricks for Brewing in Minecraft
Brewing in Minecraft is a complex and rewarding process. To help you become a master potion brewer, here are some tips and tricks to enhance your brewing skills:
- Plan Ahead: Before starting the brewing process, gather all the necessary ingredients and plan which potions you want to create. Having a clear goal will ensure efficient use of resources and time.
- Organize Ingredients: Keep your brewing ingredients organized and easily accessible. Use chests or item frames to categorize and store different items, making it quicker and easier to find what you need.
- Experiment with Different Ingredients: Don’t be afraid to try combinations of ingredients to discover new and powerful potion effects. Some ingredients may have unexpected interactions, leading to unique results.
- Use Nether Wart as a Base: Nether Wart is a fundamental ingredient that serves as the base for most potions. Make sure to always have a supply of Nether Wart to start your brewing recipes.
- Utilize Brewing Modifiers: Certain items like Redstone and Glowstone Dust can modify the duration and potency of potions. Experiment with these modifiers to customize your potions to suit your needs.
- Keep Water Sources Nearby: Having a renewable source of water near your brewing stand will save you time and effort when refilling empty bottles.
- Label and Store Potions: Once you’ve brewed your potions, label them using signs or item frames to easily identify their effects. Store them in chests for future use and organize them by type or effect.
- Bring Potion Supplies on Adventures: Take a selection of brewed potions with you whenever you embark on adventures. They can provide valuable buffs or aid in challenging encounters.
- Brew Splash Potions: Splash potions can affect multiple targets, making them useful for healing or damaging groups of mobs. Experiment with different splash potion recipes to make the most of their effects.
- Trade with Villagers: Some villagers, such as Clerics, may offer brewing-related trades. Check with different villagers to acquire rare or alternate ingredients for your potion making.
Remember, brewing in Minecraft requires patience and experimentation. Don’t get discouraged if your initial potions don’t have the desired effects. Keep practicing and refining your techniques to become a skilled potion brewer.
With these tips and tricks in mind, you’ll be well-equipped to create powerful potions that will aid you in your adventures and conquer the challenges that lie ahead.
Happy brewing, and may your potions bring you fortune and success in the world of Minecraft!