
Adjust Auto-Lock Settings
One of the easiest ways to keep your iPhone screen on is by adjusting the auto-lock settings. By default, iPhones are set to auto-lock after a certain period of inactivity to conserve battery life. However, you can extend the auto-lock duration or disable it entirely to keep your screen on for longer periods of time.
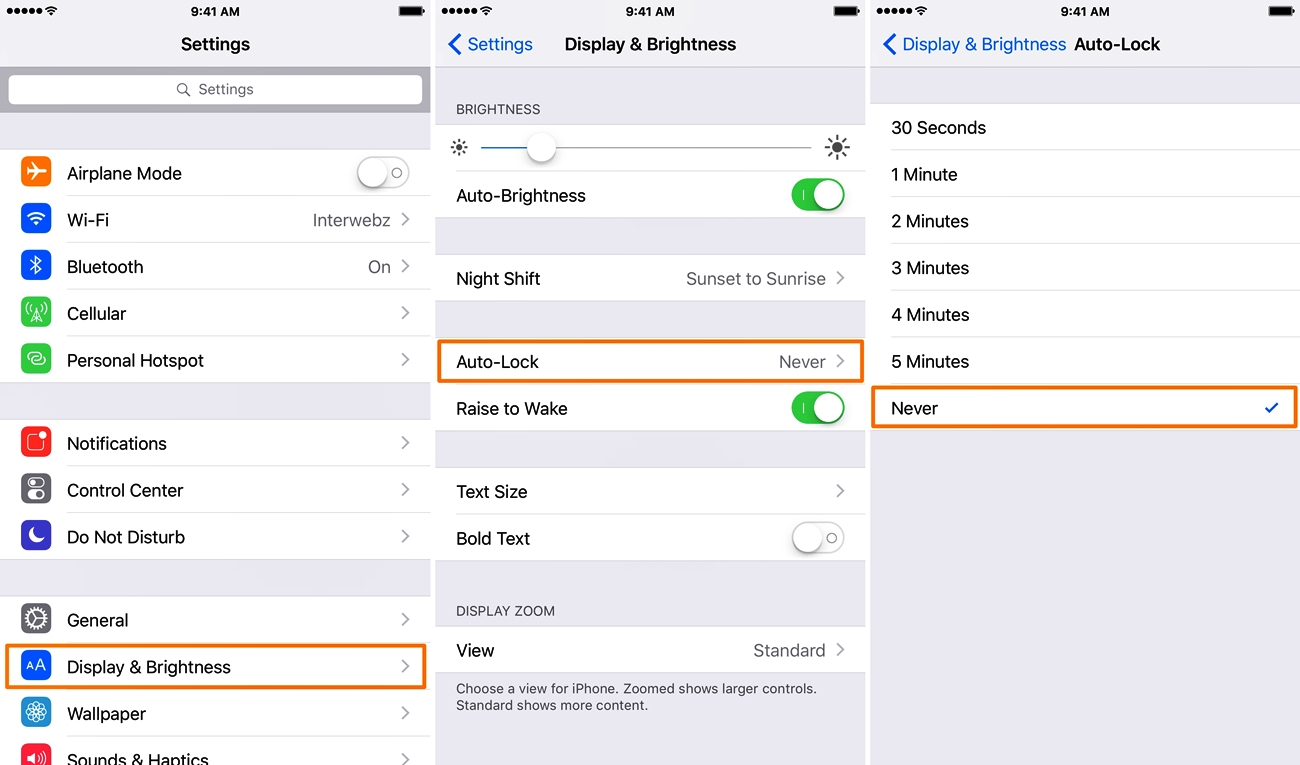
To adjust the auto-lock settings, follow these steps:
- Open the Settings app on your iPhone.
- Scroll down and tap on “Display & Brightness”.
- Tap on “Auto-Lock”.
- Select the desired duration or tap on “Never” to disable auto-lock entirely.
It’s important to note that keeping your screen on for extended periods can drain your battery faster. So, it’s a good idea to find a balance between keeping the screen on and conserving battery life.
If you frequently use certain apps or features that require continuous screen activity, adjusting the auto-lock settings can be a useful solution. For example, when using navigation apps, reading e-books, or using certain fitness tracking apps, you may want to keep your screen on to avoid interruption.
By adjusting the auto-lock settings, you can ensure that your iPhone screen stays on as long as you need it, providing convenience and uninterrupted usage for various activities.
Use the AssistiveTouch Feature
If you find yourself constantly needing to interact with your iPhone screen, using the AssistiveTouch feature can be a great solution. AssistiveTouch is a built-in accessibility feature that creates a floating button on your screen, allowing you to access various functions without physically touching the screen.
To enable AssistiveTouch, follow these steps:
- Open the Settings app on your iPhone.
- Go to “Accessibility”.
- Tap on “Touch”.
- Select “AssistiveTouch”.
- Toggle the switch to enable AssistiveTouch.
Once enabled, you will see a small floating button on your screen. You can tap this button to access a variety of functions, including locking the screen, adjusting volume, taking screenshots, and more. This eliminates the need to constantly touch or swipe your screen, making it easier to keep the screen on for longer periods.
By using the AssistiveTouch feature, you can reduce wear and tear on your iPhone’s physical buttons while keeping the screen on whenever you need it. It’s a convenient option for individuals with mobility issues or those who prefer a more hands-free approach to using their device.
Additionally, AssistiveTouch provides customization options, allowing you to add your most frequently used functions to the menu. This makes it even easier to access the features you use the most without having to navigate through multiple menus or screens.
Whether you need to keep your screen on for an extended period or simply want a more convenient way to interact with your iPhone, utilizing the AssistiveTouch feature can greatly enhance your user experience.
Enable Display Zoom
If you’re looking to make everything on your iPhone screen appear larger and easier to read, enabling the Display Zoom feature can be a helpful solution. This feature allows you to zoom in on the display, making text, icons, and other elements more prominent.
To enable Display Zoom, follow these steps:
- Open the Settings app on your iPhone.
- Go to “Display & Brightness”.
- Tap on “Display Zoom”.
- Select the desired zoom option: “Zoomed” or “Standard”.
- Tap on “Set” to confirm your choice.
When you choose the “Zoomed” option, the display will show larger text and icons, making it ideal for those who have difficulty with small font sizes or have visual impairments. On the other hand, the “Standard” option displays more content on the screen, which may be preferred by individuals who want to maximize screen real estate.
Enabling Display Zoom not only enhances readability but can also help keep the screen on for longer periods. By enlarging the elements on the screen, your interaction with the device becomes more active, reducing the likelihood of the screen timing out due to inactivity.
Additionally, Display Zoom is a user-friendly feature that requires no specialized software or third-party apps. It is a built-in accessibility option that can be easily enabled or disabled at any time by following the same steps.
Whether you have visual difficulties or simply want a more immersive and readable display, enabling Display Zoom can enhance your iPhone experience while allowing you to keep the screen on for extended use without interruptions.
Keep Brightness Level High
One effective way to ensure your iPhone screen stays on is by keeping the brightness level set to a higher setting. The screen timeout function is typically triggered by a combination of inactivity and low ambient light conditions. By maintaining a higher brightness level, you can prevent the screen from dimming or timing out prematurely.
To adjust the brightness level on your iPhone, follow these steps:
- Open the Control Center by swiping down from the top right corner of the screen (for iPhone X and later) or swiping up from the bottom of the screen (for iPhone models with a Home button).
- Locate the brightness slider.
- Drag the slider to the right to increase the brightness level.
Alternatively, you can also adjust the brightness through the Settings app:
- Open the Settings app on your iPhone.
- Tap on “Display & Brightness”.
- Drag the brightness slider to the right for a higher brightness level.
By keeping the brightness level high, you ensure that the screen remains visible even in well-lit environments. This is particularly useful when you’re using your iPhone outdoors or in brightly lit areas.
However, it is important to note that keeping the brightness level at a high setting for extended periods can drain your battery faster. It’s wise to find a balance between screen visibility and battery conservation based on your specific usage needs.
In addition, the Control Center allows you to quickly toggle the brightness level, making it convenient to adjust on the go. Simply swipe down (or up) and adjust the slider as needed to maintain optimal screen visibility.
By keeping the brightness level high, you can ensure that your iPhone screen remains visible and active for extended periods, providing uninterrupted usage and improved visibility in various lighting conditions.
Disable Battery Optimization for the App
If you have a specific app that you want to keep the screen on for, you can disable battery optimization for that app. Battery optimization is a feature on iPhones that helps conserve battery life by limiting the resources used by certain apps in the background. By disabling battery optimization for a particular app, you can ensure that the screen stays on while using that app.
To disable battery optimization for an app, follow these steps:
- Open the Settings app on your iPhone.
- Go to “Battery”.
- Tap on “Battery Health”.
- Scroll down to the “Battery Usage by App” section and tap on the app you want to disable battery optimization for.
- Tap on “Disable Optimization”.
Once you disable battery optimization for the app, it will have unrestricted access to the necessary resources, including keeping the screen on. This is particularly useful for apps that require constant screen activity, such as video streaming, GPS navigation, or virtual reality applications.
However, keep in mind that disabling battery optimization for an app may have an impact on your device’s battery life. It is recommended to use this feature selectively for apps that truly require continuous screen usage and to re-enable battery optimization for other apps to maintain optimal battery performance.
By disabling battery optimization for the app, you ensure that the screen remains on while using the specific app without any interruptions due to battery-saving measures. This can be beneficial for certain activities that demand uninterrupted screen time and a consistent user experience.
Use Guided Access Mode
If you want to keep your iPhone screen on and restrict access to specific areas of the screen or particular apps, utilizing the Guided Access mode can be an effective solution. Guided Access is a built-in feature that allows you to control which areas of the screen are touch-sensitive and to lock the device into a single app.
To enable Guided Access and keep the screen on for a specific app, follow these steps:
- Open the Settings app on your iPhone.
- Go to “Accessibility”.
- Tap on “Guided Access”.
- Toggle the switch to enable Guided Access.
- Launch the app you want to use in Guided Access mode.
- Triple-click the Home button (or the Side button on iPhone X and later) to enter Guided Access mode.
- Use the options on the Guided Access screen to configure restrictions and set a passcode.
- Tap on “Start” to begin Guided Access.
While in Guided Access mode, your iPhone screen will stay on, and the device will be restricted to the app you selected. This is especially useful when you want to lend your device to someone or use it for a specific task while preventing accidental taps or unauthorized access to other apps or settings.
To exit Guided Access mode, triple-click the Home button (or the Side button on iPhone X and later) again and enter the passcode you set during setup.
Guided Access allows you to customize the level of restrictions for individual apps, such as limiting touch input to specific areas of the screen or disabling certain features within the app. This flexibility ensures that you can tailor the screen behavior according to your specific needs while keeping it on throughout the duration of use.
By utilizing Guided Access mode on your iPhone, you can maintain control over the screen activity, restrict access to specific areas or apps, and keep the screen on for extended periods without interruptions.
Use a Third-Party App
If the built-in features and settings on your iPhone do not provide the desired level of screen control or timeout customization, you can consider using third-party apps to keep your screen on. These apps offer additional functionality and flexibility to ensure your screen stays on according to your preferences.
Here are some popular third-party apps that can help you keep your iPhone screen from timing out:
- Stay Alive: Stay Alive prevents the screen from turning off by simulating user activity. It detects when the screen is about to time out and pings a small portion of the screen to keep it active.
- Keep Screen On: Keep Screen On is a simple app that allows you to keep the screen on for a specified duration. You can manually set the desired timeout interval or keep the screen on indefinitely.
- Caffeine: Caffeine creates a virtual caffeine button on your screen that you can tap to keep the screen on. It’s a convenient option for scenarios where you need the screen to stay active for a specific task or duration.
- Screen Timeout Toggle: Screen Timeout Toggle allows you to quickly toggle the screen timeout setting on your iPhone. You can set a custom timeout or simply keep the screen on all the time with one tap.
These apps can be found on the App Store and typically offer various customizable options, such as specifying screen timeout intervals, disabling auto-lock, or keeping the screen on for specific apps or activities. Additionally, many of these apps provide an intuitive and user-friendly interface for easy control and management of screen timeout settings.
Before downloading and using any third-party app, make sure to check the reviews, ratings, and compatibility with your iPhone model and operating system version. It’s also important to note that some of these apps may require additional permissions or access to certain features on your device.
Using a third-party app provides you with additional screen control options and allows you to fine-tune the screen timeout based on your specific needs and preferences. It’s a great solution if you require more flexibility and customization beyond what the built-in settings offer.
Adjust Accessibility Settings
Your iPhone’s accessibility settings offer various options that can help you keep the screen on and tailor the device to your specific needs. These settings can be particularly useful for individuals with disabilities or those who require extended screen activity for certain tasks.
Here are a few accessibility settings you can adjust to keep your iPhone screen on:
- Display Accommodations: Under the “Accessibility” settings, you can find options like “Bold Text,” “Increase Contrast,” and “Reduce White Point.” By enabling these features, you can make the text and visuals on your screen more prominent, reducing eye strain and ensuring screen visibility.
- Auto-Brightness: By disabling the “Auto-Brightness” feature under “Display & Brightness,” you can manually adjust the brightness to keep the screen at your preferred level without it automatically dimming or timing out due to changing lighting conditions.
- AssistiveTouch: As mentioned earlier, AssistiveTouch is an accessibility feature that creates a floating button to control various functions on your screen. By enabling AssistiveTouch and customizing its actions, you can easily keep the screen on and access essential features without physical touch.
- Interaction settings: Under “Accessibility,” you can find options to adjust how you interact with your iPhone, such as “Tap to Wake” and “Shake to Undo.” These settings allow you to wake the screen with a tap or disable accidental screen actions that may cause the screen to time out.
These are just a few examples of the accessibility settings available on your iPhone. Exploring the accessibility options and adjusting them to your preferences can provide a more personalized and user-friendly experience, allowing you to keep the screen on and optimize its visibility based on your unique requirements.
Remember, accessibility settings are designed to cater to a range of needs, and you can customize them to suit your individual preferences. Experiment with different settings and find the combination that works best for you.
By adjusting the accessibility settings on your iPhone, you can enhance screen visibility, reduce distractions, and customize the device to keep the screen on according to your specific requirements and comfort.
Use a Stand or Holder
If you prefer a hands-free approach to keep your iPhone screen on, using a stand or holder can be a practical solution. A stand or holder allows you to prop up your iPhone at a comfortable viewing angle, keeping the screen visible without the need to hold the device in your hand.
Here are a few options for using a stand or holder to keep your iPhone screen on:
- Adjustable Phone Stand: These stands typically have adjustable angles and heights, allowing you to find the most comfortable viewing position. You can place your iPhone on the stand and adjust it to keep the screen on and visible while you use your hands for other tasks.
- Desktop or Table Stand: These stands are designed to hold your iPhone securely on a flat surface, such as your desk or table. They provide a stable base and keep the screen at an optimal viewing angle, making it easy to keep the screen on while you work or multitask.
- Car Mount: If you’re using your iPhone for GPS navigation or hands-free calling while driving, a car mount can keep the screen on and visible on your dashboard. Most car mounts allow you to adjust the angle and provide a secure grip to keep your iPhone in place.
- Clip-on Holder: These holders can be attached to various surfaces, such as your bed frame, desk, or kitchen cabinet. They allow you to position your iPhone at eye level and keep the screen on while your hands are occupied with other activities.
Using a stand or holder not only keeps the screen on but also reduces the risk of accidentally touching the screen, which can cause unintended actions or interruptions. Moreover, it provides a more ergonomic and comfortable viewing experience, especially during extended periods of screen usage.
You can find a wide variety of stands and holders suitable for different scenarios and preferences. Before purchasing, consider factors such as stability, adjustability, and compatibility with your iPhone model.
By using a stand or holder, you can keep your iPhone screen on and easily view it without the need to hold the device, making it a convenient solution for hands-free activities, multitasking, or watching videos.
Use Streaming Apps
If you want to keep your iPhone screen on while enjoying media content, such as movies, TV shows, or music, using streaming apps can be a great solution. Streaming apps provide a continuous stream of content, ensuring that the screen remains active throughout your viewing or listening experience.
Here are a few popular streaming apps you can use to keep your iPhone screen on:
- Netflix: Netflix offers a wide range of movies, TV shows, and documentaries that you can stream on your iPhone. By playing content through the Netflix app, you can enjoy uninterrupted viewing without the screen timing out.
- YouTube: YouTube is a popular platform for watching videos, tutorials, and music videos. By watching content through the YouTube app, you can keep the screen on and explore an extensive library of videos.
- Spotify: Spotify is a leading music streaming app that allows you to listen to your favorite songs, playlists, and podcasts. When playing music or podcasts through the Spotify app, the screen will stay on, ensuring continuous playback.
- Disney+: Disney+ offers a vast collection of Disney, Marvel, Star Wars, and National Geographic content. By streaming movies and shows through the Disney+ app, you can enjoy a captivating viewing experience without interruptions.
These are just a few examples of popular streaming apps available for your iPhone. Depending on your preferences and interests, you can explore other streaming apps that provide the content you enjoy.
Streaming apps are designed to keep the screen on and are optimized for a seamless viewing experience. They disable the screen timeout function while content is being played, ensuring uninterrupted viewing without the need to interact with the device.
When using streaming apps, it’s important to be mindful of your device’s battery life. Streaming content for extended periods can consume significant battery power. To maximize battery efficiency, you can customize settings such as video quality and ensure your device is connected to a power source when possible.
By utilizing streaming apps, you can enjoy a wide variety of media content on your iPhone while keeping the screen on. Whether you’re streaming movies, music, or videos, these apps provide a convenient and uninterrupted viewing experience.