
Checking your HVAC System
Before you proceed with installing a common wire for your Nest thermostat, it’s important to ensure that you have a compatible HVAC (heating, ventilation, and air conditioning) system. This step will help you determine if you actually need a common wire for your thermostat or if there are alternative options available.
Start by locating your HVAC system. Typically, it can be found in the basement, attic, or a utility closet. Once you have found it, check if it has a control board. The control board is a crucial component that manages the functions of your HVAC system, including the thermostat connection.
Next, identify the wires that are connected to your existing thermostat. Take note of the wire labels, which are usually marked with letters such as R, C, G, Y, W, and O. The C wire, also known as the common wire, is the wire that provides constant power to your thermostat.
If you see a wire labeled C connected to your current thermostat, then congratulations! You already have a common wire, and you can skip installing a new one. However, if there is no C wire, your thermostat may be relying on batteries or a power-sharing feature, which is not ideal for optimal performance.
Keep in mind that older HVAC systems may not have a C wire, as they were not originally designed to support smart thermostats. In such cases, installing a common wire becomes necessary to ensure the efficient operation of your Nest thermostat.
By checking your HVAC system and identifying the presence or absence of a C wire, you can determine the next steps in your Nest thermostat installation process. If you have a C wire available, you can proceed with connecting it to your thermostat. However, if you don’t have a C wire, you will need to run a new wire from your HVAC system to accommodate the common wire.
Determining if You Need a Common Wire
When it comes to installing a Nest thermostat, determining whether or not you need a common wire is crucial. A common wire (C wire) provides a continuous power supply, ensuring that your thermostat functions properly and without interruptions. However, not all HVAC systems require a common wire for operation.
The need for a common wire depends on several factors, including the type of heating and cooling system you have and the power requirements of your Nest thermostat. Some HVAC systems, especially older ones, may not have a C wire, as they were designed to run on batteries or power-sharing systems.
To determine if you need a common wire, start by checking your current thermostat. If you find a wire labeled C connected to it, then you already have a common wire installed. In this case, you can proceed with connecting the C wire to your Nest thermostat.
If your existing thermostat does not have a C wire, there are a few indications that suggest you may need one. Firstly, if your HVAC system is running on batteries, it’s a good indication that a common wire is needed. While batteries can power the thermostat, they may not provide a reliable and constant power source for continuous operation.
Another indication that you need a common wire is if your HVAC system has a power-sharing feature. Power-sharing allows the thermostat to draw power from the control board intermittently, which may affect the performance of your Nest thermostat and could lead to issues like frequent disconnections or malfunctions.
It’s important to note that newer HVAC systems typically require a C wire for proper functioning. This is especially true for smart thermostats like the Nest, which can consume more power to support advanced features such as Wi-Fi connectivity and voice control.
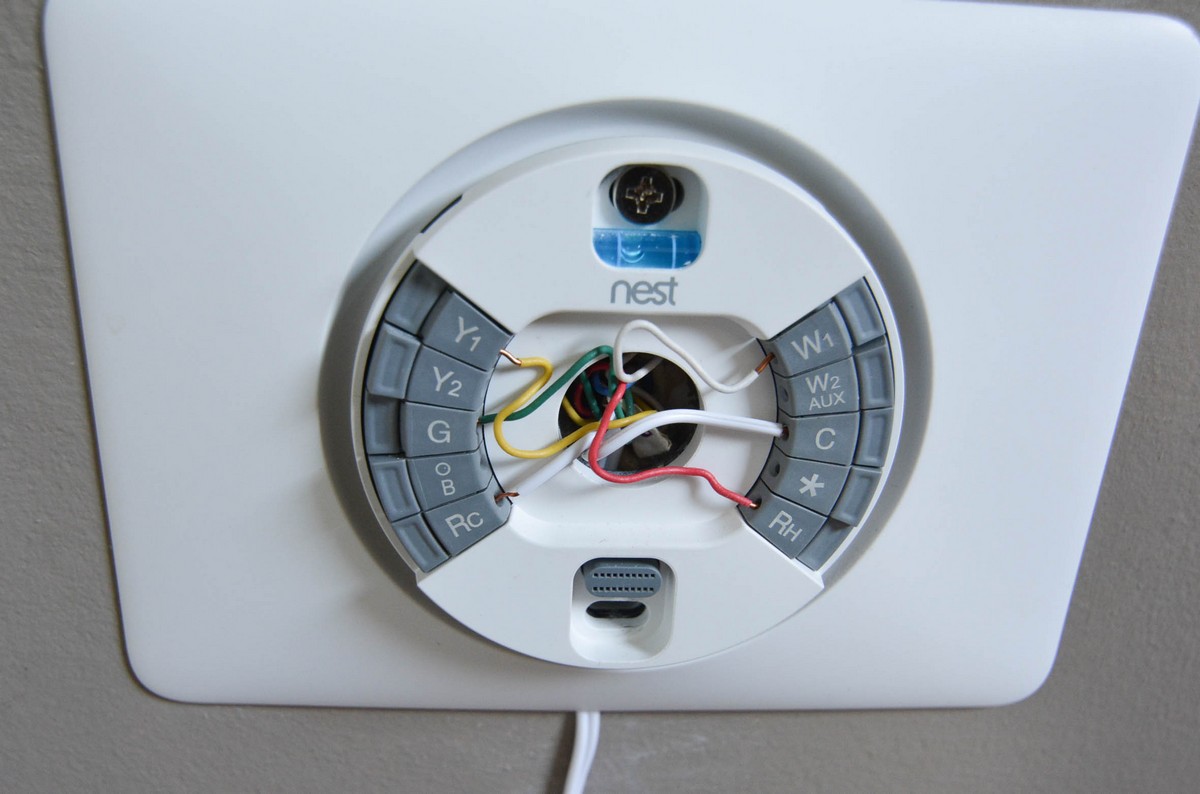
Locating the C Wire on Your HVAC System
Once you have determined that you need a common wire (C wire) for your Nest thermostat installation, the next step is to locate the C wire on your HVAC system. The C wire is responsible for providing a steady flow of power to your thermostat, ensuring its smooth operation.
Locating the C wire may require accessing your HVAC system’s control board. The control board is the central hub that manages various functions of your heating and cooling system, including the thermostat connections. Here’s how you can locate the C wire:
- Turn off the power: Before you begin any work on your HVAC system, make sure to turn off the power. This will ensure your safety during the process.
- Locate the control board: The control board is usually located near the blower motor or inside the main unit of your HVAC system. It may be behind a metal panel or inside an access panel.
- Identify the C terminal: On the control board, look for the terminal labeled “C” or “Com.” This is where the common wire will be connected.
- Check the wiring: Take a close look at the wires connected to the control board. The C wire is typically a blue wire, but it may also be a different color. Refer to the wire labels or the HVAC system’s manual for confirmation.
If you are having trouble locating the C terminal or identifying the C wire, it is recommended to consult the HVAC system’s manual or seek assistance from a professional HVAC technician. They will be able to guide you through the process and ensure a safe and successful installation of the common wire for your Nest thermostat.
Running a New Wire
If your HVAC system does not have a common wire (C wire) already installed, you will need to run a new wire from your HVAC system to your thermostat. Running a new wire may seem like a daunting task, but with the right tools and a little patience, it can be accomplished.
Here’s a step-by-step guide on how to run a new wire for your Nest thermostat:
- Turn off the power: Before you begin any work on your HVAC system, make sure to turn off the power to ensure your safety.
- Choose a route: Decide on the route for the new wire. It’s best to choose a route that is hidden or discreet to maintain the aesthetic appeal of your home.
- Prepare the new wire: Measure the distance from your HVAC system to the location of your thermostat. Add a few extra feet for flexibility. Use wire strippers to remove the necessary length of outer sheathing from the new wire.
- Route the wire: Carefully route the wire along the chosen route, taking care to avoid obstacles or sharp edges that may damage the wire. Use clips or staples to secure the wire and keep it neat and organized.
- Connect the wire: At the HVAC system, connect the new wire to the C terminal on the control board. Strip the ends of the wire if necessary and tighten the terminal screw securely.
- Connect at the thermostat: At the thermostat location, connect the other end of the new wire to the C terminal. Strip the ends of the wire if necessary and securely tighten the terminal screw.
- Seal any access holes: If you drilled any holes to route the wire, make sure to seal them properly to prevent air leakage and maintain the efficiency of your HVAC system.
It’s important to follow the wiring diagram provided by Nest or consult the installation manual for your specific model to ensure proper connections. If running a new wire seems overly complex or you’re unsure about the process, it’s recommended to hire a professional technician to assist you with the installation.
Once you have successfully run the new wire, you can proceed with connecting the common wire (C wire) to your Nest thermostat, bringing you one step closer to enjoying the full potential of your smart thermostat.
Connecting the Common Wire
With the new wire successfully run between your HVAC system and thermostat, it’s time to connect the common wire (C wire) to your Nest thermostat. This step is crucial as it ensures a continuous power supply to your thermostat for seamless operation.
Here’s a step-by-step guide on how to connect the common wire to your Nest thermostat:
- Turn off the power: Before you start any work, make sure to turn off the power to your HVAC system to avoid any electrical accidents.
- Remove the old thermostat: If you are replacing an existing thermostat, carefully remove it from the wall to access the wiring behind it. Take note of the wire colors and labels for reference.
- Identify the C terminal on your Nest thermostat: The C terminal on your Nest thermostat may be labeled differently, such as “C” or “Common.” Consult the installation manual or look for the terminal marked with a “C.”
- Strip the wire ends: Strip the ends of both the common wire and the corresponding terminal wire on the Nest thermostat. Ensure you have enough exposed wire for a secure connection.
- Connect the wires: Insert the stripped end of the common wire into the C terminal on the Nest thermostat. Use a small screwdriver to secure the connection by tightening the terminal screw.
- Reinstall the Nest thermostat: Once the common wire is securely connected, carefully place the Nest thermostat back onto the wall mounting plate. Ensure that it is level and properly aligned.
- Restore power: Turn the power back on to your HVAC system to provide electricity to your Nest thermostat.
It’s crucial to follow the wiring instructions provided by Nest or consult the installation manual for your specific model to ensure proper connections. The common wire should be securely connected to avoid any loose connections or electrical issues.
After connecting the common wire, your Nest thermostat should now have a stable power supply, allowing it to function optimally and supporting all its features. Perform a test to ensure that the thermostat displays the correct information, responds to changes in temperature, and operates smoothly.
If you’re unsure about any part of the installation process or encounter any difficulties, it’s wise to consult a professional or reach out to Nest customer support for guidance. Remember, proper connection of the common wire is essential for the successful operation of your Nest thermostat.
Testing the Installation
Once you have connected the common wire for your Nest thermostat, it’s important to test the installation to ensure everything is working correctly. Testing allows you to verify that the thermostat is receiving power and that it’s able to control your HVAC system effectively. Here’s how you can test the installation:
- Turn on the power: Make sure the power to your HVAC system is turned on.
- Check the display: Look at the display on your Nest thermostat and ensure that it’s showing the correct temperature and other relevant information. This confirms that the thermostat is receiving power.
- Adjust the temperature: Set your desired temperature on the thermostat and check if the HVAC system responds accordingly. You should hear the system turning on and feel the air conditioning or heating starting.
- Verify common wire functionality: To ascertain that the common wire is properly connected, remove the batteries from the Nest thermostat (if applicable). If the thermostat continues to function without interruption, it indicates that the common wire is providing a constant power source.
- Test additional features: If your Nest thermostat includes advanced features such as Wi-Fi connectivity or voice control, test these features to ensure they work seamlessly. Connect the thermostat to your home Wi-Fi network and try adjusting the temperature remotely using the Nest mobile app or through voice commands if supported.
- Monitor thermostat performance: Over the next few hours or days, keep an eye on the thermostat’s performance. Check if it maintains the desired temperature accurately, switches on and off as expected, and responds to changes promptly.
During the testing phase, if you notice any issues or inconsistencies with the thermostat’s operation, double-check the wiring connections to ensure they are secure and properly installed. Should problems persist, consult the troubleshooting section of the Nest installation manual or contact customer support for assistance.
By thoroughly testing the installation of your Nest thermostat, you can ensure that it is functioning correctly and taking full advantage of the common wire connection. A successfully tested installation not only provides a comfortable environment but also helps maximize energy efficiency and optimize the performance of your heating and cooling system.
Troubleshooting Common Problems
While the installation of a common wire for your Nest thermostat can greatly improve its functionality, you may encounter some common issues during the setup or operation. Fortunately, many of these problems can be easily resolved with a few troubleshooting steps. Here are some common problems and their potential solutions:
- No power to the thermostat: If your Nest thermostat is not receiving power, check the wiring connections at both ends – the HVAC system and the thermostat itself. Ensure that the common wire (C wire) is securely connected and that all other wires are properly installed. Additionally, confirm that the power to your HVAC system is turned on.
- Inconsistent temperature readings: If you find that your Nest thermostat is displaying incorrect temperature readings, it could be due to factors such as heat sources near the thermostat, improper thermostat placement, or outdated software. Make sure the thermostat is away from direct sunlight, drafts, or appliances that emit heat. You can also try resetting the thermostat or updating its software to resolve this issue.
- Connectivity issues: If you’re experiencing connectivity problems with your Nest thermostat, such as difficulty connecting to Wi-Fi or intermittent disconnections, check the Wi-Fi signal strength in the area. Ensure your thermostat is within range of the router and consider relocating the router or using a Wi-Fi extender if needed. You can also try power cycling the thermostat and router, as well as updating the thermostat’s firmware.
- Faulty wiring: If your Nest thermostat is not functioning properly, it’s essential to inspect the wiring connections for any loose or damaged wires. Double-check the terminals and make sure each wire is securely attached. If necessary, re-strip the wire ends and reconnect them. If the issue persists, it’s recommended to consult a professional HVAC technician.
- Compatibility issues: Though Nest thermostats are designed to be compatible with many HVAC systems, there may still be compatibility issues in some cases. Check the Nest website or contact customer support to ensure your HVAC system is supported. They may be able to provide additional guidance or recommend alternative solutions if compatibility is an issue.
If you encounter any other problems or require further assistance, refer to the troubleshooting section of your Nest thermostat’s user manual or visit the Nest support website to access resources such as FAQs, forums, and contact options for customer support.
By troubleshooting common problems and addressing them promptly, you can ensure the smooth operation of your Nest thermostat and fully enjoy the benefits of a reliable and efficient HVAC control system.
Alternative Options for Power Supply
If you find yourself in a situation where installing a common wire for your Nest thermostat is not possible or practical, there are alternative options available to ensure a reliable power supply. These alternative methods can provide the necessary power for your thermostat’s operation. Here are a few alternatives to consider:
- Power-sharing: Some Nest thermostats have a power-sharing feature that allows them to draw power intermittently from the HVAC system’s control board. This means that even without a dedicated common wire, the thermostat can still function using power from other terminals, such as the heating (W) or cooling (Y) terminals. However, it’s important to note that power-sharing may not provide a consistent power supply and could potentially affect the performance of the thermostat.
- Using an adapter: Another alternative is to use a power adapter specifically designed for Nest thermostats. These adapters are designed to convert the voltage from your HVAC system to power the thermostat. They can be connected to the furnace or air handler’s control board, providing a reliable power source without the need for a common wire. However, it’s essential to ensure compatibility between your HVAC system and the adapter, as well as follow the manufacturer’s instructions for installation.
- Battery-powered thermostats: If all else fails, you can consider using a battery-powered thermostat. While this option may require you to replace batteries periodically, it eliminates the need for a constant power supply. Keep in mind that battery-powered thermostats may not provide the same level of functionality as a wired Nest thermostat, particularly when it comes to advanced features such as Wi-Fi connectivity and voice control.
- Hire a professional: If you are unsure or uncomfortable with exploring alternative power supply options, it’s advisable to consult a professional HVAC technician. They can assess your specific situation, provide expert advice, and determine the most appropriate solution for your HVAC system and Nest thermostat installation.
Before opting for an alternative power supply method, it’s crucial to consider the specific requirements of your HVAC system and the capabilities of your Nest thermostat. Refer to the Nest website or consult the support resources for detailed information on compatibility and recommended power supply options.
While a common wire is the ideal power supply method for Nest thermostats, the alternative options mentioned above can help you overcome power supply challenges and still enjoy the functionality and convenience of a smart thermostat in your home.