
Understanding the Nest Thermostat
The Nest Thermostat is a smart, programmable thermostat that allows you to control the temperature of your home through a mobile app or using voice commands. It learns your schedule and preferences over time, adjusting the temperature accordingly to provide optimal comfort and energy efficiency. Understanding how the Nest Thermostat works is essential for proper installation and usage.
At its core, the Nest Thermostat uses a combination of sensors, algorithms, and machine learning to regulate the temperature in your home. It tracks your patterns and makes adjustments based on factors such as your schedule, temperature preferences, and even the weather forecast. This smart device aims to provide you with a comfortable environment while minimizing energy consumption and reducing your heating and cooling costs.
In addition to its smart features, the Nest Thermostat also offers energy-saving techniques, such as “Airwave” and “True Radiant” modes. Airwave utilizes the cooling capacity of your air conditioning system to circulate cool air, even after the compressor has turned off. True Radiant intelligently controls radiant heating systems, optimizing the usage and reducing unnecessary energy consumption.
Furthermore, the Nest Thermostat integrates with other smart home devices, allowing you to create a connected ecosystem within your home. You can link it to your voice-controlled virtual assistants, such as Amazon Alexa or Google Assistant, to control the thermostat with simple voice commands. The Nest Thermostat can also be synchronized with other smart devices, such as smart lights or blinds, creating a cohesive and convenient smart home experience.
Understanding the capabilities and features of the Nest Thermostat is crucial to maximize its benefits and ensure proper installation. By familiarizing yourself with its functions and settings, you can take full advantage of the thermostat’s energy-saving potential. Whether you’re looking to save on utility bills or enhance your home’s comfort, the Nest Thermostat offers a convenient and intelligent solution.
The Importance of Correctly Connecting Wires
When it comes to installing the Nest Thermostat, correctly connecting the wires is of utmost importance. The wires serve as the communication lines between the thermostat and your HVAC system, enabling proper functionality and control. Failing to properly connect the wires may result in a malfunctioning thermostat or even pose safety risks.
One of the primary reasons for correctly connecting the wires is to ensure that the thermostat can accurately sense and control the temperature. Each wire is designated for a specific function, such as providing power, controlling heating or cooling stages, or activating the fan. Incorrectly connecting the wires can lead to inaccurate temperature readings or incorrect operation of the HVAC system, affecting your comfort and potentially wasting energy.
Another important aspect to consider when connecting the wires is compatibility with the Nest Thermostat. Different HVAC systems use different wiring configurations, and not all systems are compatible with the Nest. Understanding which wires are compatible and how to properly connect them will prevent any compatibility issues and ensure seamless integration between the thermostat and your heating and cooling system.
Safety is also a critical factor when it comes to wiring connections. Faulty wiring or improper connections can lead to electrical hazards, such as short circuits or electrical fires. It is essential to follow the manufacturer’s guidelines and local building codes when installing the thermostat. If you are unsure about the wiring process or lack experience with electrical work, it is strongly recommended to seek professional assistance to ensure a safe and reliable installation.
By correctly connecting the wires, you can optimize the performance of your Nest Thermostat and avoid any potential issues or safety hazards. It ensures that the thermostat functions as intended, accurately controls the temperature, and seamlessly integrates with your HVAC system. Taking the time to properly connect the wires during installation will result in a smooth and efficient operation of your Nest Thermostat, providing you with the comfort and energy savings you desire.
Basic Wiring Principles
Understanding the basic wiring principles is essential for correctly installing the Nest Thermostat. While the specific wiring configuration may vary depending on your HVAC system, there are some fundamental principles that apply to most installations.
First and foremost, it is crucial to ensure that the power to your HVAC system is turned off before starting any wiring work. This helps prevent any electrical accidents or damage to the thermostat. Additionally, it is recommended to label each wire before disconnecting them to avoid confusion during reinstallation.
The Nest Thermostat typically requires a common wire, also known as a C-wire, to provide continuous power. Some HVAC systems may not have a C-wire, so it is important to check compatibility and evaluate possible alternatives, such as using an additional power supply or a power stealing feature. The C-wire is essential for the proper functioning of the thermostat and to avoid any power-related issues.
Another important principle is to properly strip and prepare the wire ends for connection. Each wire should be stripped to expose a sufficient length of bare copper or tinned wire. It is essential to ensure that no exposed wires are touching each other, as this can cause short circuits or other electrical problems. Use wire connectors or terminal blocks to securely connect the wires, following the recommended wiring diagrams provided by Nest.
It is also important to be aware of any wiring differences between the old thermostat and the Nest Thermostat. While most connections should align with their corresponding labels, there may be some variations, especially if the previous thermostat used non-standard wiring. Refer to the Nest installation guide or consult a professional if you encounter any wiring discrepancies or uncertainties.
Lastly, it is recommended to test the wiring connections before fully installing and activating the Nest Thermostat. This helps identify any potential issues or errors early on and allows for necessary adjustments or troubleshooting. Follow the manufacturer’s instructions for testing the wiring and ensure that each wire is securely connected and functioning correctly.
By understanding and following these basic wiring principles, you can ensure a successful installation of the Nest Thermostat. Proper preparation, accurate labeling, and secure wire connections are key to a functional and efficient thermostat system. If you are unsure about any aspect of the wiring process, it is advisable to seek professional assistance to avoid any errors or safety risks.
Wire Labels and Their Meanings
Understanding the labels assigned to each wire is crucial for correctly connecting the Nest Thermostat. These labels indicate the function of each wire and guide you in making the appropriate connections. While the specific labels may vary depending on your HVAC system and the compatibility of the Nest Thermostat, here are some common wire labels and their meanings:
1. R (Red) – The R wire is usually the power wire from the heating or cooling system. It supplies the necessary electrical power to the thermostat.
2. W (White) – The W wire is typically used for the primary heating system. It activates the heating system when the thermostat calls for heat.
3. Y (Yellow) – The Y wire is responsible for controlling the cooling system. It activates the air conditioning unit when the thermostat calls for cool air.
4. G (Green) – The G wire controls the fan or blower of the HVAC system. When the thermostat signals for the fan to turn on, the G wire carries the necessary signal.
5. C (Common) – The C wire, also known as the common wire, provides constant 24V power to the thermostat. It is necessary for some smart thermostats, like the Nest Thermostat, for optimal performance and functionality.
6. O/B (Orange/Brown) – This wire is used in heat pump systems and controls the reversing valve. Depending on the system, it will be labeled either O or B. O is for the cooling mode, while B is for the heating mode.
7. E (Emergency Heat) – The E wire is specific to heat pump systems with auxiliary heating. It activates the emergency or backup heating system when needed.
8. L (Heat Pump Changeover Relay) – The L wire is found in older HVAC systems with heat pump changeover relays. It controls the switching between heating and cooling modes.
These are just a few examples of common wire labels and their meanings. However, it is important to consult the wiring diagram provided by your HVAC system manufacturer or the Nest Thermostat installation guide to properly identify and connect each wire. Make sure to match the wire labels with the corresponding terminals on the thermostat to ensure accurate functioning and compatibility.
Wire Colors and Nest Compatibility
Wire colors are used as a visual indicator to identify the function of each wire in HVAC systems. While wire colors can vary, there are some common conventions that can help determine their meaning. Understanding the wire colors is important when connecting the Nest Thermostat as it ensures compatibility and proper functioning. Here are some commonly used wire colors and their corresponding functions:
1. Red – The red wire (R) is typically the power wire, providing 24V power to the thermostat. This wire is essential for the Nest Thermostat’s operation and should be connected to the R terminal.
2. White – The white wire (W) is commonly used for the primary heating system. It activates the heating system when the thermostat calls for heat. Connect it to the W terminal on the Nest Thermostat.
3. Yellow – The yellow wire (Y) controls the cooling system. It activates the air conditioning unit when the thermostat calls for cool air. Connect it to the Y terminal.
4. Green – The green wire (G) controls the fan or blower of the HVAC system. When the thermostat signals for the fan to turn on, the G wire carries the necessary signal. Connect it to the G terminal.
5. Blue – The blue wire, if present, can serve various functions, such as common (C), or it might be used for an accessory, such as a humidifier or dehumidifier. Refer to the wiring diagram or consult the manufacturer’s documentation to determine its specific purpose.
These are general guidelines for wire colors, but keep in mind that HVAC systems can have different wiring configurations. It is important to verify the function of each wire using a multimeter or consulting a professional if you are unsure. Additionally, not all HVAC systems have a C wire (common wire) available. The absence of a C wire can sometimes pose compatibility issues with smart thermostats like the Nest. In such cases, alternative power sources or power stealing methods may need to be considered.
To ensure proper compatibility with the Nest Thermostat, refer to the compatibility guide provided by Nest. This guide will help determine if your specific HVAC system is compatible and which wires are required for optimal functioning. In some cases, a professional HVAC technician may be needed to assist with wiring modifications or the addition of a C wire.
Following the correct wire color codes and understanding Nest compatibility will help you successfully connect your Nest Thermostat and ensure its proper functioning within your HVAC system.
Common Wire Compatibility
The presence of a common wire, or C wire, is often crucial for the proper functioning of the Nest Thermostat. However, not all HVAC systems have a C wire readily available. Understanding common wire compatibility and exploring alternative solutions is essential to ensure a successful installation.
A C wire provides a constant 24V power supply to the thermostat, eliminating the need for batteries or power stealing methods. It helps ensure a stable and reliable connection between the Nest Thermostat and the HVAC system. While the Nest Thermostat can operate without a C wire, it is highly recommended to have one for optimal performance and to utilize all the features of the thermostat.
If your HVAC system does not have a C wire, there are a few alternative options to consider. One option is to check if there are unused wires in your current wiring setup. Sometimes, an extra wire, such as the blue wire, can be repurposed as a C wire. Another option is to use an external power source, such as a plug-in power adapter or a power extender kit. These solutions provide the necessary power for the thermostat while bypassing the need for a dedicated C wire.
Another common workaround is power stealing. Some HVAC systems allow the Nest Thermostat to draw power from the heating or cooling wires when they are not in use. This method can work in certain situations, but it is important to note that power stealing may not provide enough power for all the features of the thermostat and can potentially cause issues or intermittent functioning.
It is recommended to consult the Nest compatibility guide or contact a professional HVAC technician for guidance on common wire compatibility in your specific situation. They can assess your HVAC system and determine the most suitable solution for obtaining a C wire or providing alternative power to the Nest Thermostat.
Keep in mind that the lack of a C wire may limit the full functionality of the Nest Thermostat, such as power-hungry features or constant Wi-Fi connectivity. However, even without a C wire, the Nest Thermostat can still provide basic temperature control and energy-saving capabilities.
Understanding common wire compatibility and exploring available options is crucial when installing the Nest Thermostat. By ensuring a stable power supply, you can maximize the features and benefits of the thermostat while maintaining a reliable connection with your HVAC system.
How to Connect Wires to a Nest Thermostat
Connecting the wires to your Nest Thermostat correctly is essential for its proper operation. Here is a step-by-step guide to help you connect the wires to your Nest Thermostat:
1. Start by turning off the power to your HVAC system at the circuit breaker. This step is crucial for your safety.
2. Remove the cover of your old thermostat and carefully disconnect the wires from their respective terminals. Take note of the labels on each wire to ensure proper reconnection later.
3. Gently straighten the wires and remove any excess insulation or tape, exposing enough wire to make a secure connection.
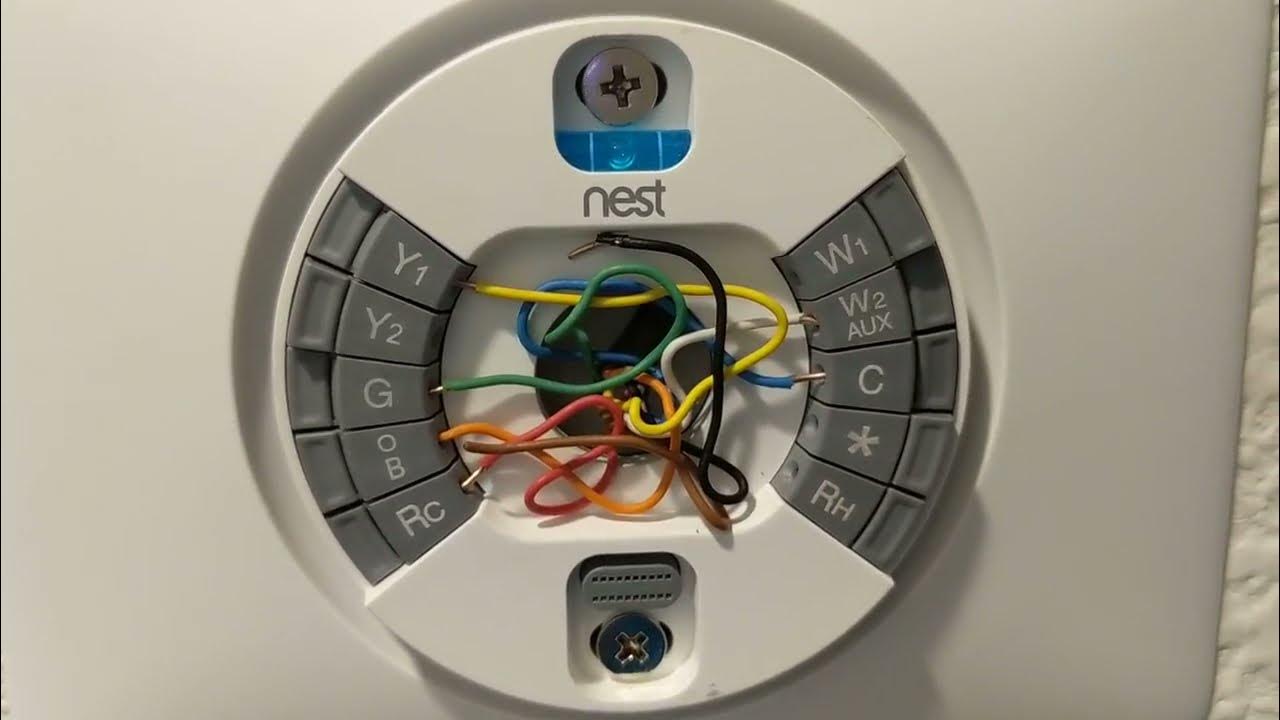
4. Identify the corresponding terminals on your Nest Thermostat. The labels on the terminals should match the labels on the wires.
5. Beginning with the R wire, insert the stripped end of the wire into the R terminal on the Nest Thermostat. Press down on the terminal to secure the wire in place. Repeat this step for each wire, connecting them to their respective terminals.
6. If you have a C wire (common wire), insert it into the C terminal. This wire is crucial for proper Nest Thermostat functionality, so make sure it is securely connected.
7. Once all the wires are connected, gently push them into the wall and align the Nest Thermostat onto the base. Ensure that the thermostat is level and firmly in place.
8. Turn the power back on at the circuit breaker and wait for the Nest Thermostat to power up. Follow the on-screen instructions to complete the initial setup and configuration.
9. After setup, observe the thermostat’s display to ensure it is correctly connected to your HVAC system and getting the required power supply.
It is important to note that these are general guidelines, and the exact steps may vary depending on your specific HVAC system and the Nest Thermostat model. Always refer to the official Nest Thermostat installation guide for detailed instructions and safety precautions.
If you encounter any difficulties or are unsure about the wiring process, it is recommended to consult a professional HVAC technician for assistance. They have the expertise to handle complex wiring situations and can ensure a seamless and safe installation of your Nest Thermostat.
Troubleshooting Common Wiring Issues
While connecting the wires to your Nest Thermostat, you may encounter some common wiring issues. Understanding these issues and knowing how to troubleshoot them can help ensure a successful installation. Here are some common wiring issues and troubleshooting steps:
1. Loose Connections: If your Nest Thermostat is not receiving power or is intermittently losing connection, check the wiring connections. Make sure each wire is securely inserted into its respective terminal. If any wire is loose, press down on the terminal to reestablish a secure connection.
2. Inaccurate Temperature Readings: If you notice significant temperature discrepancies, verify that the wires are correctly connected to their respective terminals. An incorrect connection can lead to inaccurate temperature readings. Also, check that the thermostat is not exposed to direct sunlight, drafts, or other external factors that can affect its temperature sensors.
3. C Wire Compatibility: If your HVAC system does not have a C wire and you are using an alternative power source, ensure that it is providing sufficient power for the Nest Thermostat. A weak or insufficient power supply can cause performance issues or intermittent disconnects. Consider using a power extender kit or consulting a professional for assistance.
4. Damaged or Frayed Wires: Inspect the wires for any signs of damage or fraying. If a wire is damaged, it may cause disruptions in the thermostat’s functionality. In such cases, it is recommended to replace the damaged wire or seek professional help for rewiring.
5. Compatibility Issues: If you are experiencing issues even after correctly connecting the wires, consult the compatibility guide provided by Nest. Ensure that your HVAC system is compatible with the Nest Thermostat and that you have followed the recommended wiring configurations. In some cases, a professional HVAC technician may need to assess and modify the wiring setup for optimal compatibility.
6. Non-Functioning HVAC System: If your heating or cooling system is not responding to the Nest Thermostat, double-check the wiring connections. Ensure that the wires are correctly connected to their respective terminals and that the thermostat is set to the appropriate mode (heat or cool). If the issue persists, consult a professional HVAC technician for further troubleshooting.
If you encounter any other wiring issues or are unsure about troubleshooting steps, it is recommended to consult the official Nest support documentation or contact their customer support. They can provide specific guidance based on your unique situation and help resolve any wiring problems you may face during the installation process.
Professional Help and Safety Precautions
While installing the Nest Thermostat can be a straightforward process, there are instances where professional assistance may be required. Additionally, it is crucial to prioritize safety when working with electrical systems. Here are some important points to consider:
1. Professional HVAC Technician: If you are uncertain about the wiring process or lack experience with electrical work, it is highly recommended to seek professional help. An HVAC technician can assess your HVAC system, provide expert guidance, and ensure a safe and reliable installation of the Nest Thermostat.
2. Follow Manufacturer’s Guidelines: Always refer to the official Nest Thermostat installation guide and follow the manufacturer’s instructions. This includes recommended wiring configurations, safety precautions, and any specific guidelines for your HVAC system model. Deviating from these guidelines may result in improper functioning or potential damage to your system.
3. Turn off Power: Before starting any wiring work, make sure to turn off the power to your HVAC system at the circuit breaker. This step is vital to prevent electrical accidents and ensure your safety.
4. Label Wires: Before disconnecting any wires, label each one to avoid confusion during reinstallation. This will help you correctly connect the wires to the Nest Thermostat terminals later on.
5. Use Proper Tools: When working with electrical wiring, use appropriate tools and equipment. This includes wire strippers, connectors, and a multimeter to test for proper voltage. Using the correct tools will ensure a secure and reliable connection.
6. Wear Protective Gear: To prioritize your safety, wear appropriate protective gear, such as gloves and safety glasses, when handling electrical components. This helps protect against potential electrical shocks or accidental contact with live wires.
7. Check Local Building Codes: Familiarize yourself with the local building codes and regulations related to thermostat installation. Compliance with these codes ensures a safe and legal installation.
8. Test and Verify: After completing the wiring connections, double-check your work and test the functionality of the Nest Thermostat. Verify that each wire is securely connected and that the thermostat is properly receiving power and controlling your HVAC system.
Remember, your safety should always be the top priority when working with electrical systems. If you have any doubts or concerns about the installation process, it is better to seek professional assistance rather than risk potential hazards.
By following these safety precautions and considering professional help when needed, you can ensure a successful and safe installation of the Nest Thermostat, providing you with a comfortable and energy-efficient home environment.