
What Is the OB Wire?
The OB wire on a Nest thermostat is an important component of the thermostat’s wiring system. It serves a specific purpose in controlling the heating and cooling functions of your HVAC (heating, ventilation, and air conditioning) system.
The abbreviation “OB” stands for “O/B Terminal,” which indicates that this wire is responsible for controlling the reversing valve in heat pumps. The reversing valve is what allows a heat pump to switch between heating and cooling modes. When the thermostat sends a signal through the OB wire, it activates the reversing valve to change the flow of refrigerant, resulting in either heating or cooling.
The OB wire is typically connected to the O/B terminal on your HVAC system and the O/B terminal on the Nest thermostat. In some cases, the OB wire may be combined with the W wire, resulting in a single W/OB wire. However, this configuration varies depending on the specific thermostat model and HVAC system setup.
In terms of color coding, the OB wire is often associated with the orange wire, but it can also be a different color depending on the wiring standards used by your HVAC system installer.
Overall, the OB wire plays a crucial role in the functioning of your Nest thermostat, particularly for heat pump systems. Understanding how it works and why it’s necessary can help you troubleshoot issues and optimize the performance of your thermostat.
How Does the OB Wire Work?
The OB wire on a Nest thermostat operates by sending signals to the reversing valve in a heat pump system. Heat pumps are unique because they can both heat and cool your home, depending on the desired temperature.
When the Nest thermostat detects a need for heating, it sends a signal through the OB wire to the reversing valve. The reversing valve then switches the flow of refrigerant, allowing the heat pump to extract heat from the outside and transfer it indoors. This process is known as heating mode.
On the other hand, when the Nest thermostat detects a need for cooling, it sends a signal through the OB wire in the opposite direction. This signal activates the reversing valve to switch the refrigerant flow, enabling the heat pump to absorb heat from inside the home and release it outside. This process is referred to as cooling mode.
The OB wire essentially acts as a control mechanism for the reversing valve. It signals the heat pump to switch between heating and cooling modes based on the temperature settings and needs of the thermostat. Without the OB wire, the heat pump would not be able to effectively alternate between modes, resulting in inconsistent temperature control.
It’s worth noting that the operation of the OB wire may vary depending on the specific HVAC system you have. Some systems may require the OB wire to be energized (sending a signal) for heating mode, while others may require it to be energized for cooling mode. Consulting the wiring diagram or the manufacturer’s instructions for your particular system is crucial to ensure proper functionality.
Understanding how the OB wire works and its role in the heat pump system can help you troubleshoot any issues that may arise. If you notice that your heat pump is not switching between heating and cooling modes correctly, double-check the wiring connections of the OB wire and consult the Nest thermostat’s documentation for further guidance.
Why Does My Nest Thermostat Have an OB Wire?
If you have a heat pump system in your home, it is common for your Nest thermostat to have an OB wire. The OB wire is essential for proper functionality and control of heat pumps. Here are a few reasons why your Nest thermostat may have an OB wire:
1. Heat Pump Compatibility: Heat pump systems require the use of an OB wire to control the reversing valve. The reversing valve is responsible for switching between heating and cooling modes in the heat pump. Without the OB wire, your Nest thermostat would not be able to effectively control the operation of your heat pump.
2. Efficient Temperature Control: The OB wire ensures that your heat pump performs optimally in maintaining the desired temperature in your home. By activating the reversing valve, the OB wire allows the heat pump to switch between heating and cooling modes according to the temperature settings on your Nest thermostat.
3. Enhanced Energy Efficiency: Heat pumps are known for their energy-efficient operation. The OB wire plays a significant role in maximizing this efficiency. By accurately controlling the reversing valve, the OB wire enables precise temperature adjustments, resulting in more efficient heating and cooling processes. This can lead to lower energy consumption and reduced utility costs.
4. Adaptation to Climate Changes: Heat pump systems are particularly useful in areas with mild climates, where the demand for both heating and cooling is moderate. The OB wire ensures that your Nest thermostat can seamlessly adapt to temperature changes throughout the year, providing comfort in various weather conditions.
5. Compatibility with Dual Fuel Systems: In some cases, the OB wire may also be required for compatibility with dual fuel systems. Dual fuel systems combine a heat pump and a furnace for heating purposes, utilizing the most efficient heat source based on outdoor temperatures. The OB wire is necessary to control the reversing valve in a dual fuel setup.
Having an OB wire on your Nest thermostat is a necessary component for efficient heat pump operation and temperature control. It allows your thermostat to communicate effectively with your HVAC system, ensuring comfortable indoor temperatures year-round. If you are unsure about the wiring of your Nest thermostat or the operation of the OB wire, consulting a professional HVAC technician can provide the guidance you need.
How to Install an OB Wire on a Nest Thermostat
If you have a Nest thermostat and need to install an OB wire, you’ll need some basic knowledge of HVAC wiring and electrical systems. Here is a step-by-step guide on how to install an OB wire on a Nest thermostat:
1. Turn off the Power: Before starting any electrical work, it’s crucial to turn off the power to your HVAC system at the circuit breaker. This will ensure your safety during the installation process.
2. Identify the Existing Wiring: Take a look at the existing wiring on your thermostat. Look for the O/B terminal and verify if it has an OB wire connected to it. If not, you will need to run a new wire from your HVAC system to your thermostat location.
3. Route the Wire: If you need to run a new wire, determine the most efficient route from your HVAC system to the thermostat location. It’s important to choose a route that is not obstructed and does not interfere with other wires or components.
4. Connect the Wire: Strip the ends of the new OB wire and the corresponding wire at the HVAC system and thermostat. Connect one end of the wire to the O/B terminal at the HVAC system, and the other end to the O/B terminal on the Nest thermostat. Use wire nuts or terminal connectors to ensure a secure and proper connection.
5. Secure the Wire: Use cable clips or staples to secure the OB wire along the route, keeping it tidy and away from any potential hazards.
6. Test the Connection: Once the wiring is complete, restore power to your HVAC system and turn on the Nest thermostat. Go through the setup process on the thermostat’s display to ensure it is properly detecting the OB wire and communicating with your HVAC system.
7. Configure the Settings: Once the installation is successful, you may need to configure the settings on your Nest thermostat to ensure it properly controls the reversing valve. Refer to the thermostat’s user manual or online documentation for specific instructions on setting up the OB wire.
Remember, if you are not familiar with HVAC wiring or electrical systems, it’s always best to consult a professional HVAC technician for assistance. They have the expertise and knowledge to handle the installation and ensure it is done correctly and safely.
By following these steps, you can install an OB wire on your Nest thermostat and enhance the functionality of your heat pump system.
Troubleshooting Common Issues with the OB Wire
While the OB wire is an important component in controlling heat pump systems with a Nest thermostat, there can be issues that arise. Here are some common problems and troubleshooting steps to resolve them:
1. No Heating or Cooling: If you find that your heat pump is not providing any heating or cooling, first check the wiring connections of the OB wire. Ensure it is securely connected to both the O/B terminal on the HVAC system and the Nest thermostat. If the connections are loose or damaged, reestablish the connections or replace the wire.
2. Incorrect Mode Switching: If your heat pump is not switching between heating and cooling modes correctly, the issue may lie with the OB wire. Check the wiring connections again to ensure they are properly connected. Also, verify that the programming and settings on your Nest thermostat match the system configuration. If needed, consult the thermostat’s user manual or online resources for guidance on proper configuration.
3. Reversed Heating and Cooling: In some cases, the heating and cooling modes may be reversed, meaning the heat pump provides cooling when it should be heating, and vice versa. This can happen if the temperature system configuration or OB wire connections are incorrect. Refer to the thermostat’s settings and wiring diagram to ensure the correct setup.
4. Damaged or Shorted Wire: If you suspect there may be a problem with the OB wire, such as it being damaged or shorted, visually inspect the wire for any signs of wear or cuts. If you notice any damage, replace the wire with a new one to ensure proper functionality.
5. Compatibility with Dual Fuel Systems: If you have a dual fuel system (heat pump and furnace), make sure that the OB wire is correctly integrated with the system. Check the wiring diagram provided in the thermostat’s documentation and ensure that the proper connections are made.
6. Professional Assistance: If troubleshooting the OB wire issues becomes challenging or if you are unsure about the correct configuration, it’s best to seek the help of a professional HVAC technician. They will have the expertise to diagnose the problem and provide appropriate solutions.
Remember, when working with electrical systems or HVAC wiring, always prioritize your safety. If you are uncomfortable or uncertain about any step, consult a professional to avoid any potential risks or damage to your equipment.
By troubleshooting and resolving issues with the OB wire, you can ensure efficient operation and optimal temperature control with your Nest thermostat and heat pump system.
Understanding Nest Thermostat Wiring Diagrams
Nest thermostat wiring diagrams are essential for understanding the wiring configuration and connections for your thermostat and HVAC system. These diagrams provide a visual representation of how the various wires are connected to ensure proper functioning of the system. Here’s an overview of how to interpret Nest thermostat wiring diagrams:
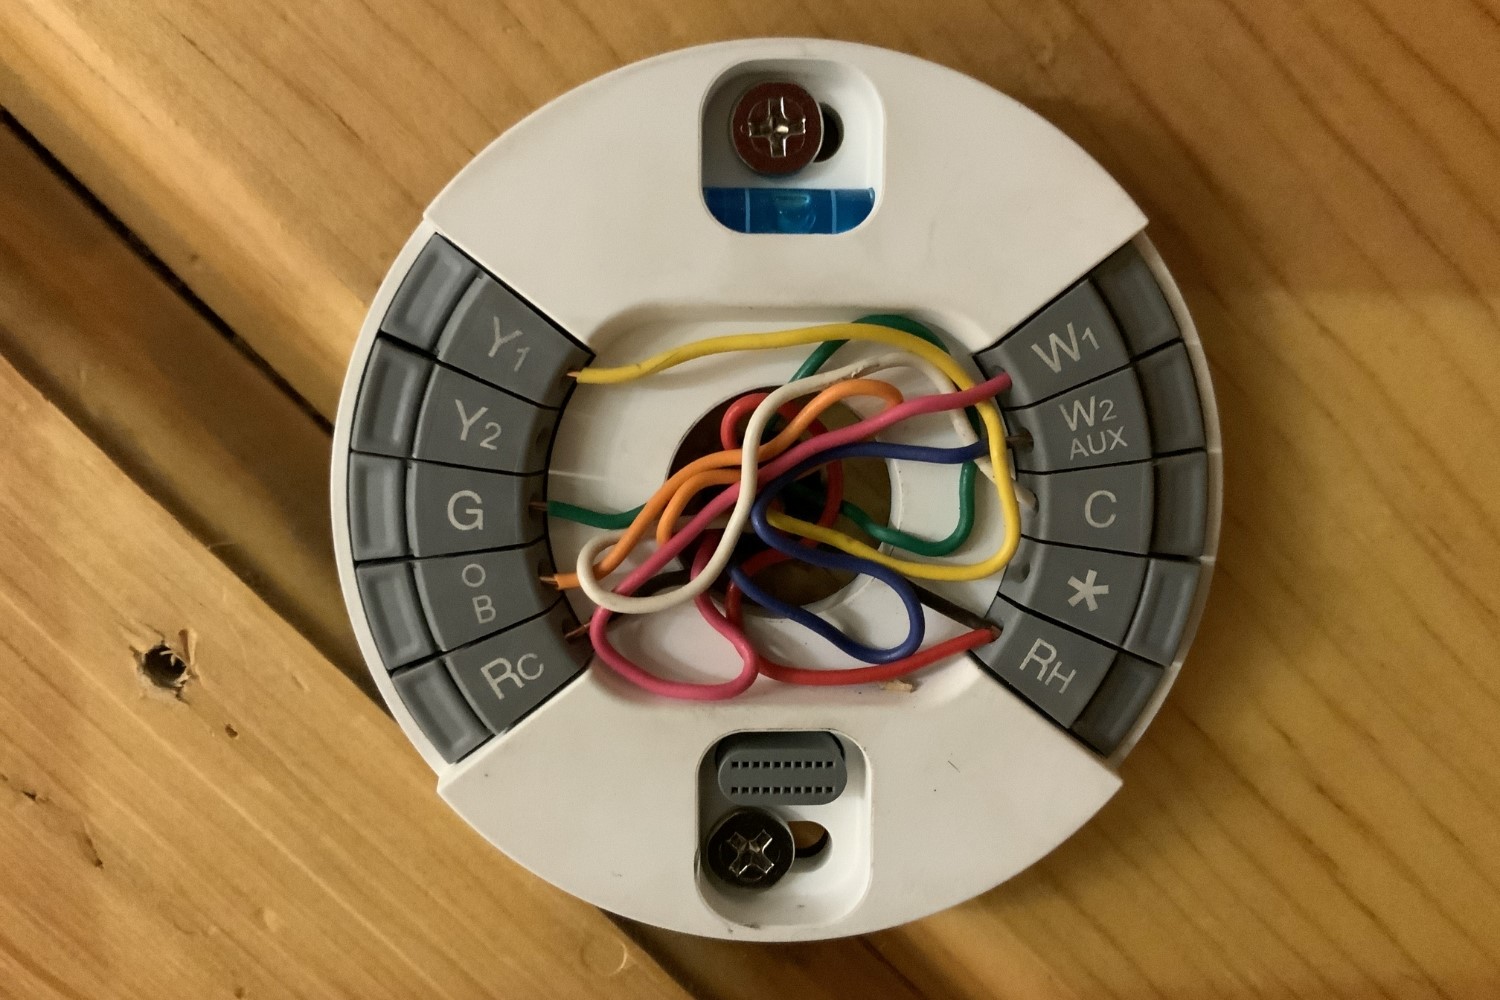
1. Terminal Labels: Nest wiring diagrams use specific labels for each terminal, which correspond to the functions they control. Common terminal labels include Rh or Rc (power), C (common), Y (cooling), G (fan), W (heating), and O/B (reversing valve). Each terminal on the thermostat and HVAC system should be labeled for easy identification.
2. Wire Color Codes: The wiring diagrams may also include wire color codes to indicate the standard colors associated with each terminal. For example, the Rh or Rc terminal is typically red, the C terminal is usually blue or black, the Y terminal is yellow, the G terminal is green, the W terminal is typically white, and the O/B terminal is often orange.
3. Connections: The wiring diagrams will show how each wire is connected from the thermostat to the HVAC system. The most common connections include connecting the Rh or Rc terminal to the power supply, the C terminal to the common wire, the Y terminal to the cooling system, the G terminal to the fan, the W terminal to the heating system, and the O/B terminal to the reversing valve.
4. Compatibility Notes: Some wiring diagrams may include compatibility notes for specific HVAC systems or unique configurations, such as dual fuel systems. These notes can provide additional guidance on how to properly connect and configure the Nest thermostat for optimal operation.
It’s important to note that every HVAC system and thermostat setup may have variations in wiring configurations and compatibility. Therefore, it’s crucial to refer to your specific HVAC system’s wiring diagram and the Nest thermostat’s documentation for accurate guidance.
If you are unsure about interpreting the wiring diagrams or need assistance with the installation, it’s recommended to consult a professional HVAC technician. They can effectively interpret the diagrams and ensure that the wiring connections are correctly established.
Understanding the Nest thermostat wiring diagrams is essential for proper installation and configuration of your thermostat. It allows you to visualize the connections and ensure that all wires are correctly connected, leading to efficient and accurate temperature control in your home.
Tips for Optimizing the OB Wire on Your Nest Thermostat
To get the most out of your Nest thermostat and the OB wire that controls the reversing valve on your heat pump system, consider these tips for optimizing its performance:
1. Proper Wiring Connections: Ensure that the OB wire is securely connected to both the O/B terminal on your HVAC system and the Nest thermostat. Loose or damaged connections can lead to inconsistent operation or even system failure. Make sure to double-check the wiring connections and fix any issues promptly.
2. Configuration Settings: Check the configuration settings on your Nest thermostat to ensure they match your HVAC system’s requirements. The Nest thermostat provides options to customize the settings, such as determining whether the OB wire should be energized for heating or cooling mode. Adjust these settings as necessary to ensure your thermostat communicates effectively with your system.
3. Sensible Temperature Settings: Set temperature thresholds that promote efficient operation and comfort. Avoid setting extreme temperature differentials between heating and cooling modes, as this can potentially strain the reversing valve and affect system performance. Opt for modest temperature adjustments that maintain a consistent and comfortable indoor environment.
4. Regular Maintenance: Perform routine maintenance on your heat pump system to keep it functioning optimally. Clean or replace air filters regularly, as dirty filters can hinder airflow and strain the system. Additionally, schedule professional maintenance at least once a year to ensure all components, including the OB wire, are in good working condition.
5. Compatible HVAC System: Before installing a Nest thermostat with an OB wire, ensure compatibility with your heat pump system. Some older or less common systems may not support the features and functionality provided by the OB wire. Refer to the Nest thermostat’s compatibility documentation or consult an HVAC professional to confirm compatibility and avoid any compatibility issues.
6. Monitor Energy Usage: Take advantage of the energy usage monitoring feature offered by the Nest thermostat. By monitoring your energy usage patterns, you can identify any abnormalities or inefficiencies in your heat pump system’s operation. Adjust settings or seek professional assistance if you notice any significant deviations from expected energy consumption.
7. Seek Professional Assistance: If you encounter persistent issues or have difficulties optimizing the OB wire’s performance, don’t hesitate to seek professional assistance. HVAC technicians have the expertise and knowledge to diagnose and resolve complex issues, ensuring that your Nest thermostat and heat pump system function efficiently.
By following these tips, you can optimize the performance of the OB wire on your Nest thermostat and maximize the efficiency and comfort of your heat pump system. Regular maintenance and proper configuration are key to ensuring optimal operation and extending the lifespan of your HVAC equipment.
Frequently Asked Questions about the OB Wire on Nest Thermostats
Here are some frequently asked questions about the OB wire on Nest thermostats and their answers:
1. What is the purpose of the OB wire on a Nest thermostat?
The OB wire, also known as the O/B Terminal, is responsible for controlling the reversing valve in heat pump systems. It allows the thermostat to switch between heating and cooling modes by directing the flow of refrigerant.
2. Can I install a Nest thermostat without an OB wire?
It depends on your HVAC system. If you have a heat pump system, an OB wire is generally required for proper functionality. However, if you have a different type of HVAC system, you may not need an OB wire. It is important to refer to the Nest thermostat’s compatibility documentation and consult an HVAC professional if unsure.
3. What if my heat pump system doesn’t have an OB wire?
If your heat pump system does not have an OB wire, it may be necessary to run a new wire or seek alternative solutions. Consult an HVAC professional for guidance on how to integrate an OB wire into your system or explore other compatible thermostat options.
4. Can I use a different wire as an OB wire?
It is recommended to use the designated OB wire for reliable operation. However, in certain cases, the OB function can be combined with the W wire (resulting in a W/OB wire) based on specific wiring configurations. It is essential to consult the wiring diagram for your thermostat and follow the manufacturer’s instructions.
5. Why is my heat pump not switching between heating and cooling modes correctly?
Incorrect switching between heating and cooling modes could be due to wiring issues, configuration settings, or compatibility problems. Check the wiring connections, verify the programming settings on your Nest thermostat, and ensure compatibility with your HVAC system. If the issue persists, consult an HVAC professional for further troubleshooting and assistance.
6. Can I install an OB wire myself?
If you have experience with HVAC wiring and electrical systems, installing an OB wire on your own can be feasible. However, if you are unfamiliar or uncomfortable with wiring procedures, it is recommended to hire a professional HVAC technician to ensure proper installation and minimize the risk of damage or safety hazards.
7. What should I do if I encounter difficulties with the OB wire or Nest thermostat?
If you experience difficulties with the OB wire or Nest thermostat, refer to the thermostat’s documentation for troubleshooting tips. Additionally, reach out to Nest customer support or consult an HVAC professional for guidance and assistance.
These are some common questions regarding the OB wire on Nest thermostats. If you have specific concerns or inquiries, it is always best to consult the Nest thermostat’s documentation or seek professional advice for accurate and personalized solutions.