
Hiring a Professional
If you’re not confident in your DIY skills or simply don’t have the time or desire to install the Nest Thermostat yourself, hiring a professional is a great option. Professional installation ensures that the thermostat is installed correctly and optimally, maximizing its performance and efficiency.
By hiring a professional, you can benefit from their expertise and knowledge. They have experience and specialized training in installing various HVAC systems, including programmable thermostats like the Nest. They will have a deep understanding of the wiring and compatibility requirements, ensuring a seamless installation process.
Another advantage of hiring a professional is the assurance of warranty coverage. If anything goes wrong during the installation or if there are any issues with the thermostat later on, the professional will be able to ensure that the warranty is not voided, providing you with peace of mind.
Additionally, a professional installation can save you time and effort. They will have all the necessary tools and equipment, making the installation process quick and efficient. You won’t have to worry about sourcing the right tools or potentially damaging your HVAC system during the installation.
While hiring a professional may come with a cost, it is an investment in the proper installation and functionality of your Nest Thermostat. A professional installation can help avoid potential problems or complications that may arise from an incorrect installation, ensuring that you can fully enjoy the benefits of your smart thermostat.
Overall, hiring a professional for Nest Thermostat installation is a reliable choice, especially for those who are not confident in their DIY skills or prefer to leave the installation to the experts. It guarantees a proper and hassle-free installation, backed by warranty coverage and the expertise of trained professionals.
Installing the Nest Thermostat Yourself
If you’re a DIY enthusiast and enjoy tackling home improvement projects, installing the Nest Thermostat yourself can be a rewarding experience. Not only does it give you control over the installation process, but it can also save you money on professional installation fees.
Before diving into the DIY installation, it’s essential to ensure that you have the necessary requirements. The Nest Thermostat is compatible with most heating and cooling systems, but it’s always wise to check the compatibility on the manufacturer’s website or consult with a Nest Pro if you’re unsure.
To install the Nest Thermostat, you will need a few essential tools. These may include a screwdriver, wire strippers, electrical tape, and a voltage tester. It’s important to have these tools on hand to ensure a smooth installation process.
Now, let’s walk through a step-by-step guide for installing the Nest Thermostat:
- Turn off the power to your HVAC system before starting the installation process. This ensures your safety and prevents any electrical mishaps.
- Remove the old thermostat from the wall by unscrewing the mounting plate. Take note of the wires connected to the terminals to ensure proper installation of the Nest Thermostat.
- If necessary, clean the wall and remove any dirt or debris left behind by the old thermostat.
- Mount the Nest Thermostat base onto the wall using the provided screws.
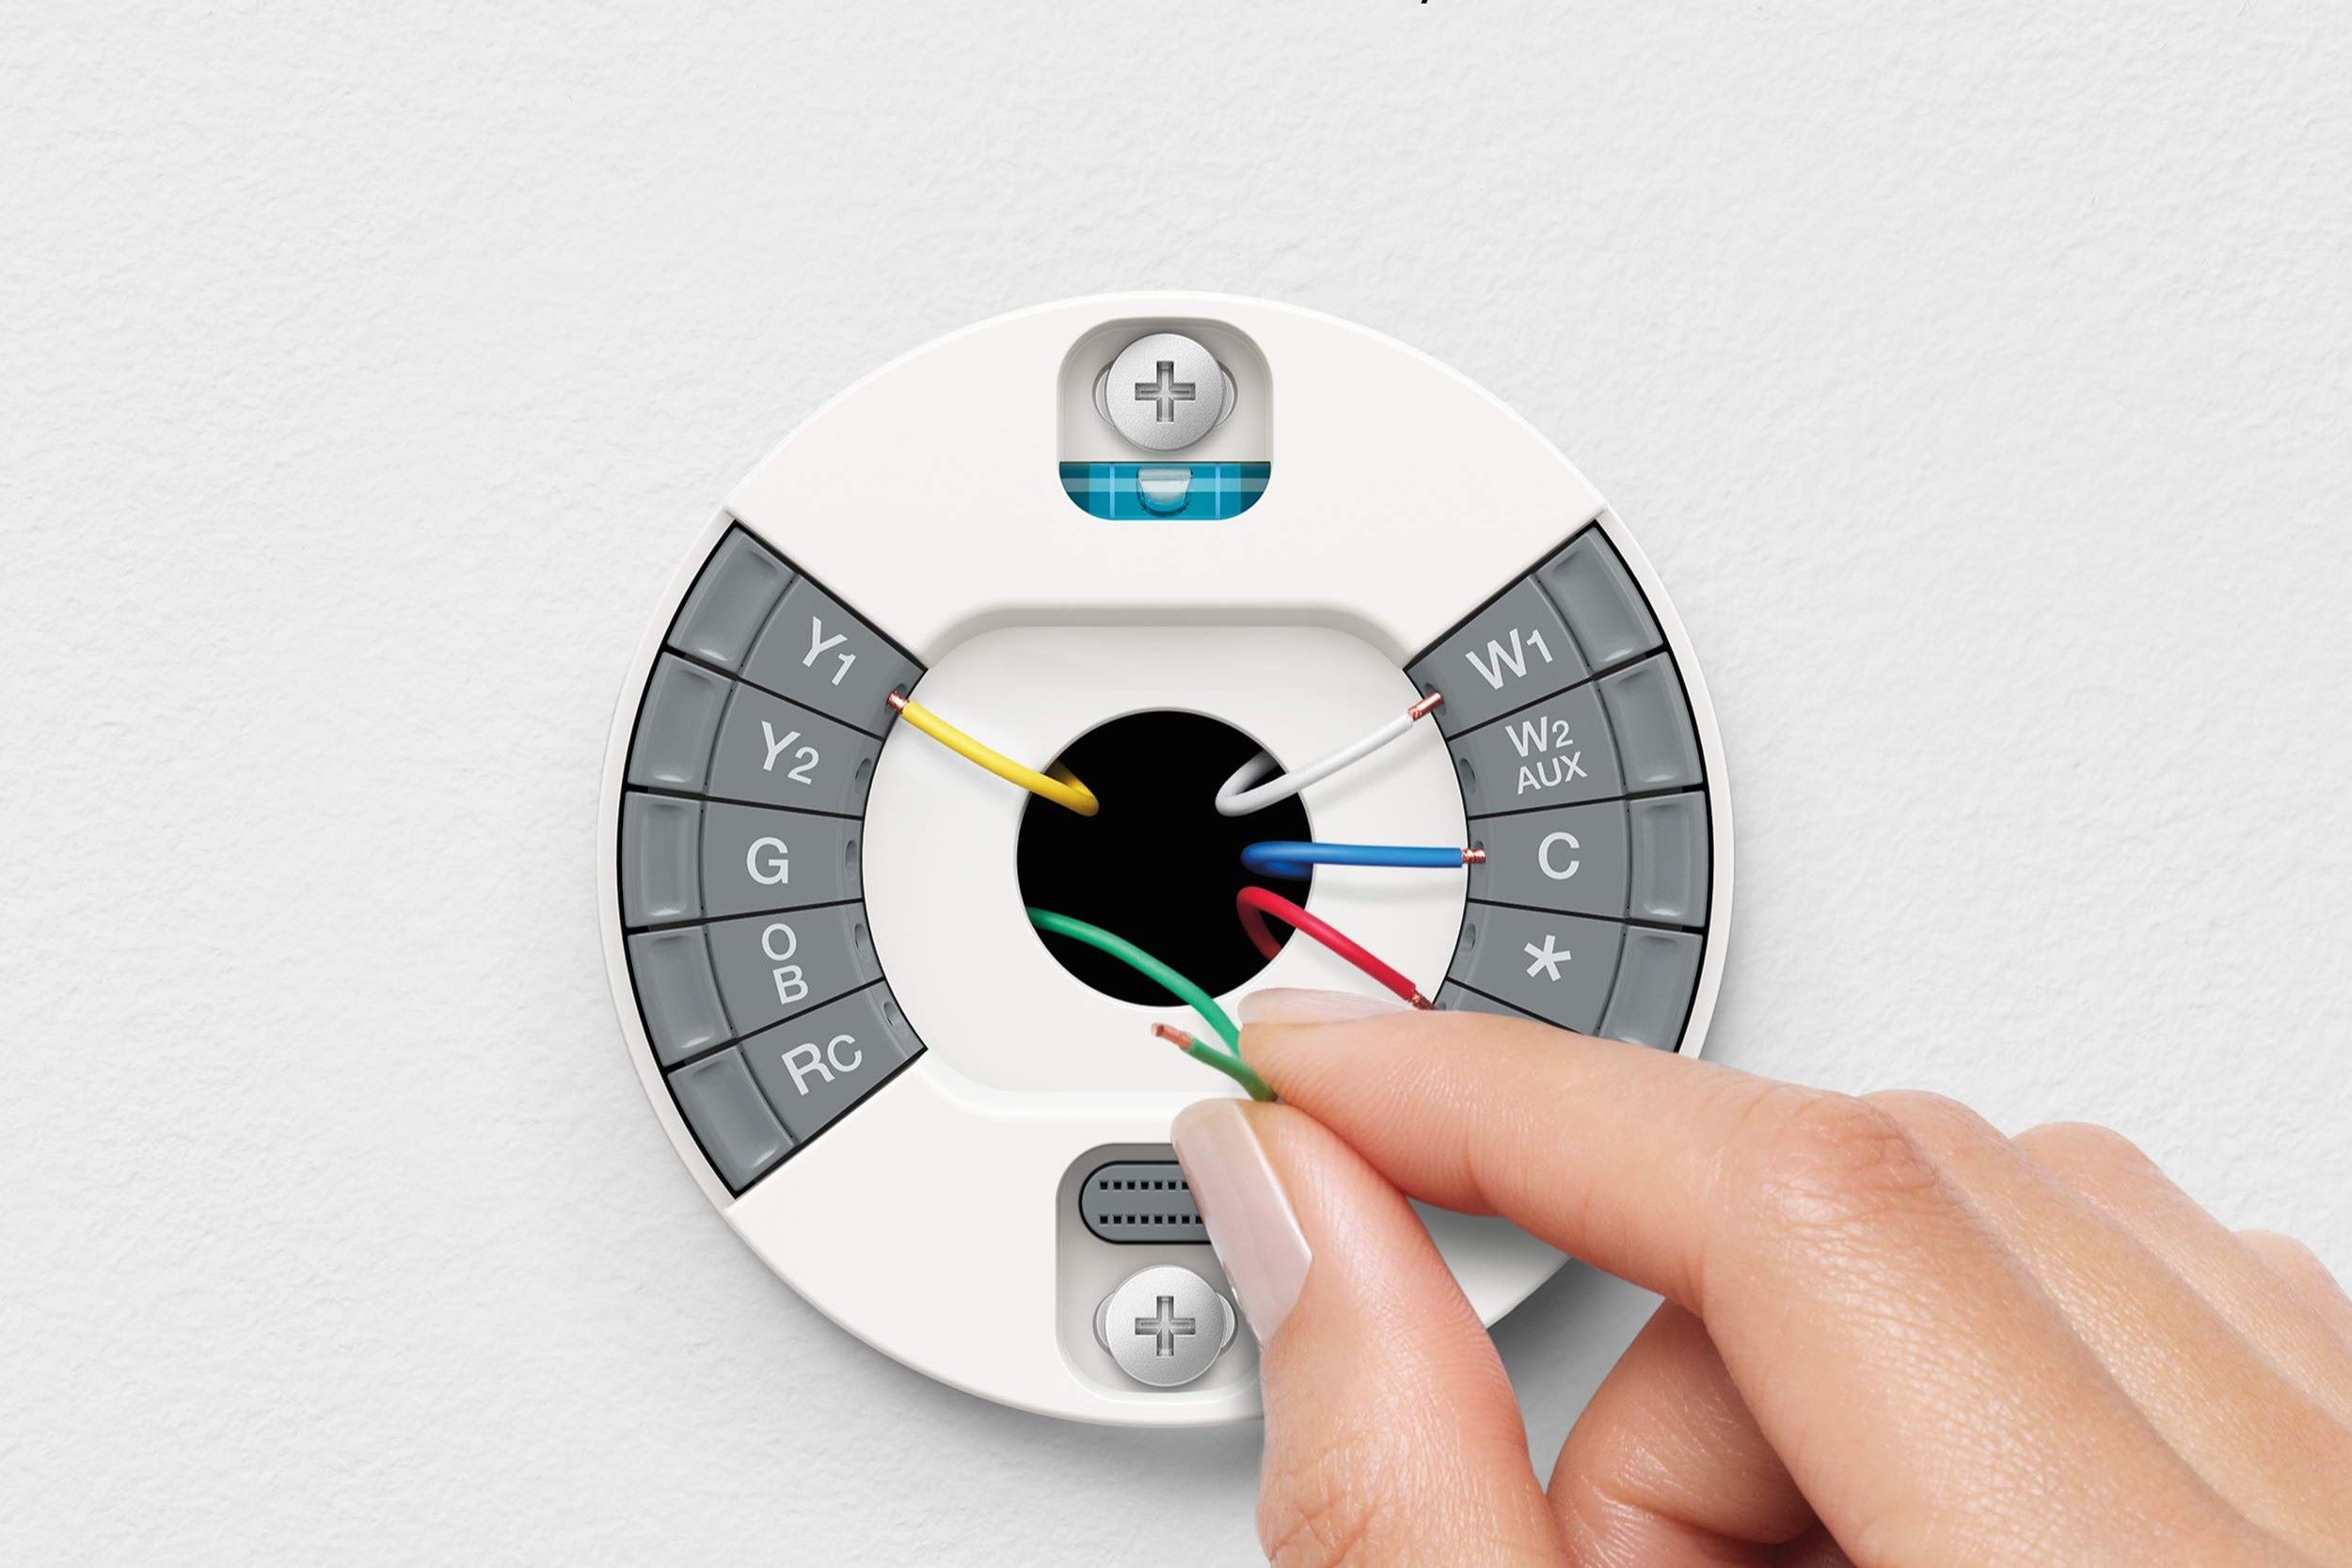
- Connect the wires from your HVAC system to the corresponding terminals on the Nest Thermostat. Ensure that each wire is securely attached.
- Attach the Nest Thermostat display to the base, making sure it clicks into place.
- Turn the power back on to your HVAC system and follow the on-screen instructions on the Nest Thermostat to complete the setup process.
During the installation process, you may encounter some challenges. Common issues include incompatible wiring, insufficient power, or a faulty HVAC system. It’s important to consult the Nest support resources or reach out to a Nest Pro for assistance if you encounter any difficulties.
Installing the Nest Thermostat yourself allows you to take control of your smart home and potentially save on installation costs. However, it’s crucial to carefully follow the installation instructions and ensure compatibility to avoid any potential issues.
Requirements for DIY Installation
Before embarking on a DIY installation of the Nest Thermostat, it’s essential to ensure that you have certain requirements in place. These requirements will help ensure a successful installation and optimal performance of the thermostat.
The first requirement to consider is the compatibility of your HVAC system with the Nest Thermostat. The Nest Thermostat is compatible with most heating and cooling systems, but it’s important to check the compatibility beforehand. You can visit the manufacturer’s website or consult with a Nest Pro to determine if your system is compatible.
Another requirement is a stable Wi-Fi connection. The Nest Thermostat relies on a Wi-Fi connection to communicate with the Nest app on your smartphone or other smart devices. A stable and reliable Wi-Fi connection is crucial for seamless operation and control of the thermostat remotely.
Additionally, it’s important to have a compatible smartphone or device to set up and control the Nest Thermostat. The Nest app is available for both iOS and Android devices and allows you to monitor and control the temperature settings, view energy usage, and configure schedules from your smartphone or tablet.
Furthermore, make sure you have access to the thermostat wiring. You will need to remove the existing thermostat from the wall to install the Nest Thermostat. This requires access to the wiring behind the thermostat and may require the use of a screwdriver and wire strippers.
Lastly, consider the power source for your HVAC system. The Nest Thermostat requires a constant power source to function properly. Most systems have a dedicated C-wire (common wire) to provide continuous power. If your system doesn’t have a C-wire, you may need to use an alternative power source, such as a power extender kit, to ensure consistent power supply for the thermostat.
By ensuring that you have these requirements in place, you can proceed with confidence in your DIY installation of the Nest Thermostat. Remember to consult the Nest Thermostat installation guide for specific instructions and follow all safety precautions during the installation process.
Tools Needed for DIY Installation
Before you begin the DIY installation of the Nest Thermostat, it’s important to gather the necessary tools. Having the right tools on hand will make the installation process smoother and more efficient. Here are the essential tools you will need:
- Screwdriver: A screwdriver will be required to remove the existing thermostat from the wall and to attach the mounting plate for the Nest Thermostat. Make sure you have a screwdriver with the correct size and type of screw head.
- Wire strippers: Wire strippers will come in handy when you need to remove the insulation from the ends of the thermostat wires before connecting them to the terminals on the Nest Thermostat. The wire strippers should have gauge markings to match the size of your thermostat wires.
- Electrical tape: Electrical tape is useful for securing the wires together, preventing them from touching and causing any electrical issues. It provides insulation and protects against potential hazards.
- Voltage tester: A voltage tester is essential for ensuring safety during the installation process. It helps you confirm that the power to your HVAC system is turned off before you begin working on the wiring.
- Level: A level is beneficial for ensuring the Nest Thermostat base is mounted straight and level on the wall. It helps maintain a visually appealing installation.
These tools should cover the basic requirements for a standard DIY installation of the Nest Thermostat. However, depending on the specific needs of your HVAC system and the complexity of your installation, you may require additional tools such as wire nuts, a stud finder, or a power extender kit. Ensure that you refer to the Nest Thermostat installation guide or consult with a Nest Pro to determine any additional tools that may be necessary.
Having all the required tools ready before you begin the DIY installation will save you time and potential frustrations. It’s important to prioritize safety and follow all instructions and precautions outlined in the installation guide. If you encounter any difficulties or are unsure about the proper use of any tools, it’s advisable to seek professional assistance.
Step-by-Step Guide for DIY Installation
If you’ve decided to take on the DIY installation of the Nest Thermostat, follow this step-by-step guide to ensure a successful installation:
- Begin by turning off the power to your HVAC system. This can usually be done by flipping the circuit breaker or turning off the power switch located near your HVAC unit. This step is crucial for your safety during the installation process.
- Next, remove the old thermostat from the wall. Use a screwdriver to unscrew the mounting plate and disconnect any wires connected to the terminals. Take a picture or make a note of the wire connections to assist you during the installation of the Nest Thermostat.
- If needed, clean the wall area where the old thermostat was mounted. Remove any dirt or debris to ensure a clean and secure mounting surface for the Nest Thermostat.
- Take the Nest Thermostat base and align it with the holes on the wall. Use a screwdriver and the provided screws to secure the base onto the wall.
- Now, it’s time to connect the wires from your HVAC system to the Nest Thermostat. Match the labeled wires from the old thermostat to the corresponding terminals on the Nest Thermostat. Ensure that the wires are securely connected by gently tugging on each wire.
- Attach the Nest Thermostat display to the base. Line up the connectors and carefully press the display onto the base until it clicks into place.
- Turn the power back on to your HVAC system by flipping the circuit breaker or turning on the power switch. The Nest Thermostat will power up and guide you through the setup process on the screen.
- Follow the on-screen instructions to connect the thermostat to your Wi-Fi network, set up your preferences, and configure your heating and cooling settings. You can also download the Nest app on your smartphone or tablet to control and monitor your thermostat remotely.
It’s important to note that these steps may vary slightly depending on your specific HVAC system and the Nest Thermostat model. Refer to the Nest Thermostat installation guide for detailed instructions and illustrations specific to your setup.
If you encounter any difficulties during the installation process or have any questions, consult the Nest support resources or consider reaching out to a Nest Pro for assistance. They can provide additional guidance or troubleshoot any issues that may arise.
Following this step-by-step guide will help you successfully install the Nest Thermostat and begin enjoying the benefits of a smart, energy-efficient heating and cooling system in your home.
Common Challenges and Troubleshooting
While installing the Nest Thermostat yourself can be a rewarding experience, you may encounter some challenges along the way. Here are some common issues that may arise during the DIY installation process and troubleshooting tips to help you overcome them:
1. Compatibility issues: One of the most common challenges is compatibility between your HVAC system and the Nest Thermostat. If your system is not compatible, you may need to seek professional assistance or consider alternative smart thermostat options that are compatible with your HVAC setup.
2. Incorrect wiring: If you notice that your heating or cooling system is not functioning properly after installation, it could be due to incorrect wiring. Double-check that the wires are connected to the correct terminals on the Nest Thermostat by referring to the wiring labels from your old thermostat. You can also consult the Nest support resources or contact a Nest Pro for assistance.
3. Insufficient power: In some cases, the Nest Thermostat may not receive sufficient power from your HVAC system, especially if you don’t have a C-wire (common wire). If this occurs, you may need to use a power extender kit or consult a Nest Pro to find a suitable solution to ensure the thermostat has constant power.
4. Nest Thermostat not connecting to Wi-Fi: If you’re having trouble connecting your Nest Thermostat to your Wi-Fi network, ensure that you have entered the correct Wi-Fi credentials and that your network signal is strong enough near the thermostat. You can also try resetting the Wi-Fi connection by going into the settings menu on the thermostat’s display.
5. Inaccurate temperature readings: If you’re experiencing discrepancies between the temperature displayed on the Nest Thermostat and the actual room temperature, it could be due to factors such as incorrect thermostat placement or calibration issues. Ensure that the thermostat is not exposed to direct sunlight, drafts, or other sources of heat or cold. You can also try recalibrating the thermostat through the settings menu.
6. Software updates: From time to time, Nest releases software updates for their thermostats to improve performance and add new features. If you encounter any issues, check for any available updates in the Nest app or online. Keeping your thermostat up to date can often resolve compatibility or performance-related problems.
If you encounter any other challenges during the installation process or have persistent issues with your Nest Thermostat, don’t hesitate to consult the Nest support resources or contact a Nest Pro. They have the expertise to troubleshoot and provide the necessary guidance to ensure your Nest Thermostat is functioning optimally.
Benefits of Hiring a Professional
While DIY installation of the Nest Thermostat can be a viable option for some, there are several benefits to consider when hiring a professional for the installation process:
1. Expertise and Knowledge: Professionals who specialize in HVAC installation have the necessary expertise and knowledge to install the Nest Thermostat correctly. They are familiar with the wiring and compatibility requirements, ensuring a seamless installation process. Their experience with various HVAC systems allows them to address any potential challenges that may arise during the installation.
2. Warranty Coverage: Opting for professional installation ensures that your Nest Thermostat warranty remains valid. Should any issues arise during or after the installation, professionals can provide the necessary documentation and support to ensure warranty coverage. This gives you added peace of mind knowing that any potential repairs or replacements will be covered.
3. Time and Convenience: Hiring a professional saves you time and effort. Instead of spending valuable time researching, learning, and carrying out the installation yourself, professionals can efficiently complete the job. They have the necessary tools and equipment readily available, ensuring a swift and hassle-free installation process. This allows you to focus on other tasks or enjoy the convenience of your newly installed Nest Thermostat sooner.
4. Professional Recommendations: Professionals can provide valuable recommendations and insights based on their experience. They can offer guidance on the ideal thermostat placement, thermostat settings, and additional features that can maximize the energy efficiency and comfort of your heating and cooling system. Their expertise ensures that you get the most out of your smart thermostat.
5. Safety and Avoidance of Errors: HVAC systems involve electrical wiring and connections that require precision and adherence to safety protocols. Professionals are trained to handle these tasks safely and minimize the risk of any errors or damage. Their expertise ensures that the installation is done safely and efficiently, minimizing the chances of any electrical or operational issues.
6. Ongoing Support: Hiring a professional establishes an ongoing relationship for any future HVAC needs. They can provide maintenance services and help troubleshoot any issues that may arise with your Nest Thermostat. This ongoing support ensures the continued optimal performance and longevity of your thermostat.
FAQ about Nest Thermostat Installation
Here are answers to some frequently asked questions regarding the installation of the Nest Thermostat:
Q: Can I install the Nest Thermostat myself?
A: Yes, the Nest Thermostat can be installed as a DIY project. However, it’s important to ensure that you have the necessary tools, knowledge, and compatibility with your HVAC system before attempting the installation. If you’re unsure or not confident in your DIY skills, it’s recommended to hire a professional for the installation.
Q: How do I know if my HVAC system is compatible with the Nest Thermostat?
A: You can check the compatibility of your HVAC system with the Nest Thermostat by visiting the manufacturer’s website or consulting with a Nest Pro. They can help determine if your system is compatible or offer alternative solutions if needed.
Q: Do I need a C-wire (common wire) for the Nest Thermostat installation?
A: The Nest Thermostat requires a constant power source for optimal performance. While it can operate without a C-wire, having one is recommended to ensure consistent power supply. If your system doesn’t have a C-wire, you may need to use a power extender kit or consult a Nest Pro for alternative power solutions.
Q: Can I use the existing wiring from my old thermostat?
A: In many cases, the wiring from your existing thermostat can be used for the Nest Thermostat installation. However, it’s important to verify the compatibility and properly connect the wires to the corresponding terminals on the Nest Thermostat. Refer to the wiring labels from your old thermostat or consult the installation guide for guidance.
Q: Can I control the Nest Thermostat remotely?
A: Yes, the Nest Thermostat can be controlled remotely through the Nest app on your smartphone or tablet. As long as your thermostat is connected to a stable Wi-Fi network, you can adjust temperature settings, view energy usage, and set schedules from anywhere.
Q: What if I encounter issues during the installation process?
A: If you encounter any difficulties during the installation, refer to the Nest Thermostat installation guide or consult the support resources provided by Nest. You can also contact a Nest Pro for professional assistance and troubleshooting.
Q: Will installing a Nest Thermostat save me money on energy bills?
A: The Nest Thermostat is designed to optimize energy usage and potentially save you money on energy bills. It learns your heating and cooling patterns, automatically adjusts temperature settings, and provides energy-saving recommendations. However, the actual savings will vary depending on your specific HVAC system, usage habits, and climate.
Q: Can I use multiple Nest Thermostats in my home?
A: Yes, you can use multiple Nest Thermostats in your home. Each thermostat can be installed separately and controlled independently or as part of a multi-zone system. This allows you to have precise temperature control and energy efficiency across different areas of your home.
Remember to consult the Nest Thermostat installation guide and resources provided by Nest for comprehensive instructions and guidance specific to your setup. If you have any additional questions or concerns, don’t hesitate to reach out to Nest support or consult a Nest Pro for further assistance.