
Why Insert Music in PowerPoint?
Adding music to your PowerPoint presentation can greatly enhance the overall impact and engagement of your slides. Here are a few reasons why you might want to consider inserting music into your presentations:
- Engage the Audience: Music has the power to evoke emotions and create an immersive experience. By incorporating the right music, you can captivate your audience and make your message more memorable.
- Add Ambiance: Whether you’re presenting at a conference, a business meeting, or a school project, adding appropriate background music can help set the tone and create a more professional and engaging atmosphere.
- Create Rhythm and Flow: Music can act as a natural rhythm guide, helping to pace your presentation and keep it dynamic. It can reinforce key points, transitions, and create a seamless flow between slides.
- Showcase Creativity: Including music in your PowerPoint shows your creativity and attention to detail. It elevates your presentation from a mere informational tool to a multi-sensory experience that leaves a lasting impression.
- Support Storytelling: Music can effectively enhance storytelling by providing a backdrop that complements the narrative. It helps to engage and connect with the audience on an emotional level.
- Highlight Key Information: By strategically placing music, such as a sound effect or a jingle, you can draw attention to important information, emphasize certain sections, and create a more interactive and memorable presentation.
With these benefits in mind, adding music to your PowerPoint can transform your presentation into a more engaging and impactful experience for your audience. Let’s explore how to insert music in PowerPoint using different methods and customize its playback options.
How to Insert Music from a File
If you have a specific music file saved on your computer that you want to insert into your PowerPoint presentation, follow these steps:
- Open your PowerPoint presentation and navigate to the slide where you want to insert the music.
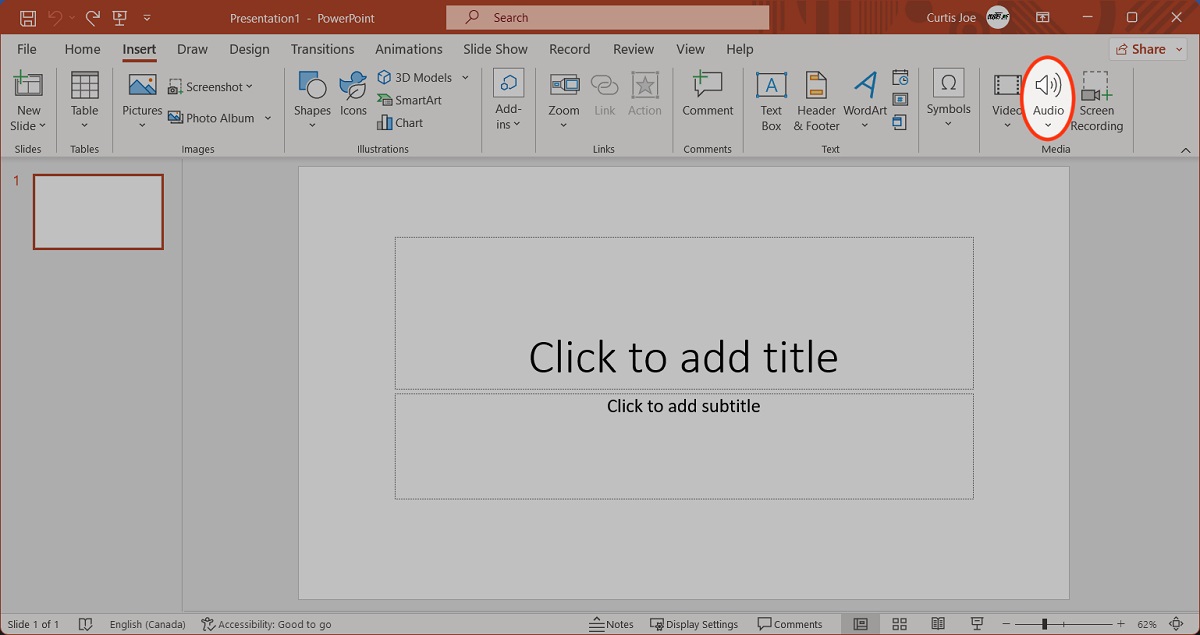
- Click on the “Insert” tab in the ribbon at the top of the PowerPoint window.
- Within the “Media” group, click on the “Audio” dropdown arrow and select “Audio on My PC” (or “Audio from File” in older versions).
- A file explorer window will open. Locate and select the music file you want to insert and click “Insert”.
- The music file will be inserted into your slide as an icon. You can drag and resize the icon as needed for your presentation.
- To customize the playback options, click on the music icon to reveal the “Audio Tools” tab in the ribbon.
- On the “Audio Tools” tab, you can choose to adjust the volume, set the start and end times, and choose whether the music should play automatically or on click.
- Preview your slide to ensure the music is playing as desired.
Keep in mind that PowerPoint supports various audio file formats, such as .mp3, .wav, and .wma. However, it’s essential to consider file size and compatibility with different devices when choosing the audio format for your presentation.
Remember to test your presentation on the device you’ll be using for the actual presentation, as some devices and versions of PowerPoint may have limitations or require additional settings for the music to play correctly.
Now that you know how to insert music from a file, let’s explore other ways to add music to your PowerPoint presentation, including using online sources and playing music across multiple slides.
How to Insert Online Music
In addition to inserting music files from your computer, PowerPoint also allows you to insert online music from various sources, including online platforms and streaming services. Follow these steps to insert online music into your PowerPoint presentation:
- Open your PowerPoint presentation and navigate to the slide where you want to insert the online music.
- Click on the “Insert” tab in the ribbon at the top of the PowerPoint window.
- Within the “Media” group, click on the “Audio” dropdown arrow and select “Online Audio” (or “Online Audio Clip” in older versions).
- A dialog box will appear with different options to search for online music. You can choose to search for music on supported platforms like Bing, YouTube, and OneDrive.
- Enter keywords or the specific name of the song or artist you’re looking for, and click on the “Search” button.
- A list of related online music options will be displayed. Click on the one you want to insert into your slide.
- The online music will be inserted as a media icon on your slide. You can adjust the size and position of the icon as needed.
- Similar to inserting music from a file, you can use the “Audio Tools” tab in the ribbon to customize playback options, such as volume, timing, and playback settings.
- Preview the slide to ensure the online music plays as expected.
Keep in mind that when using online music, you need a stable internet connection for the music to play smoothly during your presentation. Additionally, it’s essential to respect copyright laws and ensure you have the necessary permissions to use the music in your presentation, especially if you plan to share or distribute it.
Now that you know how to insert online music into your PowerPoint presentation, continue reading to learn how to play music across multiple slides, trim music, loop music, and set playback options to further enhance your presentation.
How to Play Music Across Multiple Slides
If you want to have continuous music playing throughout your PowerPoint presentation, you can set it to play across multiple slides. Follow these steps to achieve this:
- Open your PowerPoint presentation and go to the slide where you want the music to start playing.
- Click on the music icon or audio file that you have inserted into the slide.
- On the “Audio Tools” tab in the ribbon, click on the “Playback” tab.
- In the “Audio Options” group, click on the “Start” dropdown menu and select “Play across Slides.”
- If you have already set specific start and end times for the music, you may want to make adjustments to ensure the music plays seamlessly across the desired slides.
- Continue adding and designing your slides, and the music will continue playing in the background as you navigate through them.
- If you want to stop the music from playing, you can either remove the music icon from the current slide or select “Stop” from the “Playback” tab.
Playing music across multiple slides can create a cohesive and immersive experience for your audience. However, be cautious not to distract or overpower your presentation with overly loud or busy music. Choose music that complements your content and keeps the focus on your message.
Now that you know how to play music across multiple slides, let’s explore how to trim music in PowerPoint to ensure it starts and stops at the desired points.
How to Trim Music in PowerPoint
Trimming music in PowerPoint allows you to specify the exact portion of the audio file you want to play in your presentation. Follow these steps to trim music in PowerPoint:
- Click on the music icon or audio file that you have inserted into your slide.
- On the “Audio Tools” tab in the ribbon, click on the “Playback” tab.
- In the “Editing” group, click on the “Trim Audio” button.
- A playback window will appear, displaying a waveform of the audio file.
- Drag the start and end markers on the waveform to select the portion of the music you want to play in your presentation.
- Click on the “Play” button to preview the trimmed music segment.
- If you’re satisfied with the selection, click on the “OK” button.
By trimming the music, you can eliminate unnecessary sections or focus on a specific part that adds value to your presentation. This feature is especially useful when you want to use a part of a longer audio track or if you want to loop a particular segment for emphasis.
Remember to preview your slide to ensure that the trimmed music plays correctly and aligns with your presentation’s content and timing.
Now that you know how to trim music in PowerPoint, let’s explore how to loop music and set playback options to customize your presentation’s audio experience.
How to Loop Music in PowerPoint
If you want to repeat the same music segment throughout your PowerPoint presentation, you can set it to loop. Follow these steps to loop music in PowerPoint:
- Click on the music icon or audio file that you have inserted into your slide.
- On the “Audio Tools” tab in the ribbon, click on the “Playback” tab.
- In the “Audio Options” group, check the box next to “Loop until Stopped.”
- The music will now continuously repeat until you manually stop it or reach the end of the presentation.
Looping music can be beneficial when you want to create a soothing or immersive ambiance during your presentation, or when you need to play a specific segment repeatedly for emphasis or reinforcement.
Remember to consider the length of the music segment you are looping, as it may become monotonous or distracting if it is too long or doesn’t fit well with your presentation’s content.
Now that you know how to loop music in PowerPoint, let’s explore how to set music playback options to further customize your presentation’s audio experience.
How to Set Music Playback Options
PowerPoint provides various playback options for inserted music to customize how it plays during your presentation. Follow these steps to set music playback options in PowerPoint:
- Click on the music icon or audio file that you have inserted into your slide.
- On the “Audio Tools” tab in the ribbon, click on the “Playback” tab.
- In the “Audio Options” group, you can adjust the following playback options:
- Start: Choose whether the music should play automatically or on click.
- Volume: Adjust the volume level of the music.
- Loop until Stopped: Check this box to set the music to loop continuously until manually stopped.
- Hide During Show: Check this box to hide the music icon during your presentation.
- Fade In/Fade Out: Add a smooth fade-in and fade-out effect to the music.
- Bookmark: Set bookmarks within the audio file to navigate to specific points.
- Play across Slides: Enable the music to play continuously across multiple slides.
Take advantage of these options to fine-tune how the music fits into your presentation. For example, you can choose to play soothing music automatically when transitioning to a particular slide, adjust the volume to create the desired ambiance, or add fade-in and fade-out effects for a seamless audio experience.
Remember to test your presentation thoroughly, ensuring that the music playback options are set correctly and align with your desired presentation flow and timing.
Now that you know how to set music playback options in PowerPoint, you can create a customized audio experience that enhances your presentation.
Common Issues and Troubleshooting
While working with music in PowerPoint, you may encounter some common issues. Here are a few troubleshooting tips for these issues:
- No Sound: If you’re experiencing no sound during your presentation, ensure that your computer’s volume is turned up and not muted. Also, check if the speakers or headphones are properly connected.
- Missing Music files: If your music files are missing or showing as broken links, make sure that the files are still in their original location or try re-inserting the music files into your presentation.
- Incompatible File Formats: If your music file is not playing correctly, ensure that it is in a supported file format such as .mp3, .wav, or .wma. If needed, convert the file to a compatible format before inserting it into PowerPoint.
- Playback Timing Issues: If the music is not starting or stopping at the desired times, check the playback settings and adjust the start and end times accordingly. Additionally, ensure that auto-play is enabled if you want the music to start automatically.
- Internet Connectivity: If you’re using online music, make sure you have a stable internet connection during your presentation to ensure smooth playback without interruptions. Verify that the online source you’re using is accessible and the music file is still available.
- File Size: Large music files can impact the performance of your presentation, especially if you plan to share or transfer it. Compress the audio files if possible to reduce the file size and ensure smooth playback.
If you encounter any of these issues or other unforeseen problems, try closing and reopening PowerPoint, restarting your computer, or converting your presentation to a different file format (e.g., PPTX to PPT) to see if it resolves the issue.
Additionally, stay updated with the latest version of PowerPoint and ensure that your plugins or add-ins are compatible to avoid any compatibility issues with music playback.
By being aware of these common issues and utilizing troubleshooting tips, you can overcome any obstacles and deliver a seamless and engaging presentation with music in PowerPoint.