
Choosing the Right Conversion Method
When it comes to converting your PowerPoint presentations into videos, there are several methods available to choose from. The right method for you will depend on various factors such as your technical expertise, the desired output quality, and the available resources. In this section, we will explore three popular methods for converting PowerPoint to video: using PowerPoint’s built-in conversion feature, utilizing online conversion tools, or opting for third-party software.
Method 1: Using PowerPoint’s Built-in Conversion Feature
If you prefer a straightforward and hassle-free approach, then using PowerPoint’s built-in conversion feature might be the most suitable option for you. This feature allows you to easily convert your presentation to video without the need for any external tools or software. Simply follow the steps outlined in PowerPoint’s interface, choose the desired video format, adjust the settings if needed, and convert your presentation seamlessly. Keep in mind, however, that the built-in feature may not provide as many customization options as other methods.
Method 2: Using Online Conversion Tools
For those who prefer a more accessible and convenient method, online conversion tools offer a viable solution. There are various websites that allow you to upload your PowerPoint presentation and convert it to video format with just a few clicks. These tools often support a wide range of output formats and provide additional options for customization. However, be cautious of the file size limitations and potential privacy concerns when using online conversion tools.
Method 3: Using Third-Party Software
If you require advanced customization options and greater control over the output quality, third-party software is your best bet. There are numerous software options available in the market that specialize in converting PowerPoint presentations to video. These tools offer a wide array of features, such as adding animations, transitions, and audio narration to your video output. However, keep in mind that third-party software may come at an additional cost and may require some technical expertise to operate.
Before settling on a conversion method, assess your specific requirements and consider factors such as ease of use, customization options, and budget. It’s important to choose the method that aligns with your needs and allows you to achieve the desired output. By selecting the right conversion method, you can efficiently transform your PowerPoint presentations into engaging and shareable videos that effectively convey your message to your audience.
Method 1: Using PowerPoint’s Built-in Conversion Feature
If simplicity and ease of use are your top priorities, using PowerPoint’s built-in conversion feature is a straightforward and convenient option. This method allows you to convert your PowerPoint presentations to video directly within the software itself, without the need for any external tools or software installations.
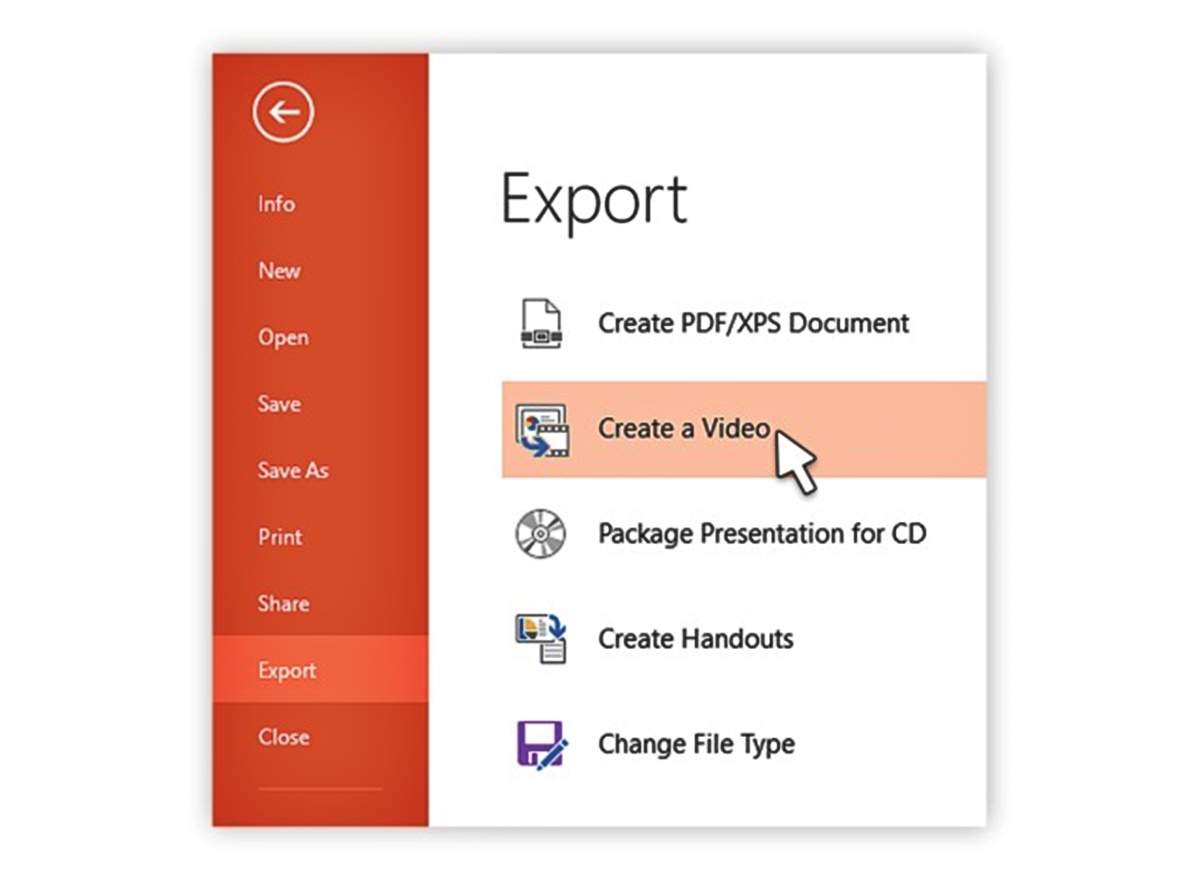
To utilize this feature, start by opening your PowerPoint presentation. Then, navigate to the “File” tab and select “Export” from the menu. In the “Create a Video” section, you will find various options to customize the video output according to your preferences.
You can choose the desired video quality, ranging from standard definition to high definition, based on your intended usage and audience preferences. Additionally, you have the option to determine the slide timing, which controls the duration each slide is displayed in the video. This allows you to pace your presentation to ensure clarity and engagement.
PowerPoint also enables you to include recorded narration and laser pointer movements in the video, replicating the experience of a live presentation. By utilizing these features, you can enhance the video with your voiceover and highlight important elements on the slides to make it more engaging.
Another notable feature of PowerPoint’s built-in conversion is the ability to add slide transitions and animations to the video. This allows you to maintain the visual appeal of your presentation and ensure a smooth transition between slides in the video format.
Once you have made the necessary adjustments and customization, you can proceed to convert the presentation to video format. Select the desired output format, such as MP4 or WMV, and choose the location where you want to save the video file. Finally, hit the “Create Video” button, and PowerPoint will begin converting your presentation into a video file.
After the conversion is complete, take the time to review the video output. Ensure that all the slides, transitions, animations, and narrations have been accurately converted. If needed, you can make any necessary edits or refinements to the video within PowerPoint.
Using PowerPoint’s built-in conversion feature offers a user-friendly and intuitive way to convert your presentations into videos. It eliminates the need for additional software and provides you with the convenience of working within a familiar environment. While it may not offer as many customization options as other methods, it is a reliable choice for those who value simplicity and efficiency.
Method 2: Using Online Conversion Tools
If you’re seeking a convenient and readily accessible method to convert your PowerPoint presentations to video, online conversion tools provide a viable solution. These tools offer a simple and user-friendly process, allowing you to convert your presentations without the need to install any software on your computer.
With online conversion tools, the process typically involves visiting a website that offers PowerPoint to video conversion services. Once on the website, you’ll typically find an option to upload your PowerPoint presentation directly from your computer or cloud storage service.
After uploading your presentation, you can specify the desired video output format. These tools often support a wide range of video formats, including popular ones like MP4, AVI, or WMV. Make sure to choose a format that is compatible with your intended use and the devices on which you plan to play the video.
Depending on the tool, you may also have the option to customize other settings such as video quality, resolution, or aspect ratio. These settings allow you to control the visual quality and compatibility of the video output according to your preferences or specific requirements.
Once you have selected the desired options, you can initiate the conversion process. The online tool will typically process your PowerPoint presentation and convert it into a video format. The duration of this process will depend on the size of your presentation and the speed of your internet connection. After the conversion is complete, you can usually download the resulting video file directly from the website.
When using online conversion tools, it’s important to be aware of potential limitations. Some tools may apply file size restrictions, limiting the size of the presentation you can convert. Additionally, consider the privacy and security implications, as you’ll be uploading your presentation to a third-party website. Make sure to choose a reputable and trustworthy online conversion tool to ensure the safety of your files and data.
Online conversion tools provide a convenient and accessible solution for converting PowerPoint presentations to video. They eliminate the need for local software installations and allow you to convert your presentations from anywhere with an internet connection. However, keep in mind the potential limitations and ensure the privacy and security of your files when utilizing these tools.
Method 3: Using Third-Party Software
If you require more advanced customization options and greater control over the conversion process, using third-party software is an ideal method for converting your PowerPoint presentations into videos. This method provides you with an extensive set of features and tools to create professional-quality videos that perfectly align with your specific requirements.
There are various third-party software options available in the market, each offering unique functionalities and capabilities. These software solutions are specifically designed for PowerPoint to video conversion and provide a comprehensive range of customization features.
With third-party software, you can tailor every aspect of your video output to your liking. You can add custom animations, transitions, and effects to enhance the visual appeal of your presentation. Additionally, you have the freedom to sync audio narrations or background music with your presentation, making the video more engaging and impactful.
Another advantage of using third-party software is the ability to finely control the timing and duration of each slide. You can adjust the duration of individual slides to ensure proper pacing and emphasize key points effectively. This level of control allows you to create a seamless and cohesive video from your PowerPoint presentation.
Furthermore, most third-party software allows you to choose from a wide range of video output formats, resolutions, and quality settings. This flexibility enables you to cater to different platforms and devices while maintaining the highest video quality possible.
To use third-party software, start by selecting a reputable option that suits your requirements. Install the software on your computer and launch it. Then, import your PowerPoint presentation into the software and explore the various customization options and tools provided.
Once you have made all the desired modifications and adjustments, you can proceed to convert your PowerPoint presentation into a video file. Select the output format and quality settings that best align with your needs, and initiate the conversion process. The software will handle the conversion, processing your presentation into a video format according to your specifications.
After the conversion is complete, take the time to review the resulting video to ensure that everything appears as desired. Most third-party software also allows you to make further edits and refinements to the video output within the same interface, providing you with additional flexibility.
Using third-party software for PowerPoint to video conversion empowers you with advanced customization options and full control over the conversion process. However, be aware that such software often comes at a price and may require some technical expertise to operate. Consider your specific needs and budget to choose the right software that can help you create stunning videos from your PowerPoint presentations.
Step 1: Preparing Your PowerPoint Slides
Before you can convert your PowerPoint presentation into a video, it’s essential to properly prepare your slides to ensure a smooth and seamless conversion process. By following this step, you’ll ensure that your slides are optimized for video playback and that the content is effectively conveyed in the video format.
Start by reviewing your PowerPoint presentation and making any necessary adjustments. Ensure that your slides are well-organized, visually appealing, and contain all the necessary content for your video. Remove any slide elements or animations that may not translate well into the video format or may disrupt the flow of information.
Consider the aspect ratio of your slides. Most videos are viewed in widescreen format (16:9), so it’s recommended to use this aspect ratio for your presentation. To change the aspect ratio in PowerPoint, go to the “Design” tab, click on “Slide Size,” and select “Widescreen (16:9)” from the options.
Pay attention to font sizes and ensure that they are readable on the screen. If necessary, increase the font size slightly to ensure optimal legibility in the video. Similarly, review any images or graphics in your slides to guarantee they are of suitable resolution and quality for video playback.
To maintain a consistent flow in your video, consider setting the slide transition timings. This will ensure that each slide is displayed for an appropriate amount of time in the video. To set the slide timings, navigate to the “Transitions” tab, select “Timing,” and adjust the duration for each slide as desired.
If you plan to include audio narration or background music in your video, ensure that the audio files are properly inserted into the presentation and are in a compatible format. Review the audio content to ensure it aligns with the visual elements and enhances the overall impact of your video.
Finally, it’s a good practice to save a separate copy of your presentation specifically for the video conversion. This way, you can make any necessary changes or edits to the video version without affecting your original presentation.
By thoroughly preparing your PowerPoint slides, you set the foundation for a successful conversion process. Taking the time to organize your slides, optimize the content, adjust the aspect ratio, and fine-tune the timing ensures that your video output will deliver an engaging and visually appealing experience to your audience.
Step 2: Choosing the Desired Video Output Format
Once you have prepared your PowerPoint slides, the next step in converting your presentation to a video is selecting the desired video output format. The video format you choose will determine the compatibility, quality, and file size of your final video.
There are several popular video formats to consider, including MP4, AVI, WMV, and MOV. Each format has its own advantages and considerations, so it’s important to choose the one that best suits your specific needs.
MP4: MP4 is a widely used video format that offers excellent compatibility across various devices and platforms. It provides a good balance between quality and file size, making it an ideal choice for sharing videos online or via email. MP4 videos can be easily played on computers, smartphones, tablets, and most video streaming platforms.
AVI: AVI is another popular video format known for its high-quality output. However, AVI files tend to be larger in size compared to other formats. While AVI videos are compatible with most media players, it’s worth considering the potential file size limitations and longer upload times, especially when sharing the video online.
WMV: WMV is a Windows Media Video format commonly used for streaming and sharing videos. WMV files have good compression capabilities, resulting in smaller file sizes while maintaining reasonable video quality. However, it’s worth noting that WMV videos may not be as universally compatible on non-Windows platforms.
MOV: MOV is a video format native to Apple devices and is widely used in Mac environments. If your target audience primarily consists of Apple users, choosing the MOV format ensures optimal compatibility and playback experience on their devices. However, it’s important to keep in mind that MOV files may require additional conversion or codec installation for playback on non-Apple devices.
When selecting the video output format, consider the intended usage and playback platforms for your video. If you plan to share the video online or via email, formats like MP4 or WMV are usually the most suitable choices due to their compatibility and smaller file sizes. On the other hand, if you’re targeting a specific device or operating system, choosing a format that is natively supported on those platforms, such as MOV for Apple devices, is advisable.
It’s worth noting that most conversion methods and tools provide options for adjusting settings within the chosen video format. These settings may include video resolution, bitrate, frame rate, and more. Take the time to explore and understand these settings to ensure you achieve the desired balance between video quality and file size for your specific needs.
By carefully selecting the video output format, you ensure that your converted PowerPoint presentation will be compatible with the desired playback devices and platforms while delivering the optimal combination of quality and file size.
Step 3: Adjusting Conversion Settings
After choosing the desired video output format, the next step in converting your PowerPoint presentation to video is adjusting the conversion settings. These settings allow you to fine-tune various aspects of the conversion process, ensuring that the resulting video meets your specific requirements and preferences.
Common conversion settings include video quality, resolution, frame rate, and audio settings. Let’s explore each of these options in more detail:
Video Quality: Depending on the conversion method or tool you’re using, you may have the option to select the desired video quality. Typically, you’ll find options such as low, medium, high, or custom settings. Consider your intended usage and the platforms on which the video will be played when choosing the appropriate video quality. For online sharing, a balance between quality and file size is usually preferred.
Resolution: The resolution of the video determines the clarity and sharpness of the image. Higher resolutions, such as 1080p (Full HD) or 4K, offer more detail but result in larger file sizes. Consider the capabilities of your target devices and the platforms where the video will be played to determine an appropriate resolution for optimal viewing experience.
Frame Rate: Frame rate refers to the number of frames displayed per second in the video. The most common frame rates are 24, 30, and 60 frames per second (fps). Higher frame rates result in smoother motion but may not be necessary for all types of presentations. Consider the complexity of your slides and the desired visual smoothness when selecting the frame rate.
Audio Settings: If your PowerPoint presentation includes audio, such as narration or background music, ensure that the audio settings are properly adjusted. Verify the audio volume levels to ensure clarity and balance with the visuals. If the conversion tool allows, consider options such as adjusting the audio bitrate or choosing stereo or mono output depending on your requirements.
In addition to these commonly adjustable settings, some conversion methods or tools may offer advanced options such as adding watermarks, adjusting aspect ratio, or applying video filters. Explore these options to further enhance your video output and align it with your desired style and branding.
It’s important to note that the availability and range of conversion settings may vary depending on the conversion method or tool you’re using. Be sure to explore the settings within your chosen method to utilize the available options fully.
When adjusting the conversion settings, consider the balance between video quality, file size, and compatibility with your target devices and playback platforms. Experiment with different settings if necessary to find the optimal combination that meets your specific requirements and delivers the desired output for your PowerPoint to video conversion.
Step 4: Converting PowerPoint to Video
Once you have prepared your PowerPoint slides, chosen the desired video output format, and adjusted the conversion settings, it’s time to convert your PowerPoint presentation into a video format. This step allows you to transform your visual presentation into a dynamic and shareable video that can be easily played on various devices or platforms.
The process of converting PowerPoint to video will vary depending on the method or tool you are using. Here are some general steps to follow:
1. Launch the conversion software or tool that you have chosen for the task.
2. Import your prepared PowerPoint presentation into the software or tool by selecting the appropriate file or using the drag-and-drop feature.
3. Once your presentation is loaded, review the settings and options available within the software. This includes checking the video format, resolution, frame rate, and other customizable features.
4. Specify the output location for the video file. Choose a location on your computer or cloud storage that is easily accessible and allows you to locate the video file easily after conversion.
5. Double-check your settings to ensure they align with your desired outcome for the video. This includes confirming the video format, resolution, and any additional features you want to include, such as transitions, animations, or audio.
6. Initiate the conversion process by clicking on the appropriate button or selecting the “Convert” option within the software or tool.
7. The software or tool will begin processing your PowerPoint presentation and converting it into the chosen video format. The duration of the conversion process will depend on the complexity and length of your presentation, as well as the speed of your computer or the online conversion tool.
8. Once the conversion is complete, the software or tool will provide a notification or prompt indicating that the video file is ready. You can then navigate to the specified output location to access the converted video.
9. Take the time to review the final video file to confirm that all the slides, transitions, animations, and audio have been accurately converted. Make any necessary adjustments or refinements within the software or tool, if required.
10. Congratulations! You have successfully converted your PowerPoint presentation into a video. The converted video file is now ready for sharing, uploading to video hosting platforms, or including in your multimedia presentations.
Remember to save a copy of the converted video file in a secure location to ensure you can easily access it for future use or sharing.
By following these steps, you can effectively convert your PowerPoint presentation into a visually dynamic and engaging video that effectively communicates your message to your intended audience.
Step 5: Reviewing and Editing the Video Output
Once the conversion process is complete, it’s crucial to review and edit the video output to ensure that it meets your expectations and effectively represents your PowerPoint presentation. This step allows you to make any necessary refinements and improvements to ensure a polished and professional video.
Start by playing the converted video in a video player to review its overall quality and playback. Pay attention to the timing of the slides, transitions, animations, and any audio elements. Make sure that the visuals and audio are synchronized correctly and that all the content is accurately presented.
During the review process, keep an eye out for any possible glitches, technical issues, or errors that may have occurred during the conversion. Look for any distorted graphics, blurred images, or missing elements within the video that were present in the original presentation.
If you spot any issues, take note of them and consider making necessary edits or adjustments. Some video editing software or online video editors allow you to make modifications directly within the interface. For example, you may be able to trim or cut certain portions of the video, rearrange slides, or re-record certain audio elements.
If your conversion tool or software does not provide built-in editing capabilities, you may need to use a separate video editing program to make the necessary changes. Export the converted video file from the conversion tool and import it into the video editing software of your choice.
In the video editing software, you can perform more advanced editing tasks, such as adding captions or subtitles, inserting additional graphics or animations, adjusting audio levels, or applying video effects to enhance the visual appeal of the presentation.
Once you have made the desired edits and refinements, preview the updated video to ensure that all modifications have been applied correctly and that the final output meets your expectations.
During the review and editing process, it’s important to keep in mind the overall coherence and flow of the video. Ensure that the visual transitions are smooth, the audio narration or background music complements the content, and the timing of each slide allows for easy comprehension of the material.
Make multiple review passes if needed, paying attention to details and taking feedback from colleagues or stakeholders if applicable. This step is crucial for producing a high-quality video that effectively conveys your message and maintains the integrity of your original PowerPoint presentation.
By thoroughly reviewing and editing the video output, you can eliminate any potential errors, improve the overall quality, and create a polished and professional video that accurately represents your PowerPoint presentation.
Step 6: Saving and Sharing the Converted Video
After reviewing and editing the converted video to your satisfaction, the final step is to save and share your video with your intended audience. This step ensures that your video reaches its target viewers and effectively conveys your message in a format that is accessible and convenient.
When saving the video, consider the desired file format and resolution. Ensure that the format and resolution are compatible with the platforms or devices on which you plan to share the video. Common formats such as MP4 or WMV are typically universally compatible and can be played on a wide range of devices and media players.
Before sharing the video, double-check the file size. If the file size is too large, it might take longer to upload or download, potentially causing issues for viewers with slower internet connections. If necessary, consider compressing the video using a video compression software or tool to reduce the file size without significantly compromising the quality.
The method for sharing your video depends on your specific requirements and the platforms you intend to use. Here are a few common ways to share your PowerPoint video:
1. Email: Attach the video to an email and send it directly to your recipients. Ensure that the video file size adheres to any size limitations set by your email provider.
2. Cloud Storage: Upload the video to a cloud storage service such as Google Drive, Dropbox, or OneDrive. This allows you to easily share a link to the video with your intended viewers.
3. Video Hosting Platforms: Upload your video to popular video hosting platforms like YouTube, Vimeo, or Wistia. This provides a dedicated platform for hosting and sharing your video, along with the ability to customize settings and embed the video in other websites or presentations.
4. Internal Platforms: If you’re sharing the video within your organization, consider using internal platforms such as an intranet, company-wide communication tools, or learning management systems.
5. Social Media: Share the video on social media platforms like Facebook, Twitter, or LinkedIn. This can help you reach a wider audience and generate engagement and feedback from viewers.
Consider the privacy settings and access restrictions when sharing your video. If the content is sensitive or intended for a specific audience, ensure that you set the appropriate privacy controls to maintain the confidentiality of the video.
When sharing the video, provide any necessary context or supporting information to enhance viewers’ understanding of the content. This can be achieved by including a description, a brief overview, or any additional resources that may supplement the video presentation.
Regularly monitor and analyze the engagement metrics of your shared video. This includes tracking views, comments, likes, or shares. Analyzing these metrics can help you gauge the impact of your video and identify areas for improvement in future video projects.
By saving and sharing your converted video effectively, you can ensure that your PowerPoint presentation reaches its intended audience, maximizes engagement, and effectively delivers your message across various platforms and devices.