
What is a Text Box in Google Docs?
A text box is a powerful tool in Google Docs that allows you to add formatted text and annotations to your documents. It is a versatile feature that enables you to emphasize important information, provide explanatory notes, or create visually appealing designs within your document.
A text box functions as an independent object within your document, allowing you to move and resize it as needed. You can customize the font, size, color, and alignment of the text, making it an excellent tool for creating titles, headings, or callouts that stand out.
With the ability to insert text boxes, Google Docs becomes more than just a basic word processor. It grants you the flexibility to add supplementary text in a visually engaging way, enhancing the overall aesthetic and readability of your document. Whether you are creating a professional report, a school project, or a marketing brochure, text boxes can elevate the visual impact of your content.
Text boxes are particularly helpful when collaborating on a document with other users. They allow you to provide feedback, suggestions, or corrections without altering the original text. By using text boxes, you can easily distinguish your comments from the main content, ensuring clarity and minimizing confusion during the editing and revision process.
Overall, a text box in Google Docs is an invaluable feature that empowers you to add visually appealing and informative elements to your documents. It enhances the versatility, creativity, and effectiveness of your content, enabling you to communicate your ideas more effectively and engage your readers in a meaningful way.
How to Insert a Text Box in Google Docs
If you’re eager to start using text boxes in your Google Docs document, follow these simple steps to insert one:
Step 1: Open your Google Docs document in your web browser.
Step 2: Click on the “Insert” option located in the menu bar at the top of the screen.
Step 3: From the drop-down menu, select “Drawing.” This will open the Google Drawings editor.
Step 4: In the Google Drawings editor, click on the “New” button to create a new drawing.
Step 5: Once the drawing canvas appears, click on the “Text Box” icon located in the toolbar at the top.
Step 6: Use your cursor to draw the size and shape of the text box on the canvas. Simply click and drag to create the desired dimensions.
Step 7: Customize the text box according to your preferences. You can change the fill color, border color, font style, font size, and font color using the options in the toolbar.
Step 8: After customizing the text box, click within it to add text. Type or paste your desired content directly into the text box.
Step 9: Adjust the position and size of the text box by clicking and dragging the corners or sides. Move it to the desired location within your drawing.
Step 10: Once you are satisfied with your text box, click the “Save and Close” button in the top right corner of the Google Drawings editor.
Step 11: The text box will now appear as an image within your Google Drawings editor. Click on the text box, and then click the “Copy” button to copy it to your clipboard.
Step 12: Go back to your Google Docs document and paste the text box by pressing Ctrl + V (or Command + V on Mac) or right-clicking and selecting “Paste.” The text box will now be inserted into your document.
Step 13: Customize the formatting options of the text box in Google Docs. You can adjust the size, alignment, and other formatting details by selecting the text box and using the options in the “Format” menu.
And there you have it! You have successfully inserted a text box in your Google Docs document, giving you the freedom to enhance your content with visually appealing design elements and annotations.
Step 1: Open your Google Docs document
To begin adding a text box to your Google Docs document, you first need to open the document you want to work on. Follow these steps to access your document:
1.1 Launch your web browser and navigate to docs.google.com to access Google Docs.
1.2 Sign in to your Google account if you haven’t already done so. Enter your email address and password, then click the “Next” button.
1.3 After successfully signing in, you will be directed to the main Google Docs page. This page displays a list of your existing documents and gives you the option to create a new one.
1.4 Locate the document you wish to add a text box to or click on “New” to create a new Google Docs document.
1.5 If opening an existing document, simply click on the document’s name from the list to open it in the Google Docs editor. The document will open in a new tab, ready for you to edit and make changes.
Opening your Google Docs document is the initial step in the process of adding a text box. By following these steps, you can access your document and start enhancing its content with the use of text boxes.
Step 2: Click on the “Insert” option in the menu bar
Once you have opened your Google Docs document, follow these steps to proceed with adding a text box:
2.1 Look for the menu bar at the top of the Google Docs editor. The menu bar contains various options and tools to help you customize your document.
2.2 Locate the “Insert” option on the menu bar. It is typically the second option from the left, represented by a square icon with a plus sign inside.
2.3 Click on the “Insert” option to reveal a drop-down menu with additional insertion options.
2.4 From the drop-down menu, choose the option labeled “Drawing.” This selection will open the Google Drawings editor, where you can create and customize a text box.
By clicking on the “Insert” option in the menu bar and selecting “Drawing” from the drop-down menu, you are one step closer to adding a text box to your Google Docs document. The next steps will guide you through the process of creating and customizing the text box within the Google Drawings editor.
Step 3: Select “Drawing” from the drop-down menu
After clicking on the “Insert” option in the menu bar, the next step in inserting a text box in your Google Docs document is to select “Drawing” from the drop-down menu. Here’s how:
3.1 Once you click on the “Insert” option, a drop-down menu will appear with several insertion options.
3.2 Scroll down the drop-down menu until you find the option labeled “Drawing.” It is usually located near the bottom of the list.
3.3 Click on the “Drawing” option to proceed.
By selecting “Drawing” from the drop-down menu, you are initiating the process of creating a drawing within Google Docs. This will open the Google Drawings editor, where you can create and customize your desired text box.
Keep following the steps to learn how to draw and customize the text box in the next sections.
Step 4: Click on “New” to create a drawing
After selecting “Drawing” from the drop-down menu, the next step in inserting a text box in your Google Docs document is to create a new drawing. Here’s how:
4.1 In the Google Drawings editor, you will see a toolbar at the top of the screen with various drawing tools and options.
4.2 Locate the “New” button in the toolbar. It is represented by a blank sheet of paper icon.
4.3 Click on the “New” button to create a new drawing canvas.
When you click on “New,” a canvas will appear where you can start drawing your text box and customizing it according to your preferences.
Creating a new drawing within the Google Drawings editor is an essential step in the process of adding a text box to your Google Docs document. Once you have created the drawing canvas, you can move on to the next steps of drawing and customizing the text box.
Step 5: Click on the “Text Box” icon
After creating a new drawing canvas in the Google Drawings editor, the next step in adding a text box to your Google Docs document is to click on the “Text Box” icon. Here’s how:
5.1 Look for the toolbar in the Google Drawings editor. It contains various tools and options for creating and editing your drawing.
5.2 Locate the “Text Box” icon in the toolbar. It is generally represented by an icon resembling a capital letter “T” inside a rectangle.
5.3 Click on the “Text Box” icon to initiate the creation of a text box.
By clicking on the “Text Box” icon, you are ready to draw and customize the size and shape of your text box within the Google Drawings editor. The text box will serve as the container for your text, allowing you to format and style the content according to your preferences.
Proceed to the next steps to learn how to draw the text box and add text to it.
Step 6: Draw the size and shape of the text box on the canvas
After clicking on the “Text Box” icon in the Google Drawings editor, the next step in adding a text box to your Google Docs document is to draw the size and shape of the text box on the canvas. Here’s how:
6.1 Click and hold the left mouse button on the canvas where you want to start drawing the text box.
6.2 While keeping the mouse button pressed, drag the cursor to create the desired size and shape for your text box.
6.3 Release the mouse button to finalize the shape of the text box.
By drawing the size and shape of the text box on the canvas, you are defining the boundaries within which your text will be placed. This offers you the flexibility to position and resize the text box to suit your needs.
Proceed to the next steps to learn how to customize the text box by adjusting its formatting and adding text to it.
Step 7: Customize the text box
After drawing the size and shape of the text box on the canvas, the next step in adding a text box to your Google Docs document is to customize its appearance. Here’s how:
7.1 With the text box selected, locate the toolbar or dialog box that contains formatting options.
7.2 Use the available options to customize the text box according to your preference. Some common customization options include:
- Changing the fill color: Select a color from the color palette or enter a specific color code to change the background color of the text box.
- Modifying the border color: Choose a color or set an appropriate color code to change the border color of the text box.
- Adjusting the size and thickness of the border: Use the appropriate controls to increase or decrease the size and thickness of the text box border.
- Choosing a font style: Select a font from the available options to change the appearance of the text within the text box.
- Setting the font size: Use the font size options to increase or decrease the size of the text within the text box.
- Aligning the text: Use the text alignment options to align the text inside the text box to the left, center, or right.
These are just a few examples of the customization options available for the text box. Depending on the tool or editor you are using, there may be additional options to explore.
By customizing the text box, you can ensure that it aligns with the overall design and style of your document. Take the time to experiment with various formatting options to achieve the desired look and feel.
Proceed to the next steps to learn how to add text to the text box and adjust its position and size on the canvas.
Step 8: Add text to the text box
Once you have customized the appearance of the text box to your liking, the next step in adding a text box to your Google Docs document is to add text to it. Here’s how:
8.1 Click inside the text box to activate the text editing mode.
8.2 Begin typing or paste the desired text directly into the text box. You can add multiple paragraphs or include bullet points and numbered lists as needed.
8.3 Format the text using the available text formatting options. You can change the font style, size, color, and alignment within the text box.
8.4 Review and proofread the text for any errors or typos. Make any necessary edits to ensure the text is accurate and coherent.
By adding text to the text box, you can convey important information or annotations within your Google Docs document. This allows you to highlight key points, provide additional explanations, or create visually appealing headings or callouts to draw attention to specific details.
Take the time to ensure the text within the text box is clear, concise, and well-formatted. This will enhance the overall presentation and readability of your document.
Proceed to the next steps to learn how to adjust the position and size of the text box on the canvas and how to save and close the drawing.
Step 9: Adjust the position and size of the text box
After adding text to the text box, the next step in adding a text box to your Google Docs document is to adjust its position and size on the canvas. Here’s how:
9.1 Click and drag the text box to reposition it on the canvas. Place it in the desired location within your drawing.
9.2 To resize the text box, click and drag any of the corners or sides. Adjust the dimensions according to your requirements.
9.3 Ensure that the text box is appropriately positioned and sized to fit within the context of your document and the surrounding elements.
By adjusting the position and size of the text box, you can optimize its placement within your document. This will ensure that the text box complements the content and enhances its visual appeal.
Take the time to experiment with different positions and sizes until you achieve the desired layout. Remember that you can always go back and make further adjustments as needed.
Proceed to the next steps to learn how to save and close the drawing and then move the text box to your Google Docs document.
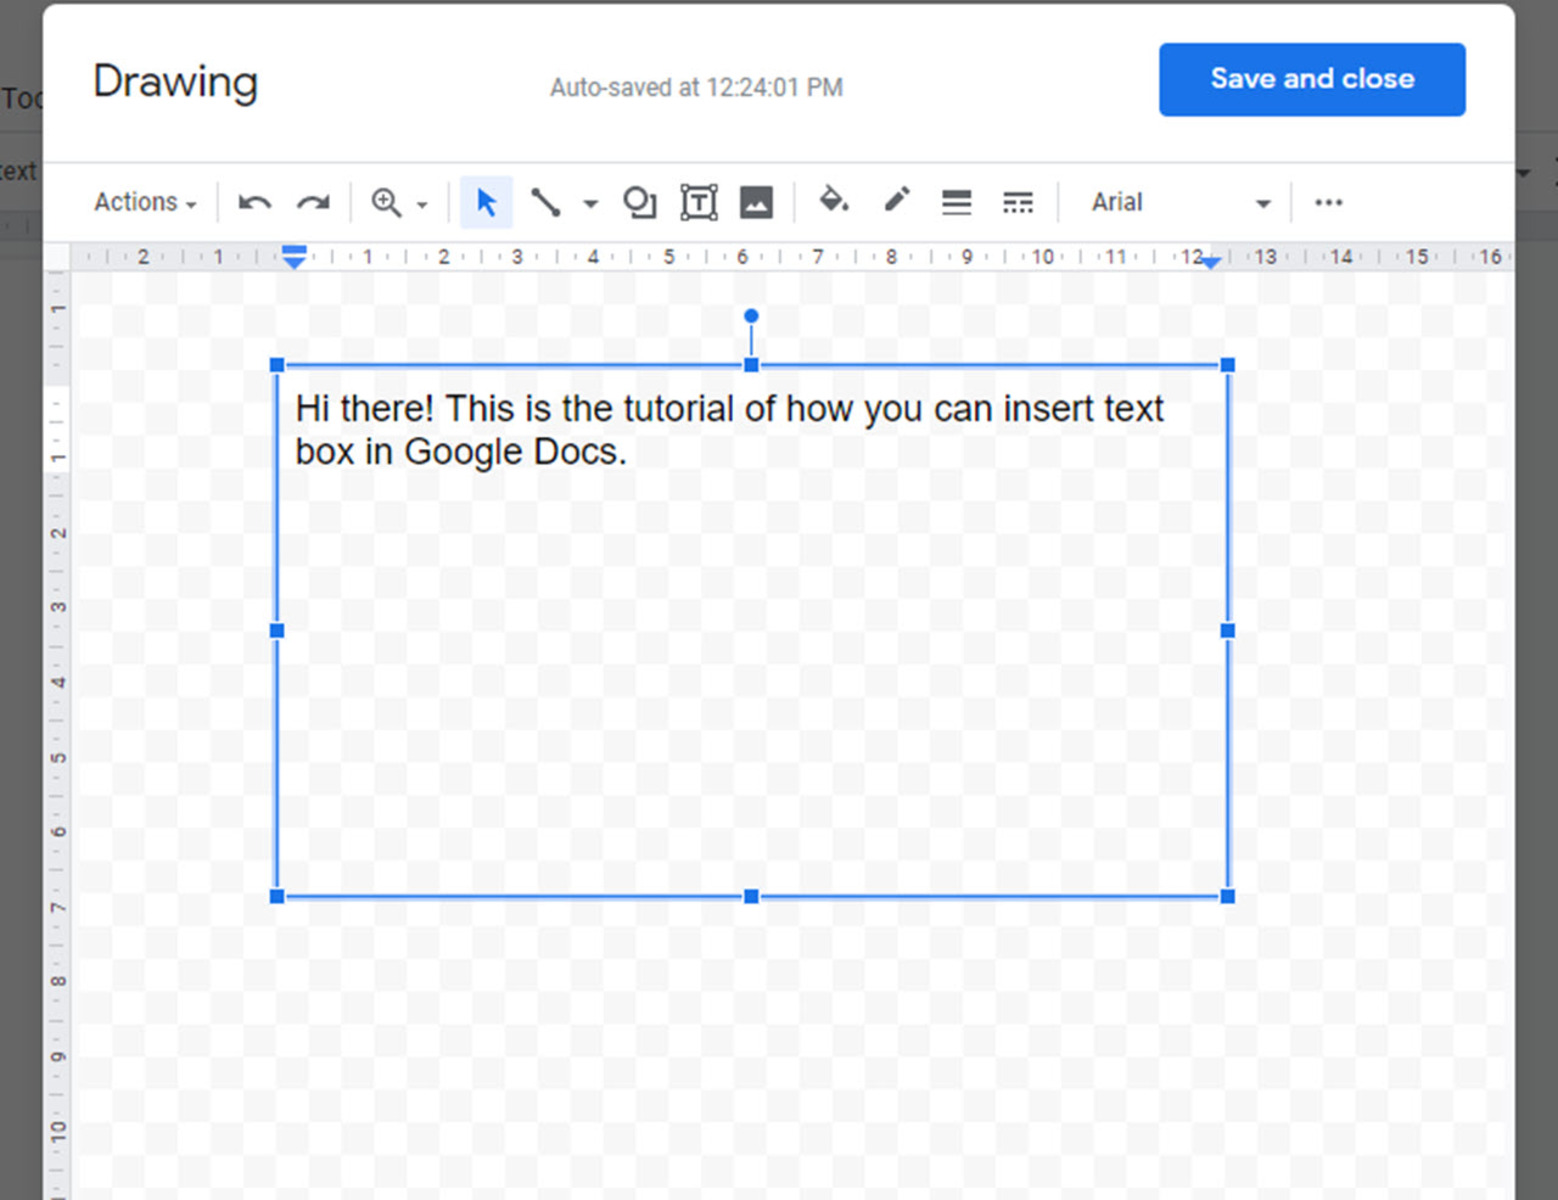
Step 10: Save and close the drawing
After adjusting the position and size of the text box in the Google Drawings editor, the next step in adding a text box to your Google Docs document is to save and close the drawing. Here’s how:
10.1 Look for the toolbar or menu options at the top of the Google Drawings editor.
10.2 Locate the “Save and Close” button, usually represented by an icon such as a floppy disk or a checkmark.
10.3 Click on the “Save and Close” button to save your modifications and exit the Google Drawings editor.
By saving and closing the drawing, you ensure that the changes you made to the text box and any other elements in the drawing are preserved.
Remember to save your work frequently to avoid losing any changes. If prompted, provide a meaningful name for your drawing to easily identify it later.
Proceed to the next steps to learn how to move the text box from the Google Drawings editor to your Google Docs document.
Step 11: Move the text box to your Google Docs document
After saving and closing the drawing in the Google Drawings editor, the next step in adding a text box to your Google Docs document is to move the text box from the drawing to your document. Here’s how:
11.1 Open your Google Docs document if it’s not already open.
11.2 Locate the drawing you just created and saved in the Google Drawings editor. It should be displayed as an image within your document.
11.3 Click on the drawing to select it.
11.4 Copy the drawing to your clipboard by using the Ctrl + C (or Command + C on Mac) keyboard shortcut or by right-clicking and selecting “Copy” from the context menu.
11.5 Go back to your Google Docs document and place your cursor at the desired location where you want to insert the text box.
11.6 Paste the text box into your document by using the Ctrl + V (or Command + V on Mac) keyboard shortcut or by right-clicking and selecting “Paste” from the context menu.
11.7 Adjust the position and size of the text box within your document if necessary. Click and drag the text box to move it, and use the resizing handles to adjust its dimensions.
By moving the text box from the Google Drawings editor to your Google Docs document, you integrate it seamlessly into your content. This allows you to incorporate the visual and informational elements of the text box into your overall document layout.
Continue to the next steps to learn how to customize the formatting options of the text box within your Google Docs document and how to edit or delete the text box as needed.
Step 12: Customize the formatting options of the text box
After moving the text box from the Google Drawings editor to your Google Docs document, the next step is to customize the formatting options of the text box. Here’s how:
12.1 Select the text box by clicking on it.
12.2 Look for the toolbar or menu bar that contains the formatting options for objects within Google Docs.
12.3 Utilize the available options to customize the formatting of the text box. These options may include:
- Changing the fill color or transparency of the text box.
- Adjusting the border color, thickness, or style of the text box.
- Modifying the font style, size, color, or alignment of the text within the text box.
- Applying special effects or shadows to the text box.
12.4 Experiment with different formatting options to achieve the desired look and feel for your text box.
Customizing the formatting options of the text box allows you to align it with the overall design and style of your document. Choosing colors, styles, and font formats that complement your content enhances its visual appeal and readability.
Proceed to the next steps to learn how to edit or delete the text box as needed, ensuring it fits seamlessly into your Google Docs document.
Step 13: Edit or delete the text box as needed
Once you have customized the formatting options of the text box in your Google Docs document, the final step is to edit or delete the text box as needed. Here’s how:
13.1 To edit the text within the text box, double-click on the text box to activate the text editing mode. Make the necessary changes, such as modifying the text itself or adjusting its formatting.
13.2 To delete the text box, select it by clicking on it and then press the Delete or Backspace key on your keyboard, or use the “Delete” option from the toolbar or menu if available.
By having the ability to edit and delete the text box, you can refine your content and ensure its accuracy. Editing allows you to make updates or corrections, while deleting provides the flexibility to remove the text box entirely if it no longer serves your purpose.
Experiment with different editing options and ensure that the content within the text box is concise, clear, and well-formatted. You can always adjust and modify the text box as needed throughout the document creation process.
By following these steps, you can easily edit or delete the text box to suit your document’s requirements and make necessary changes to your content.
Now that you have learned how to add, customize, and manage text boxes in Google Docs, you can take advantage of this powerful feature to enhance the visual appeal and readability of your documents.
Tips for Using Text Boxes in Google Docs
Text boxes in Google Docs provide a versatile way to enhance your documents’ visual appeal and organization. Here are some tips to make the most out of using text boxes:
1. Use text boxes for emphasis: Highlight key information, important notes, or callouts by placing them within text boxes. This helps draw attention to specific details and ensures important information stands out.
2. Create informational designs: With text boxes, you can make your documents visually engaging by arranging text and other elements creatively. Experiment with font styles, colors, and sizes to create visually appealing designs that enhance the overall document layout.
3. Collaborate effectively: When collaborating on a document, use text boxes to add comments, suggestions, or feedback without modifying the main content. This allows for clear communication between collaborators and streamlines the editing process.
4. Align text boxes with the document’s theme: Make sure the formatting of your text box, including font styles and colors, aligns with the overall theme and formatting choices of your document. This creates a cohesive look and enhances readability.
5. Use text boxes for organization: Organize your document by using text boxes to create headings, subheadings, or sections. This can help break up long blocks of text and make it easier for readers to navigate and understand your document.
6. Resize and position text boxes strategically: Adjust the size and position of the text boxes to create a balanced and visually appealing composition. Experiment with different placements and sizes to find the best fit for your document layout.
7. Proofread and edit text within the text box: Double-check the spelling, grammar, and formatting of the text within your text boxes. Ensure that the content is accurate, concise, and well-formatted to maintain a professional and polished look.
8. Keep text boxes organized: If you have multiple text boxes in your document, arrange them in a logical and structured manner. This makes it easier for readers to follow the flow of information and improves overall document readability.
9. Utilize text box formatting tools: Take advantage of the various formatting options available within Google Docs to customize your text boxes further. Experiment with different font styles, colors, and alignment settings to make your text boxes visually appealing and easy to read.
10. Preview your document: Before finalizing your document, preview how the text boxes look in the context of your overall content. Ensure they are properly placed, sized, and formatted, and that they enhance the overall design and flow of the document.
By applying these tips, you can maximize the impact of text boxes in Google Docs and create visually engaging, well-organized documents that effectively deliver your message.