
What is a hyperlink?
A hyperlink is a clickable element in a document or webpage that allows you to navigate to a different location when clicked. It is an essential feature in electronic documents and plays a crucial role in connecting information and enhancing the user experience. By using hyperlinks, you can create connections to websites, other sections within the same document, email addresses, or files on your computer.
Hyperlinks are typically represented by underlined text or images, and they are designed to stand out visually, making it clear to users that they can interact with them. When a hyperlink is clicked, it directs the user to the linked destination, whether it is a website, an email client, or a local file.
One of the most important aspects of hyperlinks is their ability to connect related information. They enable users to access additional resources, navigate through a document or website, and explore related topics with ease. Hyperlinks serve as a bridge between different pieces of content, offering a seamless way to access more information without disrupting the flow of the document or webpage.
Hyperlinks have revolutionized the way we navigate and interact with digital content. They have become an integral part of our daily online activities, enabling us to access information quickly and effortlessly. Whether you are creating a Word document, a web page, or an email, understanding how to use hyperlinks effectively can greatly enhance the usability and accessibility of your content.
Why use hyperlinks in Word documents?
Hyperlinks offer numerous benefits when used in Word documents. They not only facilitate easy navigation but also enhance the overall reading experience for the audience. Here are some key reasons why you should consider using hyperlinks in your Word documents:
1. Accessibility: Hyperlinks allow readers to quickly jump to specific sections within the document or external sources of information. This makes it easier for them to find relevant content and saves them the hassle of scrolling through lengthy documents.
2. Enhanced engagement: By providing hyperlinks to additional resources, such as related articles, research papers, or supporting documents, you can encourage readers to delve deeper into a topic. This increases their engagement with your content, making it more informative and valuable.
3. Credibility: Including hyperlinks to reputable sources strengthens the credibility of your Word document. It shows that you have done thorough research and provides readers with the opportunity to verify the information you have presented.
4. Convenience: Hyperlinks allow you to link to websites, email addresses, or files, making it easier for readers to access relevant information with just a click. Instead of copying and pasting a URL or searching for email addresses, readers can directly interact with the linked content.
5. Seamless document navigation: If your Word document is lengthy or includes sections with complex information, hyperlinks can serve as convenient navigation tools. You can create hyperlinks that redirect readers to different sections within the same document, allowing them to quickly jump between relevant sections.
6. Efficient collaboration: When working on a collaborative document, hyperlinks can be used to reference specific sections or external resources. This ensures that all collaborators are on the same page and can easily access the required information.
7. Improved reader retention: Hyperlinks strategically placed within your Word document can help retain readers’ interest and facilitate better information retention. By providing relevant links, you give readers the option to explore topics further without leaving the document.
Incorporating hyperlinks into your Word documents is a valuable practice that benefits both you, as the creator, and your readers. By leveraging the power of hyperlinks, you can enhance accessibility, credibility, and engagement while enabling seamless navigation and convenient access to additional resources.
How to insert a hyperlink
Inserting a hyperlink in a Word document is a straightforward process. Follow these steps to add a hyperlink:
1. Select the text or object: Highlight the text or select the object (such as an image or shape) that you want to turn into a hyperlink.
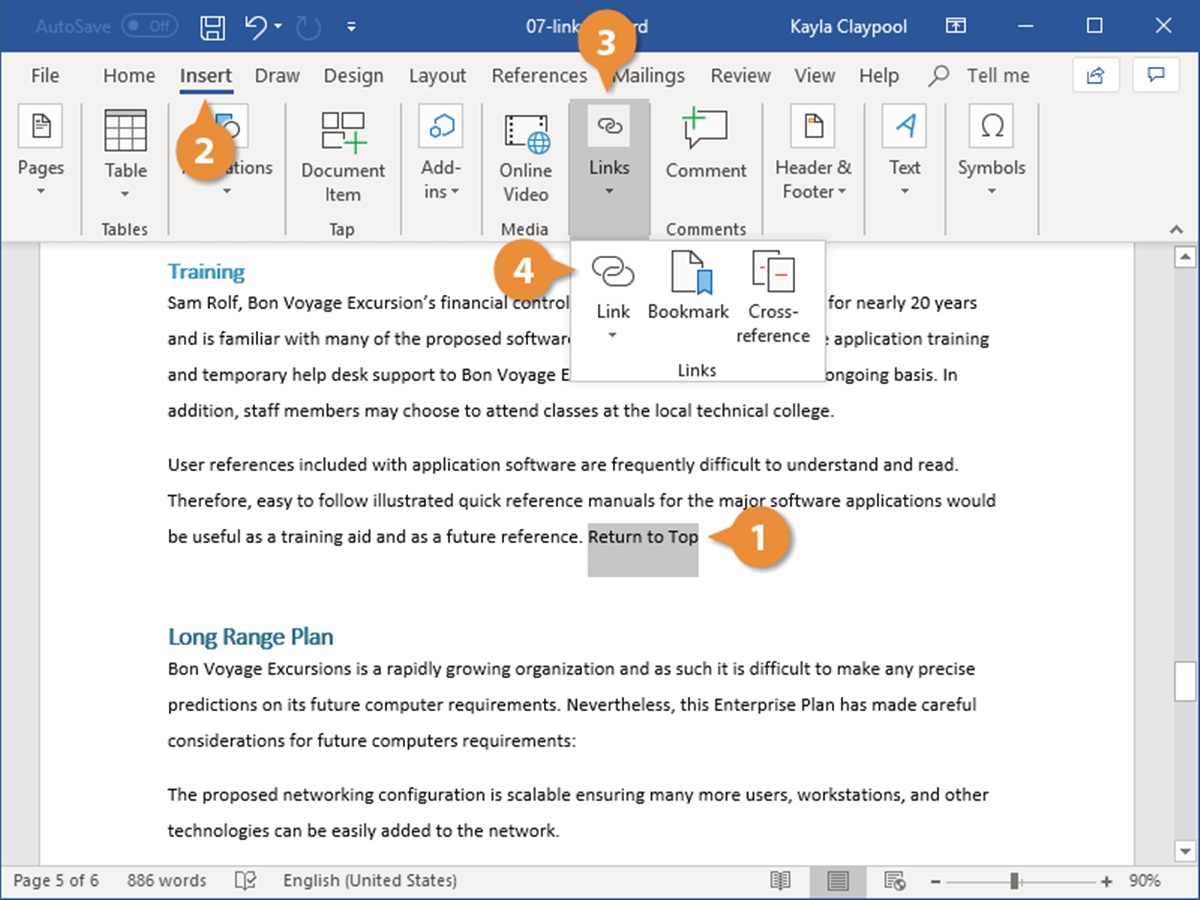
2. Click the “Insert” tab: In the Word toolbar, click on the “Insert” tab located at the top of the screen.
3. Click the “Hyperlink” button: Within the “Links” group, click on the “Hyperlink” button. Alternatively, you can right-click on the selected text/object and choose “Hyperlink” from the context menu.
4. Choose the type of hyperlink: A dialog box will appear where you can choose the type of hyperlink you want to insert. Here are the most common options:
- Link to an existing file or web page: If you want to link to a website URL or a file on your computer, select “Existing File or Web Page” in the dialog box. Enter the web address or navigate to the file using the “Look in” section.
- Link to a specific place in the document: If you want to create a link to another section within the same Word document, select “Place in This Document” in the dialog box. Then, choose the specific location you want to link to from the options listed.
- Link to an email address: To create a hyperlink that automatically opens an email composition window with the recipient’s email address pre-filled, select “Email Address” in the dialog box. Enter the email address in the “E-mail address” field.
- Create a new document: If you want to create a new Word document, Excel sheet, PowerPoint presentation, or other Office file, select “Create New Document” in the dialog box, then enter a name for the new file.
5. Set the hyperlink options: After choosing the appropriate hyperlink type and entering the necessary details, customize the hyperlink’s appearance under the “Text to display” field. You can modify the text, font, color, size, and more.
6. Click “OK”: Once you have finished setting up the hyperlink, click the “OK” button to insert it into your Word document.
Your selected text or object will now be transformed into a hyperlink. Users can click on it to navigate to the specified destination, whether it is a website, email, or another section within the document.
Remember to test your hyperlinks to ensure they are working correctly. Simply click on the link you created to verify its functionality.
By following these steps, you can effectively insert hyperlinks in your Word documents, making them interactive and allowing readers to access additional information or resources with ease.
Linking to a website
Linking to a website in your Word document allows readers to quickly and easily visit a specific web page with just a click. Follow these steps to create a hyperlink to a website:
1. Select the text or object: Highlight the text or select the object (such as an image or shape) that you want to turn into a hyperlink.
2. Click the “Insert” tab: In the Word toolbar, click on the “Insert” tab located at the top of the screen.
3. Click the “Hyperlink” button: Within the “Links” group, click on the “Hyperlink” button. Alternatively, right-click on the selected text/object and choose “Hyperlink” from the context menu.
4. Choose “Existing File or Web Page”: In the dialog box that appears, select “Existing File or Web Page” on the left-hand side.
5. Enter the web address: In the “Address” field, type or paste the URL of the website you want to link to. Make sure to include the “http://” or “https://” prefix to indicate that it is a web address.
6. Set the display text (optional): By default, the hyperlink will display the web address as the text. If you want to customize the text that appears as the hyperlink, modify the text in the “Text to display” field.
7. Click “OK”: Once you have entered the web address and set any desired options, click the “OK” button to insert the hyperlink.
The selected text or object will now be transformed into a clickable hyperlink that directs users to the specified website when clicked. Readers can simply click on the hyperlink to open the website in their web browser.
It is good practice to ensure that the website you are linking to is accessible and relevant to your audience. Double-check the URL to ensure it is accurate and functional. Additionally, consider using descriptive text for the hyperlink to provide more context to readers about where the link will take them.
Using hyperlinks to websites in your Word documents can greatly enhance the user experience by providing direct access to additional information or resources. It allows readers to explore related content or visit external sources with ease, improving the overall value and interactivity of your document.
Linking to an email address
Linking to an email address in your Word document enables readers to initiate an email message to a specific recipient simply by clicking the hyperlink. Follow these steps to create a hyperlink to an email address:
1. Select the text or object: Highlight the text or select the object (such as an image or shape) that you want to turn into a hyperlink.
2. Click the “Insert” tab: In the Word toolbar, click on the “Insert” tab located at the top of the screen.
3. Click the “Hyperlink” button: Within the “Links” group, click on the “Hyperlink” button. Alternatively, right-click on the selected text/object and choose “Hyperlink” from the context menu.
4. Choose “Email Address”: In the dialog box that appears, select “Email Address” on the left-hand side.
5. Enter the recipient’s email address: In the “E-mail address” field, type the email address of the recipient. Make sure to enter the full address, including the “@domain.com” part.
6. Set the display text (optional): By default, the email address will be displayed as the hyperlink text. If you want to customize the text that appears as the hyperlink, modify the text in the “Text to display” field.
7. Click “OK”: Once you have entered the email address and set any desired options, click the “OK” button to insert the hyperlink.
The selected text or object will now be transformed into a clickable hyperlink that opens the recipient’s default email client with a new message drafted and the recipient’s address pre-filled. When readers click on the hyperlink, it simplifies the process of composing an email to the specified recipient.
Ensure that the email address you are linking to is correct and properly formatted. Double-check for any typos or missing characters. It is also essential to consider the privacy implications of linking to an email address, as it may expose the recipient’s address to potential spammers or unauthorized usage.
Using hyperlinks to email addresses in your Word documents can provide a seamless way for readers to initiate communication with a specific recipient. It simplifies the process of composing an email and enhances the accessibility and interactivity of your document.
Linking to a document or file in your computer
Linking to a document or file in your computer from your Word document allows readers to directly access and open the file with just a click. Follow these steps to create a hyperlink to a document or file:
1. Select the text or object: Highlight the text or select the object (such as an image or shape) that you want to turn into a hyperlink.
2. Click the “Insert” tab: In the Word toolbar, click on the “Insert” tab located at the top of the screen.
3. Click the “Hyperlink” button: Within the “Links” group, click on the “Hyperlink” button. Alternatively, right-click on the selected text/object and choose “Hyperlink” from the context menu.
4. Choose “Existing File or Web Page”: In the dialog box that appears, select “Existing File or Web Page” on the left-hand side.
5. Navigate to the file: Click on the “Browse” button and navigate to the location on your computer where the file is saved. Once you find the file, select it and click “OK”.
6. Set the display text (optional): By default, the hyperlink will display the file name as the text. If you want to customize the text that appears as the hyperlink, modify the text in the “Text to display” field.
7. Click “OK”: Once you have selected the file and set any desired options, click the “OK” button to insert the hyperlink.
The selected text or object will now be transformed into a clickable hyperlink that opens the linked document or file when clicked. Readers can simply click on the hyperlink to access and open the file on their computer.
Make sure that the file you are linking to is accessible, and readers have the necessary permissions and software to open it. It is a good practice to provide descriptive text for the hyperlink, giving readers an idea of the content or purpose of the linked file.
When linking to files on your computer, keep in mind that the link will only work if the file remains in the same location or if it is moved within the computer’s file system. If the file is moved or renamed, the hyperlink may no longer function correctly.
By incorporating hyperlinks to documents or files in your Word documents, you can provide readers with a convenient way to access and open relevant files on their computer, enhancing the overall usability and interactivity of your document.
Modifying a hyperlink
Modifying a hyperlink in your Word document allows you to make changes to the destination, display text, or other properties of the hyperlink. Follow these steps to modify a hyperlink:
1. Select the hyperlink: Click on the hyperlink text or object that you want to modify. This will highlight the hyperlink and activate the “Hyperlink” options.
2. Right-click the hyperlink: Right-click on the selected hyperlink and choose “Edit Hyperlink” from the context menu. Alternatively, you can go to the “Insert” tab, click on the “Hyperlink” button, and select “Edit Hyperlink.”
3. Make the necessary modifications: In the “Edit Hyperlink” dialog box that appears, you can make the following modifications:
- Change the destination: Modify the web address, file path, or email address in the “Address” field to update where the hyperlink leads.
- Modify the display text: Edit the text in the “Text to display” field to change the text that appears as the hyperlink.
- Adjust other options: Use the additional options in the dialog box, such as “ScreenTip,” to customize the behavior and appearance of the hyperlink.
4. Click “OK”: Once you have made the desired modifications, click the “OK” button to apply the changes.
The selected hyperlink will now reflect the modifications you made. Readers will see the updated destination, display text, or other properties when they interact with the hyperlink.
It is important to verify the modifications and test the updated hyperlink to ensure its functionality. Click on the modified hyperlink to confirm that it correctly leads to the intended destination or performs the desired action.
By allowing you to modify hyperlinks, Word gives you the flexibility to update and customize the links in your documents. Whether you need to change the website URL, edit the display text, or adjust other properties, the ability to modify hyperlinks ensures that your documents remain up to date and relevant.
Removing a hyperlink
If you want to remove a hyperlink from your Word document, whether it’s because it is no longer relevant or you want to remove the interactive functionality, you can easily do so. Follow these steps to remove a hyperlink:
1. Select the hyperlink: Click on the hyperlink text or object that you want to remove. This will highlight the entire hyperlink and activate the “Hyperlink” options.
2. Right-click the hyperlink: Right-click on the selected hyperlink and choose “Remove Hyperlink” from the context menu. Alternatively, you can go to the “Insert” tab, click on the “Hyperlink” button, and select “Remove Hyperlink.”
By following these steps, the hyperlink will be removed from the selected text or object, and it will revert back to regular text or object without any interactive functionality.
It is important to note that removing a hyperlink does not delete the text or object itself. It only removes the hyperlink formatting and functionality.
By removing a hyperlink, you can eliminate unnecessary links in your Word document or revert back to plain text or object. This can be useful when you want to remove navigational elements or when the hyperlink is no longer applicable or desired.
Formatting hyperlinks
Formatting hyperlinks in your Word document can help enhance their visibility and make them more appealing to readers. Here are some key formatting options you can consider when working with hyperlinks:
1. Font style: You can change the font style of the hyperlink text to make it stand out. Choose a bold or italicized font to emphasize the hyperlink, or use a different font altogether to make it visually distinct from the surrounding text.
2. Font color: Customize the font color of the hyperlink text to make it more noticeable. Select a contrasting color that stands out against the background to ensure easy readability.
3. Underline: Underlining the hyperlink text is a common way to indicate its interactive nature. By default, Word underlines hyperlinks automatically, but you can toggle the underlining on or off using the “Underline” button in the formatting toolbar.
4. Hover color: When a reader hovers their mouse over a hyperlink, you can set a different color to appear. This visual feedback can provide an additional indication to users that the text is clickable. Use the “Hover” color option to define the color that appears when the mouse hovers over the hyperlink.
5. Text size: Adjusting the text size of the hyperlink can help it stand out from the surrounding text. Consider making the font slightly larger or smaller than the regular text to draw attention.
6. Formatting for visited links: By default, Word applies a different formatting to visited hyperlinks to distinguish them from unvisited ones. You can customize the formatting for visited links to your preference using the “Visited” color option.
7. Button or shape formatting: If you want to make the hyperlink more visually appealing, you can convert it into a button or shape. Apply different styles, colors, and effects to make the hyperlink appear like a clickable button or a highlighted element.
It’s important to strike a balance between making the hyperlinks visually distinct while retaining readability and cohesiveness with the overall document design. Avoid going overboard with formatting that may distract readers or make the text difficult to read.
By formatting hyperlinks in your Word document, you can make them more visually appealing, increase their visibility, and create a more engaging reading experience for your audience.
Keyboard shortcuts for working with hyperlinks
Using keyboard shortcuts can significantly improve efficiency and speed when working with hyperlinks in Word. Here are some useful keyboard shortcuts for managing hyperlinks:
1. Insert a hyperlink: To quickly insert a hyperlink, select the text or object you want to turn into a hyperlink and press Ctrl + K. This will open the “Insert Hyperlink” dialog box, where you can enter the destination URL or file path.
2. Follow a hyperlink: To follow a hyperlink while editing a Word document, simply press Ctrl + Click on the hyperlink. This will immediately open the destination in your web browser or the associated application.
3. Edit a hyperlink: To modify the properties of a hyperlink, place the cursor on the hyperlink text or object and press Ctrl + Shift + F9. This will open the “Edit Hyperlink” dialog box, where you can make changes to the destination URL, display text, or other properties.
4. Remove a hyperlink: To remove a hyperlink, position the cursor on the hyperlink text or object and press Ctrl + Shift + F9. This will remove the hyperlink formatting, but the underlying text or object will remain intact.
5. Open hyperlink options: To access additional options for a hyperlink, such as changing the color or underlining, select the hyperlink text or object and press Ctrl + Shift + F10. This will open a context menu with various hyperlink options.
6. Navigate between hyperlinks: If your Word document contains multiple hyperlinks, you can navigate between them using the Ctrl + Alt + Home shortcut. This will move the cursor to the next hyperlink in the document.
7. Copy a hyperlink: To copy a hyperlink, select the hyperlink text or object and press Ctrl + C. This will copy the hyperlink information to the clipboard, allowing you to paste it elsewhere.
Keyboard shortcuts can save you time and make working with hyperlinks in Word more efficient. By utilizing these shortcuts, you can quickly insert, modify, follow, or remove hyperlinks without the need to navigate through menu options or use the mouse.
It’s beneficial to familiarize yourself with these keyboard shortcuts to streamline your workflow and enhance your productivity when working with hyperlinks in Word.
Troubleshooting common issues with hyperlinks
While working with hyperlinks in Word, you may encounter certain issues that can prevent them from functioning properly. Here are some common problems that you might face with hyperlinks and suggestions for troubleshooting them:
1. Broken links: If a hyperlink leads to an incorrect or dead web page, file, or email address, it is likely a broken link. Ensure that the link’s destination is correct, and if necessary, update the hyperlink with the correct URL, file path, or email address.
2. Link not clickable: If a hyperlink appears as plain text and is not clickable, check if it is formatted correctly. Hyperlinks should be underlined and displayed in a distinctive color. If necessary, reapply the hyperlink formatting to make it clickable.
3. Inconsistent formatting: If hyperlinks in your Word document have inconsistent formatting, where some are underlined and others are not, select all the hyperlinks and choose a consistent formatting style from the formatting toolbar.
4. Relative file paths not working: If you use relative file paths to link to documents within the same folder or subfolders, ensure that the folder and file structure has not been modified. If necessary, update the file paths to reflect the correct location of the linked files.
5. Email addresses not opening: If clicking on an email address hyperlink does not open the default email client, check the email address format for errors. Ensure it is correctly entered as “name@example.com” without any spaces or additional characters.
6. Security warning dialog: If a security warning dialog appears when clicking on a hyperlink, it may be due to the potential risk associated with the linked content. Proceed with caution and confirm that the destination is safe before proceeding.
7. Hyperlink not saving: If you have created a hyperlink but it does not save when you close and reopen the document, ensure that the document is saved in a compatible format that supports hyperlinks. Save the document as a .docx file for proper retention of hyperlinks.
If you continue to experience issues with hyperlinks in your Word document, try updating or reinstalling Microsoft Office to ensure you have the latest version and bug fixes. You can also seek help from online forums or Microsoft support for specific troubleshooting steps based on your issue.
Troubleshooting common hyperlink issues requires attention to detail and an understanding of the specific problem. By addressing these issues promptly, you can ensure that the hyperlinks in your Word documents are reliable and provide a seamless user experience for your readers.
Best practices for using hyperlinks in Word documents
When using hyperlinks in your Word documents, it is important to follow best practices to ensure their effectiveness and improve the overall user experience. Here are some key best practices for using hyperlinks:
1. Make hyperlinks descriptive: Use descriptive text for your hyperlinks that accurately reflects the content or destination they lead to. Avoid using generic text, such as “Click here” or “Learn more.” Instead, provide specific and informative labels that give readers a clear idea of what to expect when they click the hyperlink.
2. Use meaningful and relevant anchor text: Anchor text refers to the text that is hyperlinked. Use words or phrases that accurately describe the linked content rather than using generic or vague terms. This improves accessibility and helps readers understand the purpose of the hyperlink.
3. Link to credible and authoritative sources: Ensure that the websites, documents, or email addresses you link to are trustworthy and provide reliable information. Linking to reputable sources adds credibility to your content and allows readers to access reliable information related to your document’s topic.
4. Proofread and validate hyperlinks: Before finalizing your Word document, review all hyperlinks to ensure they are accurate and functional. Test each link by clicking on it to verify that it correctly leads to the intended destination.
5. Consider user experience: Place hyperlinks strategically throughout your document to enhance the flow of information and user experience. Hyperlinks should be relevant to the surrounding text and provide additional value or context to readers.
6. Avoid excessive hyperlink usage: Use hyperlinks judiciously and only when necessary. Overloading your document with too many hyperlinks can distract readers and make the content appear cluttered. Only include hyperlinks that truly enhance the information or provide valuable resources.
7. Normalize hyperlink appearance: Ensure consistency in the appearance of hyperlinks throughout your document. Follow a standardized style for underlining, color, and formatting to make them easily recognizable to readers as clickable elements.
8. Regularly update hyperlinks: If your document contains hyperlinks to external websites or resources, periodically check them for any changes or updates. Remove or update broken or outdated links to maintain the relevance and accuracy of your document.
9. Provide alternative text for images: If you hyperlink an image, make sure to provide alternative text (ALT text) that describes the image for users with visual impairments or when the image fails to load. ALT text ensures accessibility and provides additional context for screen readers.
10. Consider users’ privacy: Be mindful of linking to email addresses or private documents that may unintentionally expose personal information. Ensure that sharing contact details or private files is appropriate and complies with privacy regulations.
By following these best practices, you can ensure that the hyperlinks in your Word documents are user-friendly, reliable, and enhance the overall quality and usability of your content.