
Why Clear Formatting?
Formatting is a crucial aspect of creating documents in Microsoft Word. It allows you to add font styles, colors, sizes, alignments, and more to your text. However, sometimes the formatting can become inconsistent or unintended due to pasted content, accidental key presses, or modification in styles.
Clearing formatting is essential for several reasons:
- Consistency: When working on a document collaboratively or adding content from various sources, the formatting can differ, resulting in an inconsistent appearance. Clearing formatting helps in maintaining a unified and professional look throughout the document.
- Readability: Overly formatted text can hinder readability, making it difficult for readers to comprehend the information easily. Removing unnecessary formatting allows the content to be presented in a clear and legible manner.
- Accessibility: Excessive formatting, such as colored text or intricate font styles, can pose challenges for individuals with visual impairments or those utilizing assistive technologies. Clearing formatting ensures that everyone can access the content without any obstacles.
- Formatting Errors: Sometimes, formatting errors occur unintentionally, such as overlapping text, mismatched font sizes, or inconsistent indentation. Clearing formatting can help resolve these errors and bring the document back to its intended structure.
To ensure your document is free from unwanted formatting issues, it is important to be familiar with the various methods available for clearing formatting in Microsoft Word. We will explore different techniques that can be used to remove formatting, ranging from clearing all formatting to targeting specific elements within the document.
Clear All Formatting
Clearing all formatting in Microsoft Word allows you to reset the entire document to its default appearance. This method is useful when you want to start with a clean slate and remove all formatting, including font styles, sizes, colors, alignments, and more.
To clear all formatting in Microsoft Word, follow these steps:
- Select the text or entire document that you want to clear the formatting for.
- On the top ribbon, navigate to the “Home” tab.
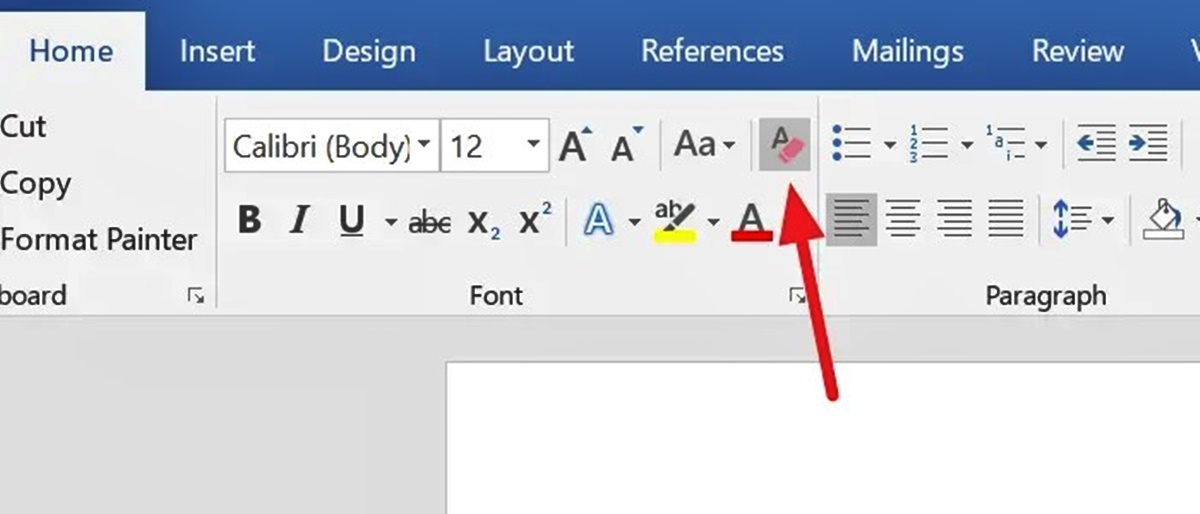
- In the “Font” group, you will find an icon labeled “Clear All Formatting,” represented by an eraser. Click on this icon.
- Alternatively, you can use the shortcut key combination “Ctrl + Spacebar” to clear all formatting.
Once the formatting is cleared, the text will revert to the default formatting defined by the document’s style settings. Keep in mind that if you have applied specific formatting manually, such as bold or italics, this method will remove those as well.
Clearing all formatting is particularly helpful when you want to start from scratch or when you need to adhere to specific style guidelines. It provides a clean canvas to work with and ensures a consistent appearance throughout the document.
Remember to save your document after clearing the formatting to preserve the changes made. By clearing all formatting, you can eliminate any unwanted styles or formatting discrepancies, ensuring your document looks polished and professional.
Clear Formatting Using the Ribbon
Microsoft Word provides a convenient method for clearing formatting using the ribbon interface. This method allows you to remove formatting from specific portions of text or the entire document while retaining other elements, such as images or tables.
To clear formatting using the ribbon, follow these steps:
- Select the text or portion of the document from which you want to remove formatting.
- Navigate to the “Home” tab on the top ribbon.
- In the “Font” group, you will find the “Clear Formatting” button that resembles an eraser. Click on it.
- The selected text will no longer have any formatting applied while other elements in the document remain untouched.
This method is useful when you want to remove formatting from specific sections but retain the formatting applied to other parts of the document. It offers a flexible approach to clear only the formatting that you choose.
Additionally, you can also use the shortcut key combination “Ctrl + Spacebar” to clear formatting using the ribbon. Select the text you want to remove formatting from and press the shortcut keys simultaneously to remove all formatting.
Clearing formatting using the ribbon allows you to fine-tune the appearance of your document by selectively removing formatting from specific portions. It gives you control over which sections to keep formatted and which ones to revert to the default styling. This method helps in maintaining a clean and consistent layout while saving time and effort spent on manual formatting removal.
Clear Formatting Using the Shortcut Keys
In addition to using the ribbon interface, Microsoft Word also provides convenient shortcut keys to quickly clear formatting. These keyboard shortcuts allow you to remove formatting without needing to navigate through the various menus and options.
To clear formatting using the shortcut keys, follow these steps:
- Select the text or portion of the document that you want to remove formatting from.
- Press the “Ctrl” key and the “Spacebar” key simultaneously.
- The selected text will now be free from any formatting, reverting to the default font and style settings.
By utilizing the shortcut keys “Ctrl + Spacebar,” you can instantly clear formatting without interrupting your workflow. This method is efficient and particularly useful when you need to remove formatting from specific sections of the document quickly.
It’s essential to note that using the shortcut keys will remove all formatting, including font styles, sizes, colors, alignments, and more. Therefore, if you have any manually applied formatting that you wish to retain, it is recommended to use the previous methods, such as clearing formatting using the ribbon, for more selective removal.
Clearing formatting with shortcut keys is a time-saving solution that allows you to streamline your editing process. Whether you are working on a lengthy document or making quick formatting adjustments, utilizing keyboard shortcuts can significantly enhance your productivity and efficiency.
Clear Formatting with the Format Painter
The Format Painter in Microsoft Word is a powerful tool that allows you to copy formatting from one element and apply it to another. However, you can also use the Format Painter to remove formatting from specific sections of text or the entire document.
To clear formatting with the Format Painter, follow these steps:
- Select the text or portion of the document that contains the formatting you want to remove.
- On the top ribbon, navigate to the “Home” tab.
- In the “Clipboard” group, you will find the “Format Painter” button. Click on it.
- The cursor will turn into a paintbrush icon.
- Click anywhere in the document or select the text where you want to remove formatting.
When you click or select the target text, the formatting from the source text will be removed, leaving the target text with its default styling.
The Format Painter method is particularly useful when you have specific sections with undesired formatting and you want to quickly remove it while maintaining other formatting elements in the document.
Additionally, you can double-click the Format Painter button to lock it. This allows you to apply the formatting to multiple sections without needing to click the button each time. Once you have finished, press the “Esc” key or click the Format Painter button again to disable it.
Clearing formatting with the Format Painter provides a convenient way to selectively remove formatting from specific sections of your document. It offers flexibility and efficiency in maintaining a consistent and polished appearance without affecting other areas that you want to keep styled.
Clear Formatting with Find and Replace
Microsoft Word’s Find and Replace feature is not only helpful for searching and replacing specific text but also for clearing formatting. By using the Find and Replace functionality, you can quickly remove formatting from specific sections or the entire document.
To clear formatting with Find and Replace, follow these steps:
- Press the “Ctrl + H” keyboard shortcut to open the Find and Replace dialog box.
- In the “Find what” field, leave it empty.
- In the “Replace with” field, also leave it empty.
- Click on the “More” button to reveal additional options.
- In the expanded dialog box, click on the “Format” button and select “Clear” from the drop-down menu.
- Choose the formatting options you want to clear, such as font styles, sizes, colors, and more.
- Click on the “Replace All” button to remove the selected formatting from the document.
By following these steps, you can clear formatting from specific elements or the entire document, based on your selection and requirements.
The Find and Replace method is helpful when you want to remove specific formatting styles applied to certain sections while keeping other formatting intact. Additionally, it is useful when you need to remove formatting from multiple occurrences throughout the document quickly.
Remember to review your document after using Find and Replace to ensure that the desired formatting has been cleared. In case of any unintended removal of formatting, you can use the “Undo” command or the “Ctrl + Z” keyboard shortcut to revert the changes.
Clearing formatting with Find and Replace adds versatility and control to the document editing process, enabling you to remove specific formatting styles and maintain a consistent layout and appearance.
Clear Formatting with Paste Special
Microsoft Word’s Paste Special feature provides a convenient way to clear formatting when pasting text from external sources or within the same document. It allows you to remove any unwanted formatting while maintaining the text’s content.
To clear formatting with Paste Special, follow these steps:
- Copy the text you want to paste into your document.
- Place your cursor in the desired location within your document.
- On the top ribbon, go to the “Home” tab.
- In the “Clipboard” group, click on the small arrow next to the “Paste” button.
- Select “Paste Special” from the drop-down menu.
- In the Paste Special dialog box, choose the “Unformatted Text” option.
- Click on the “OK” button.
By selecting “Unformatted Text” in Paste Special, you ensure that the text will be pasted without any formatting applied. This removes any unwanted styles, fonts, sizes, colors, and alignments that may have been present in the original source.
The Paste Special method is particularly useful when copying text from websites, emails, or other documents that may have different formatting styles. It allows you to preserve the content while getting rid of any incompatible or unnecessary formatting.
Additionally, you can set a default Paste Special option in Word, such as “Unformatted Text,” to save time when pasting frequently. This way, you don’t have to go through the drop-down menu every time you want to clear formatting.
Clearing formatting with Paste Special offers flexibility and efficiency, enabling you to maintain a consistent appearance in your document while incorporating content from external sources or within the same document.
Clear Formatting for Specific Text
Microsoft Word allows you to clear formatting for specific portions of text within a larger document. This method is useful when you only want to remove formatting from certain sections while retaining the formatting applied to the rest of the document.
To clear formatting for specific text, follow these steps:
- Select the text from which you want to remove formatting.
- Right-click on the selected text to open the context menu.
- In the context menu, hover over the “Clear Formatting” option.
- Click on “Clear All Formatting” to remove all formatting from the selected text.
By following these steps, the selected text will be cleared of any formatting, returning it to the default style settings defined by the document’s formatting rules.
Alternatively, you can also use the keyboard shortcut “Ctrl + Spacebar” to remove formatting from the selected text. This shortcut performs the same action as using the context menu option.
Clearing formatting for specific text allows you to maintain consistency within your document while making targeted formatting adjustments as needed. This method gives you the flexibility to highlight or differentiate certain sections of text without them being impacted by any unwanted formatting.
It’s important to note that when clearing formatting for specific text, any manually applied formatting, such as bold or italics, will also be removed. Therefore, if you only want to remove specific formatting elements while retaining others, you may consider using other methods discussed earlier, such as using the Format Painter.
Clearing formatting for specific text in Microsoft Word provides a precise and controlled way to manage the appearance of your document. It allows you to fine-tune the formatting while ensuring your content remains clear and visually appealing.
Clear Formatting in Tables
Tables in Microsoft Word often require specific formatting to organize and present data effectively. However, there may be instances where you need to remove formatting from tables or specific cells. Clearing formatting in tables allows you to reset the appearance of the table or individual cells while retaining the table structure.
To clear formatting in tables, follow these steps:
- Select the table or specific cells from which you want to remove formatting.
- On the top ribbon, go to the “Table Tools” tab, which appears when your table is selected.
- In the “Design” tab, locate the “Table Styles” group.
- Click on the small arrow at the bottom right corner of the “Table Styles” group to access the full gallery.
- In the table styles gallery, hover over the different styles to preview how they will appear on your table.
- At the top of the gallery, you will find the “Clear” option. Click on it to remove all formatting from the selected table or cells.
By following these steps, the selected table or cells will revert to the default table formatting defined by Word, eliminating any custom formatting applied previously.
It’s essential to note that clearing formatting in tables will remove all formatting, including cell borders, shading, and font styles. If you only want to remove specific formatting elements, such as cell color or font size, consider using other table formatting options, such as the borders and shading settings.
Clearing formatting in tables provides a convenient way to start fresh or ensure consistency within your table content. It allows you to adjust the appearance of your table to meet specific formatting requirements or match the overall style of your document.
Remember to review your table after clearing formatting to ensure that the structure and content remain intact as desired. If you accidentally remove formatting and need to revert the changes, you can use the “Undo” command or the “Ctrl + Z” keyboard shortcut.
Clearing formatting in tables gives you the flexibility to control the visual presentation of your tabular data while maintaining clarity and professionalism.
Clear Formatting in Text Boxes, Shapes, and SmartArt
Microsoft Word provides various tools to enhance your document with text boxes, shapes, and SmartArt graphics. These elements often come with formatting options to create visually appealing designs. However, there may be instances where you need to remove formatting from these objects to achieve a different look or to reset them to their default styles.
To clear formatting in text boxes, shapes, and SmartArt, follow these steps:
- Select the text box, shape, or SmartArt object from which you want to remove formatting.
- On the top ribbon, go to the “Format” tab, which appears when your object is selected.
- In the “Shape Styles” group, locate the “Shape Fill,” “Shape Outline,” and “Shape Effects” options.
- Click on the “Shape Fill” to choose “No Fill,” click on the “Shape Outline” to select “No Outline,” and click on the “Shape Effects” to select “No Effects.”
By following these steps, you will clear all formatting from the selected text boxes, shapes, or SmartArt objects, including fill color, outline, and effects.
Additionally, you can also use the “Reset Graphic” option within the “Format” tab to revert the object back to its default appearance.
Clearing formatting in text boxes, shapes, and SmartArt gives you the flexibility to experiment with different visual styles or to start fresh with a clean design. It allows you to remove any unwanted formatting while retaining the object’s structure and content.
Keep in mind that clearing formatting will remove all custom styling, including changes made to text color, font size, or shape effects. If you only want to remove specific formatting elements, such as the fill color or outline, consider using the individual formatting options within the “Shape Styles” group.
Remember to review your text boxes, shapes, or SmartArt objects after clearing formatting to ensure they align with your desired design. If you accidentally remove formatting and need to undo the changes, you can use the “Undo” command or the “Ctrl + Z” keyboard shortcut.
Clearing formatting in text boxes, shapes, and SmartArt allows you to achieve a consistent and polished appearance while maintaining the visual focus on your content.
Clear Formatting in Headers and Footers
In Microsoft Word, headers and footers are often used to display important information, such as page numbers, document titles, or author names. These elements can also have formatting applied to them to match the overall design of the document. However, there may be occasions when you need to remove the formatting from headers and footers to maintain a consistent look or to revert them to their default styles.
To clear formatting in headers and footers, follow these steps:
- Double-click on the header or footer area in your Word document to enter the editing mode for headers or footers.
- Select the portion of text or the specific element within the header or footer that you want to remove formatting from.
- On the top ribbon, go to the “Header & Footer Tools” tab, which appears when you are in the header or footer editing mode.
- In the “Design” tab, locate the “Navigation” group.
- In this group, you will find various formatting options for headers and footers. Click on the respective options, such as “Bold,” “Italic,” or “Font Color,” to remove the applied formatting.
By following these steps, you can clear formatting from specific elements within the headers and footers, ensuring they align with the rest of the document’s style or default formatting.
Remember that clearing formatting will remove all custom styling, such as font styles, colors, or alignments, from the selected elements. If you only want to remove specific formatting elements, consider using the individual formatting options within the “Navigation” group.
After clearing formatting, review your headers and footers to verify that they match your desired design and convey the necessary information. If you accidentally remove formatting and want to revert the changes, you can use the “Undo” command or the “Ctrl + Z” keyboard shortcut.
Clearing formatting in headers and footers allows you to maintain a consistent and professional appearance throughout your document. It ensures that the important information displayed in these areas aligns with the overall formatting of the document while providing clarity and visual appeal.
Clear Formatting with the Clear All Button
In Microsoft Word, there is a dedicated button called “Clear All” that allows you to remove all formatting from selected text or an entire document in one simple step. This feature is particularly useful when you want to start fresh or remove formatting inconsistencies throughout your content.
To clear formatting with the Clear All button, follow these steps:
- Select the text or entire document from which you want to remove formatting.
- On the top ribbon, go to the “Home” tab.
- In the “Font” group, you will find the “Clear All” button, represented by an eraser icon. Click on it.
- All formatting applied to the selected text or the entire document will be cleared, returning it to the default font and style settings.
By following these steps, you can quickly and effectively remove all formatting elements, such as font styles, sizes, colors, alignments, and more, from the selected text or document.
It’s important to note that using the Clear All button will remove all formatting, including any manually applied formatting that you may want to retain. If you only need to remove specific formatting elements, consider using the other methods discussed earlier to maintain more targeted control.
Remember to review your text or document after using the Clear All button to ensure that the desired formatting has been removed. If you accidentally remove formatting and need to revert the changes, you can use the “Undo” command or the “Ctrl + Z” keyboard shortcut.
The Clear All button offers a straightforward solution to remove all formatting from selected text or a document, allowing you to start from a clean slate or achieve a consistent layout and appearance.
Clear Formatting in Specific Styles
In Microsoft Word, styles play a significant role in maintaining consistency and efficiency in document formatting. Sometimes, you may want to remove formatting from specific styles while preserving the formatting of other styles. Word provides the functionality to clear formatting from specific styles, allowing you to modify the appearance of your document to meet your desired style requirements.
To clear formatting in specific styles, follow these steps:
- On the top ribbon, go to the “Home” tab.
- In the “Styles” group, click on the small arrow in the bottom right corner to open the Styles pane.
- In the Styles pane, you will see a list of styles used in your document.
- Right-click on the style that you want to clear formatting from.
- In the context menu that appears, select “Clear Formatting.”
By following these steps, formatting will be cleared from the selected style, leaving it with the default formatting settings defined by Word or the underlying style hierarchy.
It’s important to note that clearing formatting from a specific style will affect all text in your document using that style. Therefore, carefully consider which styles you want to modify and ensure that it aligns with your intended design.
Clearing formatting in specific styles allows you to make targeted changes to the appearance of your document without affecting other styles or manually adjusting each instance individually. It offers a streamlined approach to maintaining consistent styles while adapting the document to specific requirements.
Remember to review your document after clearing formatting from specific styles to ensure the desired modifications have been applied correctly. If you accidentally clear formatting from a style and want to revert the changes, you can use the “Undo” command or the “Ctrl + Z” keyboard shortcut.
The ability to clear formatting in specific styles empowers you to customize the look of your document while maintaining a cohesive and professional layout.
Clear Formatting in Bulleted or Numbered Lists
Bulleted and numbered lists are commonly used in Microsoft Word to organize and present information in a structured manner. However, there may be instances where the formatting of these lists needs to be modified or reset. Word provides the option to clear formatting from bulleted or numbered lists, allowing you to customize the appearance of your lists.
To clear formatting in bulleted or numbered lists, follow these steps:
- Select the bulleted or numbered list that you want to remove formatting from.
- On the top ribbon, go to the “Home” tab.
- In the “Paragraph” group, locate the “Bullets” and “Numbering” buttons.
- Click on the arrow next to the respective button to open the gallery of bullet or numbering styles.
- Scroll to the top of the gallery and click on the option that says “None” or “No Bullets” to remove the formatting.
By following these steps, the formatting (such as bullet points or numbers) applied to the selected list will be cleared, leaving it in a plain, unformatted state.
It’s important to note that clearing formatting from a bulleted or numbered list will remove the formatting from the entire list, including all its items. If you only need to remove formatting from specific list items, you can select them individually and follow the same steps.
Clearing formatting in bulleted or numbered lists allows you to modify the appearance of your lists for consistent and visually appealing formatting. Whether you want to start fresh with a new bullet or numbering style or remove formatting altogether, this method gives you control over how your lists are presented.
Remember to review your list after clearing formatting to ensure that the changes align with your desired format. If you accidentally clear formatting from a list and want to revert the changes, you can use the “Undo” command or the “Ctrl + Z” keyboard shortcut.
The ability to clear formatting in bulleted or numbered lists provides flexibility and customization options to enhance the visual impact of your document’s content.
Clear Formatting in Hyperlinks
Hyperlinks are a valuable feature in Microsoft Word that allows you to connect your document with external resources or other sections within the document. These hyperlinks are often formatted with specific styles to distinguish them from regular text. However, there may be occasions where you need to remove the formatting from hyperlinks to match your document’s overall design or reset them to their default styles.
To clear formatting in hyperlinks, follow these steps:
- Select the hyperlink text from which you want to remove formatting.
- On the top ribbon, go to the “Home” tab.
- In the “Font” group, locate the small arrow in the bottom right corner to open the Font dialog box.
- In the Font dialog box, ensure that the “Formatting” tab is selected.
- Under “Effects,” uncheck the “Underline” and “Color” options to remove the formatting from the hyperlink text.
- Click on the “OK” button to apply the changes and remove the formatting from the selected hyperlink.
By following these steps, the formatting, such as underline or color, applied to the selected hyperlink text will be cleared, leaving it in a plain, unformatted state.
It’s important to note that clearing formatting from a hyperlink will remove the formatting from the entire hyperlink text. If you only want to modify or remove specific formatting elements, such as the color or underline, consider using the individual formatting options within the Font dialog box.
Clearing formatting in hyperlinks provides the flexibility to customize the appearance of your document and ensure a consistent style throughout. It allows you to align the hyperlinks with the overall design of your document while maintaining their functionality.
Remember to review your hyperlinks after clearing formatting to ensure that they are still properly linked and visible. If you accidentally clear formatting from a hyperlink and want to revert the changes, you can use the “Undo” command or the “Ctrl + Z” keyboard shortcut.
The ability to clear formatting in hyperlinks enables you to personalize the appearance of your document while ensuring that the hyperlinks remain accessible and functional.
Clear Formatting in Footnotes and Endnotes
In Microsoft Word, footnotes and endnotes provide additional information or references that supplement the main content of a document. These notes often include formatting to differentiate them from the regular text. However, there may be instances where you need to remove formatting from footnotes and endnotes to align with the overall style of your document or reset them to their default appearance.
To clear formatting in footnotes and endnotes, follow these steps:
- In your Word document, navigate to the section that contains the footnotes or endnotes.
- Select the text within the footnote or endnote that you want to remove formatting from.
- On the top ribbon, go to the “References” tab.
- In the “Footnotes” or “Endnotes” group, click on the anchor symbol to open the Footnote and Endnote dialog box.
- In the dialog box, ensure that the “Footnote Text” or “Endnote Text” tab is selected.
- In the Text Options section, select the desired formatting options to remove the formatting from the selected footnote or endnote text.
- Click on the “Apply” button to apply the changes and remove the formatting.
By following these steps, you can clear formatting from specific text within footnotes or endnotes, allowing them to align with your document’s overall style and presentation.
It’s important to note that clearing formatting from footnotes and endnotes will remove the formatting from the selected text. If you only want to modify or remove specific formatting elements, consider using the individual formatting options within the Footnote and Endnote dialog box.
Clearing formatting in footnotes and endnotes provides flexibility in customizing the appearance of these supplementary notes while ensuring their clarity and consistency within your document.
Remember to review your footnotes and endnotes after clearing formatting to ensure they adhere to your desired format. If you accidentally clear formatting from a footnote or endnote and want to revert the changes, you can use the “Undo” command or the “Ctrl + Z” keyboard shortcut.
The ability to clear formatting in footnotes and endnotes allows you to maintain a professional and cohesive appearance throughout your document, ensuring that these additional notes are seamlessly integrated with your main content.