
Why would you want to hide your Facebook friends list?
Facebook provides users with a platform to connect and share with friends and family. While sharing personal information is part of the social networking experience, there might be instances when you want to keep certain parts of your profile private. One such aspect is your Facebook friends list. There are several reasons why you may consider hiding your friends list, and here are a few:
- Privacy concerns: One of the main reasons people choose to hide their friends list is for privacy. By default, your friends list is visible to everyone. However, you may want to control who can see your connections and maintain a level of privacy.
- Preventing unwanted friend requests: If you have a large number of friends on Facebook, you might receive numerous friend requests from people you don’t know. By hiding your friends list, you can reduce the likelihood of strangers sending you friend requests.
- Protecting your relationships: You might want to keep your professional connections separate from your personal ones. Hiding your friends list allows you to maintain a boundary between different aspects of your life.
- Avoiding social pressure: Some users feel pressured to accept friend requests from acquaintances or colleagues, even if they prefer not to add them to their friends list. By hiding your friends list, you can avoid potential social awkwardness or uncomfortable situations.
These are just a few reasons why you might want to hide your Facebook friends list. Remember, it’s your profile, and you have the right to control the visibility of your personal information. Now that you understand the motivations behind hiding your friends list, let’s explore how to do it.
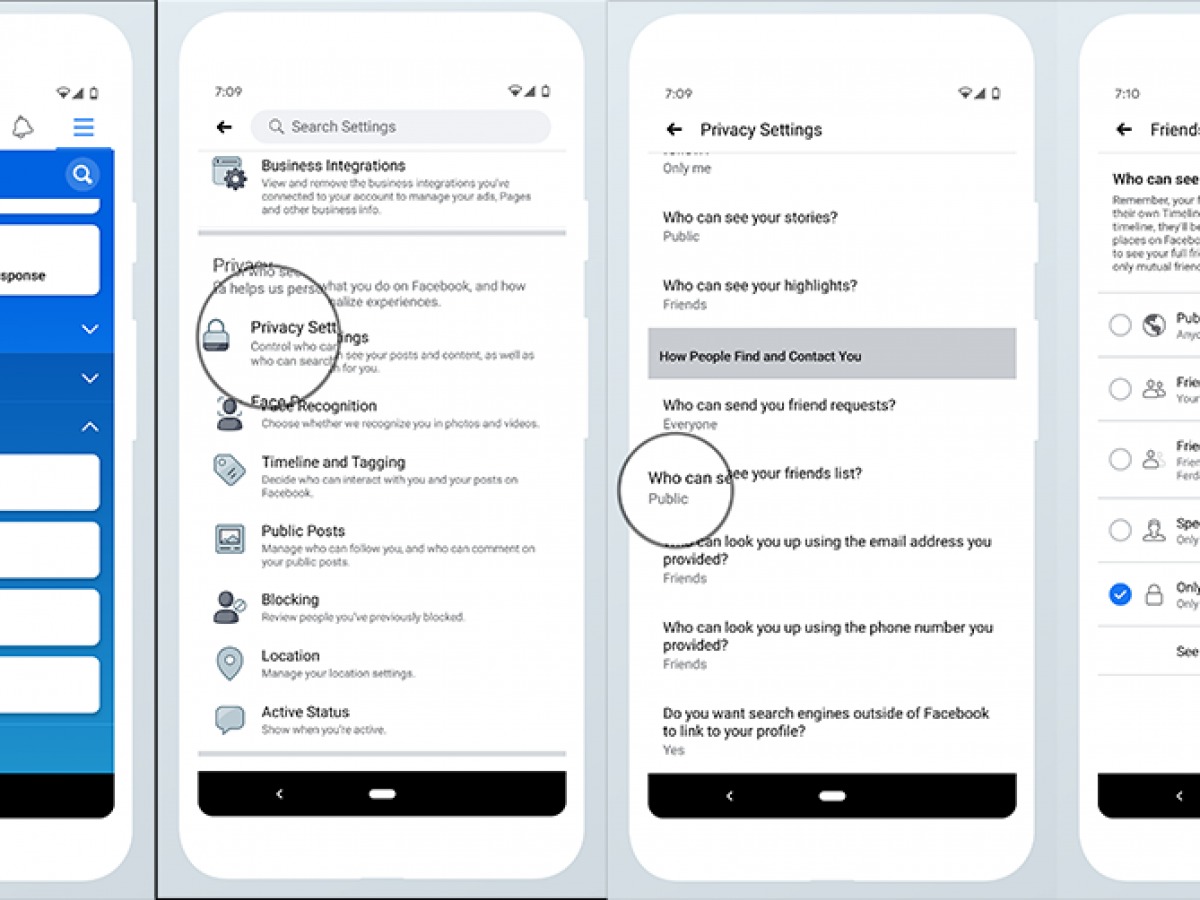
Step 1: Privacy Settings
Facebook allows you to customize your privacy settings to control who can see your friends list. Here’s how to adjust your privacy settings to hide your Facebook friends list:
- Log in to your Facebook account and navigate to your profile page.
- Click on the “Friends” tab under your cover photo. This will take you to your friends list.
- Next to the “Find Friends” button, you will see an icon that looks like a pencil. Click on it to access the privacy settings for your friends list.
- A drop-down menu will appear with several options. Select “Edit Privacy”.
- You will now see the privacy settings for your friends list. By default, it is set to “Public”, which means that anyone on Facebook can see your friends. To hide your friends list, click on the drop-down menu next to “Who can see your friends list?”
- Choose the desired privacy setting based on your preference. You can select “Friends” to only allow your friends to see your friends list, or you can select “Only Me” to hide your friends list from everyone.
- Once you have chosen the desired privacy setting, click on “Close” to save your changes. Your friends list will now be hidden from the selected audience.
It’s important to note that changing the privacy settings for your friends list will not affect your existing friends. They will still be able to see your friendship on their list. However, any new friend requests you receive will not be able to view your friends list if you have chosen to hide it.
By adjusting your privacy settings, you can maintain control over who sees your friends list on Facebook. Now that we have taken care of the privacy settings, let’s move on to the next step: limiting your audience.
Step 2: Limit Your Audience
In addition to adjusting the privacy settings for your friends list, Facebook provides additional options to limit the audience for your profile and posts. By implementing these settings, you can further control who can see your friends list indirectly. Here’s how to limit your audience:
- Go to your Facebook profile page and click on the downward-facing arrow in the top-right corner of the screen. From the dropdown menu, select “Settings & Privacy” and then click on “Settings”.
- In the left-hand menu, click on “Privacy”. This will take you to the privacy settings section.
- Under “Your Activity”, click on “Edit” next to “Who can see your future posts?”. Choose the desired audience for your future posts from the options provided. You can select “Friends” to limit your posts to your friends or choose a custom audience.
- Next, click on “Edit” next to “Limit the audience for posts you’ve shared with friends of friends or Public?” Adjust the audience for your previous posts according to your preference. You can choose to limit posts to “Friends” or a custom audience.
- Scroll down to the “How People Find and Contact You” section and click on “Edit” next to “Who can send you friend requests?”. Select the audience you want to receive friend requests from.
- Once you have made the desired changes, click on “Save Changes” to update your privacy settings.
By limiting the audience for your profile and posts, you indirectly influence who can see your friends list. Remember to regularly review and adjust your privacy settings to ensure they align with your preferences.
Now that you have learned how to adjust your privacy settings and limit your audience, it’s time to move on to the next step: reviewing your friend requests.
Step 3: Review Your Friend Requests
One way to maintain control over your Facebook friends list is by carefully reviewing and accepting friend requests. By being selective about whom you add to your friends list, you can ensure that only trusted individuals have access to your connections. Here’s how to review your friend requests:
- On your Facebook homepage, click on the friend icon at the top-right corner of the screen. This will take you to your friend requests page.
- You will see a list of pending friend requests that you have received. Take the time to review each request and consider whether you want to add that person to your friends list.
- If you decide to accept a friend request, click on the “Confirm” button next to the person’s name. This will add them to your friends list.
- If you prefer not to accept a friend request, you can click on the “Delete Request” button. This will remove the request and prevent the person from seeing your friends list.
- Remember, it’s important to only add people to your friends list whom you know and trust. Be cautious of accepting friend requests from strangers or individuals with whom you have no prior connection.
- If you receive friend requests from individuals you do not wish to add to your friends list, you can also click on the “Ignore” button. This will remove the request and indicate to Facebook that you do not wish to connect with that person.
Regularly reviewing and managing your friend requests is an effective way to maintain control over your Facebook friends list. By being selective about who you add, you can ensure that only close friends and trusted contacts have access to your connections.
Now that you know how to review your friend requests, let’s move on to the next step: adjusting your tagging settings.
Step 4: Adjust Your Tagging Settings
In addition to managing your friend requests, it’s essential to adjust your tagging settings to control who can tag you in posts and photos. This will help in ensuring that your friends list remains private. Here’s how to adjust your tagging settings:
- Go to your Facebook homepage and click on the downward-facing arrow in the top-right corner of the screen. From the dropdown menu, select “Settings & Privacy” and then click on “Settings”.
- In the left-hand menu, click on “Profile and Tagging”. This will take you to the tagging settings section.
- Under “Who can add tags to your posts?”, click on “Edit” and select the desired audience from the options provided. You can choose to allow only friends to tag you or customize the audience based on your preferences.
- Next, under “Review tags people add to your posts before they appear on Facebook?”, click on “Edit” and enable the option to review tags before they are added to your posts. This will give you control over what appears on your profile.
- Scroll down further to the “When you’re tagged in a post, who do you want to add to the audience if they aren’t already in it?” section. Click on “Edit” and choose the desired option. You can select “Friends” to limit the visibility of posts you’re tagged in to your friends.
- Once you have adjusted your tagging settings, click on “Close” to save your changes.
By customizing your tagging settings, you can control who can tag you in posts and ensure that any tags are reviewed before they are visible to others. Taking these steps will help in safeguarding the privacy of your friends list.
Now that you have adjusted your tagging settings, let’s move on to the next step: managing your friend list privacy.
Step 5: Manage Your Friend List Privacy
Managing your friend list privacy is crucial to ensure that your connections are not visible to unwanted individuals. By customizing the privacy settings for your friends list, you can maintain control over who can see your friends. Here’s how to manage your friend list privacy:
- Go to your Facebook profile page and click on the “Friends” tab located under your cover photo. This will take you to your friends list.
- In the top-right corner of the friends page, click on the pencil icon. This will open a menu with several options.
- From the menu, select “Edit Privacy”. A pop-up window will appear with the privacy settings for your friends list.
- Here, you can choose the desired visibility for your friends list. You can select “Public” to make your friends list visible to everyone, “Friends” to limit the visibility to your friends, or customize the audience based on your preferences.
- If you want to exclude certain individuals from seeing your friends list, you can click on the “Exclude” option and enter the names of those individuals.
- Once you have set the desired privacy settings for your friends list, click on “Save” to apply the changes.
By managing your friend list privacy, you can ensure that only the intended audience has access to your connections. This allows for better control over the visibility of your friends list and enhances your overall privacy on Facebook.
Now that you have learned how to manage your friend list privacy, let’s move on to the next step: blocking unwanted friends.
Step 6: Block Unwanted Friends
If you have individuals on Facebook who you no longer want to have any connection with, whether it’s due to privacy concerns or personal reasons, you can block them from accessing your profile and friends list. Here’s how to block unwanted friends:
- Open Facebook and log into your account.
- Go to the profile of the person you want to block. You can do this by searching for their name in the search bar or by clicking on their name in a post or comment.
- On their profile, locate the three-dot menu icon (ellipsis) located below their cover photo or next to the “Message” button. Click on it to open a dropdown menu.
- From the dropdown menu, select “Block”. A confirmation popup will appear.
- Read through the information in the popup to understand what blocking entails. If you still want to proceed with blocking the person, click on “Block” again to confirm your decision.
- Once you block someone, they will no longer be able to see your profile, posts, or friends list. Additionally, you will be removed from each other’s friends list, and you will not be able to send messages or interact on Facebook.
- To unblock someone in the future if you change your mind, you can follow similar steps. Instead of the “Block” option, you will see “Unblock” next to the person’s name.
Blocking unwanted friends can provide an added layer of privacy and security. It allows you to restrict access to your profile and friends list for individuals you do not wish to connect with on Facebook.
Now that you know how to block unwanted friends, let’s move on to the final step: staying aware of new privacy updates.
Step 7: Stay Aware of New Privacy Updates
Facebook frequently updates its privacy features and settings to enhance user control and protect personal information. It’s essential to stay informed about these updates to ensure that your friends list remains private. Here’s how to stay aware of new privacy updates:
- Regularly check the “Settings & Privacy” section in your Facebook account. This is where you can find updates and changes related to privacy settings.
- Follow official Facebook blogs and social media channels to stay updated on new features, tools, and privacy enhancements. Facebook often announces updates through these channels.
- Review the notifications and emails sent by Facebook regarding privacy changes. These notifications can provide valuable information about updates to privacy settings and options.
- Join Facebook user groups or online communities where users discuss privacy-related topics. These groups can provide insights, tips, and discussions about the latest privacy updates.
- Consider enabling Facebook’s “Privacy Checkup” feature. This interactive tool guides you through various privacy settings and helps you review and adjust them as needed.
- Take the time to read through the privacy policies and terms of service provided by Facebook. While they may be lengthy, they outline important information about your rights, data usage, and privacy options.
- Stay educated about general privacy best practices and online safety tips. This knowledge will help you make informed decisions about your Facebook friends list and other aspects of your online presence.
By staying aware of new privacy updates, you can adapt and optimize your Facebook privacy settings accordingly. This ensures that your friends list and other personal information remain protected.
Now that you know how to stay aware of new privacy updates, you have completed all the necessary steps to hide your Facebook friends list successfully. It’s important to regularly review and adjust your privacy settings to align with your preferences and maintain control over your online presence.