
Method 1: Hide Photos in the Photos App
If you want to keep your photos hidden without the need for any third-party apps, the Photos app on your iPhone can do the trick. Here’s how you can hide your photos:
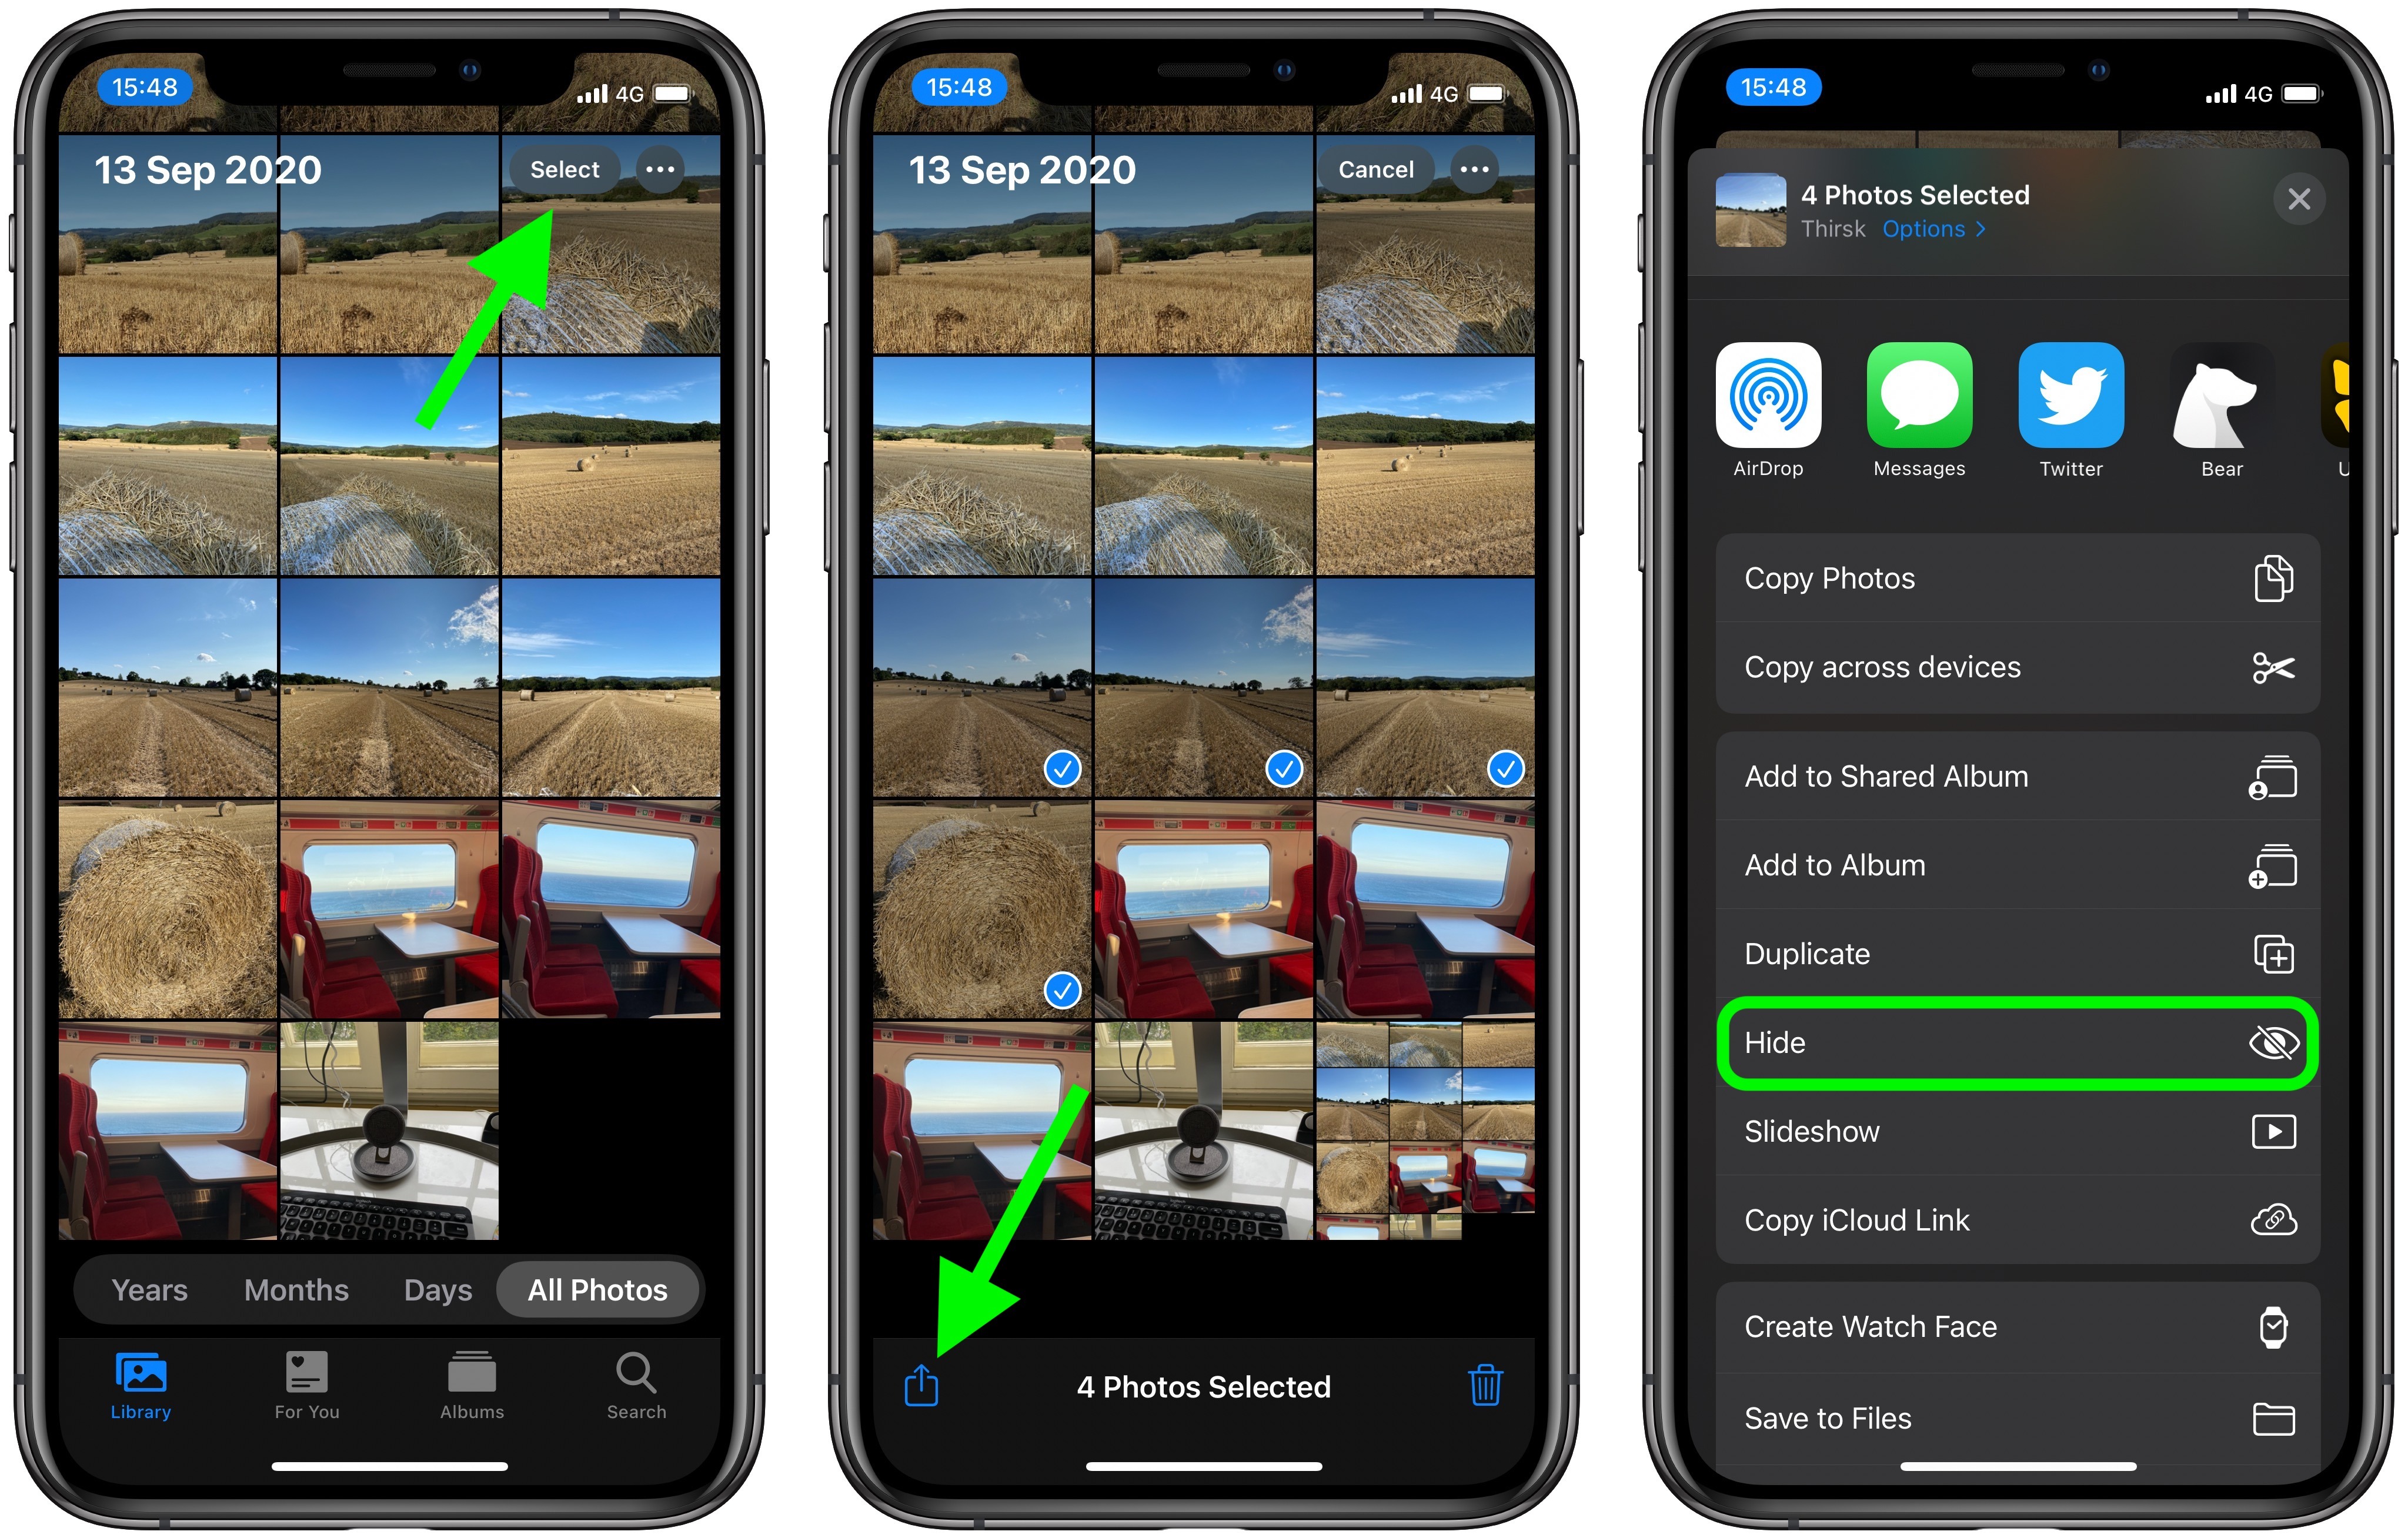
- Open the Photos app on your iPhone and find the photo that you want to hide.
- Tap on the photo to view it in full-screen mode.
- Tap on the Share button located at the bottom left corner of the screen.
- In the Share options, scroll down and find the “Hide” option. Tap on it.
- A confirmation message will appear, asking if you want to hide the photo. Tap on “Hide Photo.”
Once you have hidden a photo, it will no longer appear in the “Photos” tab or any other default photo albums. However, please note that the photo will still be visible in the “Albums” tab under the “Hidden” album.
If you want to unhide a hidden photo, follow these steps:
- Open the Photos app and go to the “Albums” tab.
- Scroll down and look for the “Hidden” album.
- Tap on the album to open it.
- Find the photo that you want to unhide.
- Tap on the photo to open it.
- Tap on the Share button and select “Unhide” to restore the photo to its original location.
By using this method, you can easily hide and unhide photos within the Photos app on your iPhone. This is a convenient option if you want to keep certain photos private without relying on any third-party apps.
Method 2: Use the “Hidden” Album
If you want to hide photos on your iPhone more discreetly, you can utilize the “Hidden” album feature. Here’s how you can use the “Hidden” album:
- Open the Photos app on your iPhone and go to the “Albums” tab.
- Scroll down until you find the “Hidden” album.
- Tap on the “Hidden” album to open it.
- To hide a photo, tap on the “Select” button at the top right corner of the screen.
- Select the photos that you want to hide by tapping on them.
- After selecting the photos, tap on the Share button at the bottom left corner of the screen.
- In the Share options, scroll down and find the “Hide” option. Tap on it.
- A confirmation message will appear, asking if you want to hide the selected photos. Tap on “Hide Photo.”
Once you have hidden photos in the “Hidden” album, they will no longer appear in the “Photos” tab or any other default photo albums. This provides an additional layer of privacy as the “Hidden” album is not easily visible to others.
To unhide photos from the “Hidden” album, follow these steps:
- Open the Photos app and go to the “Albums” tab.
- Scroll down and find the “Hidden” album.
- Tap on the album to open it.
- To unhide a photo, tap on the photo to view it in full-screen mode.
- Tap on the Share button and select “Unhide” to restore the photo to its original location.
Using the “Hidden” album feature in the Photos app allows you to keep your photos hidden in a separate and discreet location. It’s an effective way to maintain your privacy without having to rely on third-party apps.
Method 3: Hide Photos in Third-Party Apps
If you’re looking for more advanced and secure options to hide your photos on your iPhone, you can consider using third-party apps specifically designed for photo hiding. These apps offer a range of features to ensure your photos remain private. Here’s how you can hide photos using third-party apps:
- Go to the App Store on your iPhone and search for “photo vault” or “photo hiding” apps.
- Choose a reputable app with good reviews and ratings.
- Install the app on your iPhone and launch it.
- Set up a secure password or passcode to access the app.
- Follow the app’s instructions to import photos from your iPhone’s camera roll or photo library.
- Once the photos are imported, you can delete them from your camera roll to ensure they are only accessible through the app.
- Explore the app’s features to further secure and organize your hidden photos. Some apps offer features like decoy passwords, fingerprint authentication, or even a secret camera for capturing photos directly within the app.
The advantage of using third-party apps is that they provide an additional layer of security and privacy compared to the built-in options. These apps often offer encryption to protect your photos from unauthorized access. Plus, they may have more advanced features, such as creating multiple albums, slideshow modes, or even the ability to hide other file types like videos or documents.
Remember to choose a trusted app from a reputable developer to ensure the privacy and security of your hidden photos. Read reviews and do some research before making a decision.
Note: Keep in mind that using third-party apps means entrusting your photos to a separate platform. Make sure to back up your photos regularly to prevent any data loss.
Method 4: Lock Photos in a Private Album
If you want to have more control over the privacy of your photos and keep them locked behind a password, you can create a private album on your iPhone. This method allows you to restrict access to specific photos without the need for third-party apps. Here’s how you can lock photos in a private album:
- Open the Photos app on your iPhone and go to the “Albums” tab.
- Tap on the “Add” button located at the top left corner of the screen to create a new album.
- Give your album a name, such as “Private” or any other preferred name.
- Tap on the “Save” button to create the album.
- Next, go to the “Photos” tab and select the photos that you want to add to the private album.
- Tap on the Share button and select the “Add to Album” option.
- Choose the private album you created in the previous step.
Now, the selected photos are moved to the private album and will not be visible in the main “Photos” tab or other default albums. However, please note that the album itself is still visible to others, but the photos inside are locked behind a password or Face/Touch ID if you have enabled it on your device.
To access the private album and view the locked photos, follow these steps:
- Open the Photos app on your iPhone and go to the “Albums” tab.
- Scroll down until you find the private album you created.
- Tap on the album to open it.
- If you have enabled Face/Touch ID, you will be prompted to authenticate yourself.
- Enter your password or use Face/Touch ID to unlock the album.
By using this method, you can keep your photos securely locked in a private album that requires a password or biometric authentication to access. It provides an extra level of privacy and control over who can view your hidden photos.
Method 5: Use a Vault App to Hide Photos
If you’re looking for a more secure and feature-rich way to hide photos on your iPhone, using a vault app can be a great option. Vault apps are designed specifically to provide enhanced privacy and protection for your sensitive content. Here’s how you can use a vault app to hide your photos:
- Go to the App Store on your iPhone and search for “vault app” or “photo vault app.”
- Choose a reputable vault app with positive reviews and ratings.
- Install the selected vault app on your iPhone and launch it.
- Set up a strong password or passcode to safeguard your vault app.
- Follow the app’s instructions to import photos from your iPhone’s camera roll or photo library into the vault app.
- Once the photos are imported, you can delete them from your camera roll to ensure they are only accessible through the vault app.
- Explore the app’s features such as creating multiple albums, adding passwords to individual albums, or enabling additional security measures like fake login modes or intruder alerts.
Using a vault app allows you to encrypt and lock your photos, providing an extra layer of security. These apps often employ advanced encryption algorithms to ensure the privacy of your hidden photos. Many vault apps also offer additional features such as decoy modes, cloud backup, or even a secure camera within the app itself.
Make sure to choose a reputable vault app from a trusted developer and read user reviews to ensure the app meets your privacy requirements. Additionally, consider regularly backing up your vault app data to prevent any loss of your hidden photos.
Please note that some vault apps may require a subscription or offer in-app purchases for access to certain features. It’s important to review the pricing details before committing to a particular app.
Remember to choose a strong and unique password or passcode for your vault app to ensure maximum security. Avoid using easily guessable information such as birthdays or common number sequences.
By utilizing a vault app, you can keep your photos securely hidden and enjoy additional privacy features that go beyond the capabilities of the default Photos app on your iPhone.
Method 6: Hide Photos in the Notes App
If you’re looking for a simple and built-in way to hide photos on your iPhone, you can utilize the Notes app. While the Notes app is primarily used for creating text-based notes, it also allows you to add photos, making it a convenient option for hiding pictures. Here’s how you can hide photos in the Notes app:
- Open the Notes app on your iPhone and create a new note or open an existing one.
- Tap on the “+” button to add a new element to your note.
- Select “Photos” or “Camera” to add photos from your camera roll or take new ones directly within the Notes app.
- Choose the photos that you want to hide and add them to the note.
- Once the photos are added, you can resize or position them within the note as desired.
- When you’re finished, tap “Done” to save the changes to your note.
Once the photos are added to a note, they will be hidden from your main photo library and can only be accessed within the Notes app itself. This method is beneficial if you want to keep your photos discreet without the need for third-party apps.
To access the hidden photos in the Notes app, follow these steps:
- Open the Notes app on your iPhone and locate the note containing the hidden photos.
- Tap on the note to open it.
- Scroll through the note to find the hidden photos.
- Tapping on a photo will display it in full screen, and you can zoom in or out as needed.
Remember, while using the Notes app to hide photos provides a basic level of privacy, it may not offer the advanced security features found in dedicated photo hiding apps. Therefore, it’s essential to consider the sensitivity and security requirements of your hidden photos before choosing this method.
You can also add a password or enable biometric authentication (such as Face ID or Touch ID) for the Notes app for an additional layer of security. To do this, go to Settings, select Notes, and then set up a password or enable the biometric authentication option.
By utilizing the Notes app, you can easily hide photos in a secure and discreet manner without needing any third-party apps.
Method 7: Hide Photos in a Secret Calculator App
If you want to take your photo hiding game to the next level, you can use a secret calculator app to hide your photos on your iPhone. These apps disguise themselves as innocent calculator apps but have built-in photo hiding functionality. Here’s how you can hide photos in a secret calculator app:
- Go to the App Store on your iPhone and search for “secret calculator app.”
- Choose a reputable secret calculator app with positive reviews and ratings.
- Install the selected app on your iPhone and launch it.
- Set up a secure password or passcode to access the secret calculator app.
- Follow the app’s instructions to import photos from your camera roll or photo library into the app.
- Once the photos are imported, they will be hidden and only accessible through the secret calculator app.
When you launch the secret calculator app, it will appear as a normal calculator on the surface. However, entering the correct password or passcode will unlock the hidden photo vault. This extra layer of disguise provides an added level of privacy and security for your hidden photos.
Some secret calculator apps also offer additional features such as decoy passwords, break-in alert notifications, or the ability to keep certain photos visible while hiding others. Explore the app settings to customize your privacy preferences.
Please note that while secret calculator apps provide enhanced privacy, it’s crucial to choose a reputable app from a trusted developer. Read user reviews and do some research to ensure that the app meets your security requirements.
Remember to periodically back up your hidden photos to prevent any potential loss of data. This can be done by exporting the photos to your camera roll or using cloud storage services to create a separate backup.
Using a secret calculator app adds an extra layer of secrecy when it comes to hiding your photos on your iPhone. It’s a clever and inconspicuous way to keep your private pictures away from prying eyes.
Method 8: Hide Photos Using a File Manager App
If you want complete control over the organization and hiding of your photos, using a file manager app can be a viable option. With a file manager app, you can create hidden folders or encrypt your photos to keep them out of sight. Here’s how you can hide photos using a file manager app:
- Go to the App Store on your iPhone and search for a reputable file manager app.
- Choose an app with positive reviews and ratings that offers features like folder management and encryption.
- Install the selected app on your iPhone and launch it.
- Navigate to the location where you want to create a hidden folder for your photos.
- Create a new folder and give it a name that does not easily indicate its contents.
- Move or copy the photos you want to hide into this newly created folder.
- Some file manager apps offer additional features like encryption. If your selected app has this capability, consider encrypting the hidden folder for added security.
Once you have hidden your photos using a file manager app, they will be stored in the hidden folder or encrypted for privacy. This method provides you with complete control over the location and visibility of your hidden photos.
To access the hidden photos, you will need to open the file manager app and navigate to the hidden folder or decrypt the encrypted files if necessary. Make sure to protect your file manager app with a strong password or passcode to ensure the privacy and security of your hidden photos.
It’s essential to choose a trusted file manager app from a reputable developer to ensure that your photos are adequately protected. Read user reviews and do some research before selecting an app that meets your privacy requirements.
Remember to regularly back up your hidden photos to prevent any potential loss. This can be done by exporting the photos to an external storage device or using cloud storage services to create a separate backup.
Using a file manager app to hide photos provides you with greater flexibility and customization options, allowing you to keep your photos hidden and organized in a way that suits your preferences.
Method 9: Hide Photos in the Messages App
If you’re looking for a quick and simple way to hide photos on your iPhone without using any additional apps, the Messages app can serve as a discreet hiding place. You can utilize the “Keep Messages” feature to store your private photos within individual message threads. Here’s how you can hide photos in the Messages app:
- Open the Photos app on your iPhone and select the photo that you want to hide.
- Tap on the Share button and choose the option “Message.”
- In the “To” field, enter your own phone number or the phone number of a trusted contact who won’t accidentally delete the message thread.
- Tap on the Send button.
- Once the message is sent, you will see it appear in the Messages app as a conversation thread.
- To hide the photo within the message, swipe left on the message thread and select “Hide.”
Once you have hidden the photo within the message thread, it will be tucked away in the hidden messages section of the Messages app, making it less likely to be stumbled upon by others.
To view the hidden photo, follow these steps:
- Open the Messages app on your iPhone.
- Swipe left to reveal the hidden messages section.
- Find the message thread that contains the hidden photo and tap on it.
- The photo will be displayed in the conversation view, and you can view it in full-screen mode.
Please note that the hidden messages section only appears if you have enabled the “Hide Alerts” feature for any specific message threads. To enable or disable “Hide Alerts,” swipe left on a message thread, tap on “More,” and toggle the “Hide Alerts” option. Keep in mind that enabling the feature will hide notifications for that specific conversation.
While this method can be useful for quick and temporary hiding of photos, it’s important to note that the hidden photos are not securely encrypted. If you require a higher level of security, consider using other dedicated photo hiding methods or apps.
By utilizing the Messages app, you can conveniently hide photos within individual message threads and keep them out of plain sight. Just ensure to use caution when deleting or clearing message threads to avoid accidentally losing your hidden photos.
Method 10: Encrypt Your Photos with Lock Photos App
If you want to ensure the highest level of security for your hidden photos on your iPhone, using a dedicated photo encryption app can be a reliable option. These apps allow you to encrypt and password-protect your photos, providing an additional layer of privacy. One such app is Lock Photos. Here’s how you can encrypt your photos using Lock Photos:
- Go to the App Store on your iPhone and search for the Lock Photos app.
- Choose Lock Photos from a reputable developer with positive reviews and ratings.
- Install the Lock Photos app on your iPhone and open it.
- Set up a strong and unique password or passcode to secure your encrypted photos.
- Follow the app’s instructions to import photos from your camera roll or photo library.
- Once the photos are imported, Lock Photos will encrypt and securely store the photos within the app.
Lock Photos uses advanced encryption algorithms to ensure the privacy and security of your hidden photos. With encryption in place, even if someone gains access to your iPhone or the app itself, they won’t be able to view the photos without the correct password or passcode.
To access the encrypted photos in Lock Photos, follow these steps:
- Open the Lock Photos app on your iPhone.
- Enter your password or passcode to unlock the app.
- Navigate through the app and view the encrypted photos.
- Select a photo and use the app’s built-in viewer to view it securely.
Lock Photos also offers additional features such as creating custom albums, enabling a secure private web browser, or even a decoy mode to mask the app as something else entirely.
Remember to regularly back up your encrypted photos to prevent any potential loss. This can be done by exporting the photos to a secure location or using cloud storage services to create a separate backup.
By encrypting your photos with Lock Photos or a similar app, you can ensure that your hidden photos remain completely secure and inaccessible to unauthorized individuals.
Method 11: Hide Photos in a Cloud Storage App
If you prefer to keep your hidden photos securely stored in the cloud, utilizing a cloud storage app can be an effective method. Cloud storage apps provide the convenience of accessing your photos from any device while offering privacy features to keep them hidden. Here’s how you can hide photos using a cloud storage app:
- Choose a reputable cloud storage app from the App Store that offers private storage options and strong security features.
- Download and install the app on your iPhone.
- Create an account or sign in to your existing account.
- Upload the photos you want to hide to your cloud storage account.
- Once the photos are uploaded, create a private folder or use the app’s privacy settings to hide the folder from public view.
- Set a strong password or enable biometric authentication if available to ensure only authorized access to the cloud storage app.
By storing your photos in the cloud, they will be securely stored and accessible from any device with the cloud storage app installed. The added benefit is that these photos won’t be easily discoverable on your iPhone.
To view the hidden photos in the cloud storage app, follow these steps:
- Open the cloud storage app on your iPhone.
- Log in to your account if necessary.
- Navigate to the private folder where you stored the hidden photos.
- Tap on the photos to view them within the app.
- Some cloud storage apps also allow you to download and save specific photos back to your iPhone if necessary.
Remember to choose a reputable cloud storage provider and review their security and privacy policies before uploading your photos. It’s important to understand how your data is protected and ensure the cloud storage provider takes measures to keep your photos safe.
Additionally, regularly backup your photos to avoid potential data loss. Many cloud storage apps offer automatic syncing or backup features, ensuring your hidden photos are safely stored in the cloud.
By using a cloud storage app to hide your photos, you can keep them securely stored in an easily accessible location while maintaining their privacy on your iPhone.
Method 12: Use a Third-Party Secure Photo Vault App
If you prioritize privacy and want advanced security features to hide your photos on your iPhone, using a third-party secure photo vault app is an excellent choice. These apps offer robust encryption, password protection, and additional privacy features to ensure the utmost security for your hidden photos. Here’s how you can use a third-party secure photo vault app:
- Search for a reputable secure photo vault app on the App Store that meets your privacy requirements.
- Choose an app with positive reviews and ratings, and consider features such as encryption, password locking, and decoy modes.
- Install the selected app on your iPhone and open it.
- Follow the app’s instructions to set up a strong and unique password or passcode to access the app.
- Import your photos from your camera roll or photo library into the secure photo vault app.
- The app will encrypt and store your photos securely within its protected environment.
Secure photo vault apps often use advanced encryption algorithms to ensure that your hidden photos are safeguarded even if your iPhone falls into the wrong hands.
To view or retrieve your hidden photos from the secure photo vault app on your iPhone, follow these steps:
- Open the secure photo vault app on your iPhone.
- Enter your password or passcode to unlock the app.
- Navigate through the app to access your hidden photos.
- Some apps offer additional features like creating albums, adding tags, or even a secure camera to capture photos directly within the app.
Keep in mind that regular backups of your hidden photos are essential to prevent any potential loss. Some secure photo vault apps offer options to back up your encrypted photos to cloud storage services or export them to an external drive.
It’s vital to choose a reputable secure photo vault app from a trusted developer. Read user reviews, research the app’s privacy policy, and ensure that your hidden photos will be handled securely and with the utmost privacy.
By using a third-party secure photo vault app, you can rest assured that your hidden photos remain highly secure and inaccessible to unauthorized individuals.
Method 13: Hide Photos by Transferring them to a Computer or External Storage
If you want to keep your photos hidden from your iPhone altogether, transferring them to a computer or external storage device can be an effective method. This allows you to store your photos in a separate location where they won’t be easily accessible on your iPhone. Here’s how you can hide photos by transferring them to a computer or external storage:
- Connect your iPhone to your computer using a USB cable.
- Unlock your iPhone and tap “Trust” on the prompt that appears on your iPhone screen, granting access to your computer
- Open the file explorer or iTunes on your computer.
- Select your iPhone from the list of available devices.
- Navigate to the location on your computer where you want to transfer your photos.
- Within the file explorer or iTunes, find the photos you want to hide on your iPhone.
- Drag and drop the selected photos from your iPhone to the desired location on your computer.
- You can create subfolders or use existing folders to further organize and hide your transferred photos.
Transferring your photos to a computer or external storage device ensures that they are not easily accessible on your iPhone. You can keep them hidden and away from prying eyes.
To access the hidden photos, you will need to connect your iPhone to the computer again and navigate to the location where you transferred the photos. This way, you can view and manage the photos when needed.
It’s important to remember that, while this method provides an extra layer of privacy, it’s crucial to keep backups of your photos on the computer and regularly update them. By doing so, you protect against potential loss of your hidden photos due to device theft, damage, or technical malfunctions.
Additionally, consider securing your computer with a strong password or encryption, as well as making regular backups of your computer to external storage or cloud services for added protection.
By transferring your photos to a computer or external storage device, you can keep them securely hidden from your iPhone while having easy access to them when needed. This method allows for greater control over the privacy and accessibility of your hidden photos.
Method 14: Utilize the Guided Access Feature
If you want to hide photos on your iPhone temporarily and prevent others from accessing certain apps or features, the Guided Access feature can be extremely helpful. Guided Access allows you to lock your iPhone to a specific app and control which features are accessible. Here’s how you can utilize the Guided Access feature to hide photos:
- Open the Settings app on your iPhone.
- Tap on “Accessibility.”
- Scroll down and select “Guided Access.”
- Toggle the Guided Access switch to enable it.
- Set a passcode for Guided Access, which will be used to end the session.
- Open the Photos app or any other app that contains the photos you want to hide.
- Triple-click the Side or Home button (depending on your iPhone model) to activate Guided Access.
- Tap on “Options” in the bottom left corner to customize the Guided Access settings.
- Disable any features you want to hide, such as the ability to view other albums or exit the app.
- Tap on “Start” to begin the Guided Access session.
With Guided Access enabled, anyone using your iPhone will only have access to the specific app you selected and the features you allowed. This means they won’t be able to navigate away from the Photos app or view any other albums or photos.
To end the Guided Access session and regain full access to your iPhone, follow these steps:
- Triple-click the Side or Home button again.
- Enter the Guided Access passcode that you set earlier.
- The Guided Access session will end, and you will have access to all the features of your iPhone.
The Guided Access feature is a convenient way to temporarily restrict access to certain apps or features on your iPhone, including the Photos app. It offers a simple and effective method to hide photos from prying eyes, especially when you want to lend your iPhone to someone or temporarily restrict access during specific situations.
Please note that Guided Access is a temporary solution and doesn’t offer the same level of security as dedicated photo vault apps or encryption methods. For long-term photo hiding, consider utilizing more secure methods mentioned earlier in this article.
By utilizing the Guided Access feature on your iPhone, you can control access to your photos and ensure they remain hidden from unauthorized users.