
Why Forward Text Messages to Email?
Text messages have become an integral part of our daily communication. Whether it’s an important piece of information, a memorable conversation, or a valuable contact, text messages often contain content that we would like to keep and have easy access to. One way to ensure the preservation and accessibility of these messages is by forwarding them to your email account. There are several reasons why you might want to forward text messages to email:
- Backup and Archiving: Forwarding text messages to email provides a convenient way to create a backup and archive of your important conversations. In case your phone gets lost, damaged, or stolen, you will still have a record of those messages in your email account.
- Easy Searchability: Email clients often come equipped with advanced search features, allowing you to quickly locate specific text messages based on keywords or sender/receiver information. This can be especially useful when you need to refer back to a specific message or retrieve important information contained within a conversation.
- Access Across Devices: By forwarding text messages to email, you can access your messages from any device with an internet connection. Whether you’re using a computer, tablet, or another smartphone, you will have the flexibility to view and respond to your messages without being limited to your phone.
- Sharing and Collaboration: Sometimes, you may need to share a text message conversation with someone else or collaborate on a project that involves text message content. Forwarding the messages to email makes it easier to share and collaborate with others, as email platforms often offer sharing or collaboration options.
- Documentation and Legal Purposes: In certain situations where text messages are vital for documentation or legal purposes, forwarding them to email can be crucial. This ensures that you have a verifiable record of the conversation, which may be required for legal matters, disputes, or official documentation.
- Organizational Purposes: If you prefer to keep your messages organized in a specific folder or label, forwarding them to email can help you achieve that. You can create custom folders or labels in your email account and organize your forwarded text messages accordingly, making them easier to find and reference in the future.
By forwarding text messages to email, you can take advantage of the benefits mentioned above and have peace of mind knowing that your important conversations and information are securely stored and easily accessible. It’s a simple process that can be done on most smartphones, and once set up, you can choose which text messages to forward and when, depending on your preferences and needs.
Step 1: Determine the Type of Text Messages You Want to Forward
Before you begin forwarding text messages to email, it’s essential to determine the specific type or category of messages you want to forward. This step will help you identify which conversations or individual messages should be included in the forwarding process. Here are a few factors to consider in determining the type of text messages you want to forward:
- Importance: Consider the importance of the content within the text messages. Are they conversations with family or friends that hold sentimental value? Are they work-related conversations that contain critical information? By assessing the importance, you can prioritize which messages to forward to ensure they are safely stored and easily accessible.
- Relevance: Think about the relevance of the text messages to your current or future needs. Do they contain important contact information, addresses, or directions? Are they part of an ongoing conversation that requires your attention? Selecting the relevant messages will ensure you have the necessary information readily available when needed.
- Timeframe: Consider the timeframe of the text messages you want to forward. Are you looking to forward recent conversations or messages from a specific time period? Narrowing down the timeframe will help you locate and select the messages for forwarding more efficiently.
- Sender/Receiver: Take into account the sender or receiver of the text messages. Are they messages from a specific contact or group of contacts? If you have multiple conversations with different people, you may want to prioritize forwarding messages from certain individuals or groups to ensure you have their communication history readily available.
- Attachments: If your text messages contain important attachments, such as photos, videos, or documents, make a note of them. Consider whether you want to forward the messages with the attachments or if you only need the text content. This will determine the best method or settings to use for forwarding.
By considering these factors, you can determine the specific type or category of text messages you want to forward to your email account. This will help streamline the forwarding process and ensure that you capture the most relevant and important content within your conversations. Once you have identified the desired messages, you can proceed to the next step to set up the text message forwarding feature on your phone.
Step 2: Set Up the Text Message Forwarding Feature on Your Phone
To forward text messages to your email, you’ll need to enable the text message forwarding feature on your smartphone. This feature allows you to redirect incoming messages to your email account. The exact steps may vary slightly depending on your device and operating system, but the general process is as follows:
- Go to Settings: Open the Settings app on your phone. Depending on your device, you may find it on the home screen or in the app drawer.
- Find the Messaging Settings: Look for the section related to messaging or text messages in the Settings menu. It might be labeled as “Messages,” “SMS,” or “Text Messages.”
- Select Text Message Forwarding: Within the messaging settings, you should see an option for text message forwarding. Tap on it to access the forwarding settings.
- Enable Forwarding: Toggle the switch next to the email account you want to forward your text messages to. You may need to log in to that email account on your device if you haven’t done so already.
- Verify Email Address: Depending on your device and email provider, you may be prompted to verify your email address for forwarding. Follow the on-screen instructions to complete the verification process.
- Set Default Email Address (Optional): If you have multiple email accounts set up on your device, you can choose a default email address for forwarding. This is useful if you want to forward messages to a specific email account without having to select it each time.
- Adjust Other Settings (Optional): Some devices may offer additional settings for text message forwarding, such as choosing which types of messages to forward (e.g., only selected contacts or messages from certain applications). Adjust these settings according to your preferences.
Once you have successfully set up the text message forwarding feature on your phone, you are ready to start forwarding your desired text messages to your email account. In the following steps, we will guide you through the process of selecting and forwarding specific messages. Remember, the exact steps for selecting and forwarding messages may differ slightly depending on your device’s messaging app.
Step 3: Open the Text Message Conversation You Want to Forward
Now that you have enabled text message forwarding on your phone, it’s time to open the conversation containing the text messages you want to forward. Follow these steps to access the conversation:
- Open the Messaging App: Locate the messaging app icon on your phone’s home screen or app drawer, and tap on it to open the app.
- Find the Conversation: Look through your list of conversations or threads to find the specific conversation that contains the text messages you wish to forward. The conversations are usually listed chronologically, with the most recent ones at the top.
- Select the Conversation: Tap on the conversation to open it. This will display the messages exchanged between you and the other person or group of people.
Once you have opened the desired conversation, you will be able to see the text messages within it. From here, you can proceed to the next step to select the specific text messages that you want to forward to your email.
Note: Depending on your messaging app and device, you may have the option to search for specific conversations or use filters to narrow down your message history. These features can be helpful if you have a large number of conversations and want to quickly locate the one you need.
By following these steps, you can easily access the conversation containing the text messages you wish to forward. Being able to view the messages is the first step towards selecting and forwarding them to your email account. Continue reading the subsequent steps to learn how to efficiently select and forward your desired text messages.
Step 4: Select the Text Message(s) You Want to Forward
Now that you have opened the conversation containing the text messages you want to forward, it’s time to select the specific messages you wish to include in the forwarding process. Here’s how you can do it:
- Long Press Method: On most smartphones, you can press and hold your finger on a specific text message to activate the selection mode. The selected message will typically be highlighted or have a checkmark next to it. You can then continue to select additional messages by tapping on them one by one.
- Checkbox Method: In some messaging apps, you’ll find a checkbox or selection icon next to each message. Tap on the checkbox to select the desired message(s). You can select multiple messages by tapping on the checkboxes for each one.
- Select All Method (Optional): If you want to forward the entire conversation, some messaging apps offer a “Select All” option. Look for this option within the selection menu or by long pressing on any message in the conversation. Note that selecting all messages may include images or other media files, depending on the app’s settings.
Remember to select only the text messages you want to forward to avoid including any unnecessary or irrelevant content. Take into consideration the type of messages you determined in the earlier step and choose accordingly.
Note: If you have a long conversation with many messages, it may take some time to select the desired messages individually. However, some messaging apps provide options to facilitate the selection process, such as a “Select Unread” button or the ability to swipe across multiple messages to select them all at once. Explore the options available in your messaging app to streamline the selection process.
By following these steps, you can efficiently select the specific text messages from the conversation that you want to forward. Once you have made your selections, proceed to the next step to access the forwarding option and enter the email address to which you want to forward the messages.
Step 5: Access the Forwarding Option
After selecting the text messages you want to forward, the next step is to access the forwarding option within your messaging app. Here’s how you can do it:
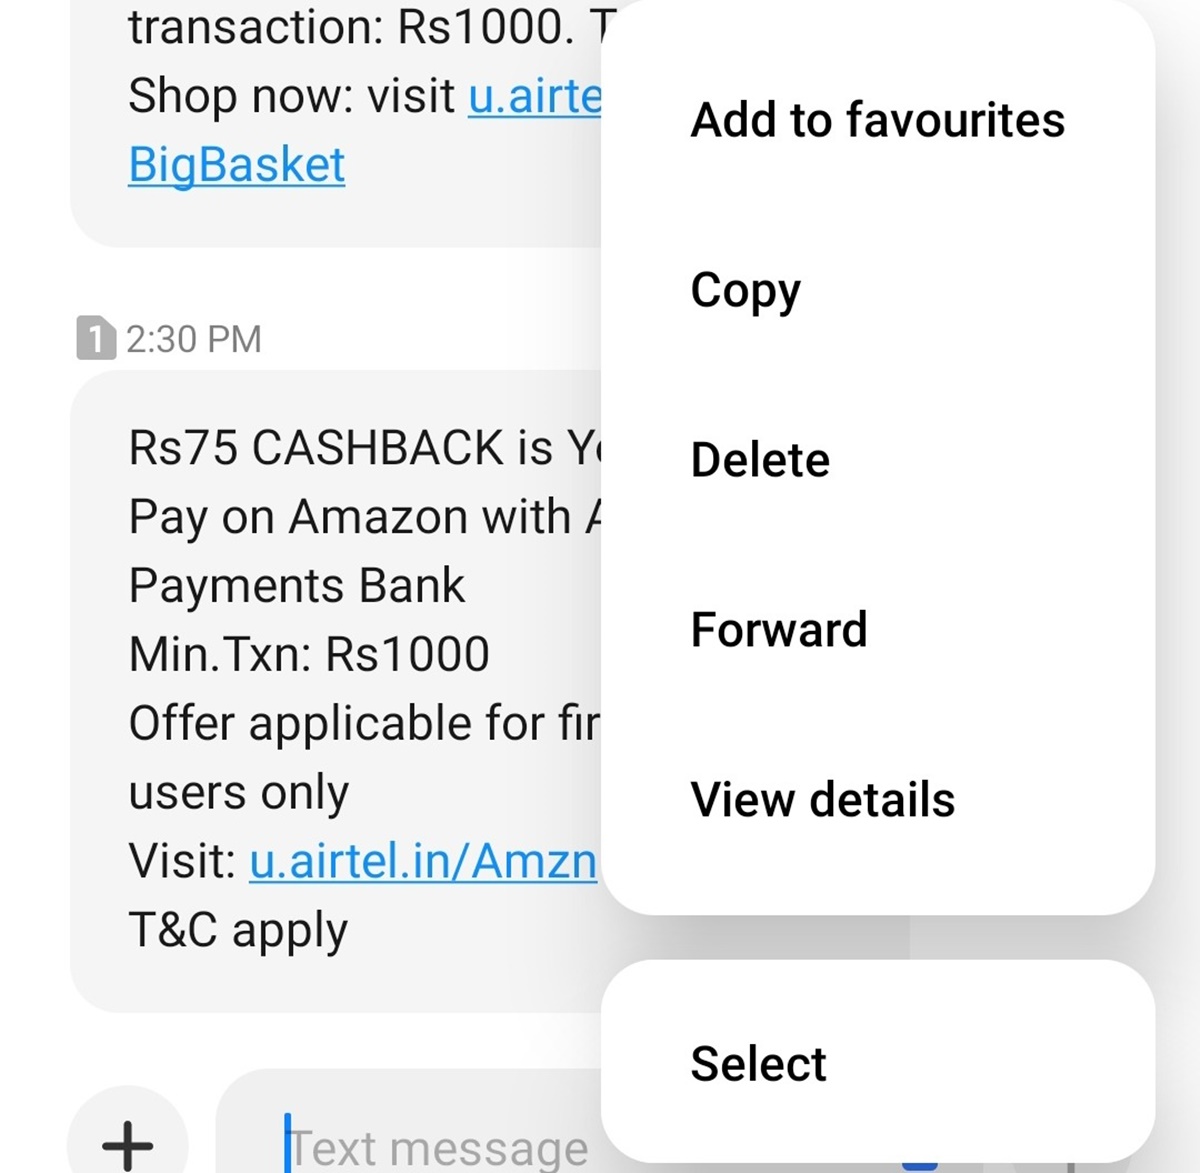
- Tap on More Options: Look for the menu or options icon within the conversation screen. It is typically represented by three dots or lines arranged vertically or horizontally. Tap on this icon to open the additional options for the conversation.
- Find Forward Option: In the menu that appears, scan through the available options and look for the option to forward the selected text messages. It is commonly labeled as “Forward” or represented by an arrow pointing forward. Tap on this option to proceed.
- Access Forwarding Settings: Once you tap on the forward option, you may be directed to a new screen or a pop-up window that shows the forwarding settings. This is where you can enter the email address to which you want to forward the selected text messages.
Depending on your messaging app and device, the layout and labeling of options may vary. Look for similar icons, labels, or instructions to locate the forwarding option. If you’re having trouble finding it, consult the app’s user manual or conduct an online search specific to your device and messaging app.
Note: Some messaging apps may offer alternative ways to access the forwarding option. For example, you may be able to swipe left or right on a selected message to reveal a menu with the forward option. Experiment with different gestures or explore the app’s settings to find the most convenient way to access the forwarding feature.
Now that you have accessed the forwarding option, you can proceed to the next step to enter the email address where you want to forward the selected text messages.
Step 6: Enter the Email Address You Want to Forward the Text Message(s) to
Now that you have accessed the forwarding settings, it’s time to enter the email address to which you want to forward the selected text message(s). Follow these steps to enter the email address:
- Tap on the Email Field: Within the forwarding settings, you should see a field or a blank space where you can enter the email address. Tap on this field to activate the keyboard and start typing.
- Enter the Email Address: Using the keyboard, enter the full email address to which you want to forward the selected text message(s). Double-check the email address for accuracy to ensure that the forwarded messages are sent to the intended recipient.
- Auto-Suggestion Feature: As you start typing the email address, your device’s keyboard or messaging app may provide auto-suggestions based on your contacts or previous entries. If you see the desired email address in the suggestions, you can tap on it to quickly populate the field.
- Multiple Email Addresses (Optional): If you want to forward the text message(s) to multiple email addresses, some messaging apps allow you to enter multiple addresses separated by commas. Check if your messaging app supports this feature and enter the additional email addresses as needed.
Ensure that you enter a valid and active email address to ensure successful forwarding of the selected text message(s). If you make any errors while entering the email address, you can tap on the field again to edit the entry before proceeding.
Once you have entered the email address, you can move on to the next step to add a message or subject (optional) before sending the forwarded text message(s) to your email.
Step 7: Add a Message or Subject (Optional)
After entering the email address to which you want to forward the text message(s), you have the option to add a message or subject to accompany the forwarded content. Adding a message or subject can provide context or additional information to the recipient. Follow these steps to include a message or subject:
- Tap on the Message/Subject Field (If Available): Within the forwarding settings, you may see a field or a blank space labeled as “Message” or “Subject.” Tap on this field to activate the keyboard and start typing.
- Add a Message or Subject: Using the keyboard, compose a short message or subject line to include along with the forwarded text message(s). This message can be a brief explanation of why you are forwarding the messages or any other pertinent information you want to convey. If you’re adding a subject line, make it concise and descriptive.
- Formatting Options (If Available): Some messaging apps provide basic formatting options, such as bold or italic text, bullet points, or hyperlinks. If these options are available, you can use them to enhance the appearance and readability of your message or subject line.
Keep in mind that adding a message or subject is optional. If you don’t have any additional information or context to include, you can skip this step and proceed to the next step to send the forwarded text message(s) to your email address.
Note: The availability of the message or subject field may depend on your messaging app or device. Some apps automatically generate a default message with information like the sender’s name and the timestamp of the original message, while others may not offer this option at all. If you don’t see a message or subject field, don’t worry – you can still proceed with forwarding the text message(s) without adding any additional text.
Once you have composed your message or subject line (if desired), you are ready to move on to the next step and send the forwarded text message(s) to your email.
Step 8: Send the Forwarded Text Message(s) to Your Email
Now that you have selected the text message(s), entered the email address, and optionally added a message or subject, it’s time to send the forwarded text message(s) to your email. Follow these steps to complete the forwarding process:
- Review the Forwarding Details: Take a moment to review the details before sending. Double-check that the selected text message(s) are correct, the email address is accurate, and any optional message or subject you added is to your satisfaction.
- Tap on the Send Button or Icon: Look for a “Send” button or an icon with an arrow pointing upward. Tap on it to initiate the forwarding process.
- Confirmation Message: Depending on your messaging app, you may receive a confirmation message stating that the text message(s) have been successfully forwarded to the specified email address. Take note of this confirmation message if it appears.
Once you’ve completed these steps, the selected text message(s) will be sent to the provided email address. The forwarding process may take a few moments, depending on the size and number of messages being forwarded. Be patient while the forwarding action is being executed.
Note: Make sure you have a stable internet connection to ensure the successful delivery of the forwarded text message(s) to your email account. If you experience any issues, such as delays or errors, double-check your network connection and try again.
After sending the forwarded text message(s) to your email, you can proceed to the final step to check your email account for the successfully forwarded messages.
Step 9: Check Your Email for the Forwarded Text Message(s)
After sending the text message(s) to your email address, it’s time to check your email account to ensure that the messages have been successfully forwarded. Follow these steps to check your email:
- Open Your Email App or Website: Launch the email app on your device or open your preferred web browser and go to the website for your email provider.
- Sign in to Your Email Account: Enter your email address and password to sign in to your email account. If you are already signed in, your inbox or the last viewed folder will be displayed.
- Check Inbox or Related Folder: Navigate to your inbox or the folder where you expect the forwarded text message(s) to appear. This could be your primary inbox or a specific folder you have designated for forwarded messages.
- Look for the Forwarded Text Message(s): Scan through your emails to find the forwarded text message(s). Depending on your email configuration, they may appear as separate emails or as part of a thread or conversation.
- Open and Review the Forwarded Message(s): Click or tap on the forwarded text message(s) to open and review them. Ensure that the content and formatting of the forwarded messages are intact.
If you don’t see the forwarded text message(s) in your inbox or the expected folder, check your spam or junk folder, as some email filters may categorize forwarded messages as spam. Additionally, make sure that the email address used for forwarding is correct and that your email account is properly configured to receive forwarded messages.
Once you have located and reviewed the forwarded text message(s), you can take further actions, such as organizing them into folders or replying to the messages, depending on your needs and preferences.
Congratulations! You have successfully forwarded the text message(s) to your email account, allowing you to access and manage them conveniently from your email platform.
Tips and Troubleshooting for Forwarding Text Messages to Email
While forwarding text messages to email is generally a straightforward process, there are a few tips and troubleshooting suggestions to keep in mind for a smooth experience:
- Double-check Email Address: Before forwarding any text messages, ensure that you have entered the correct email address. It’s easy to make a typo or select a wrong contact from your address book, so take a moment to verify the recipient email address.
- Manage Attachment Size: If your text messages contain attachments, such as photos or videos, keep in mind that some email providers have a maximum attachment size limit. If the forwarded message exceeds the limit, you may encounter issues with delivery. Consider resizing or compressing large attachments if necessary.
- Watch Out for Sensitive Information: Be cautious when forwarding text messages containing sensitive information. Ensure that the recipient’s email address is secure, and if necessary, consider encrypting the messages or using a more secure method to share sensitive data.
- Selective Forwarding: Not all text messages may need to be forwarded. Consider whether forwarding an entire conversation or selecting specific messages is more appropriate for your needs. Selective forwarding helps avoid clutter and ensures privacy for conversations that don’t require forwarding.
- Periodically Clean Up Forwarded Messages: Regularly review your email account and clean up any forwarded text messages that are no longer necessary. This will help keep your inbox organized and prevent it from becoming overwhelmed with unnecessary messages.
- Troubleshooting Delivery Issues: If you encounter any issues with the forwarding process, ensure that your phone has a stable internet connection. Additionally, check your email account’s spam or junk folder in case the forwarded messages were filtered incorrectly. If problems persist, consult the support resources specific to your device, messaging app, or email provider.
- Privacy and Security: Be mindful of privacy and security implications when forwarding text messages to email. Ensure that you have the necessary consent from all parties involved in the conversation, and take precautions to protect any sensitive information contained in the messages.
By following these tips and troubleshooting suggestions, you can effectively forward text messages to your email account and overcome any potential issues that may arise. Remember to use this feature responsibly and in accordance with applicable laws and regulations.
Now that you’re equipped with these tips, you can confidently forward text messages to your email, ensuring that important conversations and information are easily accessible and securely stored.