
What is Packet.dll?
Packet.dll is a dynamic-link library (DLL) file that is an essential component of the WinPcap library. It is responsible for providing network packet capture and transmission services to applications on the Windows operating system. The packet.dll file enables various network-related programs, such as network analyzers, packet sniffers, and protocol analyzers, to function correctly by providing access to low-level network data.
The packet.dll file provides a set of functions and APIs (Application Programming Interfaces) that allow developers to interact with network interfaces, capture network traffic, and perform various operations on the captured packets. It plays a crucial role in facilitating network monitoring, analysis, and troubleshooting tasks, making it an integral part of many networking tools and applications.
Packet.dll works in conjunction with WinPcap, a popular network capture library used by numerous software applications to capture and interpret network traffic. WinPcap relies on packet.dll to interact with network adapters, capture packets, and provide the captured data to the applications using its services.
Without the presence of packet.dll, applications that depend on packet capturing and analysis capabilities would fail to operate correctly. Any errors or issues related to packet.dll can result in the malfunctioning or crashing of software that relies on network packet capture functionality.
It is important to note that packet.dll is designed specifically for the Windows operating system and is not compatible with other platforms, such as macOS or Linux. Therefore, troubleshooting packet.dll errors or issues is relevant only to Windows users.
Why is Packet.dll Missing or Not Found?
The error message “Packet.dll is missing or not found” indicates that the packet.dll file required by a specific application or system process cannot be located. This error can occur due to various reasons, including:
1. Corrupted or Deleted File: The packet.dll file may have been corrupted or accidentally deleted, either by a user or by a malware infection.
2. Outdated or Incompatible Version: If the application or system process requires a specific version of packet.dll that is outdated or not compatible with the current system, the file may not be found.
3. Incorrect Path or File Location: The application or system process may be looking for packet.dll in the wrong directory or location, resulting in the “not found” error.
4. Registry Issues: Problems with the Windows registry, such as invalid or missing registry entries, can cause packet.dll to be inaccessible.
5. Malware Infection: Malicious software can target and modify system files, including packet.dll, leading to errors or making the file undetectable.
6. Hardware Issues: Sometimes, issues with the network adapter or other hardware components can prevent the system from detecting the packet.dll file correctly.
7. Software Conflicts: Conflict between different programs or incompatible software installed on the system can interfere with the correct functioning of packet.dll.
It is crucial to identify the underlying cause of the “Packet.dll is missing or not found” error to resolve it effectively. By understanding the reasons behind the error, users can take appropriate steps to fix the issue and ensure their applications and system processes function properly.
Common Causes of Packet.dll Errors
Packet.dll errors can occur due to various factors, and understanding these common causes can help in effectively diagnosing and resolving the issue. Some of the most prevalent causes of packet.dll errors include:
- Corrupted or Missing File: The packet.dll file may be corrupted or missing from the system due to improper installation, accidental deletion, or malware infection. This can result in errors when attempting to access or load the file.
- Outdated or Incompatible Version: If the installed version of packet.dll is outdated or incompatible with the application or system process that requires it, errors may occur. Incompatibilities can arise when using an older version of packet.dll with a newer application or vice versa.
- Registry Issues: Problems with the Windows registry, such as invalid or conflicting entries related to packet.dll, can cause errors. Registry issues often occur due to software installations or uninstallations, leaving behind incomplete or incorrect registry data.
- Hardware Problems: Issues with the network adapter, network card, or other hardware components can lead to packet.dll errors. Faulty hardware or outdated drivers can prevent proper communication with the necessary files, resulting in errors.
- Software Conflicts: Conflict between different software applications or incompatible software installed on the system can cause packet.dll errors. This can happen when multiple software programs attempt to access or modify the packet.dll file simultaneously, leading to conflicts and errors.
- Malware Infections: Malicious software can target important system files, including packet.dll, and corrupt them or modify their functionality. This can result in errors or cause the file to become completely inaccessible.
- File Path and Location: If the application or system process is unable to locate the packet.dll file due to incorrect file path or file location settings, errors can occur. This may happen if the file has been moved, renamed, or deleted from its original location.
By identifying the common causes of packet.dll errors, users can take appropriate measures to troubleshoot and resolve these issues. It is important to determine the specific cause of the error to implement the correct solution and ensure the proper functioning of the applications and system processes that rely on packet.dll.
How to Fix Packet.dll Errors
Packet.dll errors can disrupt the functionality of applications and system processes that rely on this file. Fortunately, there are several methods that users can employ to address packet.dll errors and restore normal operation. Here’s a list of possible solutions to fix packet.dll errors:
- Reinstall the Application: Uninstall and reinstall the application that is generating the packet.dll error. This ensures that the necessary files, including packet.dll, are correctly installed.
- Update Your Network Adapter Driver: Visit the manufacturer’s website and download the latest network adapter driver. Outdated or incompatible drivers can cause packet.dll errors.
- Restore Packet.dll from Recycle Bin: If packet.dll was accidentally deleted, check the Recycle Bin for the file. Restore it to its original location.
- Scan for Malware: Perform a thorough antivirus scan to detect and remove any malware or viruses that may be corrupting or interfering with packet.dll.
- Perform a System Restore: Use the System Restore feature to revert your computer’s settings to a previous point in time when packet.dll was functioning correctly.
- Copy Packet.dll to the Application Folder: Locate the packet.dll file (e.g., from another computer or from a reliable source) and copy it to the folder where the application that generates the error is installed.
- Repair Windows System Files: Use the System File Checker (SFC) tool to scan and repair any corrupted or missing system files, including packet.dll. Open the Command Prompt as an administrator and run the command “sfc /scannow”.
- Run a System File Checker Scan: Run the System File Checker (SFC) scan to automatically repair and replace corrupted system files.
- Update Windows: Keep your Windows operating system updated with the latest patches and updates. Windows updates often include bug fixes and improvements that can resolve packet.dll errors.
- Use a System Optimization Tool: Utilize a reputable system optimization tool to scan and fix any underlying issues, including those related to packet.dll errors.
By applying these methods, users can troubleshoot and resolve packet.dll errors effectively. However, it is important to note that the best solution may vary depending on the specific cause of the error. Consider trying multiple methods or seeking professional assistance if the issue persists after attempting the above solutions.
Method 1: Reinstall the Application
One of the primary methods to resolve packet.dll errors is to reinstall the application that is generating the error. This method ensures that all necessary files, including packet.dll, are correctly installed. By following these steps, you can reinstall the application and potentially fix the packet.dll error:
1. Uninstall the Application: Access the Control Panel in your Windows operating system and navigate to the “Programs” or “Programs and Features” section. Locate the application that is causing the packet.dll error, right-click on it, and select “Uninstall”. Follow the on-screen instructions to complete the uninstallation process.
2. Download the Latest Version: Visit the official website of the application and download the latest version of the software. It is important to download the appropriate version compatible with your operating system.
3. Install the Application: Once the download is complete, run the installation file and follow the on-screen instructions to install the application. Make sure to carefully read and accept the license agreement, select the desired installation location, and choose any necessary customization options.
4. Restart Your Computer: After the installation is complete, restart your computer. Restarting helps ensure that all changes take effect and that the application is properly registered in the system.
5. Check for Updates: Launch the reinstalled application and check for any available updates within the software. Updating the application can help resolve any known issues or bugs that may have contributed to the packet.dll error.
By reinstalling the application, you are essentially replacing any missing or corrupted files, including packet.dll. This method allows for a clean installation of the software, which often resolves conflicts and issues that may have occurred with the previous installation. Reinstalling the application should provide a fresh start and, in many cases, effectively fix the packet.dll error.
If reinstalling the application does not resolve the packet.dll error, consider trying other methods or seeking assistance from the application’s support team or a professional technician with expertise in troubleshooting DLL errors.
Method 2: Update Your Network Adapter Driver
Updating your network adapter driver can help resolve packet.dll errors that are caused by outdated or incompatible drivers. Network adapter drivers are essential for the proper functioning of network-related processes and can impact the accessibility of packet.dll. Follow these steps to update your network adapter driver:
1. Identify Your Network Adapter: Press the Windows key + X on your keyboard and select “Device Manager” from the menu. In the Device Manager window, expand the “Network adapters” category to view all network adapters installed on your system.
2. Update Driver Automatically: Right-click on your network adapter and select “Update driver”. Choose the option to search for updated drivers automatically. Windows will search for the latest driver software and install it if available. Follow any on-screen instructions to complete the process.
3. Update Driver Manually: If Windows does not find an updated driver automatically, you can manually download the latest driver from the manufacturer’s website. Visit the official website of your network adapter’s manufacturer and navigate to the “Support” or “Downloads” section. Locate the appropriate driver for your network adapter model and download it.
4. Install the Updated Driver: Once the driver is downloaded, run the installation file and follow the on-screen instructions to install the updated driver. Make sure to carefully read and accept the license agreement and select the desired installation options.
5. Restart Your Computer: After the driver installation is complete, restart your computer. Restarting allows the changes to take effect and ensures that the new driver is properly registered in the system.
By updating your network adapter driver, you ensure that your network connection is optimized and compatible with the applications and processes that rely on packet.dll. Outdated drivers can cause conflicts and errors, leading to packet.dll related issues. Updating the driver should resolve any compatibility problems and provide the necessary support for packet.dll, enabling the proper functioning of network-related processes.
If updating the network adapter driver does not resolve the packet.dll error, consider trying other methods or seeking assistance from a professional technician who can further troubleshoot the issue.
Method 3: Restore Packet.dll from Recycle Bin
If you accidentally deleted the packet.dll file, it may still be recoverable from the Recycle Bin. Restoring the file from the Recycle Bin can help resolve packet.dll errors. Follow these steps to restore packet.dll:
1. Open the Recycle Bin: Locate the Recycle Bin icon on your desktop and double-click it to open the Recycle Bin window.
2. Search for Packet.dll: In the Recycle Bin window, search for the packet.dll file. You can use the search bar or manually scroll through the list of deleted files.
3. Restore Packet.dll: Once you find the packet.dll file, right-click on it and select “Restore”. This action will move the file back to its original location on your system.
4. Restart Your Computer: After restoring the packet.dll file, it is recommended to restart your computer. Restarting helps ensure that any changes take effect and that the restored packet.dll file is properly recognized by the system.
By restoring the packet.dll file from the Recycle Bin, you recover the necessary component that may have been mistakenly deleted. This method is applicable when you have not permanently deleted the file and it is still recoverable from the Recycle Bin. Restoring packet.dll should eliminate any errors caused by its absence, allowing applications and system processes to function properly.
If you cannot find the packet.dll file in the Recycle Bin or if this method does not resolve the packet.dll error, consider trying other methods or seeking assistance from a professional technician who can further troubleshoot the issue.
Method 4: Scan for Malware
Malware infections can cause packet.dll errors by corrupting or modifying system files. Conducting a thorough scan for malware can help identify and remove any malicious software that may be affecting the functionality of packet.dll. Follow these steps to scan your computer for malware:
1. Use Antivirus Software: Ensure that you have a reliable and up-to-date antivirus program installed on your computer. If you don’t have one, consider installing a reputable antivirus software from a trusted source.
2. Update the Antivirus Definitions: Launch your antivirus program and update its virus definitions to ensure it is equipped to detect the latest threats.
3. Perform a Full System Scan: Initiate a full system scan using your antivirus software. This comprehensive scan will search for malware in all files and directories on your computer.
4. Quarantine or Remove Detected Malware: If the antivirus software detects any malware or suspicious files, follow its recommendations to quarantine or remove the identified threats. Take caution and carefully review the results before taking any actions to avoid inadvertently deleting important system files.
5. Restart Your Computer: After performing the scan and removing any malware, restart your computer. This allows the changes to take effect and ensures that your system starts fresh.
By scanning your computer for malware and removing any detected threats, you can eliminate potential causes of packet.dll errors. Malware can disrupt system files, including packet.dll, resulting in errors and malfunctions. Once the malware is removed, the packet.dll file should be free from any corruption or tampering, allowing applications and system processes to function properly.
Keep in mind that regular antivirus scans and maintaining up-to-date security software are vital to protect your computer from malware infections. If the packet.dll error persists even after performing a malware scan, consider trying other methods or seeking assistance from a professional technician who can further troubleshoot the issue.
Method 5: Perform a System Restore
Performing a system restore can help resolve packet.dll errors by reverting your computer’s settings to a previous state where the file was functioning correctly. System restore allows you to roll back your system to a specific point in time, undoing any changes that may have caused the packet.dll error. Follow these steps to perform a system restore:
1. Access System Restore: Press the Windows key + R on your keyboard to open the Run dialog box. Type “rstrui” and click “OK” to open the System Restore window.
2. Select a Restore Point: In the System Restore window, select the option to “Choose a different restore point” and click “Next”. You will be presented with a list of available restore points. Choose a restore point that predates the appearance of the packet.dll error.
3. Start the System Restore: After selecting a restore point, click “Next” and then “Finish” to confirm your restore point selection. Note that system restore cannot be undone, so ensure that you have selected the correct restore point.
4. Wait for the Restoration: Your computer will now begin the restoration process. This may take some time, so patience is advised. Your computer will automatically restart once the restoration is complete.
5. Check for Packet.dll Error: Once your computer restarts, check to see if the packet.dll error has been resolved. Test applications or processes that previously experienced the error to ensure normal functionality.
Performing a system restore can help fix packet.dll errors caused by recent changes or system updates that affected the file. By restoring your computer to a previous state, you essentially undo any modifications or configurations that may have led to the error.
It is important to note that performing a system restore will revert system settings, installed programs, and other system changes made after the selected restore point. Make sure to back up any important data before proceeding, as you may need to reinstall certain applications or restore files that were modified or created after the chosen restore point.
If the packet.dll error persists after performing a system restore, consider trying other methods or seeking assistance from a professional technician who can further troubleshoot the issue.
Method 6: Copy Packet.dll to the Application Folder
Copying the packet.dll file to the application folder can help resolve packet.dll errors by ensuring that the necessary file is in the correct location. If the application is unable to locate packet.dll, copying it to the application folder can provide the required access. Follow these steps to copy packet.dll to the application folder:
1. Locate Packet.dll: Search for the packet.dll file on your computer. You can do this by using the Windows search feature or browsing through the appropriate system folders. Make sure to locate a reliable and verified version of packet.dll.
2. Identify the Application Folder: Determine the folder where the application generating the packet.dll error is installed. This is typically the installation directory for the application, such as “C:\Program Files\ApplicationName”.
3. Copy Packet.dll: Once you have located packet.dll and identified the application folder, copy the packet.dll file. Right-click on the packet.dll file, select “Copy”, then navigate to the application folder and right-click inside it. Choose “Paste” to copy the file into the application folder.
4. Replace Existing File (if prompted): If you are prompted to replace an existing packet.dll file in the application folder, confirm the replacement. This ensures that the correct and functional version of packet.dll is in place.
5. Restart Your Computer: After copying packet.dll to the application folder, restart your computer. This allows the changes to take effect and ensures that the application recognizes the newly added file.
By copying packet.dll to the application folder, you provide the application with direct access to the necessary file. This can help resolve errors that occur when the application cannot locate packet.dll. Ensure that you use a reliable and verified version of packet.dll to avoid further issues or complications.
If the packet.dll error persists after copying the file to the application folder, consider trying other methods or seeking assistance from a professional technician who can further troubleshoot the issue.
Method 7: Repair Windows System Files
Repairing Windows system files can help resolve packet.dll errors caused by corrupted or missing system files. The System File Checker (SFC) tool is a built-in Windows utility that scans and repairs corrupted system files, including packet.dll. Follow these steps to repair Windows system files:
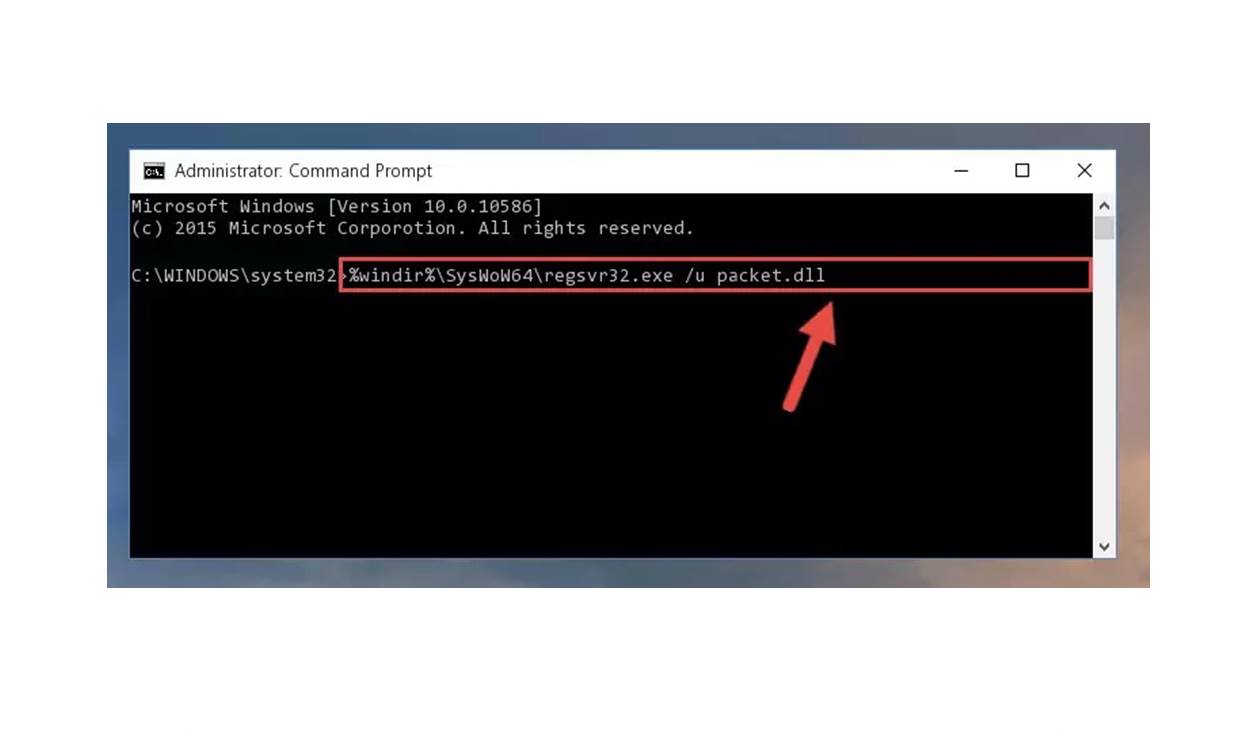
1. Open Command Prompt as Administrator: Press the Windows key, type “Command Prompt”, right-click on “Command Prompt” in the search results, and select “Run as administrator”. This gives you elevated privileges to run the SFC command.
2. Run the System File Checker: In the Command Prompt window, type the command “sfc /scannow” and press Enter. The System File Checker will start scanning for corrupted system files and automatically repair them if possible. Note that the process may take some time to complete.
3. Wait for the Repair: Allow the System File Checker to run its course and repair any corrupted system files, including packet.dll. Do not interrupt the process or turn off your computer during this time.
4. Restart Your Computer: After the repair process is complete, restart your computer. Restarting allows the changes to take effect and ensures that any repaired system files are properly recognized by the system.
By running the System File Checker and repairing corrupted system files, you can eliminate potential issues causing the packet.dll error. The tool scans your system for any inconsistencies and restores corrupted files to their original state, which can resolve problems related to packet.dll and other system files.
It is important to note that the System File Checker requires administrative privileges to perform its tasks. Running the command prompt as an administrator ensures that the necessary permissions are granted for the tool to function correctly.
If the packet.dll error persists after repairing Windows system files, consider trying other methods or seeking assistance from a professional technician who can further troubleshoot the issue.
Method 8: Run a System File Checker Scan
Running a System File Checker (SFC) scan can help resolve packet.dll errors by checking for and repairing any corrupted or missing system files. The SFC tool is a built-in Windows utility that scans your system for file integrity issues and restores damaged files. Follow these steps to run an SFC scan:
1. Open Command Prompt as Administrator: Press the Windows key, type “Command Prompt”, right-click on “Command Prompt” in the search results, and select “Run as administrator”. This gives you elevated privileges to run the SFC scan.
2. Initiate the SFC Scan: In the Command Prompt window, type the command “sfc /scannow” and press Enter. The SFC tool will start scanning your system for any corrupt or missing system files, including packet.dll. The process may take some time to complete, so be patient and let it run.
3. Wait for the Scan to Finish: Allow the SFC scan to complete its task. The tool will automatically search for corrupted files and attempt to repair them using cached copies on your system or original installation files. Do not interrupt the scan or turn off your computer during this process.
4. Review the Scan Results: Once the scan is complete, the Command Prompt will display the results. If any corrupted or missing files were found and successfully repaired, the SFC tool will report it. If no issues were found, you will see a message stating that no integrity violations were found.
5. Restart Your Computer: After the SFC scan is finished, restart your computer. Restarting ensures that any repaired or replaced system files are properly recognized by the system.
By running an SFC scan, you can correct any corrupted or missing system files that may be causing the packet.dll error. This tool helps restore the integrity of critical files, including packet.dll, which can resolve issues related to file corruption or system misconfigurations.
If the packet.dll error persists after running an SFC scan, consider trying other methods or seeking assistance from a professional technician who can further troubleshoot the issue.
Method 9: Update Windows
Updating your Windows operating system can help resolve packet.dll errors by ensuring that your system has the latest bug fixes, patches, and security updates. Windows updates often include improvements, bug fixes, and compatibility updates that can address issues related to packet.dll. Follow these steps to update your Windows operating system:
1. Open Windows Update Settings: Press the Windows key + I on your keyboard to open the Windows Settings. From the Settings menu, select “Update & Security”.
2. Check for Updates: In the Windows Update section, click on the “Check for updates” button. Windows will connect to Microsoft servers and check for any available updates for your system.
3. Download and Install Updates: If there are any updates available, click on the “Download” or “Download and install” button to start downloading and installing the updates. Depending on the size and number of updates, this process may take some time.
4. Restart Your Computer: After the updates have been installed, you will be prompted to restart your computer. Save any unsaved work and click on “Restart now” to reboot your system. Restarting ensures that the updates take effect.
By regularly updating your Windows operating system, you ensure that your system has the latest security patches, performance improvements, and bug fixes, which can address packet.dll errors. Outdated system components can lead to conflicts and compatibility issues, resulting in errors related to packet.dll.
It is recommended to periodically check for updates and install them to keep your system up-to-date. Automatic updates can also be enabled in the Windows Update settings to receive important updates automatically.
If the packet.dll error persists after updating Windows, consider trying other methods or seeking assistance from a professional technician who can further troubleshoot the issue.
Method 10: Use a System Optimization Tool
Using a system optimization tool can help resolve packet.dll errors by addressing underlying issues that may be affecting the performance and stability of your system. These tools are designed to scan your computer, identify potential problems, and optimize various aspects of your system. Here’s how you can use a system optimization tool to fix packet.dll errors:
1. Research and Select a Reliable System Optimization Tool: Look for reputable system optimization tools that are known for their effectiveness and safety. Read reviews, check ratings, and ensure that the tool is compatible with your operating system.
2. Download and Install the System Optimization Tool: Visit the official website of the selected tool and download the installation file. Run the file to install the software on your computer. Follow the on-screen instructions to complete the installation process.
3. Launch the Optimization Tool: Once installed, launch the system optimization tool. Start by running a system scan or selecting the appropriate scan option to identify potential issues that may be contributing to the packet.dll error.
4. Review the Scan Results: After the scan is complete, review the scan results. The optimization tool will usually provide a detailed report highlighting the identified issues, including any problems related to packet.dll.
5. Fix the Identified Issues: Depending on the system optimization tool, you may have the option to automatically fix the identified issues or manually select and apply specific fixes. Follow the tool’s instructions to address the issues related to packet.dll.
6. Restart Your Computer: After applying the fixes and optimizations, restart your computer to ensure that the changes take effect and that your system is running optimally.
System optimization tools can help optimize your computer’s performance, resolve conflicts, and repair potential issues that may be causing packet.dll errors. These tools may offer various features, such as disk cleanup, registry cleaning, startup optimization, and more, which can help enhance the overall system health and stability.
However, exercise caution when using system optimization tools and ensure that you choose a reliable and reputable tool from a trusted source. Always follow the instructions provided by the tool, and be cautious about making any system changes that could potentially lead to further problems.
If the packet.dll error persists after using a system optimization tool, consider trying other methods or seeking assistance from a professional technician who can further troubleshoot the issue.