
Common Problems with Headphones
Headphones are a convenient and handy accessory that allows you to enjoy your favorite music, podcasts, and videos with privacy and high-quality sound. However, like any electronic device, headphones are not immune to issues and malfunctions. Understanding the common problems that you may encounter with your headphones can help you troubleshoot and resolve these issues effectively.
1. No Sound: One of the most frustrating headphone problems is when there is no sound coming from the speakers. This can be caused by a variety of issues, such as a loose connection, faulty audio jack, or damaged wiring.
2. One-Sided Audio: If you’re experiencing audio only in one earpiece, it could be due to a loose wire or a damaged speaker. This problem is often fixable without having to replace the headphones entirely.
3. Broken Headband: The headband of headphones can sometimes break due to wear and tear or accidental damage. This can cause discomfort and may require repair or replacement to restore proper functionality.
4. Damaged Cables: Over time, the cables of headphones can fray, break, or become damaged, leading to distorted sound or intermittent connectivity.
5. Bluetooth Connectivity Issues: If you’re using wireless headphones, you may encounter connectivity problems. This can be caused by interference, software glitches, or compatibility issues.
6. Worn-out Ear Cushions: The ear cushions of headphones can deteriorate over time, leading to discomfort or compromised audio quality. Replacing or repairing these cushions can help restore the comfort and sound experience.
7. Low Sound Quality: If you notice a drop in sound quality or muffled audio, it could be due to a variety of factors, including dirt or debris in the speakers, improper audio settings, or damaged components.
By identifying the specific problem you are encountering, you can take the necessary steps to repair or address the issue. In the following sections, we will explore various methods to fix these common headphone problems, allowing you to enjoy your favorite audio content with minimal disruption.
Tools Needed for Headphone Repair
Repairing your headphones can be a rewarding DIY project that saves you time and money. To successfully fix common headphone problems, you’ll need a few essential tools. Having these tools on hand will make the repair process smoother and more efficient.
1. Screwdriver set: A screwdriver set with various sizes and types of screwdriver heads is essential for opening up the headphone casing and accessing the internal components.
2. Soldering Iron: A soldering iron is necessary for repairing broken wires, loose connections, or replacing audio jacks. Make sure to use a soldering iron with adjustable temperature settings to prevent damaging delicate components.
3. Wire cutters/strippers: These tools are crucial for cutting and stripping the headphone cables during repairs or replacements. They help achieve clean cuts and ensure secure connections.
4. Electrical tape: Electrical tape is handy for insulating and securing wires together. It provides insulation and helps protect the repaired areas from further damage.
5. Replacement parts: Depending on the specific issue, you might need to acquire replacement parts such as audio jacks, ear cushions, or even a new headband. Ensure you have the necessary replacement parts on hand before starting the repair process.
6. Cleaning solution and cloth: Sometimes, poor audio quality or connectivity issues can be due to dirt or debris build-up on the headphone surfaces. Having a cleaning solution and a soft cloth allows you to clean and maintain your headphones properly.
7. Multimeter: A multimeter is an electrical testing device that can be used to check for continuity, measure voltage, and troubleshoot electrical problems. It can help pinpoint wiring or connectivity issues within your headphones.
These are the fundamental tools you’ll need for most headphone repair projects. However, the specific tools required may vary depending on the type and model of your headphones. Additionally, it’s always a good idea to consult the manufacturer’s documentation or online resources for any unique tools or techniques recommended for your particular headphones.
Now that you have the necessary tools, let’s explore various methods to fix common headphone problems in the upcoming sections.
Method 1: Checking the Connection
When your headphones are not producing any sound or have intermittent audio, the first step is to check the connection. A loose or faulty connection can often be the cause of the problem. Follow these steps to troubleshoot the connection:
1. Inspect the audio jack: Examine the audio jack for any visible damage or debris. Sometimes, lint or dirt can get stuck inside, obstructing the connection. Use a soft, dry brush or compressed air to clean the audio jack gently.
2. Try a different audio source: Connect your headphones to a different device or audio source to see if the problem persists. This helps determine if the issue is with the headphones or the original audio source.
If the problem persists, move on to the next troubleshooting method. However, if the issue is resolved by cleaning the audio jack or using a different audio source, you have successfully fixed the problem.
Remember, it’s essential to handle the audio jack and headphone cable carefully to prevent any further damage. Avoid excessive twisting or bending, as this can weaken the connection and lead to more severe issues.
In the next section, we will discuss how to repair loose wires, another common problem faced by headphone users.
Method 2: Repairing Loose Wires
Loose or disconnected wires can result in one-sided audio or no sound at all. If you suspect that loose wires are causing the problem, follow these steps to repair them:
1. Identify the loose wire: Inspect the headphone cable and look for any visible signs of damage or loose wires. Common areas for wire damage include near the audio jack or at the connection points to the earpieces.
2. Expose the wires: Once you’ve identified the loose wire, use wire cutters to carefully strip away the outer insulation. Be cautious not to cut or damage the inner wires.
3. Twist the exposed wires: Twist the exposed wires together firmly. This will help create a secure and reliable connection.
4. Insulate the repaired wires: Wrap the exposed wires with electrical tape to insulate them and prevent any further damage. Ensure that the exposed wires are fully covered and that the tape holds them securely in place.
5. Perform a sound test: Plug your headphones into an audio source and check if the sound is now balanced in both earpieces. If not, repeat the process, ensuring that the wires are securely connected and properly insulated.
If the loose wire is near the audio jack and difficult to repair, you may consider replacing the audio jack altogether. This involves soldering the new audio jack in place, which requires more advanced repair skills and tools.
Remember, take your time when repairing loose wires and ensure the connections are secure. Rushing the repair process can lead to further damage or ineffective repairs.
In the next section, we will explore how to replace the audio jack, another method to fix headphone issues.
Method 3: Replacing the Audio Jack
If your headphone’s audio jack is damaged or malfunctioning, replacing it can often resolve the issue. Here’s a step-by-step guide on how to replace the audio jack:
1. Gather the necessary tools: For this repair, you will need a soldering iron, solder, desoldering pump or wick, replacement audio jack, wire cutters, and electrical tape.
2. Prepare the headphones: Start by disconnecting the headphones from any audio source. Carefully remove the ear cushions and any necessary screws or clips to access the internal components.
3. Identify the audio jack: Locate the damaged audio jack within the headphone casing. Take note of how the wires are connected to the existing audio jack.
4. Remove the damaged audio jack: Using the desoldering pump or wick, heat the solder joints and remove the old audio jack. Be sure to desolder all the connections without damaging any surrounding components.
5. Prepare the replacement audio jack: Strip the ends of the headphone wires, making sure to leave the appropriate amount of exposed wire for soldering. Refer to the markings on the replacement audio jack to ensure correct wire placements.
6. Solder the new audio jack: Heat the soldering iron and solder the exposed wires to the appropriate terminals on the replacement audio jack. Make sure to create secure connections and avoid cold solder joints.
7. Insulate the connections: Once the soldering is complete, insulate the connections with electrical tape. This will protect the connections from damage and ensure proper functionality.
8. Reassemble the headphones: Carefully put the headphone components back together, including the ear cushions and screws or clips. Ensure all parts are securely in place.
By replacing the audio jack, you can restore proper sound transmission and eliminate any issues caused by a faulty connection. However, note that this repair requires soldering skills and experience. If you’re not confident in your abilities, it’s recommended to seek professional help or consult the manufacturer’s support.
In the next section, we will discuss a common problem with headphones – a broken headband – and how to fix it.
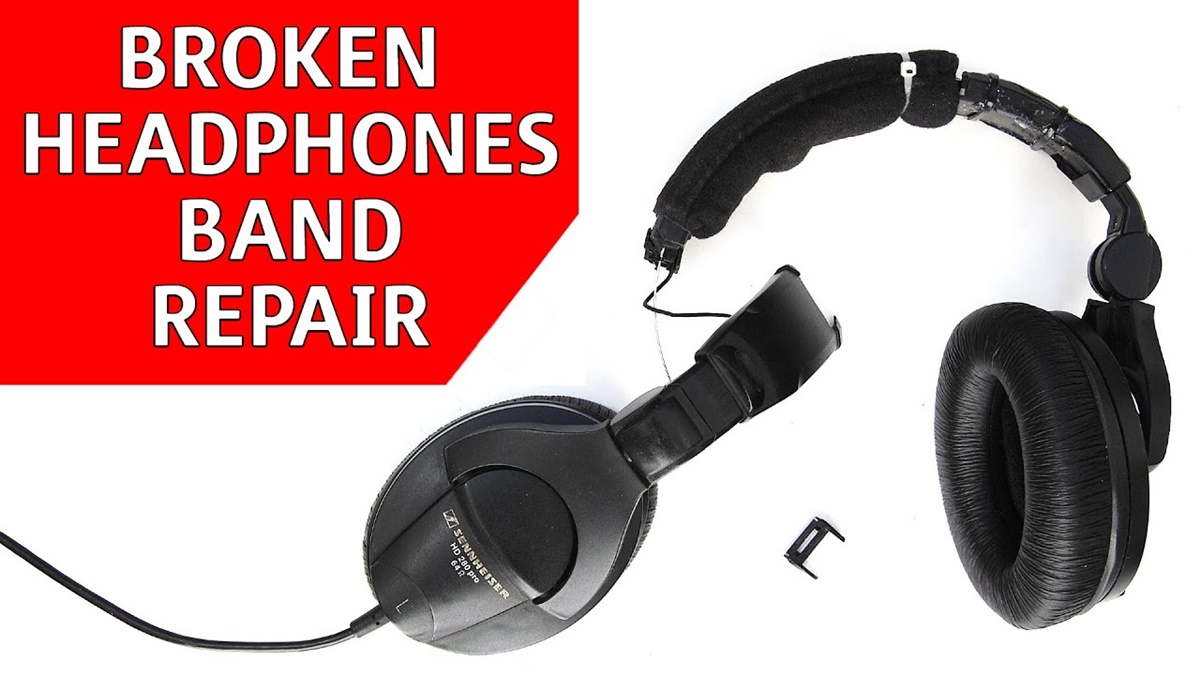
Method 4: Fixing a Broken Headband
A broken headband can render your headphones uncomfortable to wear or even unusable. Fortunately, with a few simple steps, you can fix a broken headband and restore the functionality of your headphones. Here’s what you need to do:
1. Assess the damage: Examine the headband carefully to determine the extent of the breakage. Look for any cracks, fractures, or detached sections.
2. Prepare the necessary tools and materials: To fix a broken headband, you’ll typically need a strong adhesive, such as epoxy or super glue. Additionally, you may need a small clamp or rubber bands to hold the broken parts together while the adhesive sets.
3. Apply adhesive: Apply a small amount of adhesive to both sides of the broken headband. Make sure to align the broken pieces carefully and press them firmly together. Hold them in place using a clamp or secure them with rubber bands.
4. Allow the adhesive to cure: Follow the instructions on the adhesive packaging to determine the curing time. It’s important to let the adhesive fully set and harden before putting any pressure on the repaired headband.
5. Test the headband: Once the adhesive has fully cured, carefully check the repaired headband for stability and flexibility. Ensure that the headband is securely held together and can comfortably fit on your head without causing discomfort.
If the headband is severely damaged or the adhesive does not provide sufficient strength, you may need to consider replacing the headband altogether. In such cases, check with the headphone manufacturer or look for replacement headbands that are compatible with your specific headphone model.
Fixing a broken headband can extend the lifespan of your headphones and save you from having to purchase a new pair. However, always exercise caution and handle the adhesive and broken parts carefully to prevent any injuries or further damage.
In the next section, we will discuss how to repair or replace worn-out ear cushions, another common problem with headphones.
Method 5: Repairing or Replacing Ear Cushions
Over time, the ear cushions of headphones can become worn out, leading to discomfort and compromised sound quality. Fortunately, repairing or replacing ear cushions is a relatively simple process that can significantly enhance your listening experience. Here’s how to do it:
1. Check for removable ear cushions: Some headphones have removable ear cushions that can be easily replaced. Look for a small groove or attachment mechanism that allows you to detach the cushions from the earpieces.
2. Remove the old ear cushions: If your headphones have removable ear cushions, gently pull them away from the earpieces. Be cautious not to damage the earpieces or any wires connected to them.
3. Clean the earpieces: Take this opportunity to clean the earpieces using a soft cloth or a cleaning solution specifically designed for electronics. This will ensure that the new ear cushions adhere properly and maintain optimal hygiene.
4. Attach the new ear cushions: If you’ve purchased replacement ear cushions, align them with the earpieces and press them firmly into place. Ensure that they are securely attached and comfortable to wear.
5. Repairing damaged ear cushions: If the ear cushions are not easily replaceable or you prefer to repair them, you can use adhesive (such as fabric glue) to fix any tears or detachment. Apply a small amount of adhesive to the damaged area and press it together until the adhesive sets.
If you’re unable to find replacement cushions or the original cushions are not removable, you can explore third-party options. Many companies offer universal ear cushions that can fit a wide range of headphones.
By repairing or replacing worn-out ear cushions, you can restore comfort and improve sound quality during your listening sessions. Additionally, clean and well-maintained ear cushions can enhance the longevity of your headphones.
In the next section, we will discuss how to fix the common problem of one-sided audio in headphones.
Method 6: Fixing One-Sided Audio
If you’re experiencing audio only in one earpiece of your headphones, it can be frustrating and disrupt your listening experience. Usually, this issue is caused by a loose wire or a damaged speaker. Here’s how you can troubleshoot and fix one-sided audio:
1. Check the audio jack: Ensure that the audio jack is fully plugged into the audio source and securely connected to the headphone cable. Gently wiggle the audio jack while listening to see if the audio returns to both earpieces.
2. Inspect the headphone cable: Examine the cable for any visible signs of damage, such as kinks, cuts, or fraying. If you identify any issues, you may need to repair or replace the cable.
3. Test with another audio source: Plug your headphones into a different device or audio source to determine if the issue is with the headphones or the original audio source. If the audio is still one-sided on a different device, the problem lies with the headphones.
4. Repair loose wires: Follow the steps outlined in Method 2 to repair any loose or disconnected wires. Strip, twist, and insulate the wires carefully to ensure a secure connection.
5. Replace the speaker: If the one-sided audio persists and you’ve ruled out other causes, the problem may be a faulty speaker. You can replace the speaker by desoldering the old one and soldering a new speaker in its place.
It’s important to note that fixing one-sided audio may require intermediate-level soldering skills and delicate handling of headphone components. If you’re unsure or uncomfortable with these tasks, it’s advisable to seek assistance from a professional or contact the headphone manufacturer for support.
By troubleshooting and addressing the underlying cause of one-sided audio, you can restore the balance and enjoy stereo sound through both earpieces of your headphones.
In the next section, we will discuss how to repair a cut or damaged headphone cable.
Method 7: Repairing a Cut or Damaged Cable
A cut or damaged cable can result in distorted sound or intermittent connectivity in your headphones. Fortunately, you can repair the cable with a few simple steps. Here’s how you can fix a cut or damaged headphone cable:
1. Identify the damaged area: Carefully examine the cable to locate the cut or damaged section. Look for any exposed wires or visible signs of damage.
2. Strip the cable: Use wire cutters to strip away the outer insulation of the cable on both ends of the damaged section. Be cautious not to cut or damage the inner wires.
3. Expose the inner wires: After stripping the cable, you will see the individual colored wires inside. Gently separate and untangle them without damaging or breaking any strands.
4. Twist the exposed wires: Twist the exposed wires together according to their corresponding colors. You may need to refer to the manufacturer’s documentation or do some research to identify the correct wire connections.
5. Solder the connections: Heat your soldering iron and apply solder to each twisted wire connection. Ensure a secure bond, but avoid using excessive heat that could damage the cable or wires.
6. Insulate the repaired area: Once the soldering is complete and the connections are secure, insulate the repaired area by wrapping electrical tape around the exposed wires. This will provide protection and prevent any further damage or fraying.
7. Perform a sound test: Plug your headphones into an audio source and test the sound. Check for any distortion or connectivity issues. If the sound is clear and there are no interruptions, your cable repair was successful.
If the damaged area is extensive or you’re unable to repair the cable yourself, you may consider replacing the entire cable. Some headphone manufacturers offer replacement cables that are compatible with their specific models.
Remember, take your time when repairing the cable and ensure the connections are secure. Rushing the repair process can lead to ineffective repairs or further damage.
In the next section, we will discuss how to resolder the connections, which can be a solution for various headphone issues.
Method 8: Resoldering the Connections
Resoldering the connections in your headphones can be a useful solution for various issues, such as loose connections, faulty wiring, or damaged solder joints. By properly soldering the connections, you can ensure a secure and reliable electrical connection. Here’s how to resolder the connections:
1. Prepare the necessary tools: For this repair, you will need a soldering iron, solder, desoldering pump or wick, wire cutters, and electrical tape.
2. Identify the connections to be resoldered: Inspect the headphone’s internal components and identify the connections that need to be resoldered. These could be loose wires, damaged solder joints, or faulty connections.
3. Remove the old solder: If there is excess or damaged solder on the connections, use a desoldering pump or wick to remove it. Heat the solder joint and place the desoldering pump or wick to suction or absorb the melted solder.
4. Prepare the wires: Trim and strip the wires as needed, ensuring they have enough exposed wire for soldering. Twist the exposed wires together securely if they are disconnected or loose.
5. Solder the connections: Heat the soldering iron and apply a small amount of solder to the connections. Be careful not to use too much solder, as this can cause electrical shorts or damage to nearby components. Ensure a strong and secure bond is formed.
6. Insulate the connections: Once the soldering is complete, use electrical tape to insulate and protect the soldered connections. This will prevent any potential short circuits and provide stability to the repaired area.
7. Perform a sound test: Plug your headphones into an audio source and listen to ensure that the sound is clear and balanced in both earpieces. Check for any issues with connectivity or intermittent audio.
Resoldering the connections can help resolve various headphone issues caused by loose or faulty connections. However, it’s important to exercise caution and practice proper soldering techniques to avoid damaging the components or creating new problems.
In the next section, we will discuss troubleshooting Bluetooth connectivity issues, which are common with wireless headphones.
Method 9: Troubleshooting Bluetooth Connectivity Issues
Bluetooth connectivity issues can be frustrating when using wireless headphones. If you’re experiencing difficulties connecting or maintaining a stable Bluetooth connection, try these troubleshooting steps:
1. Ensure Bluetooth is enabled: Check that Bluetooth is enabled both on your headphones and the device you’re pairing them with. Make sure they are in close proximity to establish a strong connection.
2. Clear paired device list: If you’re having trouble connecting to a specific device, try clearing the paired device list on both the headphones and the device. This can help reset the Bluetooth connection.
3. Power cycle the headphones: Turn off your headphones and then turn them back on. This can refresh the Bluetooth connection and resolve any temporary glitches.
4. Update firmware/drivers: Check for firmware or driver updates for both your headphones and the device you’re pairing them with. Updating to the latest version can improve compatibility and fix known Bluetooth issues.
5. Remove interference: Make sure there are no other devices or obstacles interfering with the Bluetooth signal. Keep the headphones away from other electronic devices, especially Wi-Fi routers or microwaves, as they can cause interference.
6. Reset Bluetooth settings: Resetting the Bluetooth settings on your device, or performing a factory reset on your headphones, can sometimes resolve persistent connectivity issues. However, note that this will remove all previous Bluetooth pairings and settings.
7. Try a different device: Test the headphones with a different Bluetooth-enabled device to see if the issue is device-specific. This will help determine whether the headphones or the original device is causing the connectivity problem.
8. Contact customer support: If none of the troubleshooting steps resolve the Bluetooth connectivity issue, reach out to the manufacturer’s customer support for further assistance. They may have specific troubleshooting methods or firmware updates available.
Bluetooth connectivity issues can often be resolved by following these steps. However, if the problem persists, it may indicate a hardware issue with the headphones or the device. Seeking professional assistance may be necessary in such cases.
In the next section, we will discuss methods to prevent future headphone damage and maintain their longevity.
Method 10: Preventing Future Headphone Damage
Taking proactive steps to prevent headphone damage can help extend their lifespan and ensure optimal performance. Here are some methods to keep your headphones in excellent condition:
1. Store them properly: When not in use, store your headphones in a protective case or pouch to prevent dust accumulation and physical damage. Avoid wrapping the cable tightly around the headphones, as it can strain the wires.
2. Handle with care: Treat your headphones gently and avoid excessive bending or twisting, especially around the cables and connectors. Pulling the cable from the audio jack or yanking the headphone cord can strain the connections and lead to damage.
3. Clean regularly: Clean your headphones regularly to remove dirt, oils, and debris that can affect the audio quality. Use a soft, lint-free cloth or alcohol wipes to wipe the ear cups, headband, and cable. Avoid using abrasive cleaners or submerging the headphones in water.
4. Protect from moisture: Keep your headphones away from excessive moisture, such as rain or spills. Moisture can damage the internal components and affect the sound quality or cause wire corrosion. Consider using moisture-resistant or waterproof headphones for outdoor activities.
5. Disconnect properly: When removing the headphones, always grip the audio jack or connector, not the cable, to disconnect them from the audio source. Pulling the cable forcibly can damage the internal connections of the audio jack or strain the cable itself.
6. Avoid extreme temperatures: Exposure to extreme heat or cold can potentially damage the headphones. Avoid leaving them in a car on a hot day or exposing them to freezing temperatures. Store your headphones in a temperature-controlled environment when not in use.
7. Do not stretch the headband: Avoid stretching the headband excessively to fit larger heads. Overstretching can cause the headband to lose its shape and, in some cases, crack or break.
8. Regularly inspect and maintain: Periodically inspect your headphones for any signs of wear, loose connections, or damage. Address any identified issues promptly to prevent further damage and ensure optimal performance.
By following these preventative measures, you can significantly prolong the lifespan of your headphones and minimize the need for repairs or replacements. Taking care of your headphones will not only enhance your listening experience but also protect your investment.
Now, armed with these ten methods to fix and prevent headphone issues, you have the knowledge to troubleshoot and maintain your headphones effectively.