
Choosing the Right Tools for Electronics Repair
When it comes to repairing electronics, having the right tools at your disposal is essential. Whether you are fixing a broken smartphone, a malfunctioning laptop, or a faulty gaming console, having the proper tools can make the repair process much easier and more efficient. Here are some essential tools that every electronics repair enthusiast should have:
- Screwdrivers: A set of precision screwdrivers with various sizes and heads is a must-have for opening up electronic devices. Many electronics are held together with tiny screws that require specialized screwdrivers to remove.
- Tweezers: Fine-tipped tweezers are handy for handling small components and wires. They allow for precise placement and removal of parts and can help avoid accidental damage to delicate components.
- Soldering Iron: A soldering iron is used for reflowing solder and soldering components onto a circuit board. Make sure to choose a soldering iron with adjustable temperature settings and different tips for different soldering tasks.
- Multimeter: A multimeter is an essential tool for troubleshooting and measuring electrical voltage, current, and resistance. It helps in identifying faulty components and diagnosing electrical problems.
- Anti-static wrist strap: When working with sensitive electronic components, it’s important to discharge any static electricity to prevent damage. An anti-static wrist strap grounds you, ensuring that static charges don’t harm the delicate electronics.
- Desoldering tools: Sometimes you may need to remove faulty components from a circuit board, and desoldering tools such as desoldering pump or desoldering braid come in handy for that purpose.
These are just a few examples of the essential tools you’ll need for electronics repair. Depending on the specific repair task, you may require additional tools such as heat guns, wire strippers, or an oscilloscope. Remember to always invest in quality tools as they will not only provide better results but also offer durability and longevity.
Having the right tools is just the first step in electronics repair. The next section will explain the basics of electronics that you need to understand before diving into the repair process.
Understanding the Basics of Electronics
Before you embark on repairing electronics, it’s crucial to have a basic understanding of how they work. Electronics involve the flow of electrons through various components, circuits, and systems to perform specific functions. Here are some fundamental concepts that will help you grasp the basics:
- Circuit: A circuit is a closed loop through which electric current flows. It consists of components such as resistors, capacitors, and transistors connected by conductive pathways.
- Components: Electronics are made up of various components that perform specific functions. These include resistors, which limit the flow of electric current; capacitors, which store and release electrical energy; and transistors, which amplify or switch electronic signals.
- Voltage: Voltage is the electrical potential difference between two points in a circuit. It is measured in volts and determines the flow of electric charge. Different components require specific voltage levels to operate correctly.
- Current: Electric current refers to the flow of electrons through a circuit. It is measured in amperes (A) and is influenced by the voltage and resistance in the circuit.
- Resistance: Resistance is a measure of how much a material or component resists the flow of electric current. It is measured in ohms (Ω) and helps control the flow of electrons in a circuit.
- Ohm’s Law: Ohm’s Law states that the current flowing through a conductor is directly proportional to the voltage applied across it and inversely proportional to the resistance of the conductor. It can be expressed as I = V/R, where I is the current, V is the voltage, and R is the resistance.
By understanding these basic concepts, you will have a solid foundation to troubleshoot and repair electronic devices. When diagnosing issues, you can analyze circuits, identify faulty components, and make necessary repairs or replacements. It’s important to continue learning and stay updated with the latest advancements in electronics to keep up with changing technologies and repair techniques.
In the next section, we will explore the process of troubleshooting common issues in electronics, which will help you in identifying and resolving problems effectively.
Troubleshooting Common Issues in Electronics
When electronic devices encounter problems, it’s essential to troubleshoot and diagnose the underlying issues accurately. Here are some common issues and troubleshooting techniques to help you identify and resolve them:
- No Power: If a device doesn’t turn on, ensure that it is properly plugged in and that the power source is functioning. Check the power cable, adapter, or battery to ensure they are not damaged or depleted. If the power source is fine, the problem may lie in the device’s power supply or internal circuitry.
- Intermittent Power: If a device powers on and off randomly, there may be a loose connection or a faulty power switch. Inspect the power connections and check for any loose wires or broken components. Clean the contacts if necessary to ensure a proper connection.
- Display Issues: If the display is flickering, distorted, or not working at all, check the connections between the display and the device. Ensure that the display cable is securely connected and not damaged. If the issue persists, it could indicate a faulty display driver or a problem with the graphics card.
- Audio Problems: If there is no sound or distorted audio, check the volume settings and ensure that the device’s audio output is properly connected. Inspect the speakers or headphones for any physical damage. Update audio drivers and check for software settings that may be causing the issue.
- Slow Performance: If a device is running slow, it may be due to excessive background processes, insufficient memory, or a fragmented hard drive. Close unnecessary programs, clear temporary files, and perform regular maintenance tasks such as disk defragmentation and software updates.
- Overheating: If a device becomes excessively hot, it may cause performance issues or even damage internal components. Ensure proper airflow by cleaning dust from vents and fans. Consider using cooling pads or external fans to prevent overheating.
- Connectivity Problems: If a device is struggling to connect to networks or peripherals, check the network settings, cables, and device drivers. Resetting network settings or reinstalling drivers may resolve the issue. For wireless connectivity, ensure that the device is within range of the network and that the Wi-Fi signal is strong.
These are just a few examples of common issues you may encounter when repairing electronics. Remember to research specific devices and consult technical manuals or online resources for detailed troubleshooting steps. Patience, attention to detail, and a systematic approach are essential when diagnosing and fixing electronic issues.
In the next section, we will delve into specific repair techniques for fixing loose or broken wires, a common problem that can be easily resolved with the right tools and knowledge.
Fixing Loose or Broken Wires
Loose or broken wires are a common issue in electronic devices, and they can cause various problems such as intermittent power, audio or video distortion, or complete device failure. Fortunately, fixing loose or broken wires is a relatively straightforward repair that can be done with a few essential tools:
To fix loose or broken wires, follow these steps:
- Power Off: Before you start any repairs, always power off the device and unplug it from the power source. This ensures your safety and prevents potential short circuits or electrical damage.
- Inspect: Examine the wire carefully to identify any breaks or loose connections. Look for any physical damage, frayed insulation, or detached ends. Use a magnifying glass if necessary to get a closer look.
- Strip: If the wire has a broken or frayed end, you will need to strip the insulation to expose clean copper strands. Use wire strippers to remove the damaged part of the insulation, being careful not to cut into the wire itself.
- Twist or Solder: For loose wire connections, twist the exposed copper strands together to ensure a solid connection. Use pliers or wire connectors to secure the twisted wires if needed. If the wire is broken, you may need to solder it back together. Heat the soldering iron, apply solder to the exposed copper strands, and carefully join them together with the hot soldering iron. Let the solder cool and harden before proceeding.
- Insulate: Once the wire connection is fixed, insulate it to prevent any potential short circuits or accidental contact. Use electrical tape or heat shrink tubing to cover the repaired area and ensure that the exposed wires are well-protected and insulated.
- Test: After completing the repair, plug in the device and power it on to check if the wire connection is secure and functioning properly. Test any affected features or functions to ensure they are working as expected.
It’s important to note that not all wire repairs can be easily fixed. In some cases, the wire may be damaged beyond repair or there may be underlying issues with the device’s internal circuitry. If you encounter such situations, it may be best to seek professional help or consider replacing the entire wire or component.
Fixing loose or broken wires is just one of the many troubleshooting and repair techniques you’ll need to master in electronics repair. In the next section, we will discuss the process of replacing faulty components, which is often necessary when attempting to repair electronic devices.
Replacing Faulty Components
When troubleshooting electronics, you may come across faulty components that need to be replaced. Components such as capacitors, resistors, transistors, or integrated circuits can fail over time or due to physical damage. Replacing these faulty components can often restore the functionality of the device. Here are the steps to replace a faulty component:
- Identify the Faulty Component: Use your diagnostic skills and testing tools like a multimeter to identify the specific component causing the issue. Look for visible signs of damage like discoloration, bulging capacitors, or burnt marks.
- Obtain a Replacement: Once the faulty component is identified, source a suitable replacement. Make sure to check the component’s specifications, such as voltage rating, resistance, or capacitance, to ensure compatibility. Online electronics suppliers or local electronics stores can often provide the required components.
- Power Off and Unplug: Always power off the device and unplug it from the power source before replacing any components. Ensuring the safety of both yourself and the device.
- Desolder the Faulty Component: Use a desoldering tool like a desoldering pump or desoldering braid to remove the faulty component from the circuit board. Heat the solder joints with a soldering iron while carefully applying the desoldering tool to suck away the melted solder.
- Prepare the Replacement Component: Trim the leads of the replacement component to the appropriate length and bend them if necessary to match the original component’s positioning on the circuit board.
- Solder the Replacement Component: Place the replacement component into the vacant space on the circuit board, aligning the leads with the corresponding solder pads. Apply flux to the solder pads, then heat the pads with a soldering iron and carefully solder the leads of the replacement component to the board.
- Clean and Inspect: Remove any excess flux and ensure that there are no solder bridges or cold solder joints. Inspect the solder joints to confirm proper connections and make any necessary touch-ups if required.
- Test the Device: Once the replacement component is soldered and the board is cleaned, power on the device to verify that the new component has resolved the issue. Test the affected features or functions to ensure they are working correctly.
Replacing faulty components requires patience, precision, and solid soldering skills. If you are not confident in your soldering abilities or if the repair involves complex circuitry, it’s advisable to seek professional assistance or consult with experienced individuals in the electronics repair community.
In the next section, we will dive into the process of repairing circuit boards, which is a more advanced repair technique often required when dealing with complex electronic devices.
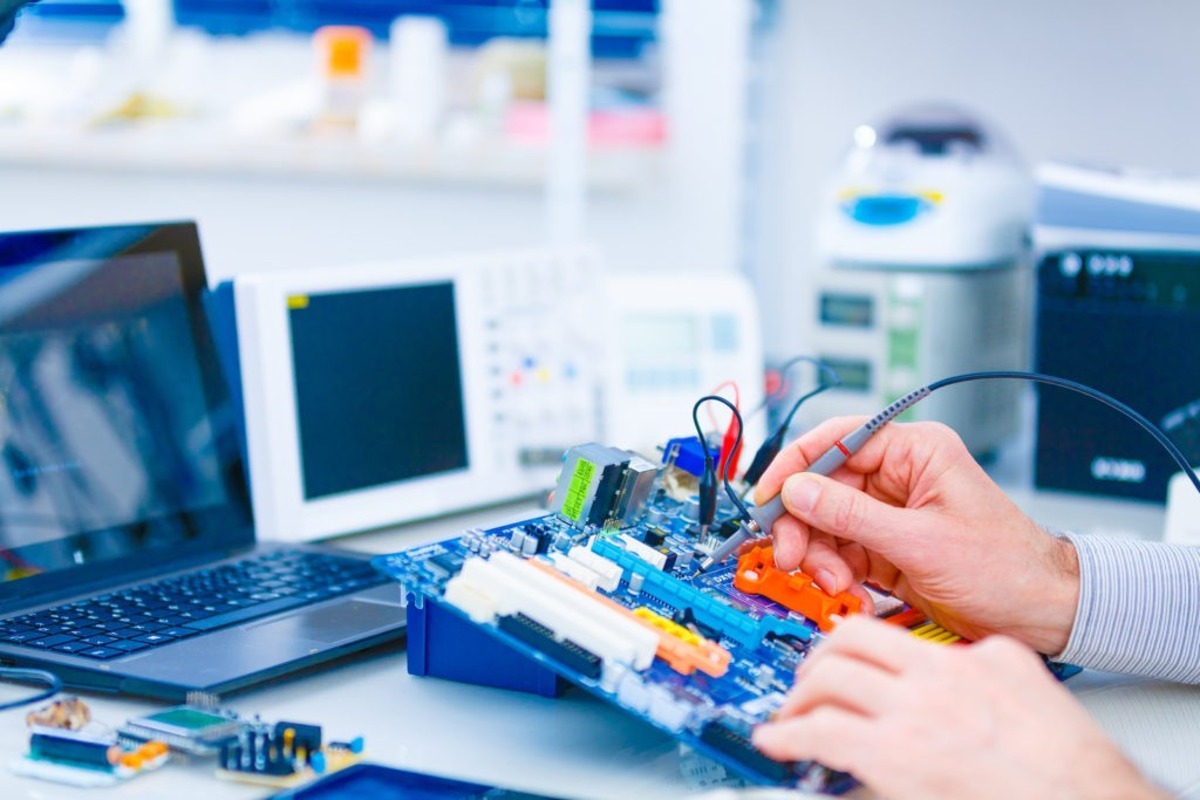
Repairing Circuit Boards
Repairing circuit boards is a more complex task that requires careful attention to detail and a basic understanding of electronic components and circuitry. Circuit boards are often found in electronic devices and serve as the foundation for connecting various components together. Here are steps to help you repair a circuit board:
- Diagnose the Issue: Identify the specific problem on the circuit board by examining it for any visible signs of damage, such as burnt or corroded traces, broken connections, or damaged components.
- Gather the Necessary Tools: Depending on the repair required, you may need tools such as a multimeter, soldering iron, desoldering tools, flux, solder wire, and small gauge wire for patching.
- Prepare the Work Area: Ensure you have a clean and well-lit workspace. Use an anti-static mat or wrist strap to protect the circuit board from electrostatic discharge (ESD) damage.
- Locate the Problem Area: Using a magnifying glass, locate the specific area or component of the circuit board that is causing the issue. It might be necessary to scrape away any conformal coating or protective material to expose the underlying circuitry.
- Remove Faulty Components: If a specific component is faulty, carefully desolder it from the circuit board using proper desoldering techniques. Be cautious not to damage the adjacent components or traces.
- Repair Broken Traces: If there are broken or damaged traces, you can repair them by carefully scraping away any coatings or debris. Use small gauge wire and solder to create jumper connections between the broken parts of the trace.
- Replace Components: If a component needs to be replaced, ensure you have a suitable replacement component with the correct specifications. Solder the new component in place, paying attention to the correct orientation and alignment.
- Inspect and Clean: Inspect the repaired areas to ensure proper connections and solder joints. Remove any flux residue or debris using isopropyl alcohol and a clean brush or cotton swab.
- Test the Circuit Board: Once the repairs and cleaning are complete, reconnect the circuit board to the appropriate power source and test the device’s functionality. Test all relevant features and functions to ensure they are working correctly.
Keep in mind that repairing circuit boards requires a steady hand and good soldering skills. Practice proper ESD precautions and always double-check your work for any potential errors or connections that could cause further issues. If the repairs are beyond your skill level, consider seeking assistance from a professional electronics repair technician.
In the next section, we will discuss the importance of cleaning and maintaining electronics to ensure their longevity and optimal performance.
Cleaning and Maintaining Electronics
Cleaning and maintaining your electronic devices is essential for preserving their longevity and ensuring optimal performance. By regularly removing dust, dirt, and debris, and following proper maintenance practices, you can extend the lifespan of your electronics. Here are some important steps to clean and maintain your electronics:
- Power Off and Unplug: Always power off the device and unplug it from the power source before cleaning. This ensures your safety and prevents any potential electrical damage.
- Use Gentle Cleaning Solutions: Choose cleaning solutions that are specifically designed for electronics and avoid using harsh chemicals that can damage the components or delicate surfaces. Isopropyl alcohol and microfiber cloths are commonly used for cleaning electronics.
- Remove Dust and Debris: Dust and debris can accumulate on electronic surfaces, vents, and fans over time, obstructing airflow and causing overheating. Use a soft brush or compressed air to gently remove dust from these areas. Be cautious not to damage any delicate components.
- Clean Display Screens: LCD, LED, and touchscreen displays can accumulate fingerprints and smudges. Use a microfiber cloth lightly dampened with water or a gentle cleaning solution to wipe the screen. Avoid applying excessive pressure, as it may damage the display.
- Keyboard and Input Devices: Keyboards and input devices can collect dirt and debris between the keys, affecting functionality. Use compressed air, a small brush, or a specialized keyboard cleaning tool to remove dirt. Consider using a keyboard cover or protector to prevent particles from entering the device.
- Avoid Liquid Exposure: Liquids can cause serious damage to electronics. Keep drinks and other liquids away from your devices to prevent accidental spills. If a spill occurs, power off the device immediately, disconnect it from the power source, and seek professional help if needed.
- Software Updates: Regularly update the software and firmware of your electronic devices. Manufacturers often release updates to improve performance, enhance security, and fix bugs. Check for updates through the device’s settings or the manufacturer’s website.
- Proper Storage: When not in use, store your electronics in a clean and dry environment, away from extreme temperatures, moisture, and direct sunlight. Use protective cases or covers to safeguard them from accidental damage.
- Regular Maintenance: Perform regular maintenance tasks such as disk cleaning, software optimization, and virus scans to keep your devices running smoothly. Follow the manufacturer’s guidelines for specific maintenance recommendations.
By incorporating these cleaning and maintenance practices into your routine, you can help preserve the performance and lifespan of your electronics. Remember to refer to the manufacturer’s guidelines and instructions for specific cleaning methods and maintenance recommendations for your devices.
In the next section, we will explore the process of dealing with water damage in electronics and provide essential tips for minimizing the impact of water exposure.
Dealing with Water Damage in Electronics
Accidents happen, and when it comes to electronics, one of the most common mishaps is water damage. Whether it’s a spilled drink, a submerged device, or exposure to moisture, water damage can have detrimental effects on electronic devices. It’s important to act quickly and follow these steps to minimize the impact of water damage:
- Power Off and Disconnect: If your device comes into contact with water, immediately power it off and disconnect it from any power source. This prevents further damage and reduces the risk of short circuits.
- Remove External Components: Take off any removable parts such as batteries, memory cards, or SIM cards. This helps prevent possible corrosion or electrical damage to these components.
- Drying: Gently pat dry the device using a soft cloth or paper towel. Avoid using excessive force or heat sources like hair dryers, as they can further damage the device. Allow the device to air dry for at least 24-48 hours in a well-ventilated area.
- Desiccants: To aid the drying process, place the device in a sealed container with desiccant packets, which can help absorb moisture. Silica gel packets or uncooked rice can also be used as alternative desiccants.
- Do Not Power On: Resist the temptation to power on the device immediately, even if it appears dry. Water can leave behind residue that can cause short circuits or further contamination if the device is powered on prematurely.
- Professional Assessment: If the device was fully submerged in water or exposed to a significant amount of moisture, consider seeking professional assistance. Technicians trained in water damage repair can assess the extent of the damage and perform necessary repairs.
- Cleaning and Inspection: Once the device is thoroughly dried, inspect it for any lingering moisture or residue. Use a soft cloth or cotton swab lightly dampened with isopropyl alcohol to clean the exterior surfaces and connectors.
- Testing: After cleaning, reassemble the device and insert the necessary components. Power it on and test its functionality. Keep an eye out for any abnormal behavior or malfunctions.
- Prevention for the Future: To prevent future water damage, consider using protective cases or covers for your devices. Avoid exposing them to water-prone environments and be cautious when using them near liquids.
It’s important to note that water damage can be unpredictable, and not all devices are recoverable. The severity and extent of the water exposure can vary, and success in salvaging a device depends on several factors. In some cases, professional assistance may be necessary, especially if the device is valuable or contains important data.
By following these steps promptly and taking precautions to prevent water damage, you can increase the chances of minimizing the impact and potentially restoring your electronics back to working condition.
In the next section, we will explore the importance of understanding soldering techniques when it comes to electronics repair.
Understanding Soldering Techniques
Soldering is a fundamental skill in electronics repair and involves joining two or more metal components using a filler material called solder. It provides a strong and reliable electrical connection between components, making it a crucial technique to master. Here are the key aspects to understand about soldering:
Soldering Iron: A soldering iron is a handheld tool used to heat the solder. It typically consists of a heated metal tip and a handle. When choosing a soldering iron, consider its wattage, temperature control, and the type of tips available for various soldering tasks.
Solder: Solder is a metal alloy with a low melting point that is used to create a bond between components. Common solder alloys include tin-lead (Sn-Pb) and lead-free variants like tin-silver-copper (Sn-Ag-Cu). Choose the appropriate solder based on the application and any regulations or specifications you need to adhere to.
Flux: Flux is a chemical compound used during soldering to remove oxidation and impurities from the metal surfaces being soldered. It improves the wetting and flow of the solder, ensuring a strong and reliable connection. Flux can be applied separately or incorporated into the solder wire.
Techniques: When soldering, there are a few key techniques to keep in mind:
- Tinning: Tinning refers to coating the surfaces to be soldered with a thin layer of solder. It aids in heat transfer, helps prevent oxidation, and makes it easier to create a secure joint.
- Heat Control: Proper heat control is crucial during soldering. The soldering iron should be hot enough to melt the solder but not so hot that it damages the components or surrounding circuitry. Adjust the temperature based on the specific application and soldering task.
- Joint Quality: A good solder joint should be shiny, smooth, and free of any cold solder joints or excessive solder. It should create a strong electrical connection without any unwanted bridges or shorts.
- Component Protection: When soldering delicate components, it’s important to minimize their exposure to excessive heat. Use heat sinks or clips to dissipate heat away from sensitive components and avoid prolonged heating.
Practice and Safety: Like any skill, soldering takes practice to master. Start with simple projects and gradually move on to more complex repairs. Be sure to work in a well-ventilated area, as soldering can release harmful fumes. Take safety precautions by wearing safety glasses and avoiding contact between hot solder and your skin.
Understanding soldering techniques is essential for successful electronics repair. It allows you to confidently repair broken connections, replace components, and perform various soldering tasks required for maintaining and restoring electronic devices.
In the next section, we will delve into the process of repairing power supply issues in electronics, which are often the underlying cause of many common device malfunctions.
Repairing Power Supply Issues
Power supply issues are a common cause of electronics malfunctions, ranging from devices not turning on to erratic behavior or intermittent power loss. Understanding how to troubleshoot and repair power supply issues is crucial for electronics repair. Here’s a step-by-step guide to help you tackle power supply problems:
- Check Power Source: First, ensure that the power source, such as an outlet or battery, is functioning correctly. Verify that other devices can successfully draw power from the same source.
- Inspect Power Cable/Adapter: Check the power cable or adapter for any visible damage or wear. If you detect any issues, such as frayed wires or loose connections, consider replacing the cable or adapter with a compatible one.
- Test Voltage: Use a multimeter to measure the voltage output of the power supply. Compare the measured voltage with the specified voltage for your device. If the voltage is significantly lower or higher than the specified range, the power supply may need to be replaced.
- Inspect Fuse/Circuit Breaker: If the device has a fuse or circuit breaker, check for any signs of a blown fuse or tripped circuit breaker. Replace the fuse with one of the same rating if necessary, or reset the circuit breaker.
- Check Internal Connections: Inspect the internal connections between the power supply unit and the device’s circuit board. Loose or damaged connections can prevent proper power flow. Reseat any connectors to ensure a secure and snug fit.
- Examine Power Supply Board: If the power supply is a separate board, visually inspect it for any signs of damage, such as burnt components or bulging capacitors. Replace any visibly faulty components or the entire power supply board if needed.
- Repair Solder Joints: Inspect the solder joints on the power supply board and any related components. Cold or cracked solder joints can cause power supply issues. Carefully reflow the solder or apply fresh solder to ensure proper connections.
- Test Power Supply Load: Connect a known load to the power supply and measure the voltage output under load conditions. Excessive voltage drop can indicate a faulty power supply or components unable to handle the load. Consider replacing or upgrading the power supply if necessary.
- Perform Component-Level Diagnostics: If you have the necessary expertise and access to a schematic diagram, perform component-level diagnostics to identify faulty components on the power supply board. Replace any faulty components to restore proper power output.
- Confirm Repair: Once the power supply issue is addressed, power on the device and test its functionality. Monitor the device for any recurring power supply problems or abnormal behavior.
It’s important to note that repairing power supply issues may require advanced knowledge and expertise. If you’re unsure or uncomfortable with any step, it’s best to seek professional assistance or consult with experienced individuals in the electronics repair community.
By following these steps and troubleshooting power supply problems, you can often resolve common issues in electronics and restore the proper functioning of devices.
In the next section, we will explore the troubleshooting and repair process for fixing display problems in electronic devices, such as distorted images or no display output.
Fixing Display Problems in Electronics
Display problems can be frustrating when using electronic devices, but they are a common issue that can often be resolved with the right troubleshooting and repair techniques. Whether you’re encountering distorted images, flickering screens, or no display output at all, here are some steps to help you fix display problems in electronics:
- Check Connections: Ensure that all cables connecting the device to the display are securely plugged in on both ends. Loose or disconnected cables can cause display issues.
- Adjust Display Settings: Check the device’s display settings to ensure they are configured correctly. Verify the resolution, refresh rate, and color settings match the specifications recommended for the display.
- Inspect Display Cable: Examine the display cable for any visible damage or frayed wires. Replace the cable if necessary, as damaged cables can cause display problems.
- Testing with External Display: Connect the device to an external display, such as a monitor or TV, using the appropriate cable. If the external display works fine, it indicates that the issue may be with the device’s internal display components.
- Restart the Device: Sometimes a simple restart can resolve display issues caused by software glitches. Power off the device, wait a few seconds, and then power it back on.
- Update Graphics Drivers: Outdated or missing graphics drivers can cause display problems. Download and install the latest graphics drivers from the manufacturer’s website to ensure compatibility and correct any software-related display issues.
- Inspect and Clean the Display: Dust, fingerprints, or smudges on the display surface can affect image quality. Gently clean the display using a microfiber cloth lightly dampened with water or a mild screen cleaning solution.
- Reset Display Settings: If the display settings have been modified, resetting them to their default values can sometimes resolve display issues. Look for a “Reset” or “Factory Reset” option in the device’s display settings menu.
- Repairing Backlight Issues: If the display is significantly dim or completely dark, the backlight may be the culprit. Backlight issues often require advanced repair skills and may involve replacing faulty components or the entire backlight assembly.
- Professional Assistance: If all else fails or if you’re uncomfortable with performing advanced repairs, seek professional assistance from an authorized service center or a qualified technician.
Remember, not all display issues can be solved through troubleshooting and simple repairs. In some cases, hardware failures or component damage may require professional intervention or component replacement.
By following these steps and using the appropriate troubleshooting techniques, you can often diagnose and resolve common display problems in electronics, restoring the visual functionality and enjoyment of your devices.
In the next section, we will delve into diagnosing and fixing audio problems in electronic devices, helping you restore clear and high-quality sound output.
Diagnosing and Fixing Audio Problems
Audio problems can be a frustrating issue when using electronic devices, whether it’s a lack of sound, distorted audio, or poor quality. Fortunately, many audio problems can be diagnosed and resolved with a few troubleshooting steps. Here’s how you can diagnose and fix common audio problems in electronic devices:
- Check Volume and Mute: Ensure that the volume is not muted or set too low. Adjust the volume settings on the device and any external audio devices, such as speakers or headphones.
- Verify the Audio Source: Make sure the appropriate audio source is selected. For example, if using external speakers, check that they are the selected output device in the audio settings.
- Inspect Audio Connections: Check all audio connections, such as speaker cables, headphone jacks, or audio input/output ports, for loose or damaged connections. Reconnect or replace cables as necessary.
- Test with Different Audio Output: Try using different audio output devices, such as headphones or external speakers, to determine if the issue lies with the audio device itself or the audio output.
- Update Audio Drivers: Outdated or corrupt audio drivers can cause audio problems. Update the audio drivers to the latest version from the manufacturer’s website or using the device’s driver update utility.
- Check Software Settings: Review the audio settings and audio mixer controls on the device to ensure the correct audio devices and settings are selected, and no audio features are muted or disabled inadvertently.
- Restart Audio Services: Sometimes, restarting the audio services can fix audio problems. Open the Services Manager, locate the audio services (e.g., Windows Audio or AudioEndpointBuilder), and restart them.
- Scan for Malware or Viruses: Malware or viruses can affect the device’s audio functionality. Perform a thorough scan using reliable antivirus software to ensure your device is free from any malicious software.
- Update Firmware or BIOS: Firmware or BIOS updates may include bug fixes or improvements related to audio functionality. Check the manufacturer’s website for any available updates and follow the instructions for updating.
- Check for Hardware Issues: If all software-related troubleshooting steps fail, it’s possible that there may be a hardware problem with the audio components. In such cases, it’s advisable to seek professional assistance to diagnose and repair the hardware issue.
Remember that audio problems can be caused by a combination of hardware, software, or settings issues. It’s important to systematically go through the troubleshooting steps to pinpoint the specific cause of the audio problem.
By following these troubleshooting techniques, you can often diagnose and fix common audio problems in electronic devices, restoring clear and high-quality sound output.
In the next section, we will explore additional tips and techniques for successful electronics repair and maintenance.