
Check the Power Supply
One of the first steps to take when your Acer laptop refuses to turn on is to check the power supply. A faulty power supply can prevent your laptop from receiving the necessary power to boot up. Here are some troubleshooting steps to follow:
- Make sure the power cord is securely plugged into both the AC adapter and a working power outlet. Sometimes, a loose connection can cause power issues.
- If you’re using a power strip or surge protector, try plugging the AC adapter directly into a wall outlet to rule out any potential issues with the power strip.
- Inspect the power cord for any visible damage. Look for frayed wires, bent pins, or any other signs of wear and tear. If you notice any issues, consider replacing the power cord with a new one.
- Test the power outlet with another device, such as a lamp or phone charger, to ensure it’s working properly. If the outlet is not functioning, try plugging the AC adapter into a different outlet.
- Check the LED indicator on the AC adapter. If the LED is off or blinking, it may indicate a problem with the adapter itself. In this case, you may need to replace the AC adapter.
- Remove the battery from your laptop and try powering it on with just the AC adapter connected. If it turns on without the battery, it could be a sign that the battery is faulty and needs to be replaced.
- If you have access to a spare AC adapter, try using it to power your laptop. This can help determine if the original AC adapter is the source of the problem.
By following these steps, you can narrow down the potential causes of your Acer laptop not turning on. If the issue is related to the power supply, addressing it early on can save you time and frustration.
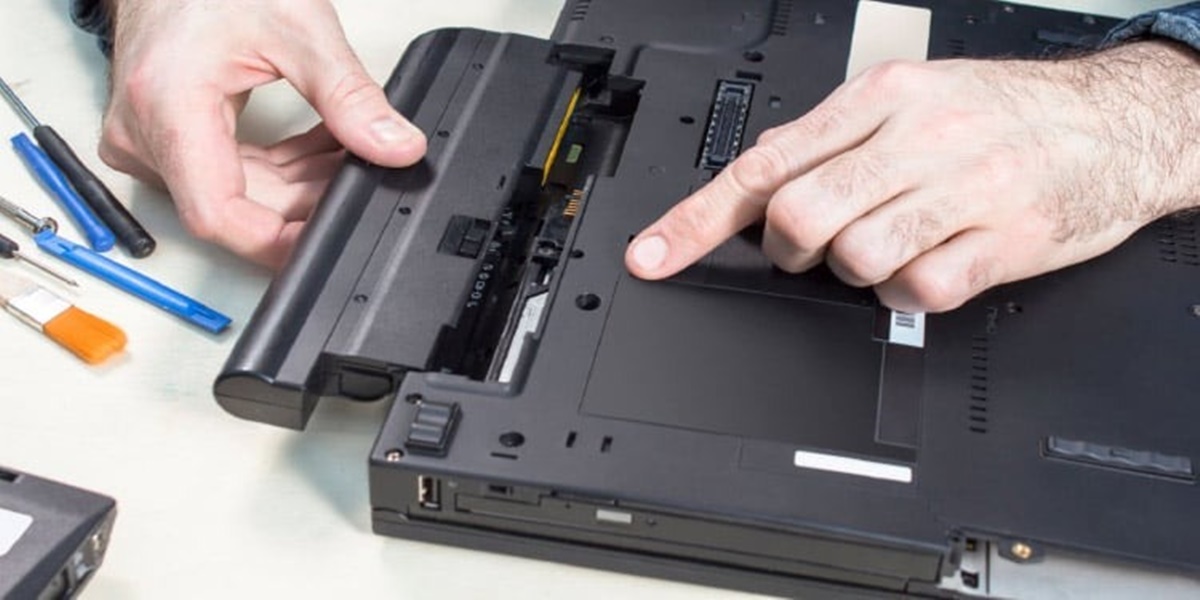
Remove the Battery and AC Adapter
If your Acer laptop is still not turning on after checking the power supply, the next step is to remove the battery and AC adapter. This process can help resolve any temporary power-related issues and reset the laptop’s hardware. Here’s how to do it:
- Ensure that your laptop is turned off and disconnected from any power source.
- Locate the battery release latch on the back or bottom of your laptop. Slide or press the latch to unlock and remove the battery.
- Disconnect the AC adapter from your laptop by gently unplugging it from the power port.
- Once both the battery and AC adapter are removed, press and hold the power button for at least 20 seconds. This helps discharge any remaining electrical charge in the laptop’s circuitry.
- After 20 seconds, release the power button and reconnect the AC adapter to your laptop.
- Try turning on your laptop without the battery plugged in. If it successfully powers on, then the issue may be with the battery. Consider replacing the battery if necessary.
- If your laptop doesn’t turn on without the battery, try reconnecting the battery and AC adapter, then attempt to power it on again.
- If your laptop still doesn’t respond, try using a different AC adapter or battery, if available, to rule out any potential issues with those components.
Removing the battery and AC adapter helps in resetting the laptop’s electrical components and can resolve certain power-related issues. If your Acer laptop still won’t turn on after performing these steps, proceed to the next troubleshooting methods.
Reset the RAM
If your Acer laptop is not turning on, resetting the RAM (Random Access Memory) can help resolve potential issues related to memory and improve startup performance. Here’s how to reset the RAM:
- Turn off your laptop and disconnect it from any power source.
- Locate the access panel on the bottom of your laptop. This panel provides access to the RAM modules.
- Use a screwdriver to remove the screws securing the access panel. Carefully lift off the panel and set it aside.
- You will see one or more RAM modules installed in the slots on the motherboard. Gently press outward on the clips at either side of the module to release it from the slot.
- Remove the RAM module(s) completely from the slot(s).
- With the RAM removed, press and hold the power button for about 10 seconds. This will discharge any remaining electrical charge in the laptop.
- Reinsert the RAM module(s) back into their respective slots. Ensure that they are properly seated and secure.
- Replace the access panel and tighten the screws to secure it in place.
- Reconnect your laptop to the power source and attempt to power it on.
Resetting the RAM can help resolve potential issues caused by loose connections or corrupt data in the memory modules. If your Acer laptop still won’t turn on after resetting the RAM, move on to the next troubleshooting steps.
Perform a Power Reset
If your Acer laptop is not turning on, performing a power reset can help resolve various issues that may be causing the problem. A power reset involves fully draining the residual power from the laptop’s components. Here’s how to perform a power reset:
- Ensure that your laptop is turned off and disconnected from any power source.
- Remove the battery from the laptop, if it’s removable.
- Unplug the AC adapter from your laptop and disconnect any peripherals or external devices.
- Press and hold the power button for at least 30 seconds. This discharges any remaining power from the laptop.
- Release the power button and reconnect the AC adapter without reinstalling the battery.
- Press the power button to turn on your laptop.
- If your laptop powers on, shut it down properly, reconnect the battery (if removable), and then turn it back on.
- If your laptop still doesn’t turn on, attempt the power reset process one more time, but this time reinsert the battery before turning it on.
A power reset helps eliminate residual power and can resolve issues related to static charge or temporary glitches. If your Acer laptop continues to have power issues after performing a power reset, proceed to the next troubleshooting methods.
Disconnect External Devices
If your Acer laptop is not turning on, it’s important to check if any external devices are causing the issue. Sometimes, a faulty external device or connection can prevent your laptop from starting up. Here’s what you can do:
- Ensure that your laptop is turned off and disconnected from any power source.
- Disconnect all external devices from your laptop, including USB drives, printers, external monitors, and any other peripherals.
- Once all the external devices are disconnected, try turning on your laptop.
- If your laptop powers on without any external devices connected, it indicates that one of the devices was causing the issue. You can reconnect the devices one by one, turning off your laptop each time, to identify the problematic device.
- If your laptop still doesn’t turn on even with all external devices disconnected, try connecting an external display to check if the issue lies with your laptop’s built-in display. If the external display works, it may indicate a problem with the laptop’s display hardware.
- Ensure that all cables and connectors are securely plugged in and not damaged. Loose or damaged connections can cause power issues.
- If you’re using a docking station or a port replicator, disconnect your laptop from it and try powering it on directly without the docking station.
- Check for any debris or dirt in the laptop’s USB ports or other connection points. Use compressed air or a soft brush to clean them if necessary.
By disconnecting external devices, you can rule out any issues related to faulty peripherals or connections. If your Acer laptop still fails to turn on after trying these steps, continue troubleshooting using the next methods.
Check the Display
If your Acer laptop is not turning on, it’s essential to check the display to ensure there are no issues preventing you from seeing any visual output. Here are some steps you can take to diagnose display-related problems:
- Confirm that the laptop’s brightness is turned up by pressing the corresponding buttons or using the keyboard shortcuts.
- Look for any signs of physical damage on the screen, such as cracks, lines, or discoloration. If you notice any damage, it may indicate a hardware problem that requires professional assistance.
- Connect your laptop to an external display using an HDMI or VGA cable. This will help determine if the issue lies with the laptop’s display or its hardware components.
- If the external display shows a proper image, it suggests that the laptop’s display may be faulty. You can try reinstalling the display driver or seek professional help.
- Try closing and opening the laptop’s lid. Sometimes, the laptop may not wake up from sleep mode, and simply closing and reopening the lid can resolve the issue.
- Inspect the display cable for any signs of damage or loose connections. If you find any issues, you may need to replace the cable or consult a technician for further assistance.
- Perform a power reset on the laptop, as explained in a previous step. Sometimes, a power-related issue can cause the display to malfunction.
- If you have access to another laptop or desktop computer, try connecting your Acer laptop as a secondary display using an appropriate cable. This can help determine if the issue lies with the laptop’s display or its graphics card.
- Lastly, if none of the above steps resolve the issue, it’s recommended to contact Acer customer support or take your laptop to a professional technician for further diagnosis and repair.
Checking the display is crucial when troubleshooting a laptop that won’t turn on. By following these steps, you can identify and address any display-related problems that may be preventing your Acer laptop from powering up.
Boot in Safe Mode
If your Acer laptop is not turning on or experiencing frequent crashes, booting in Safe Mode can help diagnose and resolve software-related issues. Safe Mode allows your laptop to start with a minimal set of drivers and services, making it easier to identify and fix any problematic software or drivers. Here’s how to boot your Acer laptop in Safe Mode:
- Ensure that your laptop is turned off completely.
- Press the power button to turn on your laptop.
- Once the Acer logo appears on the screen, press and hold the F8 key until the Advanced Boot Options menu appears.
- Using the arrow keys on your keyboard, select “Safe Mode” from the list of options, and then press Enter.
- Your laptop will now boot in Safe Mode, displaying a minimal set of drivers and services.
- Use your laptop in Safe Mode to observe if the problem persists. If your laptop functions without any issues in Safe Mode, it may indicate a problem with a software driver or a recently installed program.
- In Safe Mode, you can uninstall any recently installed applications or drivers that may be causing the problem. Access the Control Panel and navigate to “Programs” or “Programs and Features” to remove any recently installed software.
- Additionally, you can try updating your device drivers by going to the official Acer website and downloading the latest driver versions for your specific laptop model.
- After making any changes or updates, restart your laptop and see if the issue has been resolved.
- If your laptop continues to experience problems even in Safe Mode, it could indicate a more significant hardware issue. In such cases, it’s recommended to seek professional assistance or contact Acer customer support for further troubleshooting steps.
Booting in Safe Mode can help isolate software or driver-related issues, making it easier to identify and resolve the problem. Follow the steps provided above to boot your Acer laptop in Safe Mode and proceed with the necessary troubleshooting steps based on your observations.
Update Drivers and BIOS
If your Acer laptop is not turning on or experiencing stability issues, outdated drivers or BIOS (Basic Input/Output System) firmware may be the cause. Updating drivers and BIOS can help resolve compatibility issues, improve performance, and fix bugs. Here’s how you can update drivers and BIOS on your Acer laptop:
- Visit Acer’s official website and navigate to the “Support” or “Drivers and Manuals” section.
- Enter the model name or serial number of your laptop to access the support page for that specific model.
- Select the appropriate operating system from the dropdown menu to see the list of available drivers and firmware updates.
- Start by downloading and installing the latest driver updates for essential components such as the chipset, graphics card, network adapter, and audio drivers. Make sure to follow the installation instructions provided by Acer.
- Next, check if there are any available BIOS updates for your laptop model. Download the BIOS update file and carefully read the instructions provided by Acer on how to perform the BIOS update.
- During the BIOS update process, ensure that your laptop is connected to a reliable power source and plugged in. Interrupting the BIOS update can result in irreversible damage to your system.
- Follow the instructions carefully to complete the BIOS update. After the update, your laptop will restart, and the new firmware will take effect.
- Once all the driver and BIOS updates are installed, restart your laptop to apply the changes.
- After the updates, observe if your laptop performs better or if the booting issue is resolved.
- If the issue persists or if you face any difficulties during the update process, it is advisable to contact Acer customer support or seek assistance from a professional technician.
Updating drivers and BIOS is crucial for maintaining the stability and performance of your Acer laptop. By following the steps above and keeping your drivers and BIOS up to date, you can address potential compatibility issues and improve the overall functionality of your system.
Run a System Restore
If your Acer laptop is experiencing software issues or sudden malfunctions, running a system restore can help revert your system back to a previous state when it was working correctly. System restore is a built-in Windows feature that allows you to roll back your laptop’s settings, drivers, and registry to an earlier point in time. Here’s how you can run a system restore on your Acer laptop:
- Save any important files or documents and close all open applications.
- Click on the “Start” button and search for “System Restore” in the search bar. Click on the relevant search result to open the System Restore window.
- In the System Restore window, select the option to “Choose a different restore point” and click “Next”.
- You will see a list of available restore points. Choose a restore point that predates the issues you are experiencing. It’s best to select a restore point from a time when your laptop was functioning correctly.
- Click “Next” and review the details of the restore point. Make sure you understand that the system restore process will uninstall any programs or drivers installed after the selected restore point.
- Click “Finish” to start the system restore process. Your Acer laptop will restart, and Windows will roll back your system to the selected restore point.
- Once the system restore is complete, your laptop will restart again. Check if the issues you were experiencing have been resolved.
- If the problem persists or if the system restore did not complete successfully, you can try selecting a different restore point or consider other troubleshooting methods.
- Keep in mind that running a system restore will not affect your personal files but may remove any recently installed software or updates. It’s always recommended to back up your important files before performing a system restore.
- If you continue to experience issues with your Acer laptop, it may be necessary to seek professional assistance or contact Acer customer support for further troubleshooting steps.
Running a system restore can help fix software-related issues and revert your Acer laptop to a previous working state. By following the steps above, you can potentially resolve the problems you’re facing and restore your laptop’s functionality.
Contact Support
If you have tried all the troubleshooting steps mentioned above and your Acer laptop still refuses to turn on or function properly, it’s time to reach out to Acer’s customer support. Acer’s professional support team can provide you with expert guidance and assistance to resolve the issues you’re facing. Here’s how you can contact Acer support:
- Visit Acer’s official website and navigate to the “Support” or “Contact” page.
- Depending on your location, you may have different options for contacting support, such as phone, email, or live chat. Choose the method that is most convenient for you.
- If you prefer to speak with someone directly, note down the customer support phone number provided on the website. Prepare the necessary information about your Acer laptop, such as the model name, serial number, and a detailed description of the issues you’re encountering.
- If email or live chat support is available, fill out the contact form or initiate a chat session. Provide all the required details and a clear explanation of the problems you’re experiencing. Be sure to include your laptop’s model name and serial number for a more efficient response.
- When contacting support, it’s helpful to have any relevant documentation, such as warranty information and proof of purchase, readily available.
- Be patient and cooperative during your interaction with Acer’s support team. They will guide you through additional troubleshooting steps or provide instructions for warranty service if necessary.
- If your laptop is covered under warranty and the issue cannot be resolved remotely, Acer’s support team may arrange for repairs or recommend an authorized service center for further assistance.
- Remember to ask for a case or reference number during your interaction for future reference or follow-up communication.
Contacting Acer’s support team is the best course of action when all other troubleshooting methods have failed. Their expertise and resources can help diagnose and resolve complex issues with your Acer laptop effectively and efficiently.
By reaching out to Acer’s customer support, you can ensure that your laptop receives the necessary attention to get it up and running again.