
Choosing the right Philips Hue light bulb
When it comes to choosing the perfect Philips Hue light bulb for your needs, there are a few factors you need to consider. Philips Hue offers a wide range of bulbs, each with its own unique features and benefits. Here are some tips to help you make the right choice:
- Color temperature: Philips Hue bulbs come in a variety of color temperatures, ranging from warm white to cool white. Consider the ambience you want to create in your space and choose a bulb with the appropriate color temperature.
- Brightness: Different Philips Hue bulbs offer different levels of brightness. If you need bright, task lighting, opt for a higher lumen output. For more subdued, ambient lighting, a lower lumen output will work just fine.
- Compatibility: Make sure the Philips Hue bulb you choose is compatible with your existing lighting system. Whether you have recessed lights, lamps, or track lighting, Philips Hue has bulbs designed for each type of fixture.
- Special features: Philips Hue offers bulbs with various additional features, such as color-changing capabilities, motion sensors, and smart home integration. Consider whether you need any of these features to enhance your lighting experience.
By taking these factors into account, you can choose the perfect Philips Hue light bulb to illuminate your space and create the desired ambiance. Remember to always read the product specifications and customer reviews to ensure the bulb meets your specific needs.
Understanding the different socket sizes
When it comes to installing a Philips Hue light bulb, one important factor to consider is the socket size. Different light fixtures and lamps have varying socket sizes, and it’s crucial to understand these sizes to ensure compatibility. Here are the most common socket sizes you may come across:
- E26: This is the standard medium screw base size used in most lamps and fixtures. It’s the most popular socket size and is compatible with a wide range of Philips Hue light bulbs. If your lamp or fixture has an E26 socket, you have numerous options to choose from.
- E12: Also called the candelabra base, the E12 is a smaller socket commonly found in chandeliers, sconces, and decorative lighting fixtures. If you have a fixture with an E12 socket, look for Philips Hue bulbs specifically designed for this socket size.
- GU10: The GU10 is a bi-pin base commonly used in track lighting and recessed fixtures. It features two pins that plug into the socket, providing a secure connection. If your fixture has a GU10 socket, make sure to select Philips Hue bulbs designed for this type of base.
- BR30: The BR30 is a reflector bulb with a medium screw base. It’s often used in recessed can lights and provides a wider beam of light. If your fixture requires a BR30 bulb, check for Philips Hue options available in this size.
Understanding the different socket sizes is crucial to ensure that the Philips Hue light bulb you choose fits securely and functions properly in your existing fixtures. Always double-check the socket size of your fixture before purchasing a new bulb to avoid any compatibility issues.
Tools needed for the installation
Before you begin the installation of your Philips Hue light bulb, it’s important to gather the necessary tools to ensure a smooth and successful process. Here are the essential tools you may need:
- Screwdriver: Depending on the type of fixture or lamp you’re working with, you may need a flat-head or Phillips screwdriver. This tool will be required to remove any screws or fasteners holding the existing bulb in place.
- Ladder or step stool: If your fixture is located in a high or hard-to-reach area, you may need a ladder or step stool to safely reach it. Make sure you have a stable and secure platform to stand on while performing the installation.
- Gloves: While not necessarily a tool, wearing gloves can protect your hands from sharp edges or hot components during the installation process. It’s always a good idea to prioritize safety and wear appropriate protective gear.
- Soft cloth or tissue: This is useful for handling the new Philips Hue light bulb. It helps to avoid leaving fingerprints or smudges on the bulb, which could affect its performance or appearance.
These are the basic tools you may need for installing a Philips Hue light bulb. However, it’s always a good idea to refer to the specific instructions provided with your light bulb or consult a professional if you have any doubts or concerns.
Preparation before installing the light bulb
Before you begin the installation of your Philips Hue light bulb, it’s important to take a few preparatory steps to ensure a successful and hassle-free process. Here’s what you need to do:
- Turn off the power: Before working with any electrical fixture, always make sure to turn off the power at the circuit breaker or by flipping the switch. This is crucial for your safety and to avoid any accidental electrical shocks.
- Allow the existing bulb to cool down: If there’s currently a bulb in the socket, give it enough time to cool down before attempting to remove it. Many bulbs can become hot during operation, and touching a hot bulb can result in burns or injuries.
- Inspect the socket: Take a moment to inspect the socket for any signs of damage or corrosion. If you notice any issues, it’s best to consult a professional electrician to address the problem before proceeding with the installation.
- Clean the socket: Use a soft cloth or tissue to gently clean the socket, removing any dust or debris that may hinder the installation process. A clean socket ensures a secure connection and better performance for your Philips Hue light bulb.
- Read the instructions: Each Philips Hue light bulb may have specific instructions or precautions that you need to be aware of. Take the time to read through the included manual or check the manufacturer’s website for any important information regarding installation and usage.
By following these preparation steps, you’ll be ready to install your Philips Hue light bulb with ease and confidence. Remember to prioritize safety at all times and seek professional help if you’re unsure about any aspect of the installation process.
Removing the existing bulb from the smaller socket
Before you can install your Philips Hue light bulb in a smaller socket, you’ll need to remove the existing bulb. Here’s how to do it:
- Turn off the power: Ensure that the power to the socket is turned off. This will help prevent any electrical accidents while removing the bulb.
- Allow the bulb to cool: If the existing bulb is still on, let it cool down before attempting to remove it. This will prevent any burns or injuries.
- Gently twist the bulb: Grip the bulb firmly, but be cautious not to use excessive force. Most bulbs can be removed by gently twisting them counterclockwise until they loosen from the socket. If the bulb is stuck, try using a pair of gloves or a cloth for better grip.
- Release any fasteners: In some cases, the bulb may be secured in place with metal or plastic clips. Check for any fasteners around the base of the bulb and release them to free the bulb from the socket.
- Remove the bulb: Once the bulb is loose, carefully pull it straight out from the socket. Be careful not to drop the bulb or damage it during the removal process.
- Dispose of the bulb properly: Follow the proper disposal guidelines for your specific type of bulb. Some bulbs may be recyclable, while others may require special disposal methods due to containing hazardous materials.
By following these steps, you’ll be able to safely and effectively remove the existing bulb from the smaller socket, making way for the installation of your Philips Hue light bulb.
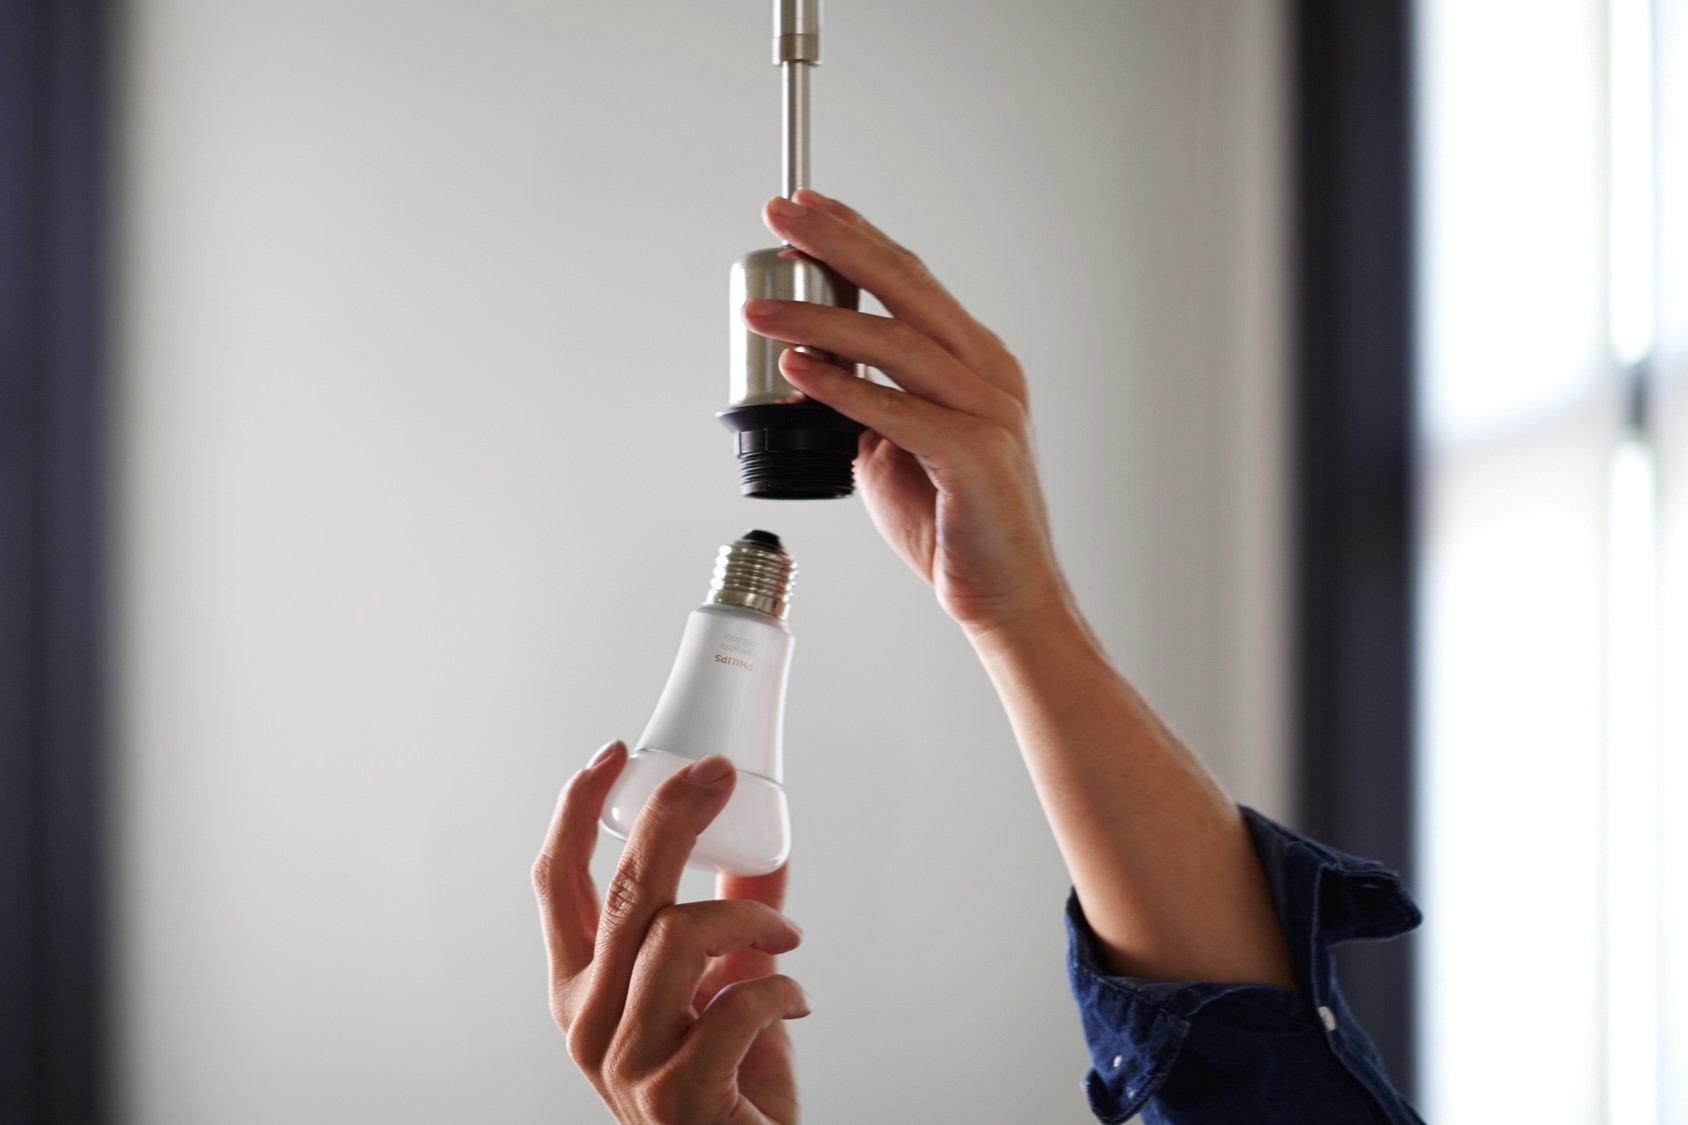
Installing the Philips Hue light bulb in the smaller socket
Now that you’ve successfully removed the existing bulb, it’s time to install your Philips Hue light bulb into the smaller socket. Follow these steps for a smooth installation process:
- Ensure the power is off: Double-check that the power to the socket is turned off to avoid any electrical mishaps.
- Inspect the socket: Take a moment to examine the smaller socket for any damage or debris. Clean the socket if necessary to ensure a proper connection for your Philips Hue light bulb.
- Hold the new bulb correctly: Carefully handle the new Philips Hue light bulb by the base. Avoid touching the bulb itself, as oils from your skin can affect its performance or lifespan.
- Align the base with the socket: Position the base of the bulb to align it with the smaller socket. Make sure the pins or screw threads line up properly for a secure fit.
- Gently twist the bulb clockwise: Begin twisting the bulb clockwise to thread it into the socket, taking care not to overtighten. Stop twisting once the bulb is securely in place.
- Check for proper alignment: Make sure the bulb is straight and properly aligned in the socket. This will ensure optimal light output and prevent any potential issues.
- Turn on the power: Once the bulb is securely installed, turn on the power to the socket to test the functionality of the Philips Hue light bulb.
- Verify proper operation: Check that the new bulb is functioning as expected, emitting the desired level of light and responding to any additional features or smart home integration.
With these steps, you’ll be able to successfully install your Philips Hue light bulb in the smaller socket. Remember to always follow the manufacturer’s instructions for your specific bulb model and consult a professional if you encounter any difficulties or concerns during the installation process.
Troubleshooting common issues
While installing and using your Philips Hue light bulb, you may encounter some common issues. Here are a few troubleshooting tips to help you resolve them:
- Bulb not turning on: If your Philips Hue light bulb is not turning on, ensure that it is properly installed and that the power to the socket is turned on. Check if the bulb is compatible with your specific lighting system and verify that it is securely screwed into the socket.
- Dim or flickering light: If the light from your Philips Hue bulb is dim or flickering, make sure it is not on a dimmer switch. Philips Hue bulbs are not compatible with traditional dimmer switches. If you have a compatible dimmer switch, adjust it to the highest setting to avoid any flickering issues.
- Unresponsive bulb: If your Philips Hue light bulb is not responding to commands from the app or the bridge, verify that it is within range of the bridge and that it is connected to a stable Wi-Fi network. Resetting the bulb by turning it off and on again may also help resolve this issue.
- Inconsistent color or brightness: If your Philips Hue light bulb is displaying inconsistent color or brightness, check the settings in your app or bridge. Ensure that you have selected the correct color or brightness level and that there are no conflicting schedules or automation rules affecting the bulb’s performance.
- Interference with other devices: If you are experiencing interference or connectivity issues with your Philips Hue light bulbs, try moving the bridge to a different location, away from other electronic devices that may cause interference. Additionally, make sure that the Wi-Fi signal in the area is strong and stable.
If you follow these troubleshooting tips and the issue persists, refer to the user manual or contact Philips Hue customer support for further assistance. They will be able to provide you with more specific guidance tailored to your particular situation.
Tips for maximizing the performance of your Philips Hue light bulb
To make the most out of your Philips Hue light bulb and ensure optimal performance, consider implementing the following tips:
- Keep the firmware updated: Regularly check for firmware updates for your Philips Hue bulbs and the Bridge. These updates often include performance improvements, bug fixes, and new features that can enhance the overall functionality of your bulbs.
- Position the Bridge strategically: Place your Philips Hue Bridge in a central location within your home to ensure a strong and stable wireless connection to all your bulbs. This will help prevent connectivity issues and maintain smooth operation.
- Use the Hue app: Take advantage of the Philips Hue app to access advanced features and customization options for your light bulbs. The app allows you to create schedules, adjust color and brightness, and even sync your lights with music or movies.
- Experiment with scenes and routines: Explore different predefined scenes or create your own customized scenes in the Hue app. Scenes allow you to instantly set the perfect ambiance in a room, while routines enable you to automate lighting based on specific triggers or schedules.
- Consider smart home integration: If you have other smart home devices, consider integrating them with your Philips Hue system. This can enable seamless automation and control of your lights along with other devices, creating a more immersive and convenient smart home experience.
- Use voice control: If you have a compatible voice assistant like Amazon Alexa or Google Assistant, set up voice control for your Philips Hue lights. This allows for hands-free control and effortless adjustment of your lighting settings.
- Experiment with color and ambiance: Don’t be afraid to have fun and experiment with different colors and lighting effects. Philips Hue bulbs offer a wide range of colors and shades, allowing you to create unique and captivating lighting displays for any occasion.
- Combine with other Philips Hue products: Explore other Philips Hue products, such as light strips, outdoor lighting, or smart switches, to enhance your lighting setup and create a seamless lighting ecosystem throughout your home.
By implementing these tips, you can fully maximize the performance and versatility of your Philips Hue light bulb system. Enjoy personalized lighting experiences that can transform the atmosphere of your home with just the touch of a button or a voice command.