
What is a Kindle email address?
A Kindle email address is a unique email address assigned to each Kindle device or app. It allows you to send documents, e-books, and articles directly to your Kindle for reading. This feature is especially useful when you want to access content that is not available in the Kindle Store or when you want to read articles from the web on your Kindle device.
The Kindle email address is typically in the format of “[name]@kindle.com” or “[name]@free.kindle.com”, where [name] represents a unique identifier for your device or app. It is important to note that this email address is not the same as your regular email address and can only be used to send content to your Kindle device.
Having a Kindle email address enables you to convert documents into a readable format for your Kindle and have them delivered directly to your device without the need for a USB connection. This convenient feature makes it easier for you to access and read your favorite documents, such as PDFs, Word documents, and eBooks, on your Kindle device.
It’s important to keep in mind that the Kindle email address is tied to your Amazon account. This means that it will be the same for all Kindle devices and apps associated with that account. If you have multiple Kindle devices registered under the same Amazon account, you can send content to any of these devices using the same Kindle email address.
In the next section, we will explore how to find your Kindle email address on your device.
Finding your Kindle email address on the device
Locating your Kindle email address on your device is a straightforward process. The steps may vary slightly depending on the specific Kindle model you have, but generally, the following instructions should help you find it:
- Turn on your Kindle device and navigate to the home screen.
- Tap on the top-right corner of the screen to open the settings menu.
- In the settings menu, select “Settings” or “Device Options,” depending on your device model.
- Scroll down and select “Personalize Your Kindle” or “My Account.”
- You should see a section labeled “Send-to-Kindle Email.” Your Kindle email address will be displayed here.
Make a note of your Kindle email address for future reference. You can now use this address to send documents, ebooks, and articles to your Kindle device.
Next, let’s explore how to find your Kindle email address on the Amazon website.
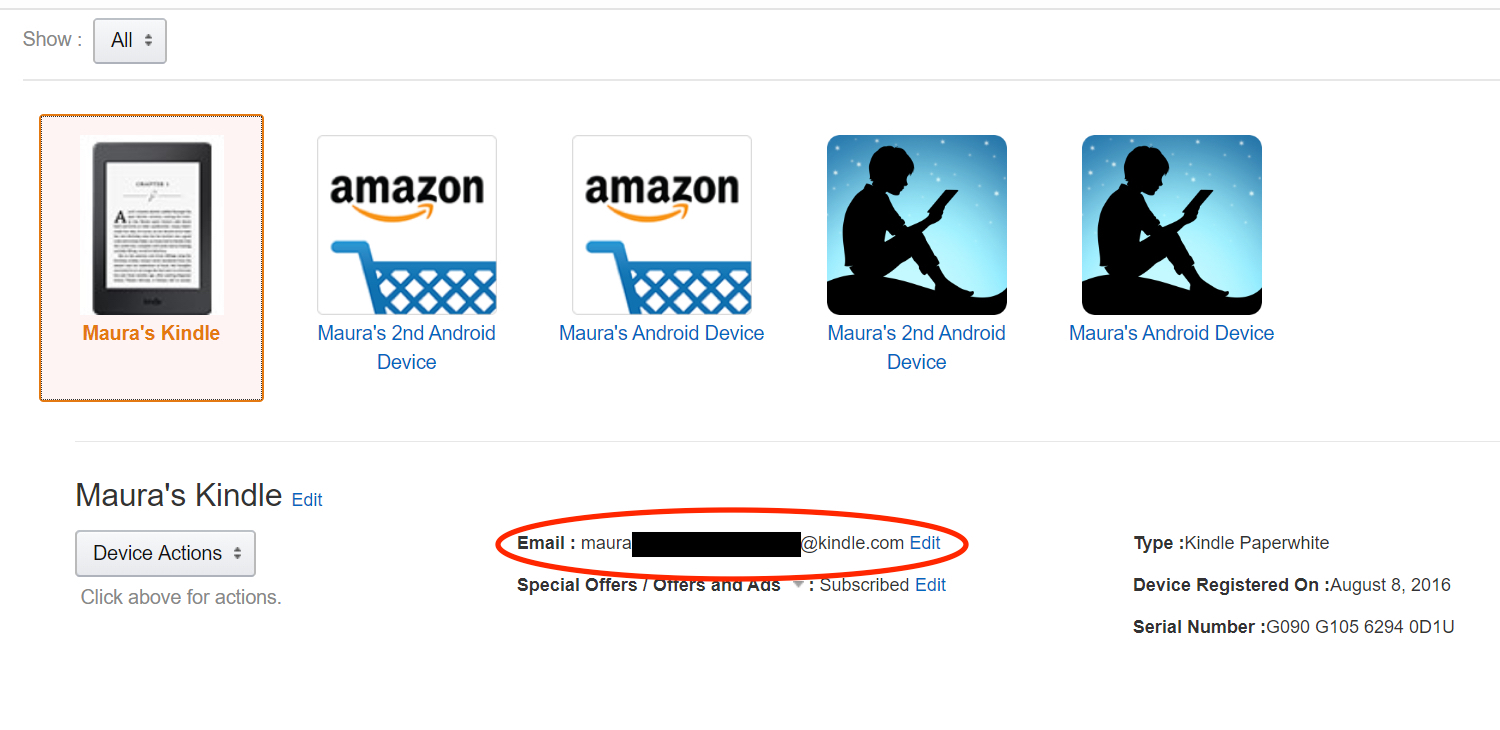
Finding your Kindle email address on the Amazon website
If you are unable to find your Kindle email address directly on your device, you can also locate it on the Amazon website. Here’s how:
- Open a web browser and go to the Amazon website.
- Sign in to your Amazon account using the same credentials associated with your Kindle device.
- Once you are signed in, hover over the “Account & Lists” option in the top-right corner of the page.
- In the drop-down menu, click on “Manage Your Content and Devices.”
- On the “Your Content” tab, click on the “Preferences” tab.
- Scroll down until you find the section titled “Personal Document Settings.”
- Underneath this section, you will see a list of your registered Kindle devices.
- Find the specific device you are looking for and locate the email address listed next to it.
Make a note of your Kindle email address for future use.
Now that you have found your Kindle email address either on your device or on the Amazon website, you can start using the Send to Kindle email feature. Let’s explore how to use it in the next section.
Using the Send to Kindle email feature
The Send to Kindle email feature allows you to easily send documents, e-books, and articles to your Kindle device for reading. To use this feature, follow these steps:
- Open your email client or web-based email service.
- Compose a new email.
- In the recipient field, enter your Kindle email address.
- Attach the document or file you want to send to your Kindle. Supported file types include PDF, MOBI, AZW, DOC, DOCX, TXT, and more.
- In the email subject line, you can leave it blank or add a brief description to help you identify the content later.
- Click on the “Send” button to send the email.
Once the email is sent, you should receive it on your Kindle device within a few minutes, depending on your internet connection. The content will appear in your Kindle library, ready to be accessed and read.
It’s important to note that only documents and files sent from the email address associated with your Amazon account will be delivered to your Kindle device. If you want to send content from a different email address, you will need to add it to your approved personal document email list on the Amazon website.
Now that you know how to use the Send to Kindle email feature, let’s address some common issues and troubleshooting tips in the next section.
Troubleshooting common issues with Kindle email addresses
While using the Kindle email feature, you may encounter some common issues. Here are a few troubleshooting tips to help resolve them:
1. Content not appearing on Kindle: If you’ve sent an email with attached content but don’t see it on your Kindle device, ensure that you are connected to a Wi-Fi or cellular network. Also, check that the file format is supported by Kindle, and that you sent it from an approved email address.
2. Delays in content delivery: Sometimes, there may be delays in receiving content on your Kindle. This can be due to high network traffic or issues with the email delivery service. Wait for a few minutes and check your Kindle library again. If the delay persists, restart your Kindle device or contact Amazon customer support for further assistance.
3. Unreadable or improperly formatted content: If the content you sent to your Kindle appears unreadable or improperly formatted, it could be due to compatibility issues or limitations with the file format. Ensure that you are sending a supported file format and that the document is properly formatted before sending it to your Kindle.
4. Invalid Kindle email address: If you receive an error message stating that your Kindle email address is invalid, double-check that you have entered the correct address. You can find your Kindle email address on your device or on the Amazon website (as mentioned in the previous sections).
5. Email delivery failure: In some cases, you may receive a bounce-back email notification stating that the email delivery to your Kindle failed. This could be due to various reasons, such as an issue with the sender’s email service or the size limitations of the email attachment. Try resending the email or contacting the sender for assistance.
If you continue to experience issues with your Kindle email address, it’s recommended to visit the official Amazon Kindle Help page or contact Amazon customer support for further troubleshooting and assistance.
With these troubleshooting tips, you should be able to resolve common issues and make the most of your Kindle email address for seamless content delivery.