
Reasons to Factory Reset an HP Laptop
Factory resetting an HP laptop can be a useful solution for various situations. Whether you are encountering persistent software issues, struggling with a sluggish performance, or preparing to sell or hand down your laptop, a factory reset can help restore your device to its original settings and eliminate any lingering problems. Here are several reasons why you might consider performing a factory reset on your HP laptop:
- Resolving software glitches: Over time, your HP laptop may accumulate software glitches, causing it to freeze, crash, or experience other performance issues. A factory reset can remove these stubborn glitches and restore your laptop to its default state, providing a fresh start for optimal performance.
- Removing malware or viruses: If your HP laptop has been infected with malware or viruses, a factory reset can help eradicate these security threats. By wiping the system and starting from scratch, you can ensure that any malicious software or code is completely removed.
- Preparing for a fresh start: Maybe you’re planning to sell or give away your HP laptop, and you want to ensure that all your personal data is entirely erased. A factory reset effectively wipes the hard drive, protecting your privacy and ensuring that no sensitive information remains on the device.
- Improving performance: As time goes by, a laptop can gradually become slower due to the accumulation of unnecessary files, temporary caches, and outdated software. Performing a factory reset can help optimize your HP laptop’s performance by clearing out all the clutter and returning it to its initial state.
- Troubleshooting persistent issues: If you’ve tried various troubleshooting methods to fix persistent issues on your HP laptop to no avail, a factory reset can be a last-resort solution. It can help diagnose and resolve issues that resist all other attempts at fixing, ensuring a fresh start and a clean slate.
Now that we’ve explored the reasons for factory resetting an HP laptop, let’s move on to the next steps in the process: backing up important files, performing a soft reset, creating a recovery USB drive, and using the HP Recovery Manager.
Backing Up Important Files
Before proceeding with a factory reset on your HP laptop, it’s crucial to back up your important files to prevent any data loss. Here’s how you can safely and efficiently backup your files:
- Identify the files to backup: Take the time to identify the files that are essential to you. These may include important documents, photos, videos, music, or any other data that you can’t afford to lose.
- Use external storage: To back up your files, you can make use of external storage devices such as USB flash drives, external hard drives, or even cloud storage services. Choose a method that suits your preferences and ensure that you have enough storage space to accommodate all the files you want to back up.
- Copy and paste method: One of the simplest ways to back up your files is by using the copy and paste method. Simply connect your external storage device to your HP laptop, navigate to the files you want to back up, and copy them to the external device. Ensure that you organize your files in a logical manner to make it easier to restore them later.
- Backup software: Another option is to use backup software specifically designed for data backup. These software solutions offer advanced features like scheduling automatic backups, incremental backups, and file versioning. Explore different backup software options and choose one that suits your needs.
- Cloud storage: If you prefer a more flexible and accessible backup option, consider using cloud storage services such as Google Drive, Dropbox, or Microsoft OneDrive. Simply upload your important files to the cloud storage platform of your choice and ensure that they are synced and accessible from your other devices as well.
Remember to double-check that all your important files are successfully backed up before proceeding with the factory reset. It’s better to be safe than sorry and ensure that you can easily restore your files once the reset is complete. With your files securely backed up, you’re now ready to move on to the next steps in the factory reset process.
Performing a Soft Reset
If you are experiencing minor software issues or your HP laptop is acting up, performing a soft reset can often resolve these issues without the need for a full factory reset. A soft reset involves restarting your laptop and refreshing the system. Follow these steps to perform a soft reset on your HP laptop:
- Save your work: Before proceeding with a soft reset, save any unsaved work and close all open applications. This ensures that you don’t lose any important data during the reset process.
- Click on the Windows Start button: From the Windows Start Menu, click on the power icon located in the lower-left corner.
- Choose Restart: A pop-up menu will appear with various options. Select “Restart” to initiate the restart process.
- Wait for the reset to complete: Your HP laptop will now initiate the restart process. Wait patiently for the reset to complete, and avoid interrupting the process.
- Check for improvements: After your laptop restarts, check if the issues you were experiencing have been resolved. Often, a soft reset can fix minor software glitches and improve the overall performance of your HP laptop.
If you find that the soft reset did not resolve the issues or you continue to experience problems, you may need to proceed with the next step: performing a factory reset. However, if the soft reset was successful in resolving the issues, you have saved yourself the time and effort of a full factory reset.
Next, we will explore how to create a recovery USB drive, which is another useful option in case you need to restore your HP laptop to its original state.
Creating a Recovery USB Drive
Creating a recovery USB drive for your HP laptop is an essential step to have a backup of your system in case of a major issue or the need for a complete system restore. This USB drive contains all the necessary files and tools to restore your laptop to its factory settings. Here’s how you can create a recovery USB drive:
- Check available space: Ensure that you have a USB flash drive with enough storage space to accommodate the recovery files. It’s recommended to use a drive with at least 16GB of storage capacity to ensure that all the necessary files can be copied.
- Access HP Recovery Manager: On your HP laptop, open the HP Recovery Manager software. You can do this by pressing the Windows key, typing “recovery manager” in the search bar, and selecting the appropriate program from the search results.
- Choose “Create Recovery Media”: Once you have launched the HP Recovery Manager, look for the option to “Create Recovery Media” and click on it. This will start the process of creating the recovery USB drive.
- Follow the on-screen instructions: The HP Recovery Manager will provide you with step-by-step instructions on how to create the recovery USB drive. Simply follow the on-screen prompts and select the appropriate options, such as the location for saving the recovery files and the USB drive you want to use.
- Wait for the creation process to complete: The creation process may take some time, depending on the size of the recovery files and the speed of your USB drive. It’s important not to interrupt the process and allow it to complete successfully.
- Label and store the USB drive: Once the recovery USB drive is created, it’s a good practice to label it with the date and purpose, such as “HP Recovery USB – System Restore.” Store the USB drive in a safe and easily accessible place, as it will be essential if you ever need to restore your HP laptop.
By creating a recovery USB drive, you are ensuring that you have a backup of your HP laptop’s system files, allowing you to restore it to its original state if needed. However, if you’re experiencing software issues that can’t be resolved through a soft reset or the use of a recovery USB drive, you may need to proceed to the next step: using the HP Recovery Manager.
Using the HP Recovery Manager
The HP Recovery Manager is a built-in tool that allows you to restore your HP laptop to its factory settings. It provides a convenient and straightforward method to recover your laptop in case of severe software issues or the need for a complete system reset. Here’s how you can use the HP Recovery Manager:
- Access the HP Recovery Manager: On your HP laptop, press the Windows key, type “recovery manager” in the search bar, and select the HP Recovery Manager from the search results to launch the program.
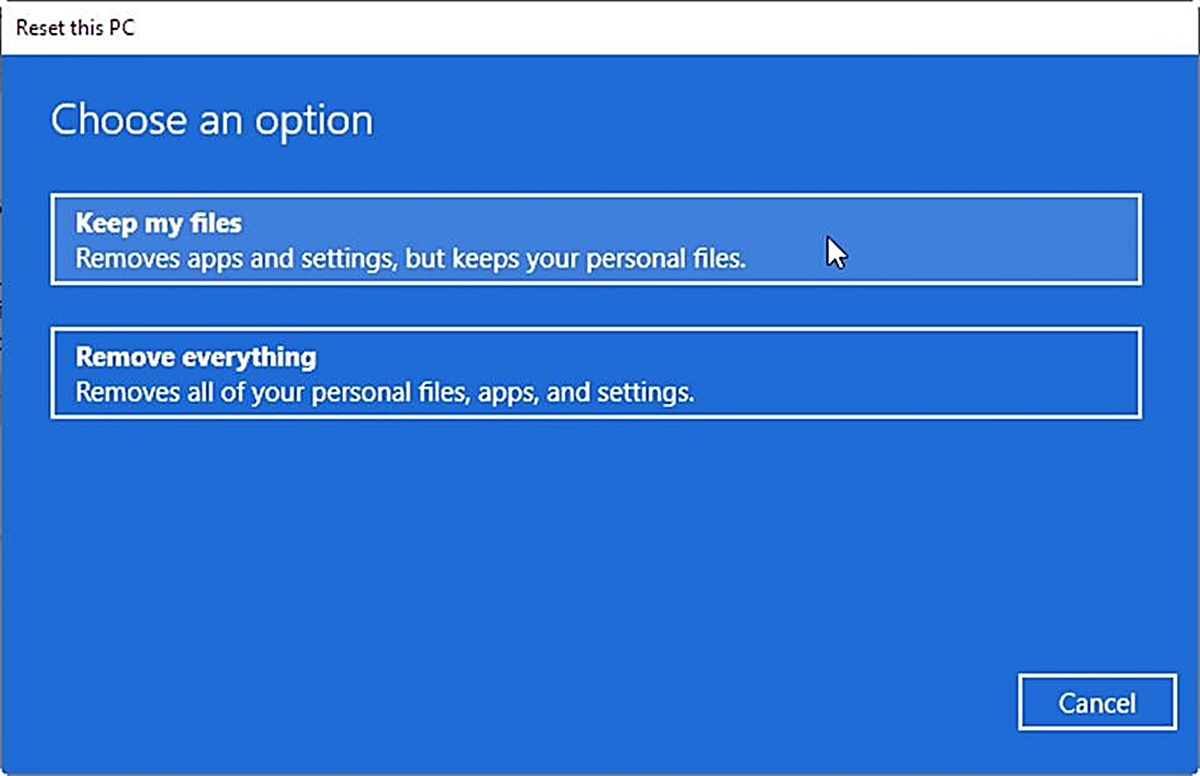
- Select the recovery option: Inside the HP Recovery Manager, you’ll find different recovery options. Depending on your specific model and available features, you might have options like “System Recovery,” “Factory Reset,” or “Reset this PC.” Choose the appropriate option that aligns with your desired outcome.
- Read and understand the warnings: Before proceeding with the recovery process, carefully read and understand the warnings provided by the HP Recovery Manager. It’s crucial to be aware that performing a system reset will erase all your files, programs, and settings, returning your laptop to its original state.
- Follow the on-screen instructions: The HP Recovery Manager will guide you through the recovery process with step-by-step instructions. Make sure to follow the on-screen prompts, select the correct options, and confirm your choices when prompted.
- Wait for the recovery process to complete: The recovery process may take some time, as it involves reinstalling the operating system and configuring your laptop to its default settings. It’s important not to interrupt the process or turn off your laptop during this time.
- Set up your HP laptop: Once the recovery process is complete, follow the instructions to set up your HP laptop. This may include selecting your language, connecting to a network, and creating a user account.
- Reinstall software and restore files: After setting up your laptop, you’ll need to reinstall any software programs you previously had and restore your files from the backup you created. Make sure to refer to your backup solution or external storage device to retrieve your files and reinstall any necessary software.
The HP Recovery Manager is a powerful tool that can help you restore your HP laptop to its original state and resolve severe software issues. However, keep in mind that this process will erase all your data, so it’s vital to have a backup of your files and settings before proceeding. If the HP Recovery Manager does not address your specific needs, you may need to consider performing a full factory reset, which we will explore in the next section.
Restoring from a System Restore Point
If you’ve encountered recent software issues on your HP laptop but don’t want to perform a full factory reset, restoring from a system restore point can be a viable solution. A system restore point is a snapshot of your laptop’s system files, registry settings, and system configurations taken at a specific time. Here’s how you can restore your HP laptop from a system restore point:
- Access the System Restore feature: On your HP laptop, press the Windows key, type “system restore” in the search bar, and select the “Create a restore point” or “System Restore” option from the search results. This will open the System Properties window.
- Choose the “System Restore” button: Inside the System Properties window, click on the “System Restore” button. This will launch the System Restore wizard.
- Select a restore point: In the System Restore wizard, you’ll be presented with a list of available restore points. Choose a restore point that predates the appearance of the software issues or errors you’re experiencing. You can also select the “Show more restore points” option to view additional restore options.
- Review the restore point details: Before proceeding with the system restore, carefully review the details of the selected restore point. Pay attention to the date, time, and description to ensure that you’re selecting the correct restore point.
- Start the system restore: Once you’ve selected a restore point and reviewed the details, click on the “Next” or “Finish” button to start the system restore process. Your HP laptop will reboot and restore the system files and settings to the selected restore point.
- Wait for the system restore to complete: The system restore process may take some time, depending on the complexity of the restore point and the speed of your laptop. It’s important to be patient and avoid interrupting the process.
- Check for resolved issues: After the system restore is complete and your laptop has restarted, check if the software issues or errors have been resolved. The system restore should revert your laptop to a previous state, potentially eliminating the problems you were encountering.
Restoring your HP laptop from a system restore point can be an effective way to tackle recent software issues without the need for a full factory reset. However, it’s important to note that a system restore will not impact your personal files or installed applications. If the issues persist or you’re facing more severe problems, the next step might involve performing a full factory reset, which we’ll explore in the following section.
Performing a Full Factory Reset
If you’re experiencing major software issues, persistent errors, or simply want to start fresh with your HP laptop, performing a full factory reset is the most comprehensive solution. This process will erase all data on your laptop and restore it to its original settings. Here’s how you can perform a full factory reset on your HP laptop:
- Backup your important files: Before proceeding with a factory reset, it’s crucial to back up any important files or data on your laptop. This ensures that you don’t lose any essential information during the reset process.
- Access the Recovery menu: Depending on your HP laptop model, there are different ways to access the Recovery menu. Common methods include pressing F11 or Esc repeatedly as your laptop powers on to access the Advanced Startup Options menu.
- Select the recovery option: Once you’ve entered the Recovery menu, choose the option that allows you to perform a full factory reset. This may be labeled as “System Recovery,” “Factory Reset,” or “Reset this PC.”
- Follow the on-screen prompts: The recovery process will guide you through a series of on-screen prompts. Read them carefully and select the appropriate options based on your preferences and the desired outcome.
- Confirm the reset: Before the factory reset begins, you’ll be prompted to confirm your decision. Be aware that this process will erase all data on your laptop, including personal files, installed applications, and custom settings. Ensure that you have backed up all necessary data before proceeding.
- Wait for the factory reset to complete: The factory reset may take some time to complete, especially if your laptop has a large amount of data. It’s essential to be patient and allow the process to finish uninterrupted.
- Set up your HP laptop: Once the factory reset is complete, your HP laptop will restart and guide you through the initial setup process. Follow the on-screen instructions to configure your laptop’s initial settings, such as language, region, network connection, and user accounts.
- Reinstall software and restore files: After setting up your laptop, you’ll need to reinstall any necessary software applications and restore your files from the backup you created earlier. Refer to your backup solution or external storage device to retrieve your files, and reinstall any required software programs.
Performing a full factory reset on your HP laptop is a drastic step, but it can effectively resolve major software issues and provide a fresh start. It’s important to remember that this process erases all data, so make sure to back up your files and settings beforehand. If you’re still experiencing issues after a factory reset, further troubleshooting or professional assistance may be required.
Reinstalling Windows on an HP Laptop
If you’re facing persistent software issues on your HP laptop or want to start completely fresh, reinstalling Windows can be a viable solution. This process involves removing the existing Windows installation and reinstalling a fresh copy of the operating system. Here’s how you can reinstall Windows on your HP laptop:
- Backup your important files: Before proceeding with a Windows reinstallation, ensure that you have backed up all important files and data from your laptop. This will prevent any loss of crucial information during the reinstallation process.
- Create a Windows installation media: To reinstall Windows, you’ll need a Windows installation media such as a USB drive or DVD. You can create a bootable USB drive by downloading the official Windows ISO file from the Microsoft website and using the Windows USB/DVD Download Tool or other third-party tools to create the installation media.
- Connect the installation media: Connect the USB drive or insert the DVD containing the Windows installation media into your HP laptop.
- Restart your laptop and enter the Boot Menu: Power on your laptop and press the designated key (usually F9, F10, or F12) to enter the Boot Menu. From the Boot Menu, choose the option that corresponds to the Windows installation media.
- Begin the Windows installation: Once the laptop boots from the installation media, you’ll be guided through the Windows installation process. Follow the on-screen prompts to select language preferences, enter the product key (if required), and accept the license agreement.
- Choose the installation type: During the installation process, you’ll be prompted to choose an installation type. Select the option to “Custom Install” or “Customize settings” to perform a clean installation that removes the existing Windows installation.
- Select the installation drive: Choose the hard drive or partition where you want to install Windows. Be cautious as this step will erase all data on the selected drive. If you have multiple partitions, make sure to select the correct one.
- Follow the on-screen instructions: Proceed with the installation by following the on-screen instructions. Windows will copy the necessary installation files, configure system settings, and install the operating system on your HP laptop.
- Complete the setup: After the installation process is complete, you’ll need to follow the on-screen instructions to set up Windows, including configuring user accounts, privacy settings, and network preferences.
- Reinstall software and restore files: Once Windows is successfully installed, reinstall any necessary software applications and restore your files from the backup you created earlier.
Reinstalling Windows on your HP laptop can help resolve persistent software issues and provide a clean slate for improved performance. Remember to back up your important files before proceeding and ensure that you have the necessary Windows installation media. If you’re unsure about the process or need assistance, consult HP’s official support documentation or reach out to their customer support for guidance.
Troubleshooting Common Issues
While factory resetting or reinstalling Windows can often solve software problems, there are several common issues that you can troubleshoot before taking such drastic measures. Here are some troubleshooting steps you can take to address common issues on your HP laptop:
- Update drivers and software: Outdated drivers or software can lead to various issues, including performance problems and compatibility issues. Ensure that you have the latest drivers and software updates installed on your HP laptop by visiting the official HP support website or using built-in update tools.
- Perform a malware scan: Malware infections can cause system slowdowns, crashes, and other issues. Run a reputable antivirus or anti-malware scanner to scan your laptop for any malicious software. Quarantine or remove any identified threats.
- Check for system updates: Regularly check for system updates from Windows to ensure that your operating system is up to date. These updates often address security vulnerabilities, stability issues, and performance enhancements.
- Clean up disk space: Insufficient disk space can impact performance. Use the built-in Disk Cleanup tool or third-party software to remove unnecessary files, such as temporary files, caches, and old system backups. Be cautious not to delete any essential files.
- Adjust power settings: If your HP laptop is experiencing battery drain or overheating, adjust the power settings to optimize performance. Lowering screen brightness, adjusting power plans, and disabling unnecessary background processes can help improve battery life and reduce heat generation.
- Run system diagnostics: HP laptops often have built-in diagnostic tools that can help identify and resolve hardware-related issues. Access the BIOS or UEFI settings by pressing the designated key during startup and perform system diagnostics to check for hardware problems.
- Check for overheating: Overheating can lead to performance issues and unexpected shutdowns. Ensure that the laptop’s vents are clear of dust and debris and use a cooling pad or elevate the laptop to improve airflow.
- Reset network settings: If you’re experiencing network connectivity issues, resetting the network settings can often resolve them. Go to the Network settings in Windows and choose the option to reset network settings. This will clear cache, remove saved networks, and reset network adapters.
- Perform a System Restore: If the issues persist after trying various troubleshooting steps, you can utilize the System Restore feature to revert your HP laptop to an earlier checkpoint where it was functioning properly. Choose a restore point from a date when the issues were not present.
- Seek professional assistance: If you have exhausted all troubleshooting options, or if you’re unsure about the best course of action, it’s advisable to seek professional assistance. Contact HP support or take your laptop to an authorized service center for expert diagnosis and repair.
By following these troubleshooting steps, you may be able to resolve common software and performance issues on your HP laptop without resorting to a factory reset or Windows reinstallation. However, if the problems persist or if you’re facing more severe issues, it may be necessary to take further action or seek professional help.