
Ways to Enable Editing in Word
If you’ve received a Microsoft Word document that is in read-only mode, you may want to enable editing to make changes or add your own content. Fortunately, there are several ways to do this. In this section, we’ll explore different methods to enable editing in Word.
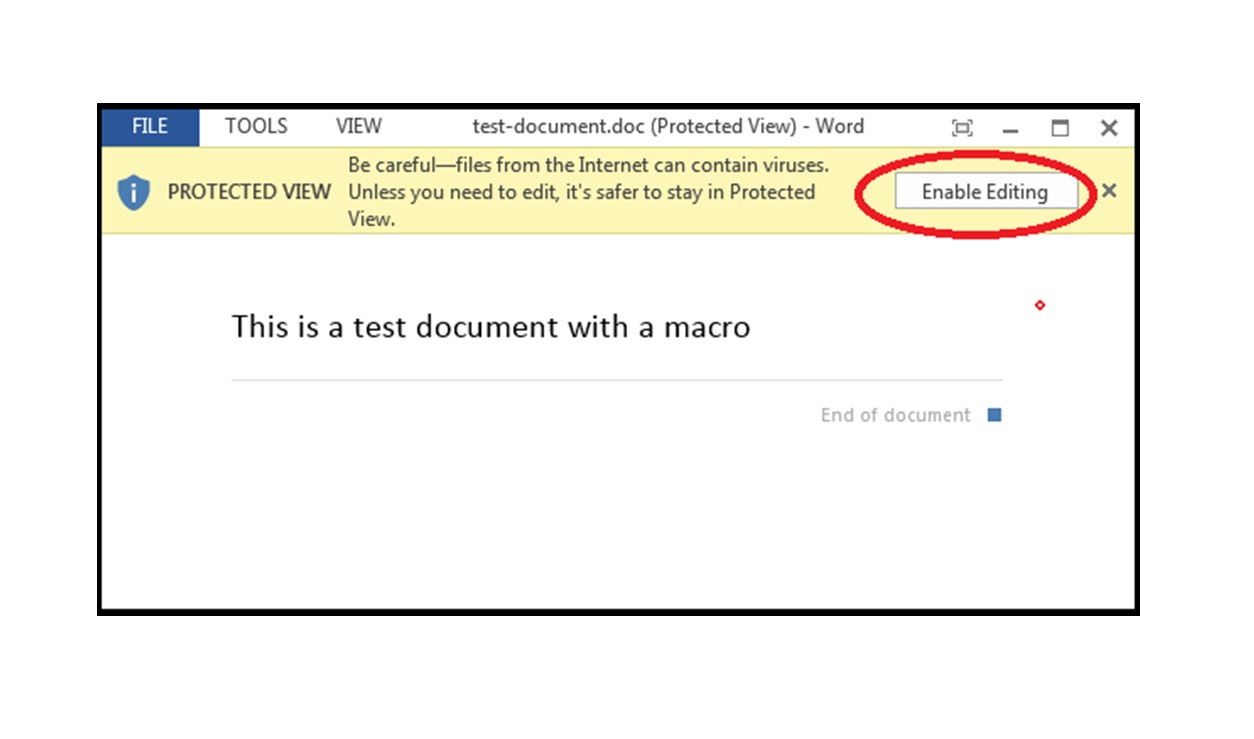
- Using the Protected View: When you open a Word document that may contain potentially harmful content, it opens in the Protected View. To enable editing, you can simply click on the “Enable Editing” button at the top of the document.
- Enabling Editing in the Backstage View: Another way to enable editing is by accessing the Backstage View. Click on the “File” tab, then select “Options.” In the Word Options window, go to the “General” tab and uncheck the “Open e-mail attachments and other uneditable files in reading view” option. Click “OK” to save the changes.
- Enabling Editing with a Password: If the Word document is password-protected, you’ll need to enter the password to enable editing. When you try to edit the document, Word will prompt you to enter the password. Once you input the correct password, editing will be enabled.
- Modifying Trust Center Settings: In some cases, the Trust Center settings in Word may be configured to restrict editing. To modify these settings, click on the “File” tab, then select “Options.” In the Word Options window, go to the “Trust Center” tab and click on “Trust Center Settings.” From there, you can customize the settings to allow editing.
- Enabling Editing in Compatibility Mode: If you’re working with an older version of Word, the document may open in Compatibility Mode, which limits editing capabilities. To enable editing, you can convert the document to the latest Word format. Click on the “File” tab, then select “Info” and click on “Convert” to update the document to the current format.
- Disabling Read-only Mode in Word: Sometimes, a Word document opens in read-only mode due to external factors. To disable read-only mode, locate the document in File Explorer, right-click on it, and select “Properties.” In the Properties window, make sure the “Read-only” checkbox is unchecked. Click “Apply” and then “OK” to save the changes.
By utilizing these different methods, you can easily enable editing in Word and make the necessary changes to your documents. Whether it’s working with password-protected files or modifying trust center settings, you now have a range of options to enable editing and ensure flexibility with your Word documents.
Using the Protected View
Microsoft Word has a feature called Protected View that activates automatically when you open a document that may contain potentially harmful content, such as files downloaded from the internet or received via email. The Protected View is designed to provide an extra layer of security by limiting the document’s functionality, including editing options.
To enable editing in Word when the document opens in Protected View, follow these steps:
- Open the Word document that is in Protected View.
- You will see a notification at the top of the document stating that it has been opened in Protected View. It may also show a message like “Editing has been disabled for this document.”
- Click on the “Enable Editing” button that appears in the notification. By clicking this button, Word will disable the Protected View and grant you editing permissions.
Once you have clicked on the “Enable Editing” button, the document will be unrestricted, and you can make any desired changes or additions. However, it’s important to note that disabling the Protected View should only be done if you trust the document and its content. If you are unsure about the authenticity or safety of the document, it’s recommended to proceed with caution or seek assistance from your IT department or the document sender.
It’s worth mentioning that you can also configure Word’s settings to automatically enable editing for files opened in Protected View. To do this, follow these steps:
- Open Word and go to the “File” tab.
- Select “Options” from the drop-down menu.
- In the Word Options window, click on the “Trust Center” tab.
- Click on the “Trust Center Settings” button.
- In the Trust Center dialog box, choose “Protected View.”
- Uncheck the options that apply to files originating from the internet or other potentially unsafe locations. For example, you can uncheck the option “Enable Protected View for files originating from the internet.”
- Click “OK” to save the changes.
By modifying these settings, you can customize Word’s behavior when opening documents in Protected View. However, it’s important to exercise caution and familiarize yourself with the potential risks involved when disabling certain security features.
Enabling Editing in the Backstage View
Microsoft Word offers a convenient feature called Backstage View, which provides easy access to various document management options. In addition to viewing document properties and printing, the Backstage View also allows users to enable editing for read-only documents. This is particularly useful when you want to modify a document that has been opened in read-only mode. Follow these steps to enable editing in Word using the Backstage View:
- Open the Word document that is currently in read-only mode.
- Click on the “File” tab located in the top-left corner of the Word window. This will take you to the Backstage View.
- From the options presented in the left-hand panel, select “Info.”
- In the main area of the Backstage View, you will see various details about the document, including the read-only status.
- Look for the “Protect Document” section within the Info tab.
- Click on the “Enable Editing” button. This will disable the read-only mode and allow you to make changes to the document.
Once you have enabled editing in the Backstage View, the document will become editable, and you will be able to make any desired modifications or additions. It’s worth noting that this method works specifically for documents that are opened in read-only mode, and it may not be applicable for documents that have other types of restrictions or password protection.
In addition to enabling editing, the Backstage View offers other document management options. For example, you can also save the document with a different file name or in a different location, share the document with others, or convert it to a different file format. The Backstage View provides a comprehensive set of tools for working with documents, making it a valuable feature in Microsoft Word.
If you frequently need to enable editing for read-only documents, you can modify Word’s settings to prevent documents from opening in read-only mode by default. To do this, follow these steps:
- Open Word and go to the “File” tab.
- Select “Options” from the drop-down menu.
- In the Word Options window, click on the “General” tab.
- Look for the section titled “Startup options.”
- Uncheck the option labeled “Open e-mail attachments and other uneditable files in reading view.”
- Click “OK” to save the changes.
By making this modification, you can save time and effort by directly opening read-only documents in editing mode, eliminating the need to manually enable editing each time.
Enabling Editing with a Password
In some cases, a Word document may be protected with a password to prevent unauthorized modifications. If you have the password, you can easily enable editing and make changes to the document. Follow these steps to enable editing with a password:
- Open the password-protected Word document that you wish to edit.
- When prompted, enter the password in the dialog box. Ensure that you type the password correctly, as passwords are case-sensitive.
- Click “OK” or press Enter to proceed.
Upon entering the correct password, Word will validate it and grant you editing access to the document. You will now be able to modify the content, formatting, or any other elements within the document according to your requirements.
It’s worth noting that passwords are typically set by the document’s creator to maintain confidentiality and control over the document’s content. Therefore, it is essential to seek permission and obtain the password from the appropriate person before attempting to enable editing in a password-protected document. Unauthorized attempts to access or modify password-protected documents may lead to legal consequences.
If you frequently work with password-protected documents and find entering the password each time cumbersome, you can choose to save the password in Word’s password manager. However, exercise caution when using this feature, and ensure that your computer and user account are adequately protected against unauthorized access. Saving passwords in the password manager may increase the risk if your device or account is compromised.
By enabling editing with a password, you can unlock the full functionality of a protected Word document and make the necessary modifications according to your needs. Remember to respect the document’s confidentiality and only make changes within the scope of your authorized access.
Modifying Trust Center Settings
Microsoft Word utilizes Trust Center settings to manage various security features, including restrictions on editing documents. By modifying these settings, you can enable editing in Word for documents that may have restrictions imposed on them. Follow these steps to modify Trust Center settings:
- Open Microsoft Word and click on the “File” tab in the top-left corner of the window.
- From the options presented, select “Options.”
- In the Word Options window, click on the “Trust Center” tab.
- Click on the “Trust Center Settings” button.
- A new dialog box called Trust Center will open, providing a range of options to customize the security settings.
- Select “Protected View” from the left-hand panel.
- Uncheck the boxes that correspond to the sources or scenarios where you want to enable editing. For example, you can uncheck the option “Enable Protected View for files originating from the internet.”
- Click “OK” to save the changes and close the Trust Center window.
- Finally, click “OK” on the Word Options window to apply the modified Trust Center settings.
By modifying the Trust Center settings, you are allowing Word to disable certain security features that restrict editing. This enables you to make changes and modifications to the protected documents easily. However, it’s important to exercise caution when modifying these settings, as doing so may expose your computer to potential security risks. It is recommended to consult with your IT department or follow your organization’s guidelines for modifying Trust Center settings.
In addition to enabling editing, the Trust Center settings in Word provide options to customize other security features, such as macro settings, file block settings, and add-in security. These settings allow you to strike a balance between security and flexibility, ensuring that you can work efficiently while maintaining a safe computing environment.
By modifying the Trust Center settings in Word, you can tailor the security features to suit your needs, enabling editing for certain types of documents and scenarios that may have been restricted by default. Always exercise caution and consider the potential risks associated with modifying security settings.
Enabling Editing in Compatibility Mode
If you’re working with an older version of Microsoft Word or have received a document created in a different format, it may open in Compatibility Mode. Compatibility Mode in Word allows you to view and edit documents created in earlier versions or in different file formats. However, editing capabilities may be limited in this mode. If you want to enable full editing functionality, follow these steps:
- Open the document in Compatibility Mode.
- Click on the “File” tab in the top-left corner of the Word window.
- From the options presented, select “Info.”
- In the Info tab, you will see a notification stating that the document is in Compatibility Mode.
- Click on the “Convert” button located next to the notification.
- Word will prompt you to confirm the conversion. Click “OK” to proceed.
By converting the document to the latest Word format, you are effectively removing the Compatibility Mode and enabling full editing capabilities. Once the conversion is complete, you can make changes, formatting adjustments, and any other necessary modifications to the document.
It’s important to note that when converting a document to a newer format, certain formatting options or features available in older versions may be affected. Therefore, it’s recommended to review the document after the conversion and make any necessary adjustments to ensure the desired layout and functionality are preserved.
Compatibility Mode is particularly useful when collaborating with others who may be using different versions of Word. It allows for seamless sharing and editing across different document formats. However, if you find yourself frequently needing to enable editing in Compatibility Mode, it may be worth considering upgrading to the latest version of Microsoft Word to take advantage of the enhanced features and improved compatibility.
By converting a document from Compatibility Mode to the latest Word format, you can ensure that you have access to the full range of editing capabilities and enjoy a more seamless editing experience.
Disabling Read-only Mode in Word
Occasionally, a Word document may open in read-only mode, preventing you from making any modifications or saving changes. Read-only mode can be enabled for various reasons, such as file permissions or document properties. If you need to disable read-only mode and enable editing in Word, follow these steps:
- Locate the read-only document in File Explorer or any file management tool.
- Right-click on the document and select “Properties” from the context menu.
- In the Properties window, navigate to the “General” tab.
- Make sure the “Read-only” checkbox is unchecked.
- If the checkbox is grayed out, it may indicate that you need administrative privileges to modify the file permissions. In this case, contact the document owner or an administrator for assistance.
- Click “Apply” and then “OK” to save the changes.
By unchecking the “Read-only” checkbox in the file properties, you are disabling the read-only mode for the document. This allows you to make edits, save changes, and modify the document as needed.
If you’re unable to disable read-only mode using the above method or if the read-only status is determined by document properties, you can try the following alternative solutions:
- Open the document and click on the “File” tab in Word.
- Select “Save As” and choose a new file name or location for the document. This often helps remove the read-only status and enables editing in the new version of the document.
Additionally, you can consider copying the contents of the read-only document into a new Word document. This allows you to work with a fresh document that isn’t restricted by the read-only mode.
It’s worth mentioning that read-only mode can also be imposed by password protection or restricted editing permissions. To disable these types of restrictions, you may need to enter the correct password or contact the document owner for the necessary permissions.
By following these steps, you should be able to disable read-only mode in Word and regain the ability to edit and modify your documents without any restrictions.
How to Turn Off Editing in Word
Once you have finished making changes or additions to a Word document, you may want to turn off editing to protect the content from any accidental modifications. There are several methods to turn off editing in Word, depending on your specific needs or document requirements. Here are some ways to accomplish this:
- Saving the Document as a Read-only File: One simple way to disable editing is to save the document as a read-only file. To do this, click on the “File” tab in Word, select “Save As,” choose a location to save the file, and select the “Read-only” option before clicking “Save.” This prevents any further changes to the document until the read-only mode is lifted.
- Modifying Trust Center Settings: Word’s Trust Center settings also offer options to restrict editing. To disable editing through Trust Center settings, click on the “File” tab, select “Options,” go to the “Trust Center” tab, click on “Trust Center Settings,” and choose the appropriate options to limit editing capabilities.
- Removing Password Protection: If the document is password-protected, you can remove the password to disable editing restrictions. Open the document, click on the “File” tab, select “Protect Document,” and choose “Encrypt with Password.” Delete the existing password and click “OK” to remove the password protection.
- Switching to Protected View: Word’s Protected View is a security feature that opens potentially unsafe documents in a restricted mode. If you want to disable editing, you can switch to Protected View by opening the document, clicking on the “File” tab, selecting “Options,” going to the “Trust Center” tab, clicking on “Trust Center Settings,” selecting “Protected View,” and adjusting the settings to enable editing.
- Converting the Document to PDF: Another method to turn off editing in Word is to convert the document to PDF format. Open the document, click on the “File” tab, select “Save As,” choose the PDF option as the file format, specify the save location, and click “Save.” The resulting PDF file will be read-only, preventing any further modifications.
By utilizing these methods, you can effectively turn off editing in Word and protect your documents from unintended changes. Choose the method that suits your needs and document requirements, whether it’s saving as a read-only file, modifying settings, removing password protection, switching to Protected View, or converting to PDF.
Remember that disabling editing may impact collaboration features or limit further revisions, so make sure to consider the implications before turning off editing in a Word document.
Saving the Document as a Read-only File
If you want to prevent any further modifications to a Word document, you can save it as a read-only file. By doing so, you effectively disable editing capabilities, ensuring that the document remains unchanged. Here’s how you can save a document as a read-only file:
- Open the document you want to save as a read-only file in Microsoft Word.
- Click on the “File” tab located at the top-left corner of the Word window.
- Select “Save As” from the options presented.
- Choose a location on your computer or cloud storage where you want to save the file.
- In the “Save As” dialog box, enter a suitable file name for the read-only version of the document.
- Before clicking “Save,” locate the “Tools” button near the bottom-right corner of the dialog box.
- Click on “General Options” from the dropdown menu.
- In the subsequent dialog box, check the box labeled “Read-only recommended.”
- Click “OK” to save the changes and exit the dialog box.
- Finally, click “Save” to create the read-only version of the document.
By saving the document as a read-only file, you are effectively enabling read-only mode and preventing any further modifications. Subsequent users who open the file will be able to view its contents but won’t be able to make edits or save changes unless they choose to save the file under a different name.
It’s important to note that saving a document as a read-only file is not foolproof and can be bypassed by knowledgeable users who choose to make changes despite the read-only status. Therefore, it’s crucial to consider other document protection methods, such as password protection or file-level permissions, for increased security.
Additionally, you should be aware that saving a document as a read-only file may not completely prevent modifications by individuals using advanced techniques or tools. However, it serves as an effective deterrent and reminder that the document should not be edited without proper authorization.
Saving a Word document as a read-only file provides an additional layer of protection, ensuring that the document remains in its original form. It’s a practical approach for sharing documents when you want to limit modifications and maintain data integrity.
Modifying Trust Center Settings
Modifying Trust Center settings in Microsoft Word allows you to customize various security features, including the ability to enable or disable editing in documents. By adjusting these settings, you can enhance document security and control the editing capabilities. Here’s how you can modify Trust Center settings:
- Open Microsoft Word and click on the “File” tab located at the top-left corner of the window.
- Select “Options” from the options presented.
- In the Word Options window, click on the “Trust Center” tab located in the left-hand panel.
- Click on the “Trust Center Settings” button.
- A new dialog box called Trust Center will appear, providing various security options.
- To modify the Trust Center settings related to editing, select the appropriate options such as “File Block Settings” or “Macro Settings.”
- Within each section, you’ll find settings that allow you to customize the level of editing capability.
- Make the desired changes based on your security preferences and requirements.
- Click “OK” to save the changes and close the Trust Center window.
- Finally, click “OK” on the Word Options window to apply the modified Trust Center settings.
By modifying the Trust Center settings, you gain fine-grained control over various security aspects with respect to editing within Word documents. For example, you can enable or disable the execution of macros, limit the types of files that can be opened, or specify how Word handles documents downloaded from the internet.
It’s important to strike a balance between security and usability when modifying Trust Center settings. Be mindful not to block necessary functionality or make the editing process overly complicated for legitimate users. Additionally, consider the specific requirements of your organization or the sensitivity of the documents you are working with.
Keeping Trust Center settings up to date and aligned with best practices ensures that your Word documents are secure while still allowing for efficient editing and collaboration. Regularly review and adjust these settings as needed to adapt to evolving security threats and changes in your organization’s policies.
By modifying the Trust Center settings in Microsoft Word, you can tailor the security features to your specific needs, striking a balance between security and productivity when it comes to document editing.
Removing Password Protection
In certain instances, Word documents may be password-protected to prevent unauthorized access, modifications, or printing. If you have the required password, you can remove the password protection and regain full editing control over the document. Here’s how you can remove password protection:
- Open the password-protected Word document in Microsoft Word.
- Click on the “File” tab located at the top-left corner of the window.
- From the options presented, select “Protect Document” or “Protect Workbook” depending on the document type.
- Choose the option labeled “Encrypt with Password.”
- A dialog box will prompt you to enter the password. Type the correct password into the box.
- Click “OK” to continue.
- Remove the existing password by deleting its content from the password field.
- Click “OK” or press Enter to confirm the removal.
- Save the changes to the document by clicking on the “Save” button or using the keyboard shortcut Ctrl+S.
Once the password is removed, you have successfully disabled the password protection for the document. You can now freely edit, print, or share the document without any restrictions imposed by the password.
It’s important to note that removing password protection requires you to know the correct password. If you attempt to remove the password without knowing it, you will be unable to disable the protection. It’s crucial to obtain the correct password from the document’s creator or authorized person before proceeding with this method.
Removing password protection may have implications for the security and confidentiality of the document. Therefore, exercise caution when sharing or distributing the document after removing the password protection. Evaluate the sensitivity of the document’s content and the need for ongoing security measures to protect its confidentiality.
By removing password protection from Word documents, you regain complete control and accessibility over the content, allowing for seamless editing, sharing, and collaboration. However, it’s essential to consider the potential risks and ensure that you have the necessary authorization to make modifications to the protected documents.
Switching to Protected View
Microsoft Word’s Protected View is a security feature that helps protect your computer and data by opening potentially unsafe documents in a restricted and read-only mode. While this mode provides an additional layer of security, it may limit your ability to edit or make changes to the document. However, you can switch to Protected View to disable editing restrictions if needed. Here’s how:
- Open the document in Microsoft Word.
- Once the document is open, look for a yellow bar at the top of the Word window indicating that the document has been opened in Protected View.
- Click on the “Enable Editing” button that appears within the yellow bar.
By clicking on the “Enable Editing” button, you disable the Protected View mode and gain full editing access to the document. You can now make modifications, add or delete content, apply formatting changes, and save the document as needed.
It’s important to exercise caution when switching to Protected View, especially when opening documents from untrusted sources or that may contain potentially harmful content. Protected View helps protect your computer from malicious code or viruses that can be embedded in certain types of files. Before enabling editing, ensure that the document is from a reliable source and has been scanned for any potential threats by your antivirus software.
If you frequently work with documents that open in Protected View mode and require editing, you can adjust the Protected View settings to allow editing for specific file types or locations within the Word options. Go to the “File” tab, select “Options,” click on the “Trust Center” tab, and choose “Trust Center Settings.” From there, you can customize the Protected View settings to suit your needs while maintaining security.
Protected View is an effective security measure that helps safeguard your computer and data from potential threats. However, it’s important to be aware of the risks associated with disabling the Protected View mode for documents that you cannot trust or verify. Always exercise caution and take the necessary precautions when working with potentially unsafe documents.
By switching to Protected View when necessary, you can comfortably review, edit, and work with files that would otherwise be restricted. Remember to weigh the benefits of editing access against potential security risks and malicious content that may be present in certain documents.
Converting the Document to PDF
If you need to turn off editing in a Word document and ensure that it remains unmodifiable, one effective method is to convert it to PDF (Portable Document Format). PDF is a widely used file format that preserves the formatting and layout of a document while minimizing the risk of unintended changes. By converting the document to PDF, you can effectively disable editing capabilities. Here’s how you can convert a Word document to PDF:
- Open the Word document you want to convert.
- Click on the “File” tab located in the top-left corner of the Word window.
- Select “Save As” from the options presented.
- Choose a location on your computer or cloud storage where you want to save the PDF file.
- Select “PDF” as the file format from the “Save As” dialog box.
- Enter a suitable file name for the PDF file.
- Click “Save” to convert the Word document into a PDF file.
Once you have converted the document to PDF, the resulting file is read-only by default. This means that recipients or users who open the PDF will not be able to make any changes to the contents of the document. However, they can still view, print, and comment on the PDF if permitted.
It’s important to note that converting a Word document to PDF may result in some formatting differences or loss of specific features depending on the complexity of the original document. Therefore, it’s recommended to review the converted PDF file to ensure that the desired formatting and content remain intact.
PDF files are widely recognized as a reliable format for sharing documents, as they provide a fixed layout that is accessible on various devices and operating systems. By converting your Word documents to PDF when editing is no longer required, you can ensure that the content remains unchanged and easily shareable while preserving the original formatting.
Keep in mind that converting a document to PDF should be done when you are fully satisfied with the final version and want to prevent any further modifications. If you anticipate the need for future edits, it’s advisable to keep a separate editable version of the document in its original Word format.
Tips and Tricks
When it comes to working with Word documents and enabling or disabling editing, there are a few tips and tricks that can enhance your overall experience. Consider implementing these strategies to streamline your workflow and optimize the editing process:
- Use Keyboard Shortcuts: Speed up your editing tasks by utilizing keyboard shortcuts. Learn common shortcuts like copying (Ctrl+C) and pasting (Ctrl+V), as well as specific formatting shortcuts such as bold (Ctrl+B) and italic (Ctrl+I). These shortcuts can significantly improve your efficiency and save valuable time.
- Utilize Styles and Templates: Take advantage of Word’s built-in styles and templates to maintain consistent formatting and improve document organization. By applying pre-defined styles or creating your own, you can easily format headings, paragraphs, and other elements consistently throughout your documents.
- Track Changes: If you’re collaborating with others or want to keep track of your own edits, enable the “Track Changes” feature in Word. This allows you to see and review any modifications made to the document, making it easy to accept or reject changes and maintain a clear record of revisions.
- Use Comments: Comments in Word are a valuable tool for providing feedback or collaborating on a document. Insert comments to leave notes, suggestions, or explanations for yourself or other colleagues. You can easily navigate through comments, reply to them, and resolve them as needed.
- Backup Your Documents: Regularly back up your Word documents to prevent data loss. Whether through cloud storage services or manual backups, it’s crucial to have copies of your important documents in case of accidental deletion or computer malfunctions.
- Stay Updated: Keep your Microsoft Word application up to date with the latest updates and patches. Updates often include important security fixes, performance improvements, and new features that can enhance your overall experience and efficiency while working with documents.
- Explore Online Resources: Take advantage of the vast array of online resources, tutorials, and forums available to learn more about Word and its advanced features. Online communities and knowledge bases are excellent sources for troubleshooting, discovering new tips, and expanding your skill set.
By implementing these tips and tricks, you can elevate your Word editing skills and work more efficiently with your documents. Whether it’s utilizing keyboard shortcuts to speed up your workflow, leveraging styles and templates for consistent formatting, or taking advantage of collaboration features like track changes and comments, these strategies can enhance your overall productivity and make editing a breeze.
Remember to continuously explore and experiment with Word’s features to uncover additional ways to facilitate your editing process and optimize your use of the application.