
Emptying the Trash
Emptying the Trash on your Mac is the first step in deleting unwanted photos. When you delete a photo or any other file on your Mac, it is moved to the Trash folder. However, removing it from the Trash is necessary to permanently delete the files and free up storage space.
To empty the Trash, follow these simple steps:
- Locate the Trash icon on your Dock, usually found at the far-right end.
- Click on the Trash icon to open the Trash folder.
- In the Trash folder, you will see all the files that have been deleted.
- To completely remove all the files, click on the “Empty” button located in the top-right corner of the Trash folder window.
- A confirmation message will appear asking if you want to permanently delete the files. Click on “Empty Trash” to proceed.
Once you have emptied the Trash, all the deleted photos and files will be permanently removed from your Mac, and the storage space will be regained.
Note that once you empty the Trash, the files cannot be restored back to your Mac. Therefore, it is important to review the contents of the Trash folder before permanently deleting them. Remember, emptying the Trash is a quick way to delete multiple photos at once, but always double-check to avoid accidentally deleting any important files.
Using Photos App to Delete Photos
The Photos app on your Mac provides a convenient way to organize and manage your photo library. It also allows you to easily delete unwanted photos. Here’s how you can use the Photos app to delete photos:
- Launch the Photos app on your Mac by clicking on its icon in the Dock or by searching for it using Spotlight.
- In the Photos app, navigate to the album or library containing the photos you want to delete. You can use the sidebar on the left-hand side to browse through your albums and libraries.
- Select the photos you want to delete by holding down the Command key and clicking on each photo. You can also click and drag to select multiple photos at once.
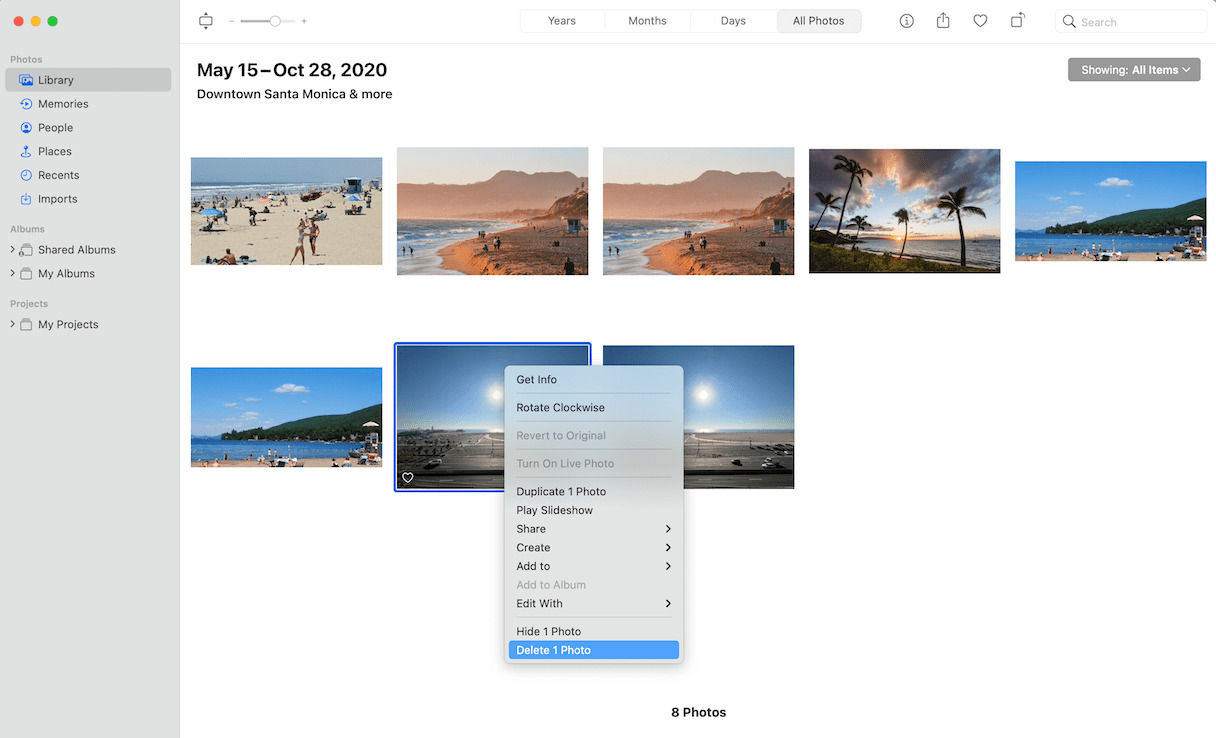
- Once you have selected the photos, right-click on any of the selected photos to reveal a drop-down menu.
- From the drop-down menu, click on “Delete X Photos” (where X represents the number of selected photos).
- A confirmation dialog box will appear asking if you want to delete the selected photos. Click on “Delete Photos” to proceed.
The selected photos will be deleted from the album and moved to the Recently Deleted album within the Photos app. These photos will remain in the Recently Deleted album for 30 days, giving you a chance to recover them if needed.
To permanently delete the photos before the 30-day period ends, follow these steps:
- In the Photos app, click on the “Recently Deleted” album located in the sidebar.
- Select the photos you want to permanently delete.
- Right-click on the selected photos and click on “Delete X Photos” from the drop-down menu.
- Confirm the deletion by clicking on “Delete Photos”.
By using the Photos app, you can easily delete photos and reclaim storage space on your Mac. Remember to review the selected photos before permanently deleting them to avoid any accidental deletion of important memories.
Deleting Photos from the Desktop
If you have photos saved directly on your Mac’s desktop, you can easily delete them to free up space and keep your desktop clutter-free. Here’s how you can delete photos from the desktop:
- Locate the photo(s) you want to delete on your desktop. They will be represented by image thumbnails.
- Select the photo(s) by clicking on them. You can select multiple photos by holding down the Command key while clicking on each photo.
- Once the photo(s) are selected, press the “Delete” key on your keyboard.
- A confirmation dialog box will appear, asking if you are sure you want to move the photo(s) to the Trash. Click on the “Move to Trash” button.
The selected photo(s) will be moved to the Trash folder on your Mac. To permanently delete them and free up storage space, you need to empty the Trash as mentioned in the previous section.
Deleting photos from the desktop is a quick way to remove unwanted images without having to open any specific applications. However, remember to review the photos before deleting them to prevent accidentally removing any important or irreplaceable images.
It’s worth mentioning that deleting photos from the desktop only removes them from that specific location, and they will still exist in other folders or libraries if you have copied or imported them elsewhere. Make sure to check other locations if you want to completely remove the photos from your Mac.
Deleting Photos from the Downloads Folder
The Downloads folder on your Mac is often a temporary storage location for files and photos that you have downloaded from the internet or received as attachments. If you have photos in your Downloads folder that you no longer need, it’s a good idea to delete them to free up space. Here’s how you can delete photos from the Downloads folder:
- Open Finder by clicking on the Finder icon in your Dock or by selecting it from the Applications folder.
- In the Finder, click on “Downloads” in the left-hand sidebar to open the Downloads folder.
- Scroll through the list of files and locate the photos you want to delete. You can identify photos by their file names or thumbnail previews.
- Select the photo(s) you want to delete by clicking on them. You can select multiple photos by holding down the Command key while clicking on each photo.
- Once the photo(s) are selected, right-click on one of the selected photos and choose “Move to Trash” from the context menu.
The selected photo(s) will be moved to the Trash folder on your Mac. To permanently delete them and free up storage space, you need to empty the Trash as explained in an earlier section of this article.
Remember to review the photos before deleting them from the Downloads folder, as some photos may have been recently downloaded and still need your attention or use. Additionally, if you have copied or moved the photos to another location on your Mac after downloading them, you may want to check those locations as well to ensure you have removed all duplicates or unnecessary copies.
By regularly cleaning out your Downloads folder, you can keep it organized and prevent it from becoming cluttered with unnecessary files and photos, ultimately freeing up valuable storage space on your Mac.
Deleting Photos from the iPhoto Library
If you use the iPhoto app to organize and manage your photo library on your Mac, you can easily delete unwanted photos from within the iPhoto Library. Here’s how you can do it:
- Launch the iPhoto app on your Mac by clicking on its icon in the Dock or by searching for it using Spotlight.
- In the iPhoto app, navigate to the album or event that contains the photos you want to delete. You can use the sidebar on the left-hand side to browse through your albums and events.
- Select the photos you want to delete by clicking on them. You can select multiple photos by holding down the Command key while clicking on each photo.
- Once the photos are selected, press the “Delete” key on your keyboard.
- A confirmation dialog box will appear, asking if you want to delete the selected photos from your library. Click on the “Delete Photos” button to proceed.
The selected photos will be removed from your iPhoto Library. However, the deleted photos will be moved to the Recently Deleted album within the iPhoto app. They will be retained there for 30 days, allowing you to recover them if needed.
If you want to permanently delete the photos before the 30-day period ends, follow these steps:
- In the iPhoto app, click on the “Recently Deleted” album located in the sidebar.
- Select the photos you want to permanently delete.
- Click on the “Delete” button at the top-right corner of the iPhoto app.
Confirm the deletion when prompted. The selected photos will then be permanently deleted and will no longer occupy space in your iPhoto Library.
Deleting photos from the iPhoto Library allows you to manage your photo collection effectively and maintain a clutter-free photo library on your Mac. Remember to review the selected photos before permanently deleting them to avoid any unintended loss of important images.
Deleting Photos from the Photos Library
If you use the Photos app to organize and manage your photo library on your Mac, you can easily delete photos directly from the Photos Library. Here’s how you can do it:
- Launch the Photos app on your Mac by clicking on its icon in the Dock or by searching for it using Spotlight.
- In the Photos app, navigate to the album or library that contains the photos you want to delete. You can use the sidebar on the left-hand side to browse through your albums and libraries.
- Select the photos you want to delete by holding down the Command key and clicking on each photo. You can also click and drag to select multiple photos at once.
- Once the photos are selected, right-click on any of the selected photos to reveal a drop-down menu.
- From the drop-down menu, click on “Delete X Photos” (where X represents the number of selected photos).
- A confirmation dialog box will appear, asking if you want to delete the selected photos from your library. Click on “Delete Photos” to proceed.
The selected photos will be removed from your Photos Library. However, they will be moved to the Recently Deleted album within the Photos app, where they will be retained for 30 days. This allows you to recover them if needed.
If you wish to permanently delete the photos before the 30-day period ends, follow these steps:
- In the Photos app, click on the “Recently Deleted” album located in the sidebar.
- Select the photos you want to permanently delete.
- Click on the “Delete X Photos” button at the top-right corner of the Photos app, where X represents the number of selected photos.
- Confirm the deletion by clicking on “Delete Photos”.
By deleting photos from the Photos Library, you can efficiently manage your photo collection and ensure your library remains organized. Remember to review the selected photos before permanently deleting them to avoid unintentional loss of important memories.
Deleting Photos from the Recently Deleted Album
The Recently Deleted album in the Photos app on your Mac serves as a temporary holding place for photos that have been deleted from your library. If you want to permanently delete photos from the Recently Deleted album and free up storage space, follow these steps:
- Launch the Photos app on your Mac by clicking on its icon in the Dock or by searching for it using Spotlight.
- In the Photos app, locate and click on the “Recently Deleted” album in the sidebar.
- In the Recently Deleted album, you will see photos that have been deleted within the last 30 days.
- Select the photos that you wish to permanently delete from the album.
- Once the photos are selected, click on the “Delete” button located at the top-right corner of the Photos app.
- Confirm the deletion by clicking on “Delete Photos”.
By following these steps, the selected photos will be permanently deleted from the Recently Deleted album, and the corresponding storage space will be reclaimed. Keep in mind that once you confirm the deletion, the photos cannot be recovered.
It’s important to regularly review and delete photos from the Recently Deleted album to avoid unnecessary occupied space on your Mac. However, exercise caution when selecting photos for deletion from this album, as it’s possible to accidentally delete important memories.
If you want to restore any photos from the Recently Deleted album back to your Photos library, simply select the desired photos and click on the “Recover” button located at the top-right corner of the Photos app.
Deleting photos from the Recently Deleted album ensures that they are permanently removed from your Mac, allowing you to optimize storage space and keep your photo library organized.
Using Third-Party Apps for Photo Deletion
While the Photos app and built-in features on your Mac provide effective methods for deleting photos, you may also consider using third-party apps for more advanced photo management and deletion options. These apps offer additional features and flexibility to help you organize and delete photos on your Mac. Here are some popular third-party apps you can explore:
- Adobe Lightroom: Lightroom is a powerful photo-editing and organization tool that allows you to delete and manage photos efficiently. It offers advanced features for organizing, categorizing, and deleting photos, making it a great option for professional photographers and enthusiasts.
- ImageOptim: If you’re looking to optimize your photo collection by reducing file sizes and freeing up storage space, ImageOptim is worth considering. It helps you compress and delete unnecessary data from your photos without compromising the image quality.
- Duplicate Photos Fixer Pro: Duplicate photos can quickly clutter your storage space. Duplicate Photos Fixer Pro scans your photo library to identify and delete duplicate or similar photos, allowing you to reclaim valuable disk space.
- MacPaw Gemini: Gemini is a powerful duplicate file finder and remover that can scan your entire system for duplicate photos. It helps you identify and delete duplicates, reducing clutter and optimizing your storage space.
Before using any third-party app, make sure to research and read reviews to ensure their reliability and compatibility with your Mac. Additionally, consider the specific features and functionalities they offer to meet your photo management needs.
Using third-party apps can provide you with more control and flexibility when deleting photos from your Mac. However, exercise caution when granting access or permissions to these apps, and always backup your photos to prevent potential data loss.
Remember that while third-party apps can offer additional options for managing and deleting photos, the built-in features of your Mac’s operating system are often sufficient for the majority of users. Evaluate your specific requirements and preferences to determine if a third-party app is necessary for your photo deletion needs.
Preventing Photos from Automatically Syncing with iCloud
iCloud provides a convenient way to store and sync your photos across all your Apple devices. However, if you want to prevent your photos from automatically syncing with iCloud, you can adjust the settings on your Mac. Here’s how to do it:
- Open the “System Preferences” on your Mac. You can access it by clicking on the Apple menu in the top-left corner of the screen and selecting “System Preferences”.
- In the System Preferences window, click on “Apple ID” or “iCloud”, depending on your macOS version.
- Select the “iCloud Drive” option.
- In the iCloud Drive settings, you will find a list of apps that can sync with iCloud. Look for the “Photos” app and deselect the checkbox next to it. This will prevent your photos from automatically syncing with iCloud.
By disabling the automatic sync of photos with iCloud, you have control over which photos are stored in your iCloud account and shared across your Apple devices. It also helps to save storage space on iCloud, especially if you have a large photo library.
Keep in mind that disabling iCloud syncing for photos means that new photos taken or imported on one device will not automatically appear on others. If you want to selectively sync certain photos with other devices, you can use AirDrop, email, or other sharing methods to transfer them manually.
It’s important to note that disabling iCloud syncing for photos on your Mac does not impact the syncing settings on your other Apple devices. If you want to disable photo syncing across all devices, you will need to adjust the settings on each device individually.
By customizing your iCloud syncing settings, you can have greater control over your photo library and choose how and where your photos are stored and shared. Whether you prefer to keep your photos local to your device or selectively sync them with specific devices, adjusting the iCloud settings on your Mac allows you to customize your photo syncing experience.