
Understanding Database Relationships
When working with a relational database management system like Microsoft Access, understanding database relationships is essential. Relationships define how tables in a database relate to each other, allowing for the efficient storage and retrieval of data. By establishing relationships between tables, you can ensure data integrity and avoid redundancy.
There are three primary types of relationships in Access: one-to-one, one-to-many, and many-to-many. Each type serves a specific purpose and determines how data is connected and shared between tables.
A one-to-one relationship means that each record in one table is related to one and only one record in another table. This type of relationship is useful when you want to divide a table with a large number of fields into multiple smaller tables to simplify data management.
A one-to-many relationship signifies that each record in one table can be related to multiple records in another table. For example, in a database for a bookstore, each customer can have multiple orders, but each order is associated with only one customer. This relationship helps to organize and track data efficiently.
A many-to-many relationship is more complex, as it allows for multiple records in one table to be associated with multiple records in another. This relationship requires the use of a junction table, which serves as a bridge between the two related tables. In the bookstore example, this can be seen when multiple customers can have multiple books in their wishlists.
To create and manage relationships in Access, you can use the Relationships window. This visual representation allows you to view and modify the relationships between tables easily. You can add tables to the relationship diagram, define join types, enforce referential integrity, and set cascade update and delete options.
Understanding and properly utilizing database relationships in Access is crucial for maintaining a well-structured and efficient database. By defining relationships between tables, you can ensure accurate data storage, minimize redundancies, and enable smooth data retrieval and analysis.
Types of Relationships in Access
When working with Microsoft Access, it’s important to understand the different types of relationships that can be established between tables. These relationships define how data is connected and shared, allowing for efficient data management and retrieval.
The three primary types of relationships in Access are one-to-one, one-to-many, and many-to-many.
A one-to-one relationship exists when each record in one table is related to exactly one record in another table. This type of relationship is useful in scenarios where you want to divide a large table with many fields into smaller, more specialized tables. For example, in a database for a school, you might have a “Students” table and a “Parent Information” table, with a one-to-one relationship between them to store additional details about each student’s parents.
A one-to-many relationship is when each record in one table can be related to multiple records in another table. This is the most common type of relationship. For instance, in a database for an online store, you might have a “Customers” table and an “Orders” table. Each customer can have multiple orders, but each order is associated with only one customer. In this case, the relationship between the two tables would be one-to-many, with the “Customers” table being the “one” side and the “Orders” table being the “many” side.
A many-to-many relationship occurs when multiple records in one table are associated with multiple records in another table. In this case, a junction table is needed to establish the relationship between the two tables. Continuing with the online store example, you might have a “Customers” table and a “Products” table. Since many customers can have multiple products in their wishlist, you would create a junction table called “Wishlist” that links the two tables. The “Wishlist” table would have foreign keys referencing the primary keys of the “Customers” and “Products” tables.
Understanding the types of relationships in Microsoft Access is crucial for designing a well-structured and efficient database. By appropriately defining and implementing these relationships, you can ensure data integrity, minimize redundancy, and enable efficient querying and reporting.
One-to-One Relationships
One-to-one relationships in Microsoft Access occur when each record in one table is related to only one record in another table. This type of relationship is used when you need to divide a table into smaller, more specialized tables to simplify data management.
An example of a one-to-one relationship would be a database for a company that stores employee data. You might have a main “Employees” table that contains general employee information, such as name, ID, and contact details. However, certain sensitive data, like salary information or performance evaluations, may only be accessible to authorized personnel. In this case, you can create a separate “Confidential Data” table with a one-to-one relationship to the “Employees” table, allowing you to control access to sensitive information.
To establish a one-to-one relationship in Access, you will need a common field between the two tables. This field acts as a unique identifier to match records from each table.
Creating a one-to-one relationship involves designating the primary key of one table as the foreign key in the related table. To do this, you can use the Relationships window in Access. Simply drag and drop the primary key field from one table onto the corresponding field in the other table to establish the relationship. Access will automatically create the necessary relationship between the tables.
One advantage of one-to-one relationships is that they allow for more efficient data organization. By separating sensitive or less frequently accessed data into a separate table, you can improve performance by reducing the overall size of the main table.
However, it’s important to note that one-to-one relationships should be used sparingly. They are typically employed when security or data protection concerns necessitate the separation of certain fields into a separate table. In most cases, it’s more practical to keep related data within a single table, using field rules or access permissions to restrict access to specific columns.
One-to-Many Relationships
In Microsoft Access, a one-to-many relationship is the most common type of relationship encountered. It occurs when each record in one table can be associated with multiple records in another table. This relationship is used to establish connections between related data and is crucial for organizing and managing relational databases effectively.
Consider a scenario where you have a database for an e-commerce store. You might have a “Customers” table and an “Orders” table. In this case, the relationship between the two tables would be one-to-many, as each customer can have multiple orders, but each order is associated with only one customer. By establishing this relationship, you can easily retrieve all the orders placed by a specific customer or analyze customer purchasing patterns.
To create a one-to-many relationship in Access, you need to have a common field between the two tables. Typically, the primary key of the “one” table would be the foreign key in the “many” table. In our e-commerce example, the CustomerID field in the “Customers” table would be the primary key, while the CustomerID in the “Orders” table would be the foreign key that establishes the one-to-many relationship.
In Access, you can use the Relationships window to define and manage one-to-many relationships. Simply drag and drop the primary key field from the “one” table onto the corresponding foreign key field in the “many” table. Access will create the necessary relationship between the tables, enforcing referential integrity to ensure that valid data is maintained.
One-to-many relationships provide several benefits. They allow for efficient data organization, as related data is stored in separate tables, reducing data redundancy. This makes it easier to maintain and update records without duplicating information. Additionally, one-to-many relationships facilitate data analysis and reporting, as you can easily filter and aggregate data based on the relationship.
It’s important to note that when working with one-to-many relationships, updating or deleting a record in the “one” table can have consequences for related records in the “many” table. For example, deleting a customer record may result in the deletion of all associated orders. Therefore, it’s crucial to understand the impact of such actions and set appropriate cascade delete and update options to ensure data integrity.
Many-to-Many Relationships
In Microsoft Access, a many-to-many relationship occurs when multiple records in one table can be associated with multiple records in another table. This type of relationship is more complex than one-to-many relationships and requires the use of a junction table to establish the connections between the two tables.
Consider a scenario where you have a database for a music library. You might have a “Songs” table and a “Playlists” table. In this case, many songs can be included in multiple playlists, and each playlist can contain multiple songs. To represent this many-to-many relationship, you need a third table called a junction table. In this example, the junction table might be called “PlaylistSongs” and would include the IDs of both the song and the playlist to establish the relationship.
Creating a many-to-many relationship in Access involves defining the relationships between the primary key fields of each table and the foreign keys in the junction table. You can use the Relationships window in Access to visually establish and manage these connections.
The junction table acts as a bridge between the two related tables and maintains the relationship between them. It allows for the mapping of multiple records in each table, enabling the creation of diverse and flexible relationships. In our music library example, the junction table “PlaylistSongs” would have foreign keys referencing the primary keys of both the “Songs” and “Playlists” tables.
Many-to-many relationships offer several advantages. They provide a way to represent complex associations between data sets. In our music library example, they allow for the creation of diverse playlists containing multiple songs, while each song can be part of multiple playlists.
Furthermore, many-to-many relationships help to reduce data redundancy by establishing connections without duplicating information. Instead of storing the same song data in multiple playlists, the junction table maintains the relationships between songs and playlists, ensuring that changes to either table are appropriately reflected in the association.
It’s important to note that when working with many-to-many relationships, data integrity becomes paramount. Any modifications made to one table should be accounted for and properly managed in the junction table. Additionally, you may need to use query techniques such as joins to extract and display data from related tables.
By understanding and effectively implementing many-to-many relationships in Access, you can create more robust and flexible databases that accurately represent the complex associations between entities.
Identifying Relationship Fields
In Microsoft Access, when establishing relationships between tables, it’s important to identify the appropriate fields that will serve as the basis for the relationship. These fields act as unique identifiers, allowing for the proper linkage between related tables.
To identify the relationship fields, you need to consider the nature of the data and how the tables are related to each other. Here are some key considerations:
Primary Key: The primary key of a table uniquely identifies each record in that table. It is often used as the relationship field in one-to-many or one-to-one relationships. It should be an auto-incrementing field or a field with a unique value for each record.
Foreign Key: In a one-to-many relationship, the foreign key is a field in the “many” table that references the primary key of the “one” table. It establishes the connection between the tables. The foreign key should have the same data type as the primary key it references.
Junction Table Fields: In a many-to-many relationship, the junction table contains the relationship fields. It typically includes the primary keys of the related tables as foreign keys. These fields link the records from each table, creating the association.
When identifying the relationship fields, it’s important to ensure they have appropriate data types and are indexed for improved performance. Additionally, you should consider the cardinality of the relationship (whether it’s one-to-one, one-to-many, or many-to-many) to determine the proper placement of primary and foreign keys.
An effective approach to identifying relationship fields is to analyze the data requirements and the relationships between entities. Consider how the tables are connected and the type of information that needs to be linked. By understanding the purpose and structure of the database, you can determine which fields will best establish the relationship.
It’s worth noting that the relationship fields should be well-designed and accurately reflect the data they represent. The use of proper field names, data types, and appropriate constraints, such as primary key and foreign key constraints, will contribute to the integrity and reliability of the relationship.
By carefully identifying and defining the relationship fields, you can establish robust and meaningful connections between tables in your Microsoft Access database. This will ensure efficient data management and accurate retrieval of related information when querying the database.
Creating Relationships in Access
In Microsoft Access, creating relationships between tables is essential for organizing and managing data efficiently. Establishing relationships ensures data integrity and reduces data redundancy by allowing for consistent and accurate connections between related tables.
There are several ways to create relationships in Access, including using the Relationships window and the Relationship Tools tab. Here’s a step-by-step guide on how to create relationships:
Step 1: Open the Relationships Window: Open your Access database and go to the Database Tools tab. Click on the Relationships button to open the Relationships window.
Step 2: Add Tables: In the Relationships window, click on the Show Table button to add the tables you want to establish a relationship between. Select the desired tables and click on the Add button.
Step 3: Define the Relationship: Once the tables are added, you will see their respective fields in the Relationships window. To create the relationship, drag and drop the primary key field of one table onto the corresponding foreign key field of the other table. Access will automatically create the relationship line between the fields.
Step 4: Set Relationship Properties: Double-click on the relationship line to open the Edit Relationships dialog box. Here, you can define the relationship properties, including join type and enforce referential integrity.
Step 5: Enforce Referential Integrity: Enforcing referential integrity helps maintain the consistency and accuracy of your data. By enabling this option, Access ensures that you cannot add records to the related table that do not have matching records in the primary table.
Step 6: Cascade Update and Delete: Optionally, you can set cascade update and delete options. Cascade update allows changes made to the primary key to automatically update related foreign keys in the linked table. Cascade delete allows deleting a record in the primary table to automatically delete related records in the linked table.
Step 7: View and Edit Relationships: After creating relationships, you can view and edit them in the Relationships window. This allows you to modify join types, referential integrity, and other properties as needed.
Step 8: Test and Validate Relationships: Before using the relationships in your database, it’s important to test and validate them. Verify that the relationships are functioning as intended and that data integrity is maintained during data entry, updates, and deletions.
By following these steps, you can successfully create relationships in Microsoft Access. Well-defined relationships enhance the structure and reliability of your database, enabling efficient data management and accurate retrieval of related information.
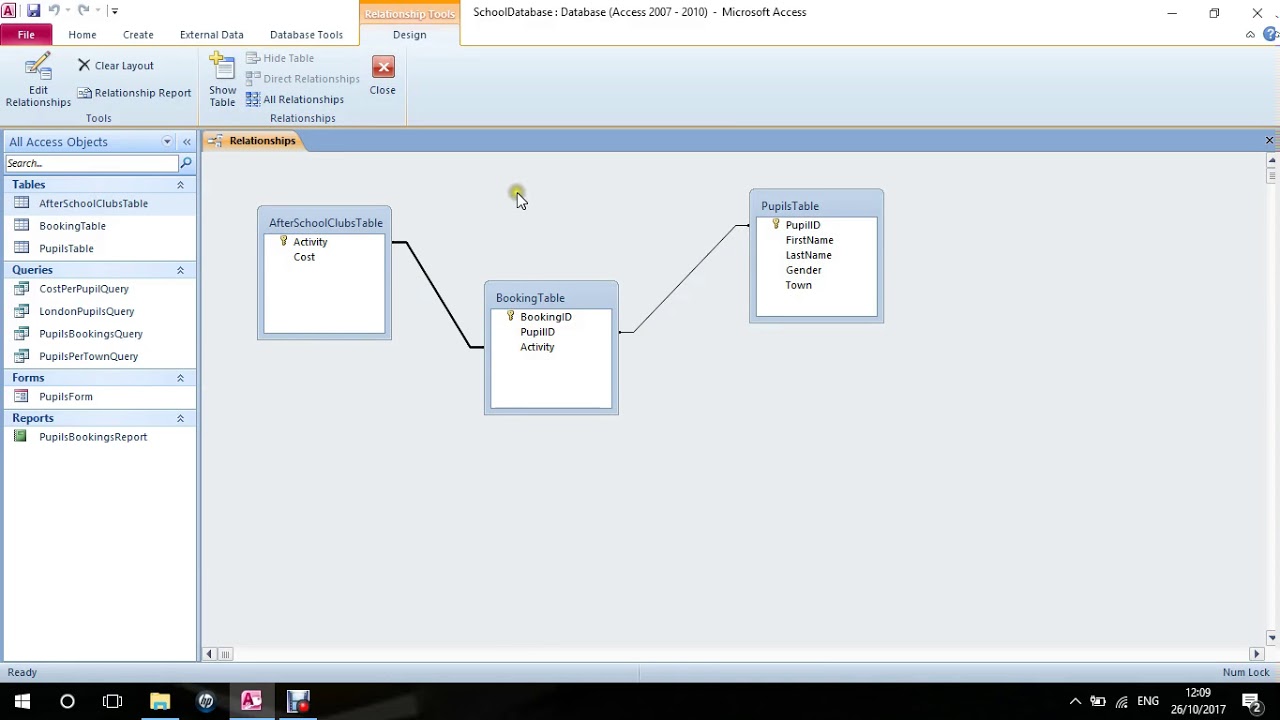
Using the Relationships Window
In Microsoft Access, the Relationships window is a powerful tool that allows you to visually manage and manipulate relationships between tables. This window provides a graphical representation of the database structure, making it easier to create, view, and modify relationships.
To access the Relationships window, open your Access database and navigate to the Database Tools tab. Click on the Relationships button to open the window.
The Relationships window consists of three main components:
- Tables: This section displays the tables in your database. You can add tables by clicking on the Show Table button, which opens a dialog box where you can select the desired tables. You can then drag and drop the tables into the window to add them.
- Field List: This section shows the fields of the selected table. You can expand or collapse the field list for each table to view or hide its fields. To create a relationship, simply click and drag the field(s) from one table to the corresponding field(s) in another table.
- Relationship Window: This area displays the relationships between the tables. Once you drag and drop the fields to create a relationship, Access automatically draws a line between the related fields. You can adjust the line style, arrow types, and line thickness to customize the appearance of the relationship.
Using the Relationships window, you have the flexibility to modify existing relationships. You can right-click on a relationship line to open the Edit Relationships dialog box, where you can change the join type, enforce referential integrity, and set cascade update and delete options.
The Relationships window also allows you to manage related tables by viewing and editing their data. By double-clicking on a table, you can open a datasheet view to add, edit, or delete records directly within the window. This feature simplifies data management and provides a convenient way to navigate through your database.
Moreover, the Relationships window provides a visual representation of the database structure, helping you understand the connections and dependencies between tables. It allows you to easily grasp the overall database architecture and make informed decisions when creating and modifying relationships.
It’s important to ensure that your relationships are well-designed and accurately represented in the Relationships window. Regularly reviewing and validating your relationships can help maintain the integrity and reliability of your database, ensuring that data is properly linked and organized.
The Relationships window in Microsoft Access is a valuable tool for managing relationships, visualizing the database structure, and ensuring efficient data management. Utilize this window to create and modify relationships, view and edit table data, and gain a comprehensive understanding of your database design.
Adding Tables to the Relationship Diagram
In Microsoft Access, the Relationship Diagram view allows you to visually represent the relationships between tables in your database. To create a relationship diagram, you need to add tables to the diagram, which provides a comprehensive view of the database structure.
To add tables to the relationship diagram, follow these steps:
- Open the Relationship Diagram: Open your Access database and go to the Database Tools tab. Click on the Relationships button to open the Relationships window.
- Add Tables: In the Relationships window, click on the Show Table button. This will open the Show Table dialog box, which lists all the tables in your database. Select the tables you want to add to the diagram and click on the Add button.
- Arrange the Tables: After adding the tables, they will appear as icons in the Relationships window. You can click and drag these icons to arrange them in the desired layout. Organizing the tables in a logical manner can help you better understand the relationships between them.
- Establish Relationships: Once the tables are added and arranged, you can create relationships by dragging and dropping the corresponding fields between the tables. This visually connects the tables and enables you to define the relationship properties.
Adding tables to the relationship diagram provides a visual representation of the database structure, making it easier to understand and manage relationships. By viewing the tables and their connections in a single diagram, you can quickly identify the interdependencies and the flow of data throughout the database.
The relationship diagram also allows you to view and edit table properties, such as field names and data types, directly from the diagram. This can be helpful when you need to make changes or adjustments to the database structure.
Additionally, the relationship diagram is a valuable tool for documentation and communication purposes. It provides a clear visual overview of the database design, allowing stakeholders to better understand the relationships and the overall structure of the data.
Regularly updating and reviewing the relationship diagram helps ensure that it accurately reflects the database structure. As you make changes to the relationships or add/delete tables, it’s important to update the diagram to maintain an up-to-date representation of the database.
By adding tables to the relationship diagram in Microsoft Access, you can visualize the relationships between tables, understand the database structure more effectively, and simplify the management of your database relationships.
Creating Relationships with the Wizard
In Microsoft Access, the Relationship Wizard provides a convenient and user-friendly way to create relationships between tables. This wizard guides you through the process of defining relationships step by step, simplifying the setup of relationships in your database.
To create relationships using the Relationship Wizard, follow these steps:
- Open the Relationship Wizard: Open your Access database and go to the Database Tools tab. Click on the Relationships button to open the Relationships window.
- Click on the Relationships Wizard Button: In the Relationships window, click on the Relationships Wizard button located in the Design tab. This will open the Relationship Wizard.
- Select the Tables: In the Relationship Wizard, you will be prompted to select the tables you want to create relationships between. Choose the desired tables and click Next.
- Select the Fields: In this step, choose the fields that you want to link together to create the relationship. You can select multiple fields from each table to establish the connections. Click Next.
- Define the Relationship Type: In the next step, you need to specify the relationship type. You can choose between one-to-one, one-to-many, or many-to-many relationships, depending on your data requirements. Select the appropriate relationship type and click Next.
- Set Join Options: This step allows you to define the join options for the relationship. You can choose to include all records from the primary table or only those records that have matching values in the related table. Select the desired option and click Next.
- Finish: In the final step, review the summary of the relationship details. If everything appears correct, click Finish to create the relationships between the selected tables.
The Relationship Wizard simplifies the process of creating relationships by providing a guided interface. It helps ensure that the relationships are set up correctly, saving time and reducing the chances of manual errors.
One advantage of using the Relationship Wizard is that it handles many of the behind-the-scenes tasks automatically. It creates the necessary relationship lines, sets the join options, and creates appropriate indexes to optimize performance.
However, it’s important to note that the Relationship Wizard may not always detect or create the precise relationships you need in complex database structures. In such cases, manual creation of relationships using the Relationships window may be more suitable.
After using the Relationship Wizard, it’s essential to review and validate the created relationships. Ensure that the relationships accurately represent the connections between tables and that the defined options match your data requirements.
By utilizing the Relationship Wizard in Microsoft Access, you can easily and efficiently create relationships between tables, minimizing manual effort, and ensuring the reliability and integrity of your database.
Defining Join Types
In Microsoft Access, when creating relationships between tables, it’s important to define the join type to specify how the records should be linked. The join type determines which records from the linked tables are included in the query results. Access provides three main types of joins: inner join, left join, and right join.
Inner Join: An inner join returns only the matching records from both tables. It includes only the records where the values in the joining fields match in both tables. This join type is commonly used when you want to retrieve records that have related data in both tables.
Left Join: A left join returns all records from the left (or primary) table and the matching records from the right (or related) table. If the joining field in the right table doesn’t have a matching value in the left table, the result will contain null values for the right table’s fields. This join type is useful when you want to retrieve all records from the primary table, regardless of whether they have related data in the secondary table.
Right Join: A right join is the opposite of a left join. It returns all records from the right (or related) table and the matching records from the left (or primary) table. If the joining field in the left table doesn’t have a matching value in the right table, the result will contain null values for the left table’s fields. This join type is less commonly used but can be helpful when you want to retrieve all records from the related table, regardless of whether they have related data in the primary table.
When defining join types in Access, it’s important to understand the relationships between tables and consider the data requirements of your queries. By selecting the appropriate join type, you can ensure that the query results accurately reflect the desired data.
Access provides an interface in the Relationship window to define the join type when creating relationships. By default, Access chooses the join type based on the nature of the relationship you’ve established. You can also manually modify the join type by double-clicking on the relationship line and selecting the desired join type in the Edit Relationships dialog box.
It’s worth noting that join types have an impact on the query performance and the data that will be displayed. Understanding the relationships and the desired results in your queries is crucial when selecting the appropriate join type.
By correctly defining join types in Microsoft Access, you can accurately link tables and create queries that retrieve the desired data based on the relationships between the tables.
Enforcing Referential Integrity
In Microsoft Access, referential integrity ensures the consistency and validity of data by enforcing the relationships between tables. It prevents orphaned records and maintains the integrity of the database by ensuring that related data remains synchronized. Enforcing referential integrity helps maintain data accuracy and reliability.
When referential integrity is enabled, Access enforces certain rules between the tables in a relationship:
Primary Key and Foreign Key Relationship: Access ensures that values entered in the foreign key field of a related table must have a corresponding value in the primary key field of the related table. This ensures that only valid data can be stored in the foreign key field.
No Orphaned Records: Enforcing referential integrity prevents orphaned records by disallowing the deletion of a primary key value if there are related records in the related table. If a primary table record is deleted, the related records in the related table are also deleted or updated, depending on the cascading options.
Updating Related Records: If a primary key value is modified, Access can automatically update the foreign key values in the related table. This ensures that the relationship remains intact and prevents inconsistencies in the data.
To enforce referential integrity, you can enable it when creating relationships in Access:
- Open the Relationships window in Access.
- Drag and drop the primary key field of one table onto the corresponding foreign key field in the related table to create the relationship.
- Double-click on the relationship line to open the Edit Relationships dialog box.
- Check the “Enforce Referential Integrity” option in the dialog box.
Enforcing referential integrity provides several benefits. It helps maintain data consistency and accuracy by ensuring that data remains synchronized across related tables. It also avoids orphans, where a record in a related table references a nonexistent record in the primary table.
It’s crucial to carefully consider the implications of enabling referential integrity, especially with cascade update and delete options. Cascade delete deletes related records if the primary key record is deleted, while cascade update updates related foreign key values if the primary key value is modified. These options should be used with caution to avoid unintended consequences.
By enforcing referential integrity in Microsoft Access, you can maintain the integrity and reliability of your data, prevent data inconsistencies, and ensure the proper functioning of your database.
Cascade Delete and Cascade Update Options
In Microsoft Access, the cascade delete and cascade update options enable automatic modifications to related records when changes are made to the primary key field of a table. These options provide a convenient way to maintain data integrity and ensure that changes in the primary table are reflected in the related tables.
Cascade Delete: When cascade delete is enabled, deleting a record from the primary table will automatically delete any related records in the related table(s). This ensures that the related records do not remain orphaned and maintains data consistency. For example, if you delete a customer record, enabling cascade delete would automatically delete all related orders, ensuring that no orphaned orders remain in the database.
Cascade Update: The cascade update option allows changes made to the primary key field to automatically update the corresponding foreign key values in the related table(s). This is useful when you modify a primary key value and want to ensure that all related records are updated accordingly. For instance, if you change a department ID in the primary table, enabling cascade update would automatically update the department ID in all related records in other tables.
To enable cascade delete or cascade update options in Access, follow these steps:
- Open the Relationships window in Access.
- Double-click on the relationship line to open the Edit Relationships dialog box.
- Check the “Enforce Referential Integrity” option if it’s not already enabled.
- Select the desired cascade delete or cascade update options from the related tables section of the dialog box.
- Click OK to save the changes.
It’s important to exercise caution when using cascade delete and cascade update options, as they can have significant effects on your data. Be mindful of the consequences and ensure that the updates or deletions will not cause unintended data loss or inconsistencies.
Using cascade delete and cascade update options can greatly simplify data management by automatically maintaining referential integrity. However, it’s crucial to use these options judiciously and understand the impacts they can have on related data.
By utilizing the cascade delete and cascade update options in Microsoft Access, you can streamline data maintenance, avoid orphaned records, and ensure that changes to the primary table efficiently propagate through the related tables.
Viewing and Editing Relationships
In Microsoft Access, it’s essential to be able to view and edit relationships between tables to ensure your database structure is accurate and properly reflects the connections between the data. Access provides tools and features that allow you to easily view and modify relationships as needed.
Viewing Relationships: To view relationships in Access, you can open the Relationships window. This window displays the tables and their relationships in a graphical format. It allows you to see the connectors between the tables and the fields that establish the relationships. You can easily identify the types of relationships (e.g., one-to-one, one-to-many, or many-to-many) and the join types that are defined.
You can also examine the details of a specific relationship by double-clicking on the relationship line. This opens the Edit Relationships dialog box, where you can view and adjust various properties of the relationship, such as referential integrity, cascade update/delete options, and join type.
Editing Relationships: Access provides several ways to edit relationships:
1. Edit Relationships Dialog Box: When you double-click on a relationship line in the Relationships window, the Edit Relationships dialog box appears. Here, you can modify properties, such as referential integrity, cascade options, and join type, for the selected relationship.
2. Delete Relationship: To remove a relationship, select the relationship line in the Relationships window, and press the Delete key or click on the Delete button in the toolbar. Confirm the deletion when prompted.
3. Add or Modify Fields: You can add or modify fields to an existing relationship by dragging and dropping the appropriate fields onto the relationship line in the Relationships window. Access will prompt you to confirm the addition or modification of the fields.
4. Create New Relationships: To create new relationships or modify existing ones, you can use the Relationship Tools tab. This tab provides various options, including creating a new relationship, editing relationship properties, and managing table aliases.
When editing relationships, it’s important to consider the impact of any changes on your database. Modifying relationships can affect data integrity, and proper testing/validation should be performed to confirm that the changes are implemented correctly.
By regularly reviewing and editing relationships in Access, you can ensure that your database accurately represents the connections between tables. This allows for efficient data management, simplifies querying, and maintains the integrity and consistency of your data.
Deleting Relationships
In Microsoft Access, deleting relationships between tables is sometimes necessary when you no longer require a particular association or when restructuring your database. When deleting relationships, it’s crucial to understand the consequences and follow the appropriate steps to maintain data integrity.
To delete relationships in Access, follow these steps:
- Open the Relationships window in Access.
- Select the relationship line(s) that you want to delete.
- Press the Delete key or click on the Delete button in the toolbar.
- Confirm the deletion when prompted.
Before deleting relationships, it’s important to consider the impact on your data. Deleting a relationship automatically removes the link between tables, but it does not delete the actual records in the tables.
Keep in mind the following considerations when deleting relationships:
Data Integrity: If referential integrity is enforced, deleting a relationship can lead to orphaned records. Ensure that there are no dependent records that will lose their reference to other tables, or that you have appropriate cascade delete actions defined.
Backup: Before deleting relationships, it’s a good practice to create a backup of your database. This ensures that you can revert to the previous state if any unintended consequences arise.
Testing and Validating: After deleting a relationship, it’s essential to test and validate your database to ensure that the changes do not introduce any data inconsistencies or errors.
Deleting relationships should be done with caution, especially when modifying or restructuring your database. It’s recommended to have a clear understanding of the relationships and their impact on your data before making any changes.
If you accidentally delete a relationship, you can re-establish it by adding the appropriate fields and defining the relationship again.
By carefully considering the implications and following the correct steps, you can safely delete relationships in Microsoft Access, allowing for the maintenance and improvement of your database structure.
Troubleshooting Relationships in Access
While working with relationships in Microsoft Access, you may encounter issues or errors that affect the functionality and integrity of your database. Troubleshooting these relationship problems is crucial to maintaining a reliable and efficient database. Here are some common troubleshooting steps to resolve relationship issues:
1. Verify Table and Field Names: Check that the table and field names used in the relationship are correct. Spelling errors or inconsistencies can prevent the connection between tables.
2. Check Field Data Types and Sizes: Ensure that the data types and field sizes of related fields are compatible. Mismatched data types can result in errors or unexpected results.
3. Verify Referential Integrity Constraints: Ensure that referential integrity is properly enforced in relationships. Confirm that the appropriate cascade delete and update options are set to maintain data consistency.
4. Validate Primary Key and Foreign Key Values: Ensure that primary key and foreign key values match between related tables. If values are missing or invalid, it can cause relationship errors.
5. Check for orphans: Orphaned records can occur when a related record in the primary table is deleted without deleting the associated records in the related table. Use cascade delete options or manually delete related records to avoid orphans.
6. Test Queries and Forms: If relationship-related queries or forms are not producing the expected results, review the design and SQL statements for accuracy. Verify that the joins and conditions are correctly specified.
7. Compact and Repair: Performing a compact and repair operation on the database can correct minor corruption issues that may impact relationships and overall database functionality.
8. Review Relationship Structures: Analyze the relationship diagram and ensure that the structure accurately represents the intended relationships. Pay attention to the cardinality and join types to ensure they align with the actual data requirements.
9. Backup the Database: Before implementing any significant changes or troubleshooting steps, it’s important to backup the database to avoid data loss in case of unforeseen issues.
10. Seek Expert Assistance: If you are still struggling to resolve relationship problems, consider seeking assistance from experts or accessing online resources such as forums and support documentation for Access.
By following these troubleshooting steps, you can effectively identify and resolve relationship-related issues in Microsoft Access. Maintaining proper relationships is essential for data integrity and seamless database operations.