
Choosing an Apple Device
When it comes to creating an iCloud email address, the first step is to choose an Apple device that suits your needs. Apple offers a wide range of devices, including iPhones, iPads, MacBooks, and iMacs. Each device has its own capabilities and features, so it’s essential to choose one that aligns with your preferences and requirements.
If you prefer a compact and portable option, consider the latest iPhone or iPad models. These devices offer convenient access to your iCloud email on the go and are perfect for individuals who are always on the move. The iPhone provides seamless integration with other Apple services, making it a popular choice among Apple enthusiasts.
For those who require a larger screen and more computing power, MacBooks and iMacs are excellent choices. With their sleek designs and powerful hardware, these devices offer optimal performance for tasks such as email management, document editing, and web browsing. MacBooks are lightweight and portable, while iMacs provide a larger display for a more immersive experience.
Before making a purchase, consider factors such as budget, intended usage, and desired features. Assess whether you need a device primarily for email purposes or for more extensive tasks such as multimedia editing or programming. By understanding your needs, you can make an informed decision and select the Apple device that best suits your lifestyle and requirements.
Remember, choosing an Apple device is a personal decision, and there is no one-size-fits-all solution. Take your time to research and compare different models, read reviews, and visit Apple stores to try out the devices before making a final decision. Once you have chosen the ideal Apple device, you can proceed with setting up an Apple ID and creating your own iCloud email address.
Setting up an Apple ID
Before you can create an iCloud email address, you need to set up an Apple ID. Your Apple ID serves as your key to accessing various Apple services, including iCloud. Here’s a step-by-step guide to creating an Apple ID:
- Go to the Apple ID website using a web browser on your Apple device or computer.
- Click on the “Create Your Apple ID” button to start the registration process.
- Fill out the required information, such as your name, birthday, and email address. It’s recommended to use a separate email address not tied to any other Apple ID.
- Create a strong password that includes a mix of uppercase and lowercase letters, numbers, and special characters.
- Set up security questions that will help you recover your Apple ID if you forget your password.
- Verify your email address by entering the verification code sent to the email you provided.
- Agree to the terms and conditions.
- Complete the setup process by adding a payment method, such as a credit card or PayPal account. This step is optional and can be skipped.
- Once you’ve created your Apple ID, you can use it to sign in and access various Apple services, including iCloud.
Setting up an Apple ID is a straightforward process, and it’s crucial to ensure that all the information you provide is accurate and up to date. Your Apple ID will be associated with your iCloud email address, so make sure to remember the login credentials and keep them secure.
Now that you have successfully set up your Apple ID, you’re ready to move on to accessing the iCloud settings and creating your iCloud email address.
Accessing the iCloud Settings
Once you have your Apple ID set up, you can easily access the iCloud settings to create your iCloud email address. Here’s a step-by-step guide on how to access the iCloud settings:
- On your Apple device, go to the “Settings” app, which is represented by the gear icon.
- Scroll down and tap on your name or profile picture, located at the top of the Settings menu.
- In the Apple ID menu, you will see various options related to your Apple ID and iCloud. Tap on “iCloud” to access the iCloud settings.
- On the iCloud settings page, you will find a list of services and apps that are linked to your iCloud account.
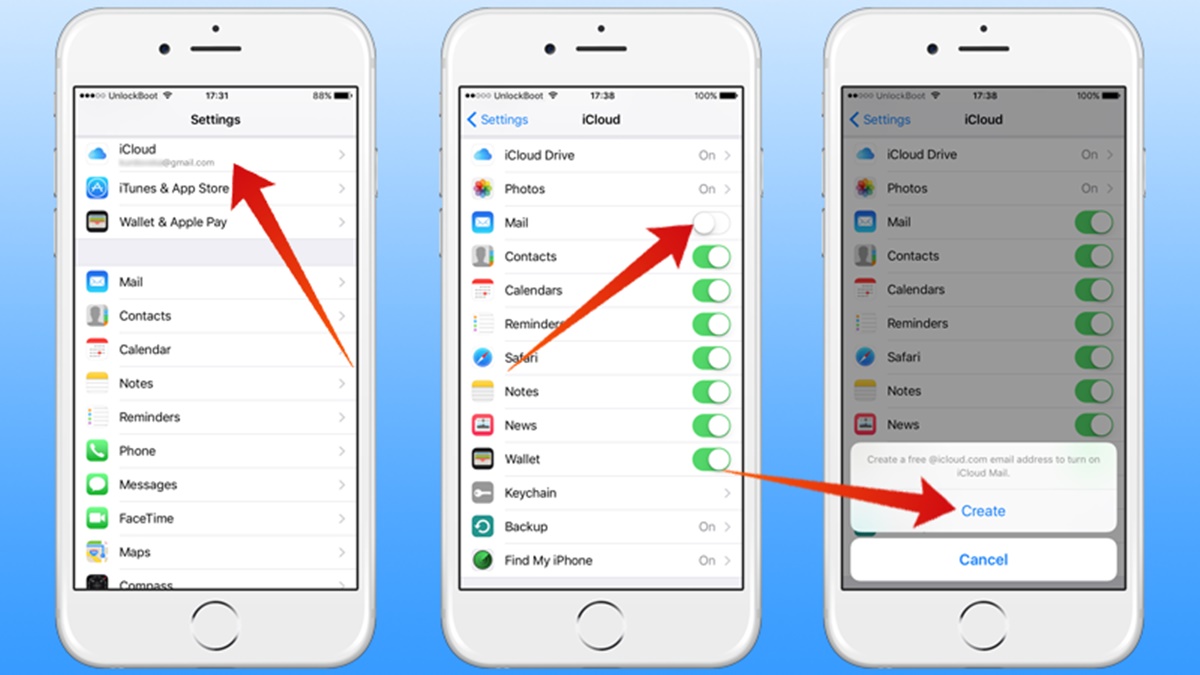
- To create your iCloud email address, tap on “Mail.” If you don’t see the “Mail” option, ensure that the Mail toggle switch is turned on.
- On the next screen, you will have the option to either use an existing email address or create a new iCloud email address. Choose “Create” to proceed with creating a new email address.
By following these steps, you will be able to access the iCloud settings and begin the process of creating your iCloud email address. It’s important to note that accessing the iCloud settings may vary slightly depending on the Apple device and iOS version you are using. However, the general steps provided above should guide you in the right direction.
Next, we will explore the process of creating your iCloud email address, including selecting an email address and entering essential information. This will enable you to have your personalized iCloud email for seamless communication and access to vital iCloud features.
Creating an iCloud Email
Creating an iCloud email address is a simple process that allows you to have a personalized email for all your iCloud-related activities. Here’s how you can create an iCloud email address:
- After accessing the iCloud settings, as mentioned in the previous step, tap on “Mail.”
- On the next screen, you will be presented with two options: “Use your current email address” or “Get a free iCloud email address.” Choose the latter option to create a new iCloud email address.
- Next, you will need to choose a relevant and unique email address. You can use letters, numbers, and periods in the email address. Avoid using spaces or special characters.
- Tap on “Next” to proceed, and if your chosen email address is available, you will be able to proceed. If the address is already taken, you will be prompted to choose a different one.
- After successfully selecting an available email address, you will be directed to the next step, where you need to enter essential information such as your first and last name.
- Complete the necessary details in the respective fields, including a strong password for your iCloud email account. Ensure that your password meets the Apple security requirements.
- Agree to the Terms and Conditions to proceed with the creation of your iCloud email address.
- Finally, tap on “Create” to complete the process, and you will now have your own personalized iCloud email address.
Creating an iCloud email address provides seamless integration with other Apple services and enhances your overall iCloud experience. Your new email address will be accessible through the Mail app on your Apple devices, as well as via the iCloud website on other platforms.
Now that you have successfully created your iCloud email address, you can proceed with customizing your email preferences and setting up iCloud email on other devices for easy access to your mailbox.
Selecting an Email Address
When creating an iCloud email, one of the crucial steps is selecting the right email address. Your email address is not just a means of communication; it represents your online identity. Here are a few tips to consider when selecting an email address for your iCloud account:
- Keep it professional: If you plan to use your iCloud email for work or professional purposes, it’s important to choose an email address that reflects professionalism. Consider using your name or a combination of initials and last name to create a professional email address.
- Make it memorable: Your email address should be easy to remember for both you and others. Avoid complex combinations of numbers, symbols, or random letters. Opt for a simple and straightforward email address that is easy to share and recall.
- Avoid personal information: Protect your privacy by avoiding including personal information, such as your birthdate or street address, in your email address. This will help prevent potential security breaches or identity theft.
- Consider relevance: Select an email address that is relevant to your interests, hobbies, or profession. For example, if you’re a photographer, you could consider using an email address that incorporates your photography-related keywords.
- Check availability: Before finalizing your email address, make sure it is available, as some common or popular email addresses may already be taken. You want to avoid any confusion or mix-ups by having a unique and available email address.
By considering these tips, you can choose an email address that not only suits your personal preferences but also aligns with your professional goals and interests. Remember, your email address is a representation of yourself in the online world, so take the time to select one that you will be proud to use for your iCloud email.
Once you have selected a suitable email address, you can proceed with entering essential information and creating your iCloud email account, as outlined in the previous steps. Customizing your email preferences and setting up your iCloud email on other devices will further enhance your email experience with iCloud.
Entering Essential Information
When creating an iCloud email address, it is important to enter essential information to ensure the smooth functioning of your email account. Here are the key details you need to provide:
- Name: Enter your first name and last name. This will be displayed as the sender name when you send emails from your iCloud account.
- Username: Your username will be automatically generated based on the email address you selected earlier. It will be the portion of your email address before the “@” symbol.
- Password: Choose a strong and unique password for your iCloud email account. Make sure it meets the requirements set by Apple, including a mix of uppercase and lowercase letters, numbers, and special characters.
- Security Questions: Set up security questions that will be used to verify your identity and regain access to your iCloud account in case you forget your password.
- Date of Birth: Provide your date of birth to confirm that you meet the age requirements for creating an iCloud email account.
- Recovery Email Address: It is recommended to enter a recovery email address. This will serve as a backup in case you ever need to recover your iCloud account.
- Phone Number: Adding a phone number to your account can enhance security and facilitate account recovery if needed. It is optional but highly recommended.
By providing accurate and up-to-date information, you ensure that your iCloud email account is properly maintained and can be easily recovered if necessary. It is important to keep your password and security-related information confidential to keep your account secure.
Once you have entered all the essential information, review it carefully to make sure everything is correct. Any mistakes or typos could cause issues later on, so it’s important to double-check before proceeding.
With the essential information entered, you are one step closer to having your own fully functional iCloud email account. The next step involves verifying your email address and setting a password for your email account, which we will cover in the following sections.
Verifying the Email Address
After entering all the necessary information to create your iCloud email address, the next step is to verify your email address. Verifying your email address confirms that you have access to the email account associated with your iCloud email address. Here’s how you can verify your email address:
- Check your inbox: After entering your email address, Apple will send a verification email to the address you provided during the registration process. Open your email inbox and look for an email from Apple with the subject line “Verify your email address.”
- Open the verification email: Click on the email to open it and follow the instructions provided by Apple.
- Click on the verification link: Within the email, you will find a verification link. Click on the link to verify your email address.
Once you have successfully clicked on the verification link, your email address will be confirmed, and you can proceed with the next steps of setting a password and customizing your email preferences.
If you do not see the verification email in your inbox, it’s important to check your spam or junk folder as it may have been mistakenly filtered. Additionally, make sure you provided the correct email address during the registration process. If you still encounter issues with email verification, you can contact Apple Support for further assistance.
Ensuring the successful verification of your email address is essential for accessing all the features and benefits of iCloud email. It adds an extra layer of security and confirms your ownership of the email address associated with your iCloud account.
With the email address verified, you can proceed with setting a password for your iCloud email account, which will be covered in the next section.
Setting a Password for the Email
Setting a strong and secure password is crucial to protect the privacy and security of your iCloud email account. A strong password ensures that only authorized individuals can access your email and personal information. Follow these steps to set a password for your iCloud email:
- On the password setup screen, enter a password that meets the criteria outlined by Apple. Make sure your password is a combination of uppercase and lowercase letters, numbers, and special characters.
- Avoid using common passwords or easily guessable phrases. Instead, create a unique password that is difficult for others to guess but easy for you to remember.
- Consider using a passphrase that combines multiple words, making it longer and more secure. For example, “GleamingStar14R@diance!”
- Avoid using personal information or obvious sequences of numbers like your birthdate or phone number.
- Refrain from reusing passwords across multiple accounts. Each account, including your iCloud email, should have a unique and separate password to prevent potential security breaches.
- Ensure that your password is at least eight characters long, but longer passwords are generally more secure.
- Once you have entered your password, confirm it by typing it again in the designated field to ensure accuracy.
Creating a strong password for your iCloud email account is essential in safeguarding your personal data and preventing unauthorized access. Regularly updating your password and using a combination of letters, numbers, and symbols can help maximize the security of your email account.
Remember to keep your password confidential and avoid sharing it with anyone. It’s a best practice to periodically change your password and enable two-factor authentication for an additional layer of security.
With a secure password in place, you are well on your way to customizing your email preferences and using your iCloud email account across various devices for seamless communication.
Customizing Email Preferences
Once you have set up your iCloud email account and password, you can customize various email preferences according to your preferences and needs. Customizing your email preferences allows you to personalize your email experience and tailor it to your specific requirements. Here are some options you can customize:
- Signature: Add a professional or personal signature to your outgoing emails. This can include your name, job title, contact information, or any other details you want to include.
- Mail rules: Create filters and rules to automatically sort incoming emails into specific folders, mark them as read or unread, or forward them to other email addresses.
- VIP List: Designate certain contacts as “VIPs” to prioritize their emails and receive notifications when you receive a message from them.
- Push notifications: Choose whether you want to receive real-time notifications on your devices when new emails arrive or customize the frequency of these notifications.
- Auto-reply: Set up an automatic response to let people know when you are away or temporarily unavailable. This can be especially useful for professional or out-of-office situations.
- Aliases: If you want to use different email addresses within your iCloud account, you can create email aliases for various purposes or to manage different aspects of your life.
- Spam filtering: Adjust the level of spam filtering to ensure that unwanted or suspicious emails are appropriately detected and filtered out of your inbox.
- Language and region settings: Select your preferred language and time zone for accurate date and time displays in emails.
Customizing your email preferences allows you to streamline your email management and improve your overall productivity. By taking advantage of these features, you can tailor your email experience to suit your individual needs and ensure that your inbox remains organized and efficient.
Accessing the email settings within your iCloud account allows you to make these customizations across all your Apple devices, ensuring consistency and flexibility in managing your emails.
Now that you have customized your email preferences, you can set up your iCloud email on other devices to enjoy seamless access and synchronization across multiple platforms.
Setting up iCloud Email on Other Devices
Setting up your iCloud email on other devices allows you to access your emails across multiple platforms and ensures that you are always connected and up-to-date. Whether you have an iPhone, iPad, Mac, or even a Windows or Android device, here’s how you can set up your iCloud email:
- On an iPhone or iPad: Go to the “Settings” app, tap on your name, select “iCloud,” and ensure that the “Mail” toggle switch is turned on. Your iCloud email account will automatically sync with the default Mail app.
- On a Mac: Open the “Mail” app on your Mac, click on “Mail” in the menu bar, then select “Add Account.” Choose “iCloud” and enter your iCloud email address and password. The Mail app will configure the settings automatically.
- On a Windows PC: Download and install the iCloud for Windows app from the Microsoft Store. Open the app, sign in with your Apple ID, and select the “Mail” option to set up your iCloud email on the Mail app for Windows.
- On an Android device: Open the default email app on your Android device, select “Add Account,” and choose the “Other” option. Enter your iCloud email address and password, and manually configure the server settings using the information provided by Apple.
By setting up your iCloud email on other devices, you can stay connected and access your emails, contacts, calendars, and other iCloud services seamlessly. Your emails will sync across all your devices, ensuring that you can read, send, and manage your emails no matter where you are.
It’s important to note that the steps and settings may vary slightly depending on the device and operating system version you are using. However, the general process is similar, and you can find detailed instructions on the Apple Support website or the respective device’s support documentation.
With your iCloud email set up on various devices, you can enjoy the convenience of unified email management and synchronize your digital communication effortlessly.
Troubleshooting Common Issues
While setting up and using an iCloud email account is generally smooth, there may be times when you encounter common issues. Here are some troubleshooting steps to help resolve common iCloud email issues:
- Check your internet connection: Ensure that you have a stable internet connection on your device. Unstable or weak connections can affect the functionality of your iCloud email.
- Check iCloud service status: Sometimes, iCloud services may experience temporary disruptions. Visit the Apple System Status page to check if there are any known issues with iCloud services.
- Verify email settings: Double-check your email settings to ensure they are correctly configured. Make sure you have entered the correct incoming and outgoing server information and that your username and password are accurate.
- Clear cache and cookies: If you are experiencing issues with accessing your iCloud email through a web browser, try clearing your cache and cookies. This can help resolve any browsing-related issues.
- Update your device: Ensure that your device’s operating system is up to date. Software updates often include bug fixes and improvements that can resolve issues with email functionality.
- Reset Mail app: If you are having trouble with the Mail app on your Apple device, try force quitting the app and reopening it. If the issue persists, you can try resetting the Mail app by going to “Settings,” selecting “Mail,” and choosing “Reset Mail Settings.”
- Check email account storage: iCloud offers a limited amount of storage for your email account. If you are experiencing issues with sending or receiving emails, check if your email account storage is full. Delete unnecessary emails or attachments to free up space.
- Contact Apple Support: If all else fails or if you are facing more complex issues, reach out to Apple Support for further assistance. They can provide personalized support and guide you through the troubleshooting process.
By following these troubleshooting steps, you can often resolve common issues with your iCloud email account effectively. Remember to consult official Apple resources and support if you require further assistance or encounter persistent problems.
With these troubleshooting techniques in your toolkit, you can quickly overcome any obstacles and ensure a smooth and uninterrupted experience with your iCloud email.
Frequently Asked Questions
Here are some frequently asked questions about creating and using an iCloud email account:
1. Can I create multiple iCloud email addresses?
Yes, you can create multiple iCloud email addresses. Apple allows you to have up to three email aliases associated with your iCloud account. These aliases function as separate email addresses that receive emails in the main iCloud inbox.
2. Can I use my iCloud email on non-Apple devices?
Yes, you can set up your iCloud email on non-Apple devices as well. While iCloud integration is seamless on Apple devices, you can access your iCloud email through other email apps on Android, Windows, and other platforms. You need to configure the email settings manually using the server information provided by Apple.
3. Can I access my iCloud email on the web?
Yes, you can access your iCloud email through the iCloud website. Simply go to icloud.com and sign in with your Apple ID and password. This allows you to read, send, and manage your emails from any device with a web browser.
4. What happens to my iCloud email if I stop using Apple devices?
Your iCloud email account remains active even if you no longer use Apple devices. You can continue to access your iCloud email through the iCloud website or configure it on other email clients or apps. However, certain features specific to Apple devices may not be available.
5. Can I change my iCloud email address?
Apple does not currently offer an option to change your primary iCloud email address. However, you can create email aliases within your iCloud account or set up forwarding to another email address if you prefer to receive emails elsewhere.
6. Is my iCloud email account secure?
Apple takes security seriously and implements measures to protect your iCloud email account. This includes encrypted communication and storage, two-factor authentication, and spam filtering. It’s important to use a strong, unique password and keep your account information confidential to ensure the security of your iCloud email account.
If you have any further questions or encounter issues with your iCloud email account, it’s recommended to consult Apple’s official support documentation or reach out to their customer support for assistance and guidance.