
What is a Thunderbird Signature
A Thunderbird signature is a customizable block of text that is automatically appended to the end of your outgoing emails. It typically contains information such as your name, job title, contact details, and any other relevant information you want to include. Signatures are useful for personalizing your emails and providing recipients with additional information about you or your company.
With Thunderbird, you can create multiple signatures for different email accounts or for different purposes. For example, you might have one signature for your work email and another one for your personal email. This allows you to tailor your signature to the specific context of each email you send.
Signatures in Thunderbird can also be formatted using HTML, which allows you to add images, links, and other formatting elements to make your signature more visually appealing and professional. HTML signatures give you more flexibility to showcase your brand or add a personal touch to your emails.
In addition to adding basic contact information, you can also use Thunderbird signatures to include other elements like quotes, slogans, social media icons, or even a legal disclaimer. It’s a great way to make a lasting impression on your recipients and ensure that your emails are consistent and professional across all interactions.
Whether you’re a business professional, an entrepreneur, or simply someone who wants to add a personal touch to your emails, Thunderbird signatures are an essential feature that can help you stand out and leave a lasting impression on your contacts.
Step 1: Open Thunderbird
To create a Thunderbird signature, the first step is to open the Thunderbird application on your computer. If you haven’t already installed Thunderbird, you can download it for free from the official Mozilla Thunderbird website and follow the installation instructions for your operating system.
Once Thunderbird is installed on your computer, launch the application by double-clicking on the Thunderbird icon or by searching for it in your applications folder or Start menu.
After launching Thunderbird, you will be greeted with the main interface, which displays your email inbox, folders, and other options. Take a moment to familiarize yourself with the various features and settings available in Thunderbird, as it will help you navigate the application more efficiently.
If you have already set up an email account in Thunderbird, it will be displayed on the left-hand side of the interface under the “Accounts” section. If you haven’t set up an account yet, you can do so by clicking on the “Create a new account” button and following the prompts to enter your email address, password, and other necessary information.
Once you have your email account set up in Thunderbird, you’re ready to proceed to the next step and start customizing your signature.
Remember to save any changes you make in Thunderbird so that they are applied to your account. Thunderbird provides an auto-save feature, but it’s always a good idea to manually save your settings to ensure they are preserved.
Now that you have successfully opened Thunderbird, let’s move on to the next step in creating your Thunderbird signature.
Step 2: Go to Preferences
Once you have opened Thunderbird, the next step in creating a Thunderbird signature is to navigate to the Preferences menu. This is where you can access the settings and customization options for your email accounts.
To access Preferences in Thunderbird, you can either click on the menu button (represented by three horizontal lines) in the top-right corner of the Thunderbird window and select “Options” from the drop-down menu, or you can go to the “Tools” menu and choose “Options” from there.
When you click on “Options” or “Preferences,” a new window will open with a list of categories on the left-hand side. These categories represent different aspects of Thunderbird’s settings and features that you can customize.
Look for the category labeled “Composition” or “Composition & Addressing.” This category deals with the settings related to composing new messages, including signatures.
Click on the “Composition” or “Composition & Addressing” category to expand it and reveal its subcategories. You may see options such as “General,” “Addressing,” “HTML,” and “Attachments.”
Select the subcategory labeled “Signatures” or “Signature Text.” This is where you will find the settings and customization options for your Thunderbird signatures.
By clicking on the “Signatures” or “Signature Text” subcategory, you will be able to see the options for managing your signatures, including the ability to create, edit, and delete signatures for each of your email accounts.
Once you have successfully navigated to the Preferences menu and located the Signature settings, you’re ready to move on to the next step and start adding a signature to your email account.
Remember to explore other settings and options in Thunderbird’s Preferences menu to fully customize your email experience according to your preferences.
With Preferences now accessed, let’s proceed to the next step in creating your Thunderbird signature.
Step 3: Select Account Settings
After accessing the Preferences menu in Thunderbird, the next step in creating a Thunderbird signature is to select the Account Settings for the specific email account that you want to add the signature to.
In the Preferences window, you will see a list of categories on the left-hand side. Look for the category labeled “Account Settings” or “Account Actions.” This is where you will find the settings for each of your email accounts.
Click on the “Account Settings” or “Account Actions” category to expand it and reveal the list of email accounts that you have set up in Thunderbird.
Select the email account that you want to add the signature to by clicking on it. This will display the specific settings and options for that particular account.
In the Account Settings for that email account, you will find various tabs or sections such as “Server Settings,” “Outgoing Server (SMTP),” and “Copies & Folders.” Look for the tab or section labeled “Signature” or “Composition & Addressing” depending on your version of Thunderbird.
Click on the “Signature” or “Composition & Addressing” tab or section to access the signature settings for that email account.
Within the Signature settings, you will see options to enable a signature, create a new signature, and select an existing signature. You can also choose whether to place the signature above or below the quoted text when replying or forwarding messages.
If you have already created a signature before, you can select it from the drop-down menu. Otherwise, you can click on the “New” button to create a new signature.
By selecting the Account Settings for your email account, you are now ready to customize and add a signature to your Thunderbird email account.
Remember to repeat this step for each email account that you want to add a signature to if you have multiple accounts set up in Thunderbird.
With the Account Settings selected, let’s move on to the next step of creating your Thunderbird signature.
Step 4: Click on the Email Account You Want to Add a Signature to
After accessing the Account Settings in Thunderbird, the next step in creating a Thunderbird signature is to identify and select the specific email account you want to add the signature to.
In the Account Settings window, you will see a list of your email accounts on the left-hand side. Each account will be listed separately with its name or email address.
Take a moment to review the list of email accounts and identify the one for which you want to create or modify the signature.
Click on the email account you want to add a signature to. This will bring up the specific settings and customization options for that email account.
When you click on the email account, you will see various tabs or sections related to different settings, such as “Server Settings,” “Outgoing Server (SMTP),” and “Copies & Folders.”
Look for the tab or section labeled “Signature” or “Composition & Addressing” within the settings for your selected email account.
Clicking on the “Signature” or “Composition & Addressing” tab or section will allow you to access and modify the signature settings for that particular email account.
Within the signature settings, you will have options to create a new signature, select an existing signature, and choose where the signature should be placed in composed messages and replied or forwarded messages.
If you have already created a signature for this account, you can select it from the drop-down menu. Otherwise, you can click on the “New” button to create a new signature specific to this email account.
By clicking on the email account you want to add a signature to, you are now ready to start customizing and adding the signature to your Thunderbird email account.
Remember to repeat this step for each email account you want to add a signature to, if you have multiple accounts set up in Thunderbird.
With the email account selected, let’s move on to the next step of creating your Thunderbird signature.
Step 5: Scroll down to the Signature Section
After selecting the specific email account in Thunderbird that you want to add a signature to, the next step in creating a Thunderbird signature is to scroll down to the Signature section within the account settings.
Within the account settings for the selected email account, you will find different tabs or sections related to various settings. Look for the tab or section labeled “Signature” or “Composition & Addressing” depending on your Thunderbird version.
Scroll down within the account settings until you reach the Signature section. This is where you can customize and manage the signature for the selected email account.
In some versions of Thunderbird, the Signature section may be visible without scrolling, while in others, you may need to scroll down the settings window to find it. Keep scrolling until you see the Signature options.
Within the Signature section, you will find options to enable a signature, create a new signature, select an existing signature, and choose the placement of the signature in composed messages and replied or forwarded messages.
If you have already created a signature for this email account, you can select it from the drop-down menu within the Signature section. To create a new signature, click on the “New” button and follow the prompts to enter your desired signature text and formatting.
Take some time to explore the options within the Signature section to customize your signature according to your preferences. You can format the signature using HTML to add images, links, and other styling elements to make it more visually appealing.
Keep in mind that Thunderbird allows you to have different signatures for different email accounts, so you can personalize each one based on its purpose or audience.
Once you have scrolled down to the Signature section and familiarized yourself with the available options, you are ready to proceed with creating and customizing your Thunderbird signature.
With the Signature section in view, let’s move on to the next step in creating your Thunderbird signature.
Step 6: Create Your Signature
Once you have reached the Signature section within the account settings of your selected email account in Thunderbird, it’s time to create your signature.
Click on the “New” button within the Signature section to create a new signature or select an existing signature from the drop-down menu if you have previously created one.
When creating a new signature, a text box will appear where you can enter the desired content for your signature. This is where you can include your name, job title, contact information, and any other details you want to include.
You can type directly into the text box to enter your signature text. Thunderbird also allows you to use HTML formatting to enhance your signature with images, links, and other styling elements. If you want to use HTML formatting, make sure to enable the HTML editor, usually by clicking on the appropriate button or selecting the HTML option in the signature settings.
To add a more personalized touch to your signature, you can consider including a quote, a tagline, or a call-to-action relevant to your profession or business. This can help make your signature more engaging and memorable for the recipients of your emails.
While creating your signature, ensure that it is concise and professional. Avoid making it too long or cluttered, as this may overwhelm the recipients. Keep in mind that an effective signature is clear, informative, and visually appealing.
As you create your signature, you can preview how it will appear by sending a test email to yourself or a trusted recipient. This allows you to see how the signature renders within the email and make any necessary adjustments before finalizing it.
If desired, you can also create multiple signatures for different occasions or purposes. For example, you might have one signature for business emails and another for personal emails. Thunderbird allows you to manage and switch between different signatures easily.
Once you have crafted your signature to your liking, you are ready to move on to the next step and further customize your Thunderbird signature.
With your signature created, let’s proceed to the next step of refining and customizing your Thunderbird signature.
Step 7: Customize Your Signature
After creating your Thunderbird signature, the next step is to customize it to make it more visually appealing and aligned with your personal or professional branding.
In the Signature section of your email account settings, you will find various customization options that allow you to enhance your signature. Here are some ways you can customize your Thunderbird signature:
1. Formatting: Use the formatting options available in Thunderbird to apply font styles, colors, and sizes to different parts of your signature. This helps in highlighting important information and creating visual interest.
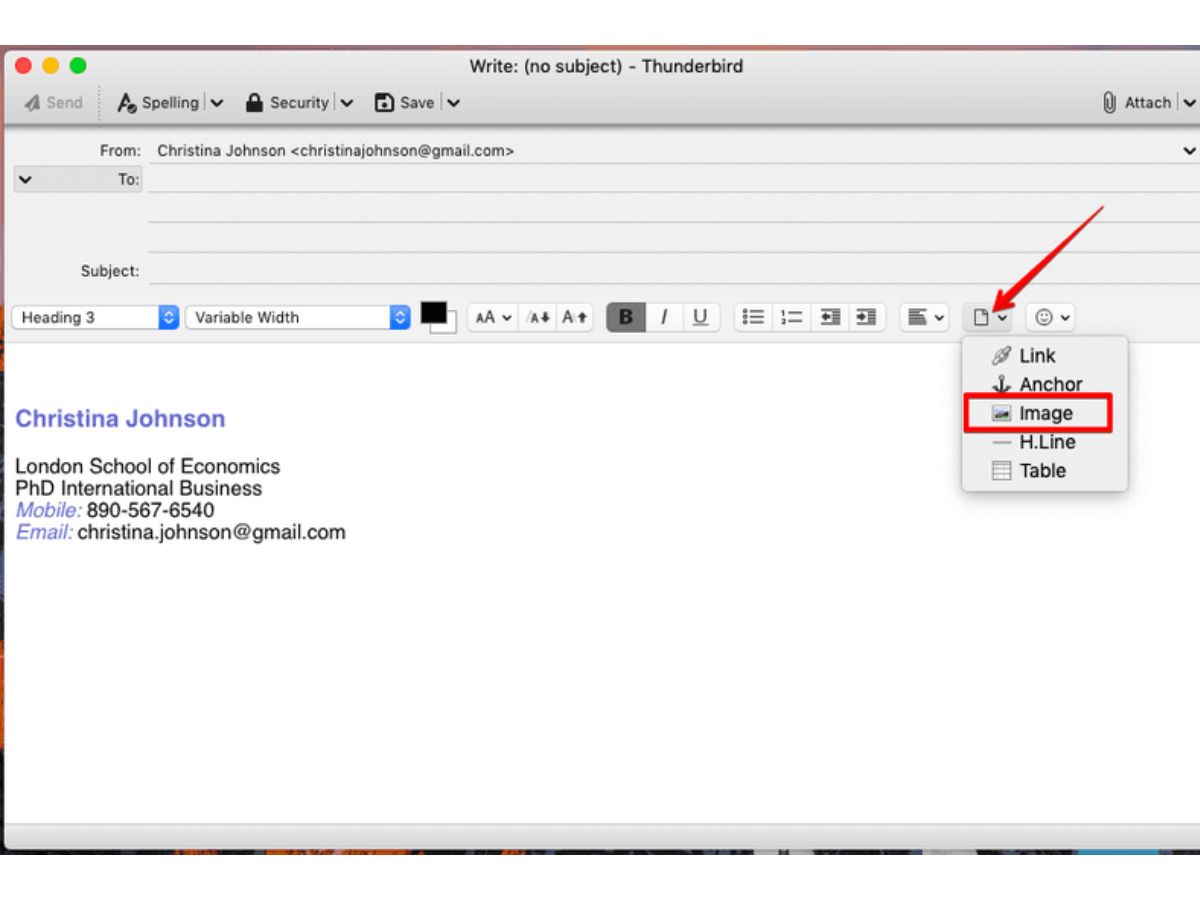
2. Images: If you want to include your company logo, a profile picture, or any other relevant images in your signature, Thunderbird allows you to easily add them. Consider using images that are optimized for email to ensure they load quickly for your recipients.
3. Links: Incorporating links in your signature can be useful for directing recipients to your website, social media profiles, or any other online resources. Use the hyperlink tool in the editor to insert clickable links.
4. Social Media Icons: To promote your social media presence, consider adding small icons or buttons linked to your social media profiles. This allows recipients to easily connect and engage with you on various platforms.
5. Legal Disclaimers: If you need to include legal disclaimers or compliance statements in your emails, you can add them as part of your signature. This ensures that every outgoing email includes the necessary legal information.
6. Consistency: It’s important to maintain consistency across all your email communications. Ensure that your signature aligns with your overall branding, using consistent colors, fonts, and visual elements.
7. Proofread: Before finalizing your signature, make sure to proofread the content to ensure there are no spelling or grammatical errors. Additionally, double-check all links to ensure they are working correctly.
Remember, the goal of customizing your Thunderbird signature is to reflect your unique style, professionalism, and brand identity. Take the time to experiment with different customizations to find the perfect balance that suits your preferences and objectives.
Once you have customized your signature to your satisfaction, you are ready to test it and ensure it appears as desired in your outgoing emails.
With your signature customized, let’s proceed to the next step of testing your Thunderbird signature.
Step 8: Test Your Signature
After customizing your Thunderbird signature, it is essential to test it to ensure that it appears correctly in your outgoing emails. Testing allows you to identify any formatting issues, broken links, or other elements that may need adjustment.
To test your signature in Thunderbird, follow these steps:
1. Compose a Test Email: Open a new email composition window and address it to yourself or a trusted recipient. This allows you to send the test email to see how your signature appears in the actual email client.
2. Check Signature Placement: In the test email, verify that the signature appears in the correct location (above or below the quoted text) as specified in the account settings. Ensure that it is visually separated from the body of the email and does not interfere with the readability of the message.
3. Review Formatting: Pay attention to the formatting of your signature. Check if the fonts, colors, and sizes of text are consistent and display as intended. Verify that any images or social media icons are loading correctly and are not distorted or stretched.
4. Test Hyperlinks: Click on the links within your signature to ensure they are functioning correctly. Verify that they open the intended webpage or resource in a web browser when clicked.
5. Mobile-Friendly Testing: Test your signature on different devices, including smartphones and tablets, to ensure that it is responsive and displays properly on smaller screens. Check if any elements are overlapping or causing layout issues on mobile devices.
6. Review Spelling and Grammar: carefully inspect the content of your signature for any spelling or grammatical errors. Proofread the text to ensure that it is free from mistakes and reads smoothly.
7. Seek Feedback: If possible, ask a colleague or friend to review the test email and provide feedback on the appearance and readability of your signature. Fresh eyes may catch any issues you might have overlooked.
8. Make Adjustments: Based on the results of your testing and feedback, make any necessary adjustments to your signature. This might include fixing formatting issues, correcting links, or refining the wording in your signature.
By thoroughly testing your Thunderbird signature, you can ensure that it presents a polished and professional image to your recipients. A well-tested signature helps to establish credibility and enhances the overall effectiveness of your email communications.
With your signature successfully tested, let’s proceed to the next step of saving your Thunderbird signature.
Step 9: Save Your Signature
After customizing and testing your Thunderbird signature to your satisfaction, the next step is to save it so that it becomes the default signature for your selected email account. Saving your signature ensures that it will be automatically applied to every outgoing email from that account.
To save your signature in Thunderbird, follow these steps:
1. Review Signature Settings: Double-check the signature settings in the Account Settings section for your email account. Verify that the correct signature is selected and configured to be applied to new messages, replies, and forwarded emails, as per your preference.
2. Confirm Changes: If you made any final adjustments to your signature after testing, ensure that those changes are incorporated in the signature settings. This ensures that you save the most up-to-date version of your signature.
3. Click OK or Save: Look for the “OK” or “Save” button within the Account Settings section. This will allow you to save the changes you made to the signature settings for your email account.
4. Verify Signature Presence: Close the Account Settings window and go back to the main Thunderbird interface. Compose a new email from the selected email account to confirm that your saved signature is being automatically added to the email.
5. Repeat the Process: If you have multiple email accounts in Thunderbird that require a signature, repeat the previous steps for each account. This ensures that each account has its own customized and saved signature.
6. Update as Needed: Remember that you can always revisit the signature settings in the Account Settings section to make further modifications or create new signatures. This flexibility allows you to adapt your signature to changing needs or preferences.
By saving your Thunderbird signature, you eliminate the need to manually add your signature to each outgoing email. Thunderbird will automatically append your saved signature to every email you send from the associated email account, saving you time and effort.
With your signature successfully saved, let’s move on to the final step, which is optional but recommended for users with multiple email accounts.
Step 10: Repeat for Other Email Accounts, If Desired
If you have multiple email accounts set up in Thunderbird and you wish to add signatures to those accounts as well, you can repeat the previous steps for each account. This allows you to have a tailored signature for each email account you use in Thunderbird.
To repeat the process for other email accounts, follow these steps:
1. Access Account Settings: Go to the Thunderbird main interface and click on the menu button (represented by three horizontal lines) in the top-right corner. From the drop-down menu, select “Options” or “Preferences” to open the Preferences window.
2. Select Other Email Account: Locate the email account for which you want to add a signature from the list of categories on the left-hand side of the Preferences window. Click on the account to expand its settings.
3. Navigate to Signature: Within the account settings, find the tab or section labeled “Signature” or “Composition & Addressing” depending on your Thunderbird version. Click on it to access the signature settings for that specific email account.
4. Create and Customize Signature: Follow the same steps as before starting from Step 6 to create and customize a signature for the selected email account. Customize it according to your preferences and branding, and test it to ensure it appears correctly in outgoing emails.
5. Save the Signature: Once you are satisfied with the signature for the email account, save the changes in the signature settings for that account. Check that the correct signature is selected and configured to be applied to new messages, replies, and forwarded emails.
6. Repeat for Additional Email Accounts: If you have more email accounts that require a signature, go back to Step 2 and repeat the process for each account.
By repeating the steps for other email accounts, you ensure that each account has its own unique signature that reflects the appropriate information and branding.
This step is optional, and if you don’t need a signature for certain email accounts, you can simply skip this step and proceed with using Thunderbird without a signature for those accounts.
With the process to create signatures for other email accounts complete, you have successfully customized signatures for your desired email accounts in Thunderbird.