
Overview
In today’s digital age, email communication remains an indispensable tool for individuals and businesses alike. Whether you need to send important updates, share newsletters, or inform a group of contacts about an upcoming event, having a well-organized mailing list is crucial. Outlook, a widely used email client, offers an easy and efficient way to create and manage mailing lists. By following a few simple steps, you can gather your contacts into a single group and effortlessly send emails to everyone on the list.
In this article, we will walk you through the process of creating a mailing list in Outlook. We will cover how to open Outlook’s People section, create a new contact group, add contacts to the group, edit or remove contacts from the group, use the mailing list in an email, and effectively manage the list over time.
Whether you’re an individual who wants to keep friends and family updated or a business professional in charge of communicating with clients or colleagues, this guide will equip you with the knowledge to efficiently create and utilize a mailing list in Outlook.
So, let’s dive into the step-by-step process of setting up and managing your mailing list in Outlook, ensuring your email communication is organized, efficient, and effective.
Step 1: Open Outlook and go to the People section
The first step in creating a mailing list in Outlook is to open the application and navigate to the People section. This is where you can manage your contacts and create groups for your mailing list.
To begin, open Outlook on your computer or device. Once the application is launched, you will typically see different sections such as Mail, Calendar, People, and so on. Click on the “People” section to access your contacts.
If you cannot find the People section immediately, you may need to click on the “…” (ellipsis) icon or navigate through different tabs or menus to locate it. Outlook’s interface might vary slightly depending on the version you are using, but the steps should be similar.
Once you are in the People section, you’ll be able to see all your contacts and manage them. This includes creating new contact groups, adding or removing contacts from existing groups, and organizing your contacts for easier communication.
The ability to create and manage groups in Outlook’s People section is a powerful feature that allows you to streamline your email communication and save time by sending emails to multiple contacts at once. Whether you need to send invitations, announcements, or general updates, having a mailing list in Outlook provides a convenient way to reach out to specific groups of people.
Now that you know how to navigate to the People section in Outlook, you’re ready to move on to the next step: creating a new contact group. This will allow you to group your contacts together and facilitate effortless communication with your mailing list. Let’s proceed to step 2.
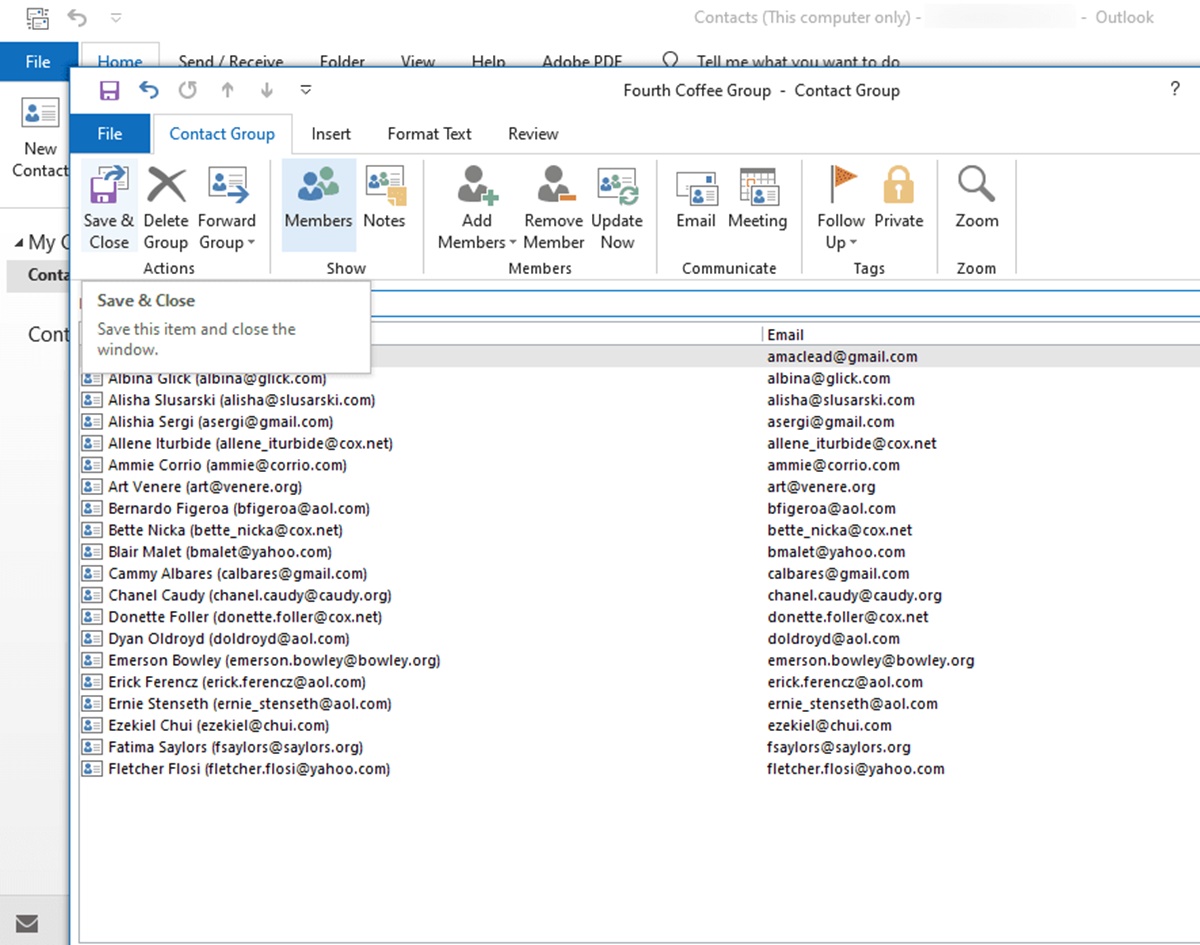
Step 2: Create a new contact group
After opening Outlook and accessing the People section, the next step is to create a new contact group for your mailing list. Contact groups allow you to gather specific contacts together under a single label, making it easier to send emails to the entire group at once.
To create a new contact group in Outlook, follow the steps below:
- Click on the “New Contact Group” or “New Group” button, usually located at the top of the contacts pane.
- A new window will appear, prompting you to provide a name for your group. Enter a descriptive name that will help you easily identify the group. For example, “Friends,” “Colleagues,” or “Family.”
- Add members to your contact group by clicking on the “Add Members” button. You can choose to add members from your existing contacts, or you can manually enter their email addresses.
- If you decide to add members from your existing contacts, a window will appear showing your contacts list. Select the desired contacts by checking the box next to their names, and then click the “Members” button to add them to the group. You can add multiple contacts at once by holding down the Ctrl key (or Command key on Mac) while selecting.
- If you prefer to manually enter email addresses, click on the “Add Email” button and type in the email addresses of the contacts you want to add. Separate multiple email addresses with a semicolon (;).
- Once you have added all the desired members to the group, click the “OK” button to create the contact group.
After following these steps, you will have successfully created a new contact group in Outlook. The group will be listed in your contacts alongside your individual contacts. You can easily identify the group by its name.
Having a dedicated contact group for your mailing list allows you to efficiently manage and send emails to a specific set of contacts. This eliminates the need to manually enter each individual email address whenever you want to communicate with the group.
Now that you have created a contact group, it’s time to move on to the next step: adding contacts to the group.
Step 3: Add contacts to the group
With the contact group created, it’s time to add contacts to the group. This step is crucial as it ensures that all the relevant individuals will receive your emails when you use the mailing list you have created. Here’s how you can add contacts to the group in Outlook:
- Open the People section in Outlook, where you can view your contacts and contact groups.
- Locate the contact group that you want to add contacts to and select it by clicking on it.
- A window will appear displaying the details of the contact group. Look for the “Add Members” button on the toolbar at the top, and click on it.
- From the dropdown menu, choose whether you want to add members from Outlook contacts, Address Book, or create new contacts.
- If you select “Outlook Contacts,” a new window will open displaying your list of contacts. You can select one or multiple contacts by holding down the Ctrl key (or Command key on Mac) while clicking on the contacts.
- If you choose “Address Book,” a window will open showing the available contact lists in your Outlook. Select the desired contact list and choose the contacts you want to add.
- If you want to create new contacts, choose the option “New E-mail Contact” or “New Contact.” Fill in the necessary details, such as name and email address, and click “Save & Close.”
- Once you have selected the contacts you want to add, click the “Members” button to add them to the contact group.
- Finally, click the “OK” button to save the changes and add the selected contacts to the group.
- Repeat this process whenever you need to add new contacts to the group or update existing members.
Keep in mind that adding contacts to the contact group ensures that their email addresses are readily available when you want to send an email to the entire group. It simplifies the process by eliminating the need to manually enter each recipient’s email address every time you compose an email. Instead, you can simply select the contact group as the recipient, and your email will be automatically sent to all the members.
Now that you have successfully added contacts to your contact group, let’s move on to the next step: editing or removing contacts from the group.
Step 4: Edit or remove contacts from the group
Once you have added contacts to the contact group, you may need to edit or remove certain contacts from the group. Whether you want to update contact information or remove contacts who are no longer relevant, Outlook provides simple ways to make these changes. Here’s how:
- Open Outlook and go to the People section where your contact groups are listed.
- Select the contact group that you want to edit or remove contacts from.
- A window will appear with the details of the contact group displayed.
- Click on the “Edit” button or the pencil icon, usually located in the toolbar at the top.
- A new window will open showing the members of the contact group.
- To edit a contact’s information, simply click on the contact’s name and make the necessary changes in the fields provided. Once you are done editing, click “Save & Close.”
- To remove a contact from the group, select the contact by clicking on the check box next to their name. Then, click on the “Remove” button or the trash can icon.
- Confirm the removal by clicking “Yes” or “OK” when prompted.
- Continue editing or removing contacts as needed.
- Close the contact group window once you are finished making changes.
By editing or removing contacts from the contact group, you can ensure that the group remains up to date and relevant. This is particularly important when contact information changes or when you want to streamline your communication by excluding certain contacts from receiving group emails.
It’s worth noting that editing or removing contacts from the contact group does not delete the contacts from your overall contacts list in Outlook. It only affects their membership in the specific contact group. The contacts will still be available for individual communication or for membership in other contact groups.
Now that you know how to edit or remove contacts from your contact group, let’s move on to the next step: using the mailing list in an email.
Step 5: Use the mailing list in an email
Now that you have your contact group set up and members added, you can easily use your mailing list in an email within Outlook. This feature allows you to efficiently send messages to all the contacts in your contact group without having to manually enter each recipient’s email address. Follow these steps to use the mailing list in an email:
- Open Outlook and start composing a new email.
- In the “To” field, begin typing the name of your contact group. As you type, Outlook will automatically suggest the contact group.
- Select the contact group from the suggestions, and Outlook will populate the “To” field with the email addresses of all the contacts in the group.
- Continue composing your email, adding a subject and message as needed.
- Once you’re ready to send the email, click the “Send” button or use the appropriate keyboard shortcut.
By using the mailing list in an email, you ensure that your message will be sent to all the members of the contact group. This eliminates the need to manually enter each individual’s email address, saving you time and reducing the risk of missing someone.
It’s important to keep in mind that when using the mailing list, each recipient will see the email addresses of the other recipients. This may not be desirable in situations where privacy is a concern. To address this, you can use the “Bcc” field instead of the “To” field when composing the email. This will hide the email addresses from other recipients.
Now that you know how to use your mailing list in an email, let’s move on to step 6: sending an email to the mailing list.
Step 6: Sending an email to the mailing list
With your mailing list set up and ready to use in Outlook, it’s time to send an email to the entire group. By following these steps, you can ensure that your message reaches all the contacts in your contact group:
- Open Outlook on your computer or device and click on the “New Email” button to start composing a new email.
- In the “To” field, start typing the name of your contact group. Outlook will suggest the contact group as you type.
- Select the contact group from the suggestions, and Outlook will automatically populate the “To” field with the email addresses of all the contacts in the group.
- Continue composing your email, adding a subject and a message that is relevant to all the recipients in the contact group.
- Review your email to ensure that it conveys the intended message and is free from any errors.
- When you are satisfied with your email, click the “Send” button to send it to all the members of the contact group.
Sending an email to the mailing list allows you to communicate with all the contacts in your contact group at once. This saves you time and effort by not having to individually send the same message to each recipient.
It’s important to note that when using the mailing list, each recipient will see the email addresses of the other recipients. If you want to maintain the privacy of each contact’s email address, consider using the “Bcc” field instead of the “To” field. This will hide the email addresses from other recipients.
Additionally, make sure to craft your email in a way that is relevant and applicable to all the recipients in the contact group. Avoid including personal or sensitive information that may not be appropriate for everyone to see.
Now that you’ve successfully sent an email to your mailing list, let’s move on to step 7: managing the mailing list over time.
Step 7: Managing the mailing list over time
Managing your mailing list in Outlook is an ongoing process to ensure that it remains up to date and effective. By regularly reviewing and maintaining your contact group, you can streamline your communication and keep your list relevant. Here are some tips for managing your mailing list over time:
- Regularly review your contact group: Periodically go through your contact group to see if there are any contacts that need to be added, removed, or updated. This ensures that your mailing list remains accurate and reflects the current state of your contacts.
- Add new contacts: As you meet new people or gather more contacts, add them to your contact group to include them in future communications. This way, you can keep your list fresh and expand your network.
- Remove inactive or irrelevant contacts: If there are contacts in your group who are no longer relevant or have become inactive, consider removing them from the group. Keeping your list focused on engaged and responsive contacts will help improve the effectiveness of your communications.
- Update contact information: If any contact’s information changes, such as their email address or phone number, make sure to update it in your contact group. This ensures that your emails reach the intended recipients and helps maintain accurate contact details.
- Create additional contact groups: Depending on your needs, you may want to create additional contact groups to segment your contacts further. For example, you could have separate groups for different projects or interests, allowing for more targeted communication.
- Regularly backup your contact list: It’s always a good practice to regularly back up your contact list in Outlook. This ensures that you have a copy of your contacts in case of any unexpected data loss or system issues.
By consistently managing your mailing list, you can ensure that your communications are efficient and targeted. Regularly reviewing and updating your contact group helps maintain its relevance and effectiveness over time.
Remember, effective communication is essential for both personal and professional purposes. By keeping your mailing list organized, you can enhance your email communication and make sure your messages reach the right audience.
With these steps in mind, you now have the knowledge to create, use, and manage a mailing list in Outlook. Whether you’re sending updates to friends and family or communicating with colleagues and clients, Outlook’s contact groups offer a convenient way to streamline your email communication and reach a specific group of recipients.