
What is a Hanging Indent?
A hanging indent is a formatting style commonly used in academic papers, essays, and other types of written documents. It refers to a type of paragraph indentation where the first line of a paragraph is aligned with the left margin, while the subsequent lines are indented inward. This creates a visually appealing and organized appearance for your text.
The hanging indent is particularly useful when citing sources in a bibliography or creating a works cited page, as it helps to clearly distinguish between different entries or citations. It is also commonly used when writing research papers, summaries, or any content that requires a structured and professional layout.
By using a hanging indent, you can enhance the readability of your document and make it easier for readers to follow the flow of information. It provides a clear visual cue that separates the main text from additional details or supporting evidence. Additionally, a hanging indent helps to conserve space, especially when working with lengthy lists or paragraphs.
Creating a hanging indent in Microsoft Word is a simple and efficient way to format your document. It allows you to maintain consistency and professionalism throughout your writing, ensuring that your work is well-organized and visually appealing. In the following sections, we will guide you through the step-by-step process of creating a hanging indent in Word.
Step 1: Open your document in Microsoft Word
Before we begin formatting your text with a hanging indent, you’ll need to open your document in Microsoft Word. If you don’t already have Word installed on your computer, you can easily download it from the official Microsoft website or use any other word processing software that supports hanging indent formatting.
To open your document in Microsoft Word, follow these simple steps:
- Launch Microsoft Word from your desktop or start menu. The Word application icon usually resembles a white “W” on a blue background.
- Click on the “File” tab located in the top-left corner of the screen. This will open the File menu.
- In the File menu, select the appropriate option to open your desired document. You can choose to open a recent document from the list of recent files, browse your computer to find the document, or open a new blank document if you haven’t started writing yet.
- Once you’ve selected your document, click the “Open” button. Your document will now be displayed in the Microsoft Word application window.
Now that you have your document open in Microsoft Word, you’re ready to proceed with formatting the text using a hanging indent. Remember to save your document periodically to ensure you don’t lose any changes or updates made throughout the process.
Step 2: Select the text you want to format
After opening your document in Microsoft Word, the next step is to select the text that you want to apply the hanging indent formatting to. Whether it’s a paragraph, a block of text, or a list, follow these steps to select the desired content:
- Click and hold the left mouse button at the beginning of the text you want to format.
- Drag the mouse cursor over the text, highlighting it as you go. Alternatively, you can select multiple paragraphs by clicking at the beginning of the first paragraph, holding down the Shift key, and then clicking at the end of the last paragraph.
- Release the mouse button to finalize the selection. The selected text should now be highlighted or shaded to indicate that it has been chosen.
If you’re working with a longer document, it might be easier to select all the text at once by pressing Ctrl + A on your keyboard. This keyboard shortcut will select the entire document, allowing you to apply the hanging indent formatting to the entire text.
Remember, the hanging indent is typically applied to block quotes, citations, references, or any other form of indented text that you want to stand out from the rest of the content. So, make sure to accurately select the text you want to format before proceeding to the next step.
Step 3: Go to the “Paragraph” section in the toolbar
Once you have selected the text you want to format with a hanging indent, it’s time to navigate to the “Paragraph” section in the toolbar. The “Paragraph” section contains various formatting options that allow you to customize the indentation and alignment of your selected text.
Follow these steps to locate the “Paragraph” section in Microsoft Word:
- Look for the toolbar at the top of the Microsoft Word application window. The toolbar contains several tabs, such as “Home,” “Insert,” “Page Layout,” and more.
- Click on the “Home” tab, which is usually the default tab when you open a new document.
- Within the “Home” tab, locate the “Paragraph” section. It is usually situated towards the right side of the toolbar, next to other formatting options like font, font size, and text alignment.
When you find the “Paragraph” section, you’ll notice a variety of formatting tools and settings at your disposal. These tools allow you to modify the indentation, spacing, alignment, and other aspects of your selected text. It is within this section that you’ll find the option to apply the hanging indent formatting to your chosen text.
Once you have successfully located the “Paragraph” section, you’re ready to proceed to the next step and access the specific hanging indent formatting settings.
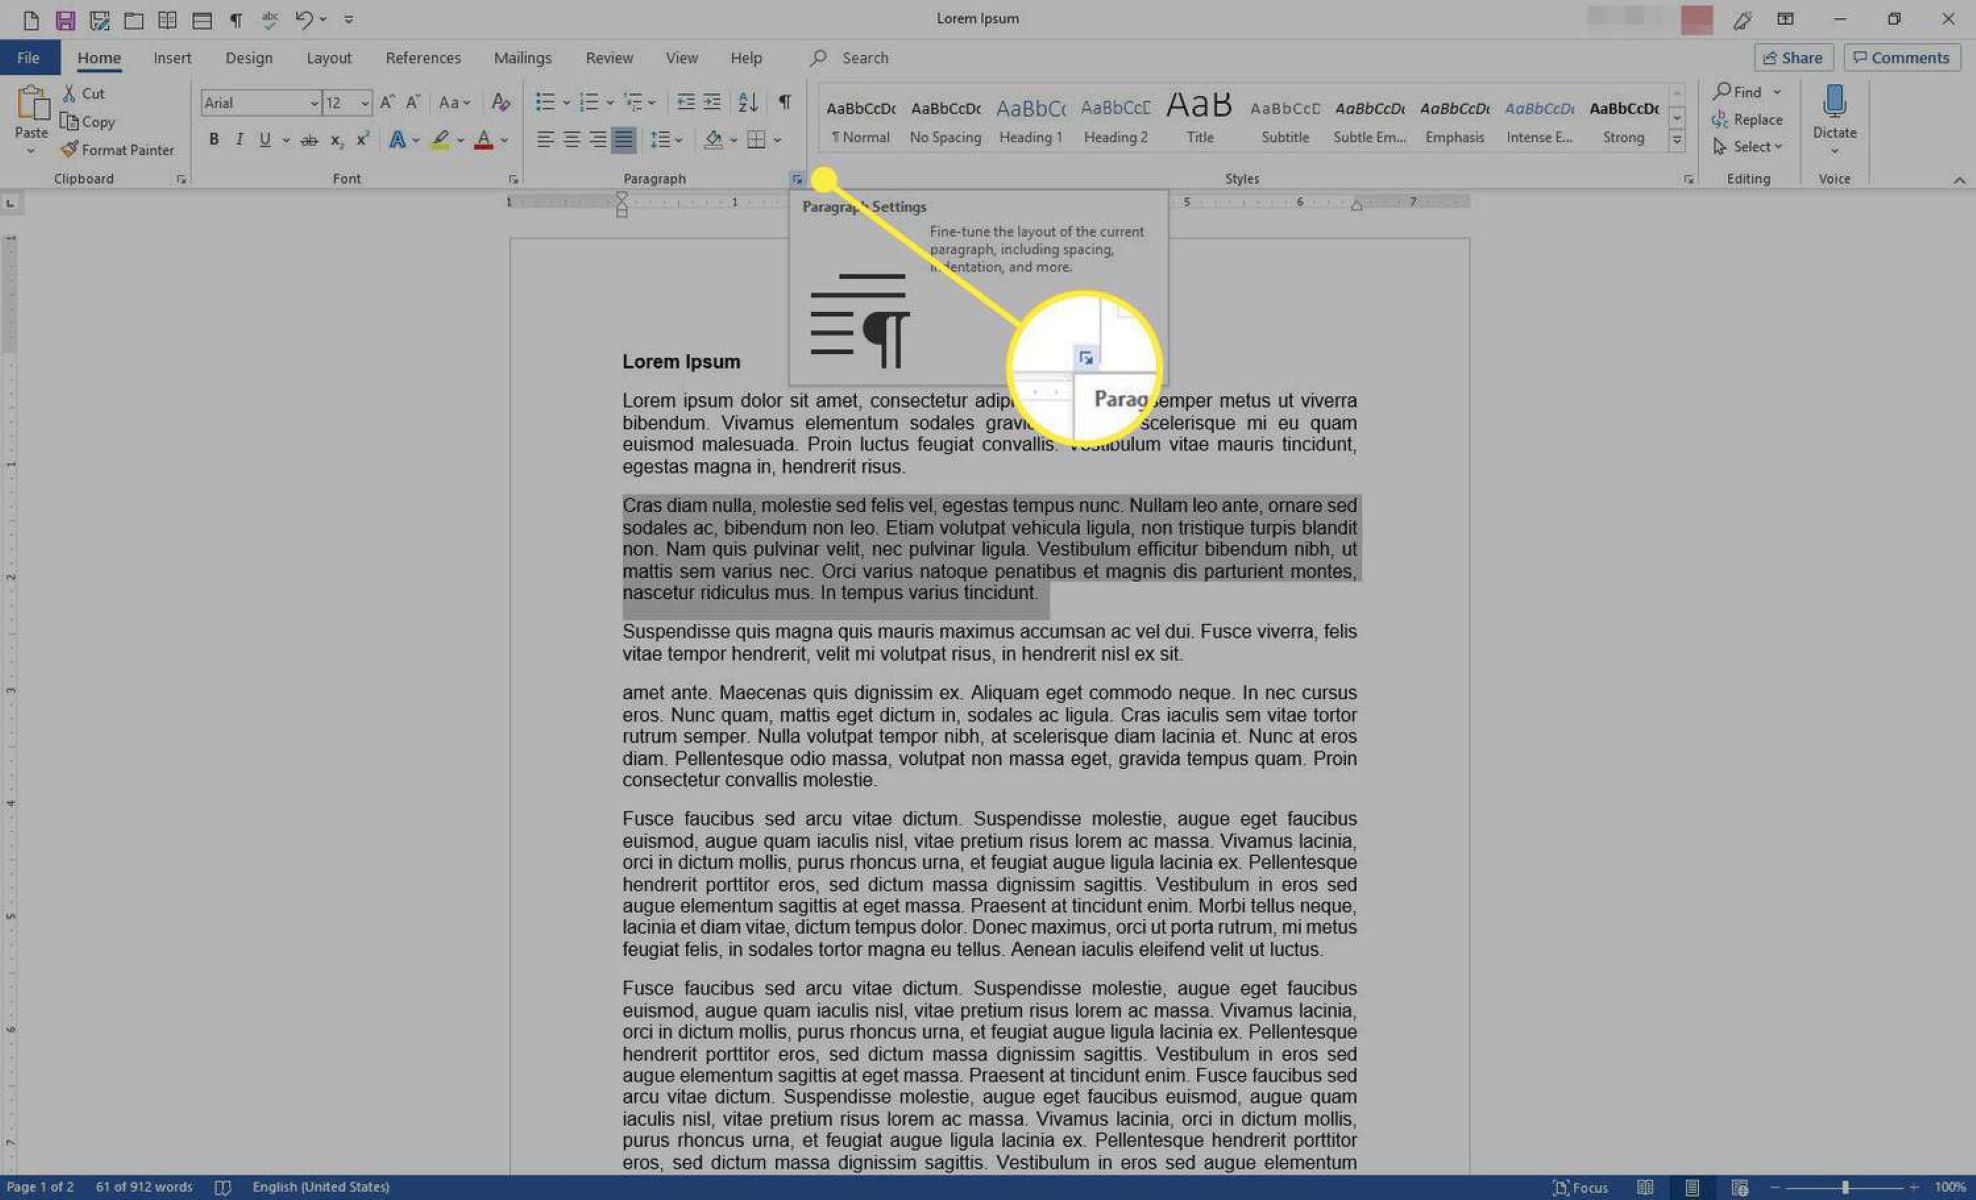
Step 4: Click on the small arrow in the bottom right corner to open the Paragraph settings
Now that you have arrived at the “Paragraph” section in the toolbar, it’s time to access the specific settings that will allow you to apply the hanging indent formatting. To do this, you will need to click on a small arrow that is located in the bottom right corner of the “Paragraph” section. This arrow indicates that there are additional options available.
Follow these steps to open the Paragraph settings:
- Within the “Paragraph” section of the toolbar, locate the small arrow icon. It is typically located in the bottom right corner, and when you hover over it, you’ll see a tooltip indicating that it opens the “Paragraph” settings.
- Click on the small arrow icon to open the Paragraph settings dialog box. This will launch a separate window or panel that contains various formatting options for paragraphs.
By clicking on the small arrow, you gain access to additional options that go beyond what is visible in the toolbar. These settings allow you to fine-tune the formatting of your selected text, including the hanging indent.
Once you have successfully opened the Paragraph settings dialog box, you are ready to proceed to the next step, where you will find the specific option to enable the hanging indent for your selected text.
Step 5: Find the “Indentation” section in the dialog box
After opening the Paragraph settings dialog box by clicking on the small arrow in the bottom right corner of the “Paragraph” section, the next step is to locate the “Indentation” section. This section contains the specific settings that allow you to apply the hanging indent formatting to your selected text.
Follow these steps to find the “Indentation” section in the dialog box:
- Once the Paragraph settings dialog box opens, take a look at the different tabs or sections available within the dialog box. These tabs usually include “Indents and Spacing,” “Alignment,” “Line and Page Breaks,” and more.
- Click on the tab or section that is labeled “Indents and Spacing” or something similar. This is where you will find the specific settings related to indentation.
- Within the “Indents and Spacing” section, look for the subsection or group of settings dedicated to indentation. This subsection may be labeled as “Indentation,” “Special Indent,” or something similar.
Once you have located the “Indentation” section within the Paragraph settings dialog box, you’re one step closer to applying the hanging indent to your selected text. In the next step, you will find the specific option to enable the hanging indent formatting and adjust its size to suit your needs.
Step 6: Under the “Special” dropdown menu, select “Hanging”
After locating the “Indentation” section within the Paragraph settings dialog box, the next step is to choose the specific type of indentation that you want to apply to your selected text. In this case, you will be selecting the “Hanging” option from the “Special” dropdown menu.
Follow these steps to select the “Hanging” option:
- Within the “Indentation” section of the Paragraph settings dialog box, look for a dropdown menu labeled “Special” or something similar. This dropdown menu typically allows you to choose from various indentation options.
- Click on the “Special” dropdown menu to expand the available options.
- From the dropdown menu, select the option labeled “Hanging.”
By selecting the “Hanging” option, you are instructing Word to apply the hanging indent formatting to your selected text. This means that the first line of each paragraph will start flush with the left margin, while the subsequent lines will be indented inward.
Keep in mind that the exact location and appearance of the “Special” dropdown menu may vary slightly depending on the version of Microsoft Word you are using. However, in most versions, the “Hanging” option can be found under the “Special” dropdown menu within the “Indentation” section of the Paragraph settings dialog box.
With the “Hanging” option selected, you are now ready to proceed to the next step, where you will have the opportunity to adjust the size of the hanging indent.
Step 7: Adjust the size of the hanging indent
Now that you have selected the “Hanging” option from the “Special” dropdown menu in the Paragraph settings dialog box, the next step is to adjust the size of the hanging indent. This step allows you to control how far the lines of text are indented inward from the left margin.
Follow these steps to adjust the size of the hanging indent:
- Within the “Indentation” section of the Paragraph settings dialog box, locate the field or option that allows you to specify the size or measurement of the hanging indent. This field is often labeled as “By,” “Indentation,” or something similar.
- Enter the desired value or measurement in the field. This value represents the distance by which the subsequent lines of text will be indented inward.
- You can use either centimeters (cm), inches (in), millimeters (mm), or another unit of measurement, depending on your preference and the requirements of your document.
Adjusting the size of the hanging indent gives you control over the appearance and indentation of the subsequent lines of text in your selected paragraphs. You can increase or decrease the value to find the perfect balance between readability and aesthetics.
It’s important to note that the specific location and labeling of the field for adjusting the size of the hanging indent may differ slightly based on the version of Microsoft Word you are using. However, in most versions, this field can be found within the “Indentation” section of the Paragraph settings dialog box.
Once you have adjusted the size of the hanging indent to your liking, you’re ready to move on to the next step and apply the hanging indent formatting to your selected text.
Step 8: Click “OK” to apply the hanging indent to your text
After adjusting the size of the hanging indent in the Paragraph settings dialog box, you are now ready to apply the hanging indent formatting to your selected text. To do this, you simply need to click the “OK” button within the dialog box.
Follow these steps to apply the hanging indent:
- Within the Paragraph settings dialog box, locate the “OK” button. This button is typically located towards the bottom-right corner of the dialog box.
- Click the “OK” button to confirm your formatting settings and close the dialog box.
By clicking “OK,” you are instructing Microsoft Word to apply the hanging indent formatting to the selected text according to the specifications you set in the Paragraph settings.
After clicking “OK,” you will notice that the lines of text in your selected paragraphs are now formatted with a hanging indent. The first line will remain flush with the left margin, while the subsequent lines will be indented inward, creating a visually appealing and organized layout.
It is important to remember that the hanging indent formatting will be applied to the selected text only. If you want to apply the hanging indent to multiple paragraphs or sections in your document, you will need to repeat Steps 2 to 8 for each desired selection.
With the hanging indent successfully applied to your selected text, you’re ready to proceed to the next step and review the hanging indent in your document.
Step 9: Review the hanging indent in your document
After applying the hanging indent formatting to your selected text, it’s important to review your document to ensure that the indentation appears as desired. This step allows you to confirm that the hanging indent is visually consistent and enhances the readability and organization of your content.
Follow these steps to effectively review the hanging indent in your document:
- Scroll through your document to locate the paragraphs or sections where you applied the hanging indent formatting.
- Observe the indentation of the selected text. The first line of each paragraph should be aligned with the left margin, while the subsequent lines should be indented inward. The indentation should be consistent throughout your document.
- Inspect the spacing and alignment of the hanging indent. Ensure that there is sufficient space between paragraphs and that the text remains visually appealing and easy to read.
As you review the hanging indent in your document, make any necessary adjustments or modifications to ensure that it aligns with your formatting preferences and the requirements of your document.
If you notice any inconsistencies or issues with the hanging indent, you can easily modify it by selecting the text again and following the steps outlined in the previous sections.
By carefully reviewing the hanging indent in your document, you can ensure that your text is properly formatted and visually consistent, enhancing the overall professionalism and readability of your document.
Additional Tips for Working with Hanging Indents
While you now have a good understanding of how to create a hanging indent in Microsoft Word, there are a few additional tips and considerations that can help you work more efficiently and effectively with hanging indents.
Here are some additional tips to keep in mind:
- Apply hanging indents consistently: Maintain a consistent application of hanging indents throughout your document. This helps create visual harmony and ensures a professional presentation.
- Experiment with indentation size: Adjust the size of the hanging indent to find the right balance of indentation for your specific document. This can help with readability and visual appeal.
- Use hanging indents for citations and references: Hanging indents are commonly used for citations, bibliographies, and references to clearly differentiate them from the main content. Apply hanging indent formatting to these sections for a more organized appearance.
- Consider using preset styles: Microsoft Word offers preset styles that include hanging indents, such as the “Bibliography” or “Reference” style. Using these styles can save you time and ensure consistent formatting.
- Adjust indents for nested lists: If you have nested lists within your hanging indents, you may need to adjust the indentation settings accordingly. Use the list formatting options in Word to ensure proper alignment and readability.
- Check formatting after making changes: Always review your document after making any formatting changes. This ensures that the hanging indent is applied correctly and that there are no unexpected formatting issues.
By following these additional tips, you can enhance your work with hanging indents and create well-formatted documents that are visually appealing and easy to read.
Remember, practice makes perfect when it comes to formatting. Feel free to experiment with different settings and styles to achieve the desired result. With time and experience, you will become more proficient at creating and working with hanging indents in Microsoft Word.