
What is a hanging indent?
A hanging indent is a formatting style commonly used in academic writing, bibliography, and references, where the first line of a paragraph is aligned with the left margin, and subsequent lines of the same paragraph are indented. This indentation helps to visually differentiate the first line from the rest, making it easier to identify separate entries or paragraphs within a larger text.
A hanging indent is mostly employed in documents, such as essays, research papers, and presentations, to organize and format bibliographies, reference lists, citations, and other similar content. It enhances the readability and professionalism of the document, making it easier for readers to identify and follow the flow of information.
By using a hanging indent, writers can present information in a clear and organized manner, ensuring that each entry or paragraph is easily distinguishable and comprehensible. It allows readers to quickly and efficiently locate specific pieces of information within a longer list or document, without the need to scan through the entire content.
The hanging indent format is especially useful in situations where there are multiple entries or paragraphs that need to be listed or referenced. It provides a consistent and visually appealing style, making it easier to compare and contrast information, as well as trace the origins or sources of specific content.
Overall, the hanging indent is an essential formatting technique that improves the readability, organization, and professionalism of written work. It plays a crucial role in presenting information in a structured and accessible manner, ensuring that readers can navigate through the document efficiently and comprehend the content with ease.
Step 1: Open Google Slides and create a new presentation
Creating a hanging indent in Google Slides is a simple yet effective way to format your text. To get started, follow these step-by-step instructions:
- Open your web browser and navigate to Google Slides.
- If you’re not already signed in to your Google account, log in with your credentials.
- On the Google Slides homepage, click the “+” sign to create a new presentation.
- Choose a template for your presentation from the available options or select a blank slide to start from scratch.
- Give your presentation a title by clicking on the default “Untitled Presentation” text and entering your desired title.
Now that you have created a new presentation, you’re ready to proceed to the next step.
It’s important to note that Google Slides is a cloud-based application, which means that all your presentation files are stored online and can be accessed from any device with an internet connection. This makes it convenient for collaborative work and easy sharing.
By opening Google Slides and starting a new presentation, you have set the stage for creating a professional and visually appealing slide deck. Now let’s move on to the next step to insert a text box.
Step 2: Insert a text box
Once you have opened Google Slides and created a new presentation, the next step is to insert a text box where you want the hanging indent to appear. Follow these instructions to insert a text box:
- Click on the slide where you want to add the text box. This will make the slide active so that you can proceed with the next steps.
- In the menu bar at the top of the screen, click on the “Insert” tab.
- A drop-down menu will appear. From this menu, select the “Text box” option.
- Your cursor will change to a crosshair icon. Click and drag on the slide to create a text box with the desired size.
- Once you release the mouse, the text box will appear on the slide, ready for you to enter your text.
Text boxes are versatile tools in Google Slides that allow you to add and format text. They can be resized, moved around the slide, and customized to match the design and style of your presentation.
When inserting a text box for a hanging indent, it is recommended to place it in an appropriate location where you want the indented text to appear. This could be within a bullet point list, a paragraph, or any other area where you intend to apply the hanging indent format.
Now that you have successfully inserted a text box, you can proceed to the next step to enter your text or paste existing content into the text box.
Step 3: Type or paste your text into the text box
Now that you have inserted a text box in Google Slides, it’s time to enter your text or paste existing content into the text box. Follow these instructions:
- Click inside the text box to activate it. Your cursor will appear as a blinking vertical line, indicating that you can start typing or pasting your text.
- Type your desired text directly into the text box, or if you already have the content prepared in a separate document, you can copy and paste it into the text box.
- As you type or paste your content, make sure to break it down into separate paragraphs or entries, depending on your formatting requirements.
- If you are copy-pasting from another source, be cautious of any formatting or special characters that might not transfer accurately. Make sure to proofread and adjust the text if necessary.
By typing or pasting your text into the text box, you are preparing the content that you want to apply a hanging indent to. It is important to ensure that your text is properly organized and formatted before proceeding to the next step.
Remember that you can customize the font style, size, color, and other formatting options within the text box to align with your overall presentation design and aesthetics.
Now that your text is successfully entered into the text box, you are ready to move on to the next step to highlight the text and apply the hanging indent formatting.
Step 4: Highlight the text
After typing or pasting your text into the text box in Google Slides, the next step is to highlight the text that you want to apply the hanging indent to. Follow these instructions:
- Click and drag your mouse cursor over the text you want to format. This will highlight the selected text.
- If you have a large amount of text, you can hold down the Shift key on your keyboard and use the arrow keys to select the desired portion of text.
- Make sure to select the entire paragraph or section that you want to include in the hanging indent.
By highlighting the text, you are indicating to Google Slides that you want to apply a specific formatting style to the selected content. This step is crucial in targeting the correct portion of text for the hanging indent.
It’s important to note that you can apply the hanging indent to multiple paragraphs or entries within the same text box. Simply hold down the Ctrl (Windows) or Command (Mac) key on your keyboard and click on the individual paragraphs you want to include in the formatting. This will highlight each paragraph separately.
Now that you have successfully highlighted the text, you are ready to move on to the next step and apply the hanging indent formatting.
Step 5: Click on the “Format” tab in the menu bar
After highlighting the desired text in Google Slides, the next step is to access the formatting options. Follow these instructions:
- In the Google Slides interface, locate the menu bar at the top of the screen.
- Click on the “Format” tab to reveal a dropdown menu.
The “Format” tab houses various formatting options that allow you to modify the appearance and style of your selected text, including applying the hanging indent formatting.
It’s important to note that the “Format” tab will only appear in the menu bar when you have selected the text or text box that you want to format.
By clicking on the “Format” tab, you are ready to proceed to the next step and access the specific formatting options for your text.
Now that you have accessed the “Format” tab, you can continue to the following step to select the “Paragraph styles” option from the dropdown menu.
Step 6: Select “Paragraph styles” from the dropdown menu
After clicking on the “Format” tab in the menu bar of Google Slides, the next step is to select the “Paragraph styles” option from the dropdown menu. Follow these instructions:
- Once the dropdown menu appears after clicking on the “Format” tab, scroll down until you find the “Paragraph styles” option.
- Click on “Paragraph styles” to display a submenu with different formatting presets.
The “Paragraph styles” submenu in Google Slides allows you to apply various pre-designed styles to your selected text, including the hanging indent formatting.
By selecting “Paragraph styles,” you are unlocking a range of formatting options and presets that can be applied to your text, helping you achieve the desired visual style and structure.
Remember that the availability and exact placement of the “Paragraph styles” option may vary slightly depending on the version of Google Slides you are using. However, it should be easily identifiable within the “Format” tab’s dropdown menu.
Now that you have selected “Paragraph styles” from the dropdown menu, you are ready to progress to the next step and choose the “Hanging Indent” option to apply the desired formatting to your text.
Step 7: Scroll down and choose “Hanging Indent”
After accessing the “Paragraph styles” submenu in Google Slides, the next step is to scroll down and choose the “Hanging Indent” option. Follow these instructions:
- Within the “Paragraph styles” submenu, scroll down the list of available formatting presets.
- Continue scrolling until you locate the “Hanging Indent” option. It is typically towards the bottom of the list.
- Click on “Hanging Indent” to apply the formatting style to your selected text.
By choosing the “Hanging Indent” option, Google Slides will adjust the indentation of the selected text, creating a hanging indent format where the first line remains flush with the left margin, and subsequent lines are indented.
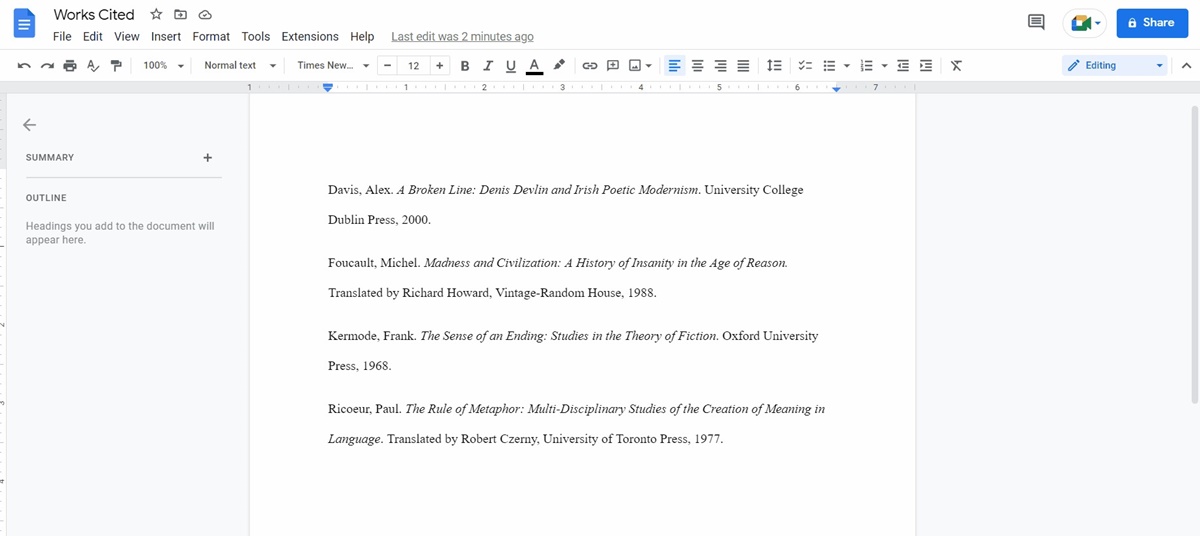
The hanging indent formatting is commonly used in citations, references, bibliographies, and other types of content where proper formatting is crucial.
Remember that the “Hanging Indent” option may appear differently in the menu depending on the version of Google Slides or the interface you are using. Look for any mention of “Hanging Indent” or a formatting preset that aligns with the concept of a hanging indent.
Now that you have successfully chosen the “Hanging Indent” option, your selected text will be formatted with the desired indentation. You can proceed to the next step to adjust the indent size if desired.
Step 8: Adjust the indent size if desired
After applying the hanging indent formatting to your selected text in Google Slides, you have the option to adjust the indent size to your preference. Follow these instructions:
- Ensure that your text is still selected with the hanging indent formatting applied.
- In the menu bar, navigate to the “Format” tab and click on it.
- From the dropdown menu, select the “Align & indent” option.
- A submenu will appear with various alignment and indent options.
- To adjust the indent size, locate the “Indentation options” section and modify the values accordingly.
Within the “Indentation options” section, you can alter the left indent and right indent values. Increasing the left indent value will move the entire block of text further to the right, while decreasing the value will bring it back towards the left margin. This allows for fine-tuning the positioning of the hanging indent within your text box.
Experiment with different indent sizes to achieve the desired visual presentation. Keep in mind that the indent size should be consistent and visually appealing, ensuring that the hanging indent is easily distinguishable from the first line.
Remember to preview your changes as you adjust the indent size to ensure that it aligns with your overall document layout and style.
Now that you have the option to adjust the indent size if desired, you can proceed to the next step to apply the hanging indent to your text.
Step 9: Apply the hanging indent to your text
Once you have selected the desired indent size for your hanging indent in Google Slides, the next step is to apply the formatting to your text. Follow these instructions:
- Ensure that your text is still selected with the adjusted hanging indent size.
- In the menu bar, navigate to the “Format” tab and click on it.
- From the dropdown menu, select the “Align & indent” option.
- A submenu will appear with various alignment and indent options.
- Within the submenu, click on the “Hanging Indent” checkbox.
By checking the “Hanging Indent” box, Google Slides will finalize the formatting changes and apply the hanging indent style to your selected text.
Double-check that your text is properly indented, with the first line flush with the left margin and subsequent lines indented accordingly.
It’s important to note that the “Hanging Indent” checkbox may appear differently depending on the version of Google Slides or the interface you are using. Look for any option that resembles “Hanging Indent” or refers to the indentation of subsequent lines.
Now that you have successfully applied the hanging indent to your text, you can proceed to the next step to customize the formatting of your text if desired.
Step 10: Customize the formatting of your text
After applying the hanging indent to your text in Google Slides, you have the option to further customize the formatting to enhance the visual presentation. Follow these instructions:
- Ensure that your text with the hanging indent is still selected.
- In the menu bar, navigate to the “Format” tab and click on it.
- From the dropdown menu, explore different formatting options such as font style, size, color, alignment, and more.
- Choose the formatting options that align with your preferred style and document design.
- Make adjustments as necessary until you achieve the desired look for your text.
Customizing the formatting allows you to make your text visually appealing, consistent with your overall presentation, and easy to read. You can experiment with font styles, sizes, and colors to highlight key information and create visual hierarchy within your text.
In addition to font formatting, you can also adjust the alignment of your text, add bullet points or numbering, and apply other text effects to further enhance the readability and impact of your content.
Remember to maintain consistent formatting throughout your presentation to ensure a coherent and professional look.
Now that you have customized the formatting of your text, you can proceed to the next step to apply the hanging indent formatting to additional slides, if necessary.
Step 11: Repeat the process for additional slides
If you have multiple slides in your Google Slides presentation and you want to apply the hanging indent formatting to additional slides, you can easily repeat the process. Follow these instructions:
- Navigate to the slide where you want to apply the hanging indent.
- Select the text box or content on the slide where you want the hanging indent to appear.
- Follow Steps 4 to 9 to highlight the text, access the formatting options, and apply the hanging indent formatting.
- Make any necessary adjustments to the indent size or customize the formatting of the text, if desired.
Repeating the process for additional slides ensures consistency and uniformity throughout your presentation. It’s a quick and straightforward way to format your content effectively and make it visually appealing.
Remember to review each slide after applying the hanging indent formatting to ensure that the indent size and formatting align with your desired presentation style.
By following these steps for each slide that requires the hanging indent, you can ensure a professional and cohesive look across your entire presentation.
Now that you know how to repeat the process for additional slides, you can move on to the final step to save and share your presentation with the hanging indent formatting.
Step 12: Save and share your presentation with the hanging indent
After formatting your Google Slides presentation with the hanging indent, the final step is to save your work and share it with others. Follow these instructions:
- In the top left corner of the Google Slides interface, click on the “File” tab.
- A dropdown menu will appear. Click on the “Save” or “Save as” option to save your presentation.
- Choose the desired location to save your presentation, such as your Google Drive or local device storage.
- Give your presentation a name, then click “Save.”
By saving your presentation, you ensure that all the changes you have made, including the hanging indent formatting, are preserved for future use.
Next, if you wish to share your presentation with others, follow these steps:
- In the top right corner of the Google Slides interface, click on the blue “Share” button.
- A sharing settings window will appear, where you can enter the email addresses of the individuals you want to share the presentation with.
- Select the appropriate sharing permissions, such as view-only or edit access, for each recipient.
- Click “Send” to share the presentation.
By sharing your presentation, you allow others to view or collaborate on your work, ensuring that your hanging indent formatting is visible to the intended audience.
It’s important to regularly save your work while working on your presentation to prevent any potential loss of progress.
Congratulations! You have successfully saved and shared your presentation with the hanging indent formatting.
Now you can confidently present your well-structured and visually appealing slides, knowing that your hanging indent formatting will effectively highlight and organize your text.