
Choosing the Right PDF to JPG Converter
Converting PDF files to JPG format can be a useful way to extract images or create a more accessible format for sharing and viewing. While there are several methods available, choosing the right PDF to JPG converter is essential to ensure quality results and a seamless conversion process. Below, we explore different options to help you find the most suitable converter for your needs.
1. Online Conversion Tools: These web-based converters offer convenience and accessibility, allowing you to upload your PDF file and convert it to JPG directly from your browser. Look for reliable and secure platforms that support high-resolution conversions, provide customization options, and have a user-friendly interface. Some popular online conversion tools include Smallpdf, Zamzar, and PDF2JPG.
2. Using Adobe Acrobat: If you have access to Adobe Acrobat software, you can utilize its built-in conversion capabilities. Adobe Acrobat offers advanced features for converting PDFs to various formats, including JPG. This method allows you to convert individual pages or the entire document while maintaining the quality and integrity of the original file. It is a suitable option for those who frequently work with PDFs and require precise control over the conversion process.
3. Using Preview on Mac: Mac users can take advantage of the built-in Preview application for converting PDFs to JPGs. Simply open your PDF file in Preview, go to the “File” menu, choose “Export,” and select the JPEG format. This method is straightforward, convenient, and ideal for occasional conversions or quick image extraction.
4. Using Microsoft Paint: Although not specifically designed for PDF to JPG conversion, Microsoft Paint can be a simple solution if you’re looking for a basic and readily available option. Open your PDF file in a PDF viewer, take a screenshot of the desired page, paste it into Microsoft Paint, and save it as a JPG file. While this method may not offer advanced features or high-quality results, it can be useful for quick conversions or when other tools are not available.
5. Using Command Line Tools: For tech-savvy individuals, command line tools provide a powerful and customizable approach to convert PDFs to JPGs. Tools like Ghostscript and ImageMagick offer command line interfaces that allow you to execute conversion commands with specific parameters and options. This method requires some technical knowledge but provides flexibility and control over the conversion process’s finer details.
Consider the factors that matter most to you, such as conversion speed, output quality, ease of use, and availability, when choosing the right PDF to JPG converter. Assessing your requirements and exploring the various options will help you find the converter that best meets your needs.
Method 1: Online Conversion Tools
When it comes to converting PDF files to JPG format, online conversion tools offer a convenient and hassle-free option. These web-based platforms eliminate the need for software installation and allow you to convert your files directly from your browser. Here’s how to use online conversion tools effectively:
1. Choose a reliable platform: There are numerous online conversion tools available, so it’s important to select a reputable and trustworthy platform. Look for platforms that have positive user reviews, guarantee data security, and offer a wide range of file format conversions. Some popular options include Smallpdf, Zamzar, and PDF2JPG.
2. Upload your PDF file: Once you’ve chosen an online conversion tool, navigate to their website and locate the PDF to JPG converter. Click on the “Upload” button or drag and drop your PDF file into the designated area. Make sure to check the file size limit, as some tools may have restrictions on larger files.
3. Customize the conversion settings (if available): Some online conversion tools offer customization options to tailor the conversion process to your specific needs. These options may include selecting the desired image quality, resolution, or even cropping the PDF pages before conversion. Take advantage of these features to achieve the desired results.
4. Start the conversion: After uploading your PDF file and adjusting the settings, initiate the conversion process by clicking on the “Convert” or “Start” button. The online tool will convert your PDF file to JPG format, and the converted file will be available for download once the conversion is complete. The conversion time may vary depending on the file size and the speed of the online tool’s servers.
5. Download and verify the converted file: Once the conversion is finished, download the converted JPG file to your computer. Before finalizing the process, it’s crucial to verify the quality and accuracy of the converted file. Open the JPG file in an image viewer to ensure that it matches your expectations and retains the necessary details and clarity from the original PDF.
Online conversion tools are a convenient solution for converting PDF files to JPG format, especially when you don’t have access to specialized software. However, it’s important to keep in mind that the output quality and customization options may vary among different platforms. Experiment with different online converters to find the one that best suits your needs.
Method 2: Using Adobe Acrobat
If you have access to Adobe Acrobat software, converting PDF files to JPG format becomes a seamless process. Adobe Acrobat offers a wide range of features, including its built-in conversion capabilities. Follow these steps to convert PDF to JPG using Adobe Acrobat:
1. Open the PDF file: Launch Adobe Acrobat on your computer and open the PDF file you want to convert to JPG. You can either click on the “File” menu and select “Open,” or use the drag-and-drop functionality to open the file directly in the application.
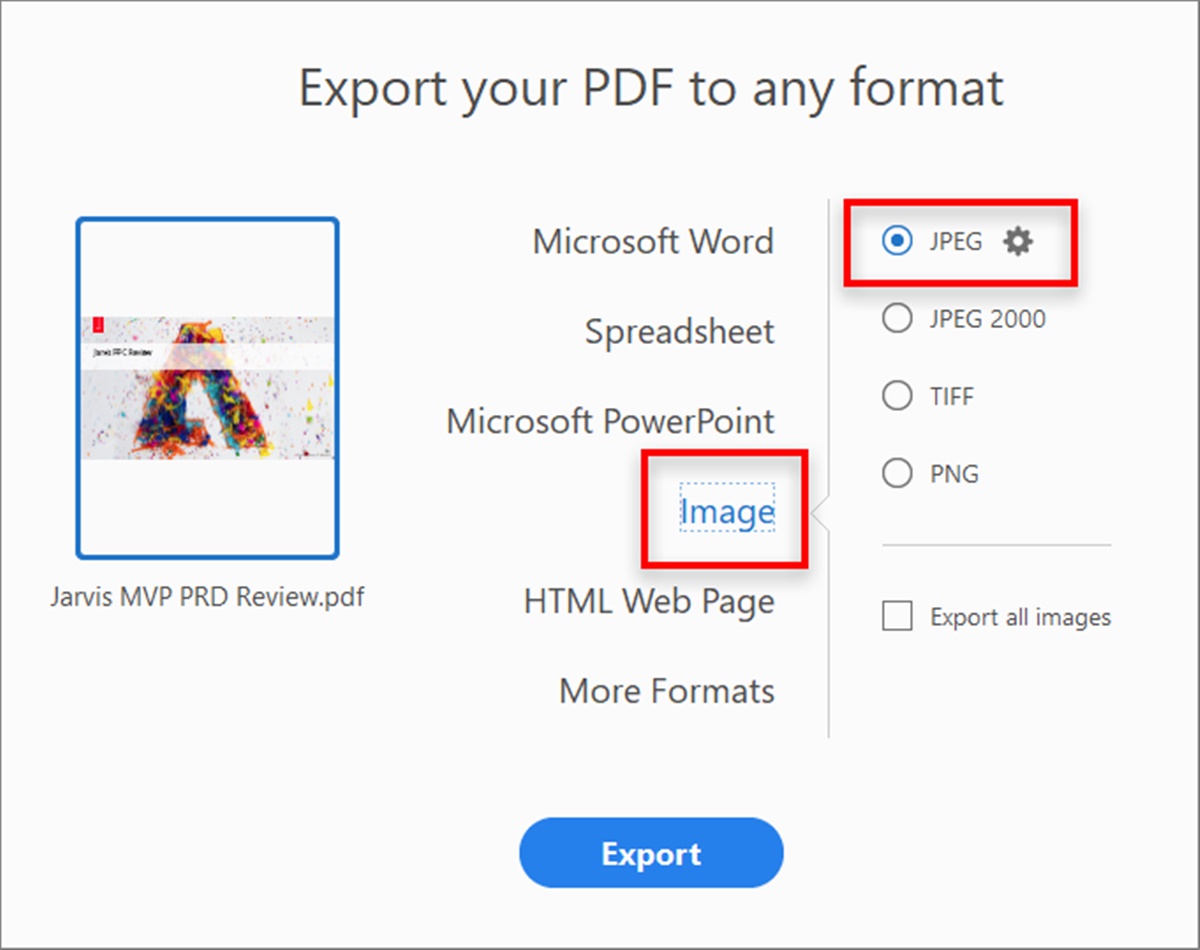
2. Choose the Export option: Once your PDF file is open in Adobe Acrobat, go to the “File” menu and select the “Export To” option. From the drop-down menu, choose “Image” and then “JPEG.”
3. Configure the conversion settings: In the export settings window, you can customize the conversion process according to your preferences. Specify the desired resolution, image quality, and color settings to ensure the output JPG file meets your requirements. Adobe Acrobat also provides options to convert specific pages or the entire document.
4. Select the destination folder: After configuring the conversion settings, click on the “Choose” button to select the destination folder where you want to save the converted JPG file. Choose a location that is easily accessible and organized for future use.
5. Start the conversion: Once all the settings are in place, click on the “Save” or “Export” button to begin the conversion process. Adobe Acrobat will convert your PDF file to JPG format, and the converted file will be saved in the specified destination folder.
6. Verify the converted file: After the conversion process is complete, navigate to the destination folder and open the converted JPG file with an image viewer. Make sure to review the file and confirm that it retains the necessary details, clarity, and quality from the original PDF.
Using Adobe Acrobat for PDF to JPG conversion offers a reliable and precise method, particularly for users who frequently work with PDF files. The software provides advanced features and customization options, allowing for fine-tuning of the conversion process to achieve desired results.
Method 3: Using Preview on Mac
For Mac users, converting PDF files to JPG format can be easily done using the built-in application called Preview. Preview is a versatile tool that allows you to view, edit, and convert various file formats, including PDFs. Follow these steps to convert PDF to JPG using Preview on Mac:
1. Open the PDF file: Locate the PDF file you want to convert to JPG and double-click on it to open it in Preview. If Preview is not set as the default application for opening PDFs, you can right-click on the PDF file, select “Open With,” and choose Preview from the list.
2. Access the Export function: Once the PDF file is open in Preview, click on the “File” menu at the top of the screen and select the “Export” option. Alternatively, you can use the keyboard shortcut Command + Shift + S.
3. Choose the JPEG format: In the Export window, you can customize the conversion settings. Select “JPEG” from the “Format” drop-down menu. Preview also allows you to adjust the image quality by moving the slider between “Low,” “Medium,” and “Best” options.
4. Specify the output location: Choose the destination folder where you want to save the converted JPG file. You can create a new folder or select an existing one to keep your files organized. Click on the “Save” button to proceed.
5. Start the conversion: After selecting the output location, click on the “Save” button to initiate the conversion process. Preview will convert the PDF file to JPG format as per the specified settings and save it in the chosen destination folder.
6. Verify the converted file: Once the conversion is complete, navigate to the destination folder and open the converted JPG file using an image viewer. Verify that the converted file maintains the desired quality, clarity, and details from the original PDF.
Preview on Mac offers a straightforward and convenient method for converting PDF files to JPG format. It is a particularly useful option for Mac users who occasionally need to convert PDFs, as it eliminates the need for third-party software installation and provides a streamlined conversion process.
Method 4: Using Microsoft Paint
If you are looking for a quick and basic solution to convert PDF files to JPG format, Microsoft Paint can serve as a readily available option. Although not specifically designed for PDF conversions, Microsoft Paint can be used to extract images from a PDF file and save them as JPG. Follow these steps to convert PDF to JPG using Microsoft Paint:
1. Open the PDF file: Begin by opening the PDF file you want to convert in a PDF viewer or web browser on your computer. Make sure to have the PDF file readily accessible for the conversion process.
2. Take a screenshot: Navigate to the page or image you want to convert from the PDF file and take a screenshot. Press the “Print Screen” key on your keyboard to capture the entire screen, or use the “Alt + Print Screen” combination to capture the active window containing the PDF.
3. Open Microsoft Paint: Once you have taken the screenshot, open Microsoft Paint. You can do this by searching for “Paint” in the Windows search bar or accessing it from the Start menu or program list.
4. Paste and crop the image: In Microsoft Paint, paste the screenshot you captured by pressing “Ctrl + V” or selecting the “Paste” option in the “Home” tab. If necessary, use the crop tool or select and delete unwanted parts of the image to isolate the specific portion you want to convert to JPG.
5. Save as JPG: Once you have cropped the image to your desired selection, go to the “File” menu and click on “Save As.” Choose the JPEG file format from the drop-down list of formats. Give the file a name and specify the location where you want to save it. Click “Save” to finalize the conversion process.
6. Verify the converted file: After saving the file, navigate to the location where you saved it and open the JPG file with an image viewer. Ensure that the converted image retains the necessary clarity and details from the original PDF.
It’s important to note that using Microsoft Paint for PDF to JPG conversion is a basic method and may not offer advanced features or high-quality results. This method is most suitable for quick conversions or situations where specialized tools are not readily available.
Method 5: Using Command Line Tools
For tech-savvy individuals who prefer command line interfaces and want precise control over the PDF to JPG conversion process, command line tools like Ghostscript and ImageMagick provide powerful options. Here’s how to convert PDF to JPG using command line tools:
1. Install the necessary tools: Start by installing the required command line tools on your computer. Ghostscript and ImageMagick are open-source software that can be downloaded from their official websites and installed following the provided instructions.
2. Open the command prompt or terminal: Launch the command prompt on Windows or the terminal on macOS/Linux. This will serve as the interface for executing the conversion commands.
3. Navigate to the directory: Use the command prompt or terminal to navigate to the directory where your PDF file is located. Use the “cd” command followed by the file path to access the desired location.
4. Execute the conversion command: Once in the correct directory, use the appropriate command to convert the PDF to JPG. For Ghostscript, the command is typically: gs -sDEVICE=jpeg -o output.jpg input.pdf. For ImageMagick, the command is often: convert input.pdf output.jpg. Modify the commands with the specific file names and paths relevant to your situation.
5. Customize the conversion options (if necessary): Command line tools offer various options and parameters that can be used to customize the conversion process. These options include specifying the image quality, resolution, page range, and more. Refer to the documentation of the specific tool you are using for guidance on available options.
6. Verify the converted file: Once the conversion process is complete, navigate to the directory where the JPG file was saved. Open the file with an image viewer to ensure that the conversion was successful and that the JPG file retains the necessary details and quality.
Using command line tools for PDF to JPG conversion requires some technical knowledge and familiarity with command line interfaces. However, this method provides a high level of flexibility and control over the conversion process, making it ideal for those who prefer a command line approach.
Tips for Converting PDF Files to JPG Format
Converting PDF files to JPG format can be a useful process for various purposes, including image extraction and sharing. To ensure a smooth and successful conversion, consider the following tips:
1. Quality considerations: When selecting a conversion method or tool, prioritize the output quality. Look for options that allow you to customize the image resolution, compression, and other settings to maintain the necessary clarity and details from the original PDF.
2. Image customization: Some conversion tools offer options for cropping, rotating, or resizing the images during the conversion process. Take advantage of these features to customize the output images according to your specific requirements.
3. Page selection: If you only need specific pages from a PDF file, consider selecting and converting those pages individually. This can save time and storage space, especially for larger PDF files with numerous pages.
4. File size optimization: PDF to JPG conversion can result in larger file sizes, especially when dealing with high-resolution images. To optimize file size, consider reducing the image quality or resizing the images to a smaller resolution, especially if the images are for web use or sharing purposes.
5. Batch conversions: If you have multiple PDF files to convert, look for tools or methods that support batch conversions. This will help streamline the process and save time, allowing you to convert multiple files simultaneously.
6. File organization: Maintain a well-organized file structure by creating separate folders for the original PDFs and the converted JPGs. This will make it easier to locate and manage your files in the future.
7. Verification and validation: Always verify the converted JPG files after the conversion process is complete. Open the images in an image viewer to ensure that they accurately represent the original PDF content and retain the necessary details and clarity.
Remember, choosing the right conversion method or tool is essential for achieving desirable results. Evaluate your specific needs, such as customization options, speed, and output quality, to select the most suitable approach for converting your PDF files to JPG format.