
What is a HEIC file?
HEIC, which stands for High Efficiency Image Format, is a file format that was introduced by Apple with the release of iOS 11. It is used to store images captured by devices such as iPhones and iPads. HEIC files are known for their high image quality and advanced compression algorithms, allowing them to offer better image quality at smaller file sizes compared to traditional formats like JPEG.
HEIC files use the High Efficiency Video Coding (HEVC) codec, also known as H.265, which is a newer and more efficient method of encoding videos and images. This means that a HEIC file can store more information in less space, resulting in smaller file sizes without compromising on image quality. Additionally, HEIC files support features like transparency, depth maps, and a wide range of color depths, making them a versatile choice for photographers and graphic designers.
One notable advantage of HEIC files is their support for the lossless compression option. This means that users can save images in a compressed format without losing any image data, providing a more flexible approach for photographers who want to save storage space without compromising the quality of their images.
However, one downside of HEIC files is their compatibility with certain devices and applications. While Apple devices and newer versions of operating systems can natively open and view HEIC files, other devices and older software may not have built-in support for this format. This can pose a challenge when sharing and accessing HEIC files across different platforms.
Fortunately, there are several methods available to convert HEIC files to more universally supported formats like JPEG. In the following sections, we will explore some of the most effective ways to convert HEIC files to JPG in Windows, allowing for easy sharing and accessibility of your images. Whether you choose to use the Photos app, dedicated HEIC to JPG converters, or online conversion tools, you can seamlessly convert your HEIC files to JPG and enjoy their benefits on any device or software that supports the JPEG format.
Why convert HEIC files to JPG?
While HEIC files offer various advantages in terms of image quality and compression, there are several reasons why you may need to convert them to the more widely supported JPG format. Here are some of the main reasons to consider converting HEIC files to JPG:
- Compatibility: Although newer Apple devices and operating systems can open HEIC files natively, compatibility becomes an issue when sharing or accessing files on devices without built-in support. Converting HEIC files to JPG ensures that the files can be easily viewed and used on any device or software that supports the JPEG format, making them more universally accessible.
- Cross-Platform Sharing: If you frequently share images with friends, family, or colleagues who use different devices or software, converting HEIC files to JPG ensures that everyone can view and use the images without any compatibility issues. JPG is widely supported across different platforms and devices, making it an ideal format for seamless sharing and collaboration.
- Software Compatibility: Some image editing software or applications may not be fully compatible with HEIC files. By converting HEIC files to JPG, you can ensure that you can easily edit and manipulate your images using a wide range of software options without any limitations.
- Online Sharing: Uploading HEIC files to certain websites or platforms may result in compatibility issues. Converting HEIC files to JPG allows you to share your images on various online platforms, social media, or file-sharing websites without worrying about compatibility problems or the need for additional plugins or software for viewing.
- Preserving Image Quality: Although converting HEIC files to JPG involves a slight loss of image quality due to compression, the difference is usually minimal and may not be noticeable in most cases. By converting files to JPG, you can ensure that your images remain visually appealing while reducing file size, making them easier to store, manage, and share.
By converting HEIC files to JPG, you can overcome compatibility issues, ensure cross-platform sharing, take advantage of a wide range of software options, facilitate online sharing, and preserve image quality. With the availability of various conversion methods, you can conveniently convert your HEIC files to JPG and enjoy the benefits of this widely supported image format.
Method 1: Using the Photos App
If you are using a Windows computer, you can easily convert HEIC files to JPG using the built-in Photos app. Follow these steps to convert your HEIC files to JPG:
- Open the Photos app on your Windows computer. You can find it in the Start Menu or by searching for “Photos” in the search bar.
- Click on the “Settings” icon located at the top-right corner of the Photos app. It looks like three horizontal dots.
- In the Settings menu, scroll down and click on the “Defaults” option.
- In the Defaults section, you will find an option to change the “Photo format”. Click on the drop-down menu next to it.
- From the available options, select “JPEG” as the desired photo format.
- Once you have selected JPEG as the default photo format, the Photos app will automatically convert your HEIC files to JPG when you open or share them.
By using the Photos app on your Windows computer, you can easily convert HEIC files to JPG without the need for any additional software or online tools. This method allows for a quick and seamless conversion process, ensuring that your HEIC files are accessible and shareable on any device or software that supports the JPEG format.
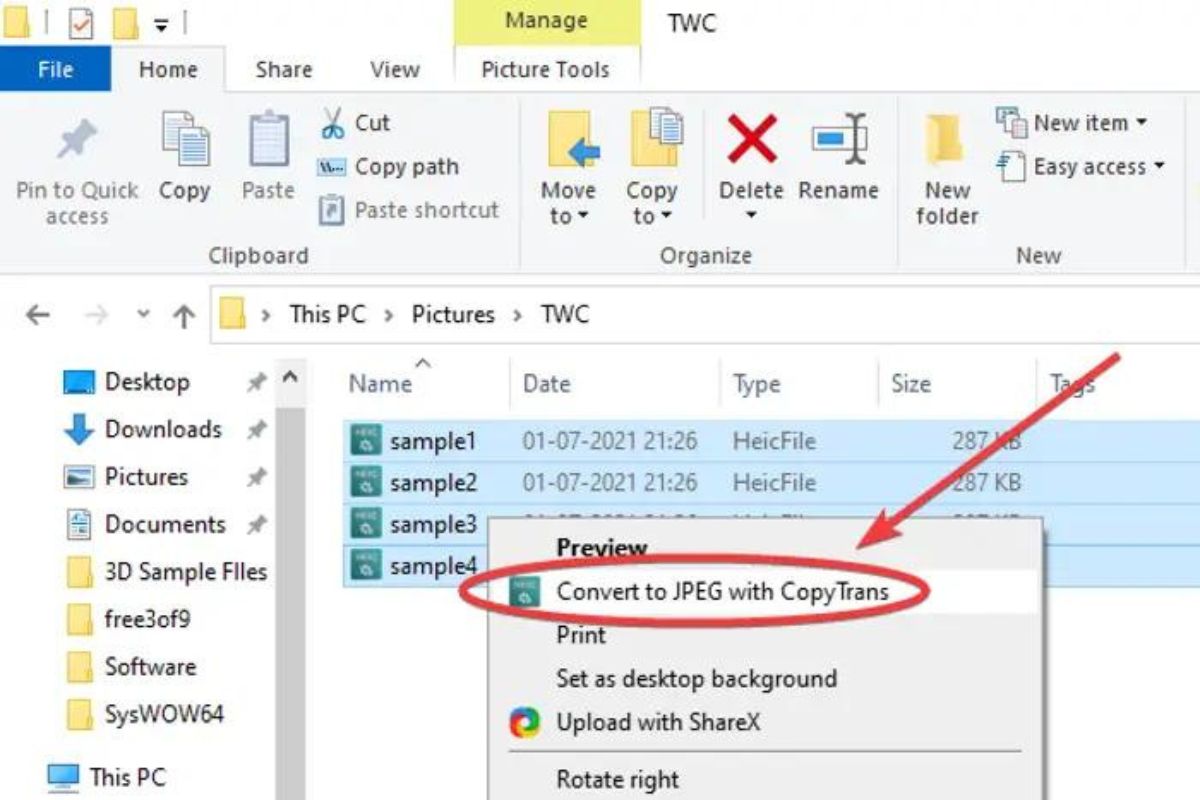
Method 2: Using the HEIC to JPG Converter
If you prefer a more dedicated solution for converting HEIC files to JPG, you can utilize a third-party HEIC to JPG converter. There are several converter tools available online, both free and paid, that provide a user-friendly interface and efficient conversion process. Here’s how you can use a HEIC to JPG converter:
- Search for a reliable HEIC to JPG converter tool online. Choose one that suits your requirements and has positive reviews from other users.
- Download and install the converter software on your Windows computer. Make sure to follow the installation instructions provided by the software developer.
- Launch the HEIC to JPG converter tool on your computer.
- Click on the “Add Files” or “Select Files” button within the converter tool to import the HEIC files you want to convert. You can either select individual files or an entire folder containing HEIC files.
- Once you have selected the files, choose the output format as JPG.
- Select the desired output folder where the converted JPG files will be saved. You can either choose an existing folder or create a new one specifically for the converted files.
- Click on the “Convert” or “Start Conversion” button to initiate the conversion process. The converter tool will then convert the imported HEIC files to JPG format and save them in the selected output folder.
Using a dedicated HEIC to JPG converter provides you with more control over the conversion process and allows for bulk conversion of multiple files simultaneously. It ensures that all your HEIC files are converted to JPG format with ease, maintaining the quality of your images while making them compatible with a wider range of devices and software applications.
Method 3: Using Online HEIC to JPG Converters
If you prefer a quick and hassle-free method to convert HEIC files to JPG without installing any software on your computer, you can use online HEIC to JPG converters. These web-based tools allow you to upload your HEIC files and convert them to JPG format directly. Here’s how you can use online HEIC to JPG converters:
- Search for a reputable online HEIC to JPG converter. There are several options available, so choose one that has good user reviews and a straightforward interface.
- Visit the website of the chosen converter tool in your web browser.
- Click on the “Select Files” or “Choose Files” button on the website to upload the HEIC files you want to convert. Some online converters also support drag and drop functionality, allowing you to directly drag the files into the browser window.
- Once you have selected the HEIC files, the online converter tool will start the conversion process automatically. This may take a few seconds to a few minutes, depending on the size and number of files being converted.
- After the conversion is complete, the website will provide you with an option to download the converted JPG files. Click on the “Download” or “Save” button to save the converted files to your computer.
- Repeat the process if you have more HEIC files to convert.
Using online HEIC to JPG converters is a convenient option, especially if you only have a few files to convert and don’t want to install additional software on your computer. These converters are accessible from any web browser and allow you to convert HEIC files to JPG format quickly and easily.
It’s important to note that when using online converters, always be cautious about uploading sensitive or personal images to ensure your privacy and security. Choose reputable converters that have encryption protocols and take steps to protect user data.
Tips for converting HEIC files to JPG
Converting HEIC files to JPG can be a simple and efficient process if you follow the right techniques. Here are some helpful tips to ensure a successful conversion:
- Organize your files: Before starting the conversion process, it’s a good idea to organize your HEIC files into a specific folder. This will make it easier to select and convert the desired files without any confusion.
- Choose the right conversion method: Consider your preferences and requirements when choosing a conversion method. Whether you opt for the Photos app, a dedicated converter tool, or an online converter, ensure that it fits your needs and provides the desired output quality.
- Check the output quality settings: Some conversion tools or online converters allow you to adjust the output quality of the converted JPG files. If available, make sure to set the desired quality level to ensure the best balance between file size and image quality.
- Backup your HEIC files: Before converting your HEIC files to JPG, it’s always a good practice to create a backup of your original files. This ensures that you have a copy of the original files in case you need them in the future.
- Test the conversion with a few files: If you are converting a large number of HEIC files, it’s a good idea to test the conversion process with a few files first. This allows you to ensure that the conversion method you’ve chosen produces the desired results before converting all your files.
- Consider batch conversion: If you have multiple HEIC files that need to be converted, look for tools or methods that support batch conversion. This will save you time and effort by allowing you to convert multiple files simultaneously.
- Verify the converted files: Once the conversion process is complete, it’s recommended to double-check the converted JPG files to ensure their quality and integrity. Open a few files to verify that the conversion was successful and that the images appear as expected.
- Delete unnecessary files: After the conversion is complete and you have verified the quality of the converted JPG files, you can safely delete the original HEIC files if you no longer need them. This will help declutter your storage space and ensure that you only have the necessary files stored on your device.
By following these tips, you can ensure a smooth and efficient conversion process when converting HEIC files to JPG. Whether you’re concerned about file organization, output quality, or backup, these tips will help you make the most of your conversion experience.