
Why Connect Echo and Alexa to Wi-Fi?
The Echo device and Alexa voice assistant have become integral parts of many households, revolutionizing the way we interact with our homes. By connecting your Echo device and Alexa to Wi-Fi, you unlock a world of possibilities and make the most of the smart features they offer. Here’s why it’s essential to connect your Echo and Alexa to Wi-Fi:
1. Access to a Wider Range of Skills: When your Echo device is connected to Wi-Fi, Alexa can seamlessly access and update its extensive library of skills. These skills enable your Echo device to perform tasks like playing music, providing weather updates, setting reminders, ordering groceries, and much more.
2. Voice-Controlled Home Automation: With Wi-Fi connectivity, you can control smart home devices using simple voice commands through your Echo device. Whether you want to adjust the lights, set the thermostat, lock the doors, or start your coffee maker, Alexa can help you effortlessly manage your connected devices.
3. Convenient Information Access: Connecting your Echo to Wi-Fi ensures that Alexa can quickly retrieve information from the web. You can ask questions such as “What’s the weather forecast for today?” or “What are the latest headlines?” and receive immediate answers, keeping you up to date and informed.
4. Music and Entertainment Streaming: By connecting Alexa to Wi-Fi, you enable seamless music and entertainment streaming through popular platforms like Amazon Music, Spotify, Pandora, and more. You can request your favorite songs, create playlists, and explore new artists effortlessly with just your voice.
5. Hands-free Convenience: Connecting your Echo device to Wi-Fi allows you to enjoy the hands-free convenience of interacting with Alexa. You can ask for information, set timers, create shopping lists, and even make hands-free calls to your friends and family, all without lifting a finger.
6. Continuous Software Updates: Wi-Fi connectivity ensures that your Echo device receives the latest firmware updates and new features released by Amazon. These updates enhance the performance and functionality of your device, keeping it up to date with the latest advancements in technology.
In summary, connecting your Echo device and Alexa to Wi-Fi opens up a world of possibilities, allowing you to control your smart home, access a wide range of skills, stream music and entertainment, and enjoy hands-free convenience. By ensuring a reliable Wi-Fi connection, you can make the most of the smart features and functionalities that Echo and Alexa offer, making your life easier and more enjoyable.
Step 1: Prepare Your Echo Device
Before connecting your Echo device to Wi-Fi, it’s important to ensure that you have everything ready. Here’s what you need to do to prepare your Echo device:
1. Choose the Right Location: Select a suitable location for your Echo device. It should be within reach of your Wi-Fi router, but not obstructed by walls or other objects. Placing it in a central area of your home will ensure better Wi-Fi connectivity throughout.
2. Unbox and Inspect: Carefully unbox your Echo device and inspect it for any physical damage. Make sure all the necessary components, such as the power adapter and cable, are included and in good condition.
3. Read the User Manual: Familiarize yourself with the user manual provided with your Echo device. It will contain important information on setup instructions, troubleshooting tips, and additional features that may be available.
4. Check Power Requirements: Ensure that your Echo device is compatible with the power outlet in your home. Some models may require a specific voltage or type of power adapter. Make sure you have the correct power source to avoid any issues during setup.
5. Gather Wi-Fi Information: Take note of your Wi-Fi network name (SSID) and password. You will need this information during the setup process to connect your Echo device to your Wi-Fi network.
6. Charge or Connect to Power: Depending on the model of your Echo device, you may need to charge it or connect it directly to a power outlet. Follow the instructions provided to ensure your device has sufficient power for the setup process.
7. Prepare the Alexa App: Download and install the Alexa app on your smartphone or tablet. This app is available for both iOS and Android devices. The Alexa app will guide you through the setup process and provide additional features and settings for managing your Echo device.
By following these preparatory steps, you will ensure a smooth and hassle-free setup process for your Echo device. Taking the time to prepare and gather the necessary information will save you time and frustration during the actual setup and connection to Wi-Fi. Once you have completed these steps, you are ready to move on to the next phase of setting up your Echo device: downloading the Alexa app.
Step 2: Download the Alexa App
To set up and connect your Echo device to Wi-Fi, you’ll need to download the Alexa app on your smartphone or tablet. The Alexa app acts as the control center for your Echo device, allowing you to manage settings, skills, and other features. Here’s how to download the Alexa app:
1. Compatible Devices: Ensure that you have a compatible smartphone or tablet. The Alexa app is available for both iOS and Android devices. Make sure your device meets the required software version and has sufficient storage space for the app.
2. App Store or Google Play Store: Open the respective app store on your device. For iOS devices, launch the App Store, and for Android devices, open the Google Play Store.
3. Search for Alexa: In the search bar of the app store, type in “Alexa” and tap the search icon. The Alexa app should appear in the search results.
4. Select and Download: Tap on the Alexa app from the search results to view the app details. Verify that it is the official app developed by Amazon. Tap the “Download” or “Install” button to start the download process.
5. Wait for Installation: Allow the app to download and install on your device. The installation time may vary depending on your internet connection and device performance. Once the installation is complete, you can proceed to the next step.
6. Open the Alexa App: Locate the Alexa app on your device’s home screen or app drawer. Tap on the app icon to launch it.
7. Sign in to Your Amazon Account: If you already have an Amazon account, sign in using your credentials. If you don’t have an Amazon account, create a new account by following the on-screen instructions.
Once you have downloaded and installed the Alexa app, you are one step closer to connecting your Echo device to Wi-Fi. The Alexa app will guide you through the setup process, providing detailed instructions and prompts to ensure a seamless connection. Make sure to keep your device connected to the internet throughout the setup process to enable a successful connection between your Echo device and the app.
Step 3: Plug in Your Echo Device
After downloading the Alexa app, it’s time to plug in and power up your Echo device. Here’s how to properly plug in your Echo device:
1. Locate the Power Adapter: Take out the power adapter that came with your Echo device. Ensure that the adapter is in good condition and has no visible damage.
2. Identify the Power Port: Look for the power port on your Echo device. It is usually located at the back or bottom of the device. Align the power adapter’s connector with the power port.
3. Insert the Power Adapter: Carefully plug the power adapter into the power port of your Echo device. Gently push the connector all the way in until it is firmly inserted.
4. Connect to Power Outlet: Find a nearby power outlet in your home. Make sure the outlet is easily accessible and not obstructed. Plug the power adapter into the outlet. Ensure that you have a stable power source for the Echo device.
5. Switch on the Echo Device: Locate the power button on your Echo device. Press the power button to turn on your Echo device. Wait for the device to power up. You will see a light ring on the Echo device indicating that it is ready for setup.
6. Wait for Setup Mode: Your Echo device will enter setup mode automatically after turning it on. In setup mode, the light ring will turn orange or blue, indicating that the Echo device is ready to connect to Wi-Fi.
7. Check for Wi-Fi Status: Open the Alexa app on your smartphone or tablet. It will automatically detect the Echo device in setup mode. Follow the on-screen instructions in the app to proceed with the Wi-Fi connection process.
Remember to place your Echo device within range of your Wi-Fi router. An optimal Wi-Fi signal strength will ensure a stable and reliable connection between your Echo device and the network.
By following these steps to properly plug in your Echo device, you are now ready to establish a connection between your device and Wi-Fi network. In the next steps, you will use the Alexa app to complete the setup and connect your Echo device to Wi-Fi.
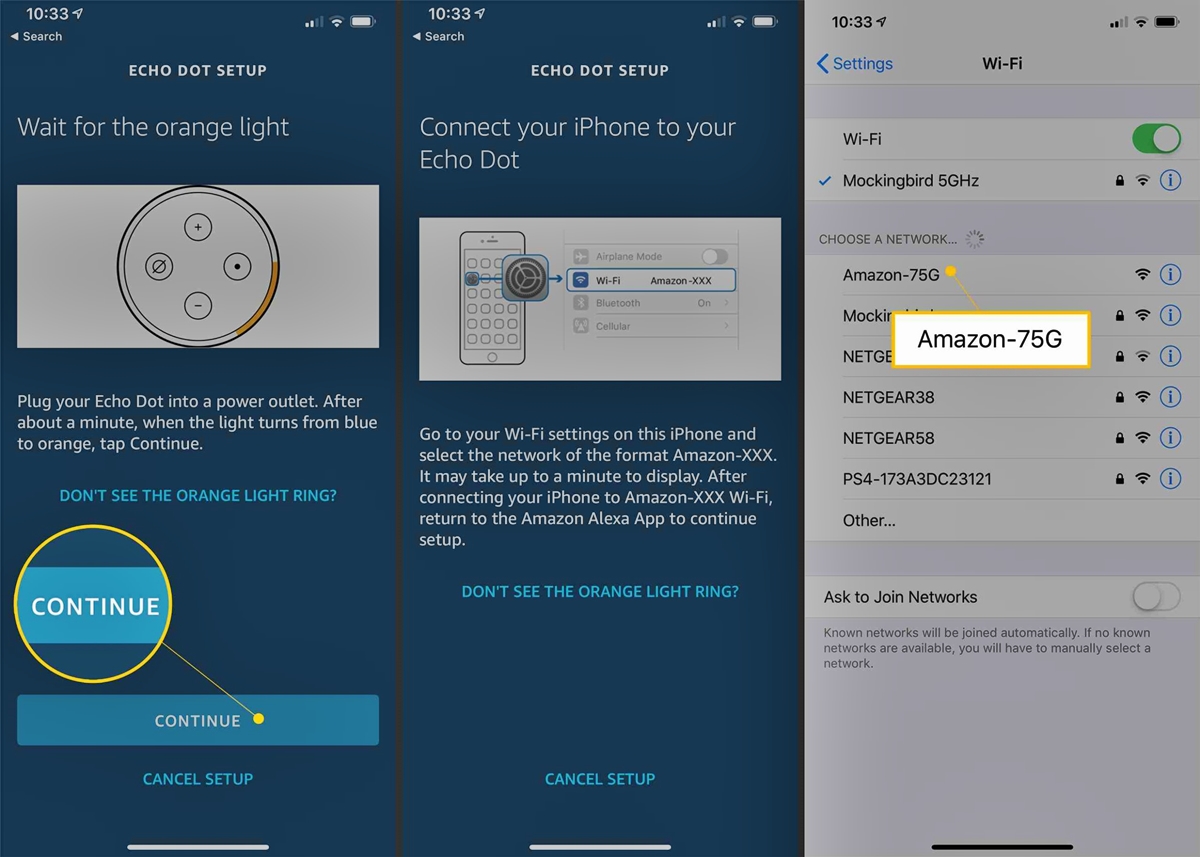
Step 4: Follow On-Screen Instructions
Once you have plugged in your Echo device, it’s time to follow the on-screen instructions within the Alexa app to complete the setup process. Here’s what you need to do:
1. Open the Alexa App: Launch the Alexa app on your smartphone or tablet. If you are not already signed in, enter your Amazon account credentials to log in.
2. Set Up a New Device: Tap on the menu icon in the top-left corner of the app. From the menu, select “Add Device” or “Set Up New Device.”
3. Select Your Echo Device: Choose the type of Echo device you are setting up from the list of available options. If you have multiple Echo devices, select the one you are currently setting up.
4. Confirm Connection Mode: The Alexa app will ask you to confirm whether your Echo is displaying the correct color light. Ensure that the light on your Echo device matches the one displayed on the app screen.
5. Connect to Wi-Fi: The Alexa app will guide you through the process of connecting your Echo device to your Wi-Fi network. It will detect available Wi-Fi networks and display them in a list. Select your Wi-Fi network from the list and enter the password when prompted.
6. Wait for Connection: After entering the Wi-Fi information, the Echo device will attempt to connect to your network. Wait patiently while the connection is established. The light ring on your Echo device may change color during this process.
7. Complete the Setup: Once the connection is successful, the Alexa app will confirm that your Echo device is now connected to Wi-Fi. You may be prompted to give your device a custom name, which will help you identify it if you have multiple Echo devices.
8. Optional Settings: The Alexa app may provide further options to customize your Echo device’s settings. These can include options such as setting your device location, enabling voice purchasing, or integrating third-party services.
By following the on-screen instructions provided by the Alexa app, you will complete the setup process and successfully connect your Echo device to Wi-Fi. Ensure that you carefully follow each step and provide accurate information during the setup process.
Once the setup is complete, you can start interacting with your Echo device using voice commands and explore the various features and skills available through Alexa. Enjoy the convenience of hands-free control and access to a wide range of services and information at your fingertips with your connected Echo device.
Step 5: Connect to Wi-Fi
Now that you have set up your Echo device and downloaded the Alexa app, it’s time to connect your device to your Wi-Fi network. Follow these steps to ensure a successful Wi-Fi connection:
1. Launch the Alexa App: Open the Alexa app on your smartphone or tablet. Make sure you are signed in to your Amazon account.
2. Find Your Echo Device: In the Alexa app, tap on the devices icon located at the bottom right corner. You will see a list of all your Alexa-compatible devices. Select the Echo device you want to connect to Wi-Fi.
3. Select Wi-Fi Settings: Once you have chosen your Echo device, tap on the “Wi-Fi” option in the device settings. This will take you to the Wi-Fi setup page.
4. Choose Wi-Fi Network: On the Wi-Fi setup page, you will see a list of available Wi-Fi networks. Tap on your desired network to proceed with the connection.
5. Enter Wi-Fi Password: If your Wi-Fi network is secured with a password, you will be prompted to enter it. Carefully type in your Wi-Fi password and tap “Connect” or “Join.”
6. Wait for Connection: The Echo device will attempt to connect to your Wi-Fi network. It may take a few moments to establish the connection. Once connected, you will see a confirmation message in the Alexa app.
7. Test the Connection: To ensure a successful connection, you can ask Alexa a simple question or command, such as “Alexa, what’s the weather today?” If Alexa responds correctly, it means your Echo device is successfully connected to Wi-Fi.
8. Reposition if Needed: If you experience any connectivity issues, consider repositioning your Echo device closer to your Wi-Fi router. Thick walls or interference from other devices can affect the signal strength.
By following these steps, you will connect your Echo device to your Wi-Fi network, enabling seamless communication and access to Alexa’s wide range of features and capabilities. If you ever need to connect your Echo device to a different Wi-Fi network, simply follow these steps again and select the desired network from the available options.
Enjoy the convenience of controlling your home with simple voice commands, accessing information, and enjoying music and entertainment through your connected Echo device and Alexa.
Troubleshooting Tips
Setting up your Echo device and connecting it to Wi-Fi is usually a smooth process. However, if you encounter any issues along the way, here are some troubleshooting tips to help you resolve common problems:
1. Check Wi-Fi Connectivity: Ensure that your Wi-Fi network is up and running. Verify that other devices in your home can connect to the network without any issues. Restarting your router can sometimes resolve connection problems.
2. Restart Your Echo Device: If you’re experiencing connectivity problems, try restarting your Echo device by unplugging it from the power source for a few seconds and then plugging it back in. This can help refresh the device’s connection.
3. Move Closer to the Wi-Fi Router: If your Echo device is located far from your router, it may have trouble establishing a stable Wi-Fi connection. Try moving your Echo device closer to the router and see if that improves the connection.
4. Enter Correct Wi-Fi Password: Double-check that you have entered the correct password when connecting your Echo device to Wi-Fi. Ensure there are no typos or extra spaces in the password.
5. Reset Your Wi-Fi Settings: If you have recently changed your Wi-Fi network name or password, you may need to reset your Echo device’s Wi-Fi settings. To do this, press and hold the reset button on the device until the light ring turns orange, then set up the Echo device again from scratch.
6. Update the Alexa App: Ensure that you have the latest version of the Alexa app installed on your smartphone or tablet. Outdated versions may have compatibility issues with the Echo device.
7. Contact Customer Support: If you have tried all the troubleshooting tips and are still experiencing issues, reach out to the Amazon customer support team for further assistance. They are available to help you resolve any technical difficulties you may encounter.
Remember, troubleshooting can sometimes be a trial-and-error process. If one solution doesn’t work, don’t get discouraged. Try another troubleshooting step until you find the solution that works for your specific issue.
By following these troubleshooting tips, you can overcome common connectivity problems and ensure a smooth setup and connection process for your Echo device. Enjoy the full benefits of having a connected smart home and interacting with Alexa effortlessly.
Final Thoughts
Connecting your Echo device and Alexa to Wi-Fi opens up a world of convenience and possibilities. With a stable Wi-Fi connection, you can enjoy hands-free control, access a wide range of skills, stream music, and control your smart home devices effortlessly. While the setup process may seem daunting at first, following the steps outlined in this guide will help you successfully connect your Echo device to Wi-Fi.
Remember to prepare your Echo device, download the Alexa app, plug in your device, follow the on-screen instructions, and connect to your Wi-Fi network. If you encounter any issues, refer to the troubleshooting tips to overcome common connectivity problems.
Once connected, your Echo device becomes a powerful personal assistant, providing you with information, entertainment, and smart home control with just your voice. Take the time to explore the various skills and features available through the Alexa app, and customize your settings according to your preferences.
Lastly, keep in mind that technology and software are constantly evolving. It’s a good practice to periodically update your Echo device’s firmware and the Alexa app to ensure you have access to the latest features and improvements.
Now, armed with the knowledge and guidance provided in this guide, you are ready to embark on your journey towards a connected and intelligent home environment. Enjoy the convenience, entertainment, and efficiency that Echo and Alexa bring to your daily life. Let your voice be the key to unlocking the full potential of your smart home with Echo and Alexa, connected to your Wi-Fi network.