
Connecting an iPad to a Monitor: A Step-by-Step Guide
Connecting your iPad to a monitor can greatly enhance your productivity, allowing you to enjoy a larger screen and take advantage of a more comfortable viewing experience. Whether you need to make a presentation, watch videos, or simply work on a bigger canvas, the process is easier than you might think. Just follow these simple steps to connect an iPad to a monitor:
- Check Your iPad Model: Before you begin, make sure to check which iPad model you have. Older models may have different ports and compatibility compared to newer ones. This will help you determine the appropriate adapters or cables needed for the connection.
- Identify the Monitor Inputs: Take a look at the ports available on your monitor. Common inputs include HDMI, DisplayPort, DVI, or VGA. Identifying the inputs will help you select the proper adapter to connect your iPad.
- Choose the Right Adapter: Based on your iPad model and monitor inputs, choose the compatible adapter. There are various options available, such as HDMI adapters or Lightning to VGA adapters. Make sure to select the one that suits your specific requirements.
- Connect the Adapter to the iPad: Once you have the appropriate adapter, connect it to your iPad. If using a Lightning adapter, plug it into the Lightning port on your iPad. If using a USB-C adapter, insert it into the USB-C port.
- Connect the Adapter to the Monitor: Next, connect the other end of the adapter to the corresponding input on the monitor. For HDMI, connect it to the HDMI port on the monitor. For VGA or DVI, use the respective ports. Ensure a secure and proper connection.
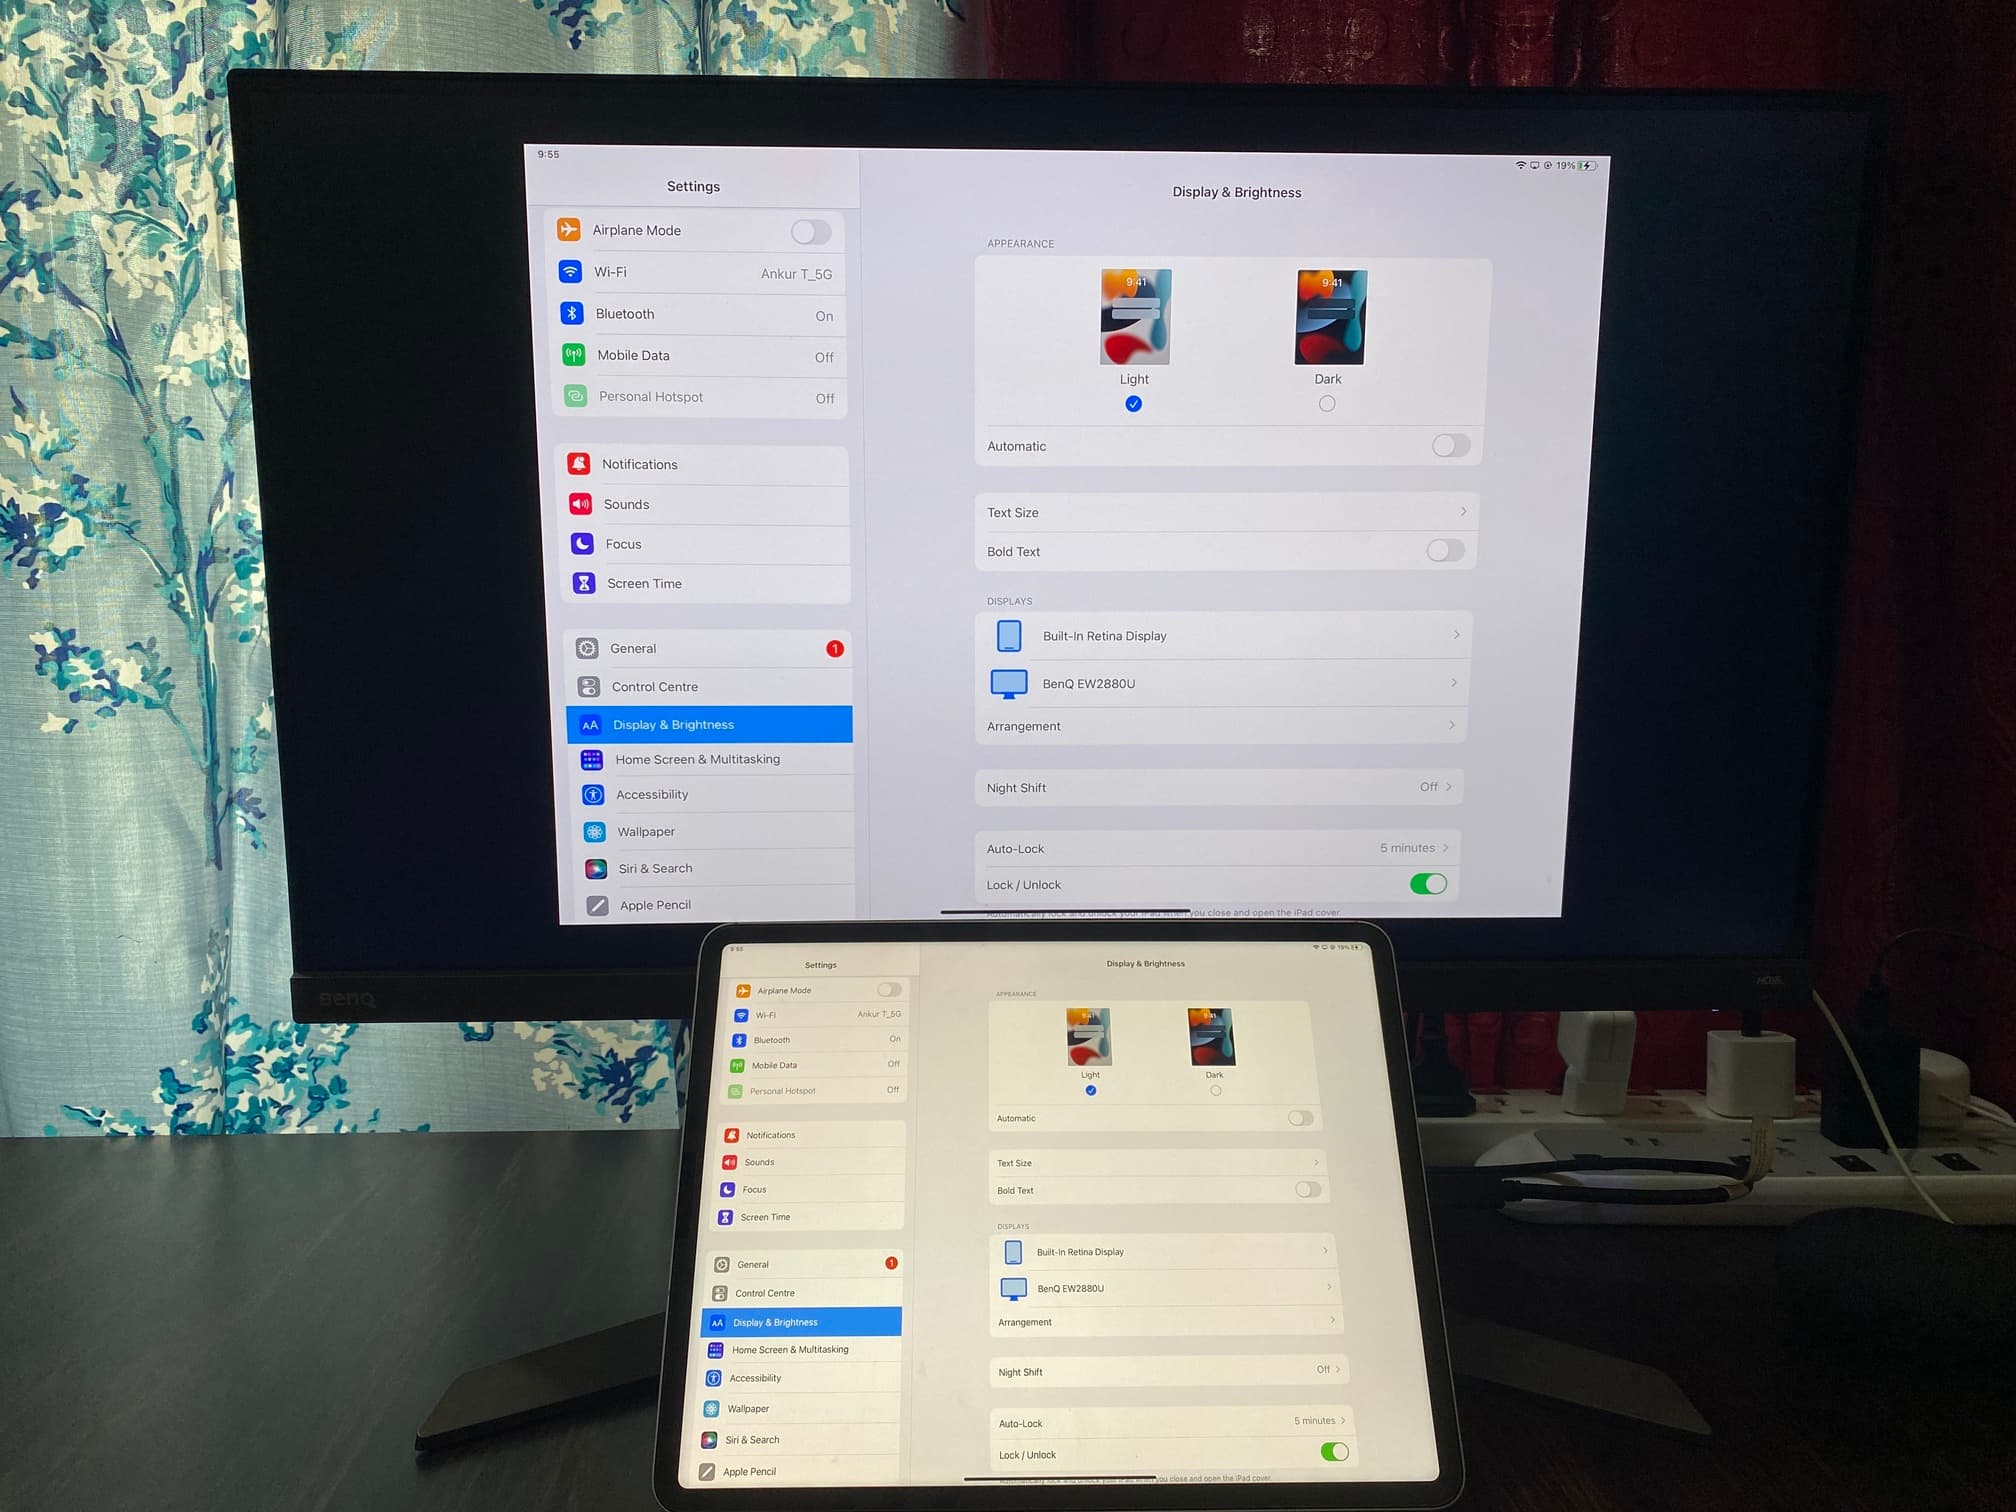
- Adjust Display Settings on the iPad: With the physical connection established, it’s time to adjust the display settings on your iPad. Go to the “Settings” menu and navigate to “Display & Brightness.” From there, you can choose the mirroring option to have your iPad display mirrored on the connected monitor.
- Adjust Display Settings on the Monitor: On some monitors, you may need to manually adjust the input source to ensure it recognizes the connected iPad. Use the monitor’s controls to select the correct input source, such as HDMI or VGA, depending on the adapter you’re using.
- Troubleshooting Common Issues: If you encounter any issues, such as a blank display on the monitor or distorted images, try restarting both the iPad and the monitor. Additionally, ensure all connections are secure and cables are not damaged. If problems persist, consult the device manuals or seek further assistance.
With these simple steps, you can successfully connect your iPad to a monitor and unlock a world of possibilities for productivity, entertainment, and creativity. Enjoy the benefits of a larger screen and make the most out of your iPad’s capabilities.
What You Will Need
Before you embark on the journey of connecting your iPad to a monitor, it’s essential to gather the necessary tools and accessories. Here’s a list of items you will need:
- iPad: First and foremost, you will need an iPad. Make sure to check the model and compatibility as older models may have different port options compared to more recent ones.
- Monitor: You will obviously need a monitor to connect your iPad to. Ensure that your monitor has the necessary input options, such as HDMI, DisplayPort, DVI, or VGA, depending on the adapter you plan to use.
- Adapter or Cable: To establish the connection between your iPad and the monitor, you will need the appropriate adapter or cable. The specific adapter or cable you require will depend on your iPad model and the available inputs on your monitor. Some common options include HDMI adapters, Lightning to VGA adapters, USB-C to HDMI cables, and more.
- Power Source: It’s important to ensure that both your iPad and the monitor have a stable power source. Connecting the devices to a power outlet or using fully charged batteries will prevent any disruptions during the connection process.
- Required Cables: Apart from the main adapter or cable, you may also need additional cables to complete the connection. For example, if you’re using an HDMI adapter, you will need an HDMI cable to connect the adapter to the monitor.
- Knowledge of Display Settings: Familiarize yourself with the display settings on your iPad. Knowing how to access and adjust these settings will be necessary to establish the connection and optimize the display on the connected monitor.
- User Manual/Online Resources: It’s a good idea to keep the user manual for your iPad and monitor handy in case you encounter any technical issues during the process. Additionally, online resources, such as official support websites or forums, can provide valuable troubleshooting tips and guidance.
By ensuring you have all the necessary equipment and information, you will be well-prepared to connect your iPad to a monitor without any hassle. So gather your tools, follow the step-by-step guide, and get ready to enjoy the benefits of a larger screen and enhanced productivity!
Step 1: Check Your iPad Model
Before you begin the process of connecting your iPad to a monitor, it’s important to determine the model of your iPad. This step ensures that you select the right adapter and understand the compatibility requirements for the connection.
To check the model of your iPad, follow these steps:
- Open the “Settings” app on your iPad’s home screen.
- Tap on “General” from the left-hand menu.
- Scroll down and tap on “About.”
- Look for the “Model” or “Model Number” section. It should provide you with specific information about your iPad.
Once you have identified your iPad model, you can use this information to determine the appropriate adapter or cable required for the connection. Different iPad models have different port options, such as Lightning or USB-C, which will influence the type of adapter you need.
Furthermore, understanding your iPad model will also help you find specific instructions or troubleshooting advice related to your device’s connection capabilities.
If you are unsure about your iPad’s model or need further assistance, you can refer to the official Apple support website or consult the user manual that came with your device. Additionally, you can reach out to Apple support for personalized guidance specific to your iPad model.
By checking your iPad model before proceeding, you can ensure a smooth and successful connection to a monitor, maximizing your iPad’s potential for productivity, entertainment, and more.
Step 2: Identify the Monitor Inputs
Before connecting your iPad to a monitor, it’s crucial to identify the available inputs on the monitor itself. This step will help you select the appropriate adapter or cable for the connection and ensure compatibility.
To identify the monitor inputs, follow these steps:
- Inspect the back or side of your monitor where the ports are located.
- Look for the various port options available, such as HDMI, DisplayPort, DVI, or VGA.
- Take note of the types and number of inputs the monitor has.
Knowing the inputs available on your monitor will allow you to choose the correct adapter or cable for connecting your iPad. For example, if your monitor has an HDMI input, you will need an HDMI adapter or cable to connect the iPad to the monitor. Similarly, if your monitor has a VGA input, you will need a Lightning to VGA adapter.
Some monitors may have multiple input options, giving you flexibility in choosing the adapter or cable that works best for your setup. It’s also worth noting that higher-end monitors might have advanced features like USB-C or Thunderbolt inputs, which can provide even better connectivity options for newer iPad models.
If you’re unsure about the inputs on your monitor, you can refer to the user manual that came with the monitor or visit the manufacturer’s website for more detailed information. Additionally, you can inspect the labels near the ports on the monitor itself, as they often provide clear indications of the input types.
By identifying the monitor inputs beforehand, you can ensure that you select the right adapter or cable for the connection, guaranteeing a successful and seamless integration between your iPad and the monitor.
Step 3: Choose the Right Adapter
Once you have checked your iPad model and identified the inputs on your monitor, the next step is to choose the right adapter for the connection. The choice of adapter will depend on your iPad model and the available inputs on your monitor.
To choose the appropriate adapter, consider the following factors:
- iPad Model: Different iPad models have varying port options, such as Lightning or USB-C. Ensure compatibility by selecting an adapter that is specifically designed for your iPad model.
- Monitor Inputs: Refer to Step 2 and determine the input types available on your monitor. Common inputs include HDMI, DisplayPort, DVI, or VGA. Choose an adapter that matches the input type of your monitor.
- Adapter Types: There are several adapter options available in the market, including HDMI adapters, Lightning to VGA adapters, USB-C to HDMI cables, and more. Choose the adapter that suits your specific requirements and provides the desired level of video and audio quality.
- Additional Features: Some adapters may offer additional features, such as multiple ports or pass-through charging capability. Consider these features if they are important to your setup and can enhance your overall experience.
- Brand and Quality: Opt for adapters from reputable brands to ensure reliability and compatibility. Read user reviews and check for product recommendations to make an informed choice.
Remember, selecting the right adapter is crucial for a successful connection. Using an adapter that is not compatible with your iPad model or the monitor inputs may lead to connectivity issues or poor display quality.
If you are unsure about which adapter to choose, you can consult the Apple website, visit an authorized retailer, or contact customer support for personalized guidance and recommendations based on your specific requirements.
By choosing the right adapter, you can ensure a seamless connection between your iPad and the monitor, allowing you to enjoy a larger screen and unlock new possibilities for productivity, entertainment, and more.
Step 4: Connect the Adapter to the iPad
Now that you have chosen the appropriate adapter for your iPad model and the monitor inputs, it’s time to connect the adapter to your iPad. This step is essential for establishing the physical connection between the two devices.
To connect the adapter to your iPad, follow these simple steps:
- Locate the appropriate port on your iPad based on the adapter you have chosen. For older iPad models, this is usually the Lightning port, while newer iPad Pro models may have a USB-C port.
- Take the adapter and align it with the port on your iPad.
- Gently insert the adapter into the port, making sure it fits snugly. Be careful not to force the connection as it may damage the port.
- Once the adapter is properly connected, you should feel a firm click or see it securely in place.
- Check that the adapter is seated correctly and that there are no loose connections.
It’s important to note that some adapters may require additional steps for connection, such as securing screws or attaching cables. Consult the adapter’s manual or refer to the manufacturer’s instructions for any specific requirements.
If you encounter any difficulties during the connection process or if the adapter does not fit properly, double-check that you have the correct adapter for your iPad model. If you are unsure, refer to the user manual or contact the manufacturer for assistance.
Once the adapter is successfully connected to your iPad, you have completed a vital step in the process. The next step is to connect the adapter to the monitor, which will be covered in the following section.
Step 5: Connect the Adapter to the Monitor
With the adapter successfully connected to your iPad, the next step is to establish the connection between the adapter and the monitor. This step will allow you to display your iPad’s screen on the larger monitor, providing a more immersive viewing experience.
To connect the adapter to the monitor, follow these steps:
- Identify the input port on the monitor that corresponds to the adapter you have chosen. For example, if you are using an HDMI adapter, locate the HDMI input on the monitor.
- Take the appropriate cable, such as an HDMI cable, and connect one end to the corresponding port on the adapter.
- Connect the other end of the cable into the input port on the monitor.
- Ensure that the cable is securely inserted into both the adapter and the monitor.
- Verify that all connections are properly seated and that there are no loose cables.
Depending on the type of adapter and monitor you have, you may need to use additional cables to establish the connection. For example, if you are using a VGA adapter, you will need a VGA cable to connect the adapter to the monitor. Ensure you have the necessary cables in order to complete the connection successfully.
Once the adapter is connected to the monitor, you may need to adjust the monitor’s input source settings. This will ensure that the monitor recognizes the connected iPad. Use the controls on the monitor to select the corresponding input source, such as HDMI or VGA.
If you encounter any issues or the monitor does not display the iPad’s screen, double-check all connections and make sure they are secure. Restarting the devices may also help resolve any connectivity problems.
With the adapter successfully connected to the monitor, you are one step closer to enjoying your iPad’s content on a larger screen. The next steps involve adjusting the display settings on the iPad and monitor, which will be covered in the following sections.
Step 6: Adjust Display Settings on the iPad
After connecting the adapter to both your iPad and the monitor, it’s necessary to adjust the display settings on your iPad. This will enable you to optimize the viewing experience and ensure that your iPad’s screen is properly mirrored or extended onto the connected monitor.
To adjust the display settings on your iPad, follow these steps:
- Unlock your iPad and go to the home screen.
- Tap on the “Settings” app to open the settings menu.
- In the left-hand menu, scroll down and tap on “Display & Brightness.”
- On the right-hand side, you will see various options related to the display settings.
- Tap on “Screen Mirroring” or “AirPlay & Handoff,” depending on your iPad model and iOS version.
- Select the option that corresponds to your adapter or monitor. This option may be labeled as the name of the monitor or the type of input, such as HDMI or VGA.
- Ensure that the “Mirroring” or “Extend” mode is turned on, depending on your preference. “Mirroring” will display the same content on both the iPad and the connected monitor, while “Extend” will allow you to use the monitor as a separate display.
- Adjust any additional display settings, such as resolution or brightness, based on your preferences.
It’s worth noting that the available display settings and options may vary depending on your iPad model and the version of iOS you are using. If you are unsure about the specific options for your device, consult the iPad user manual or refer to the Apple support website for detailed instructions.
Once you have adjusted the display settings on your iPad, the screen should be mirrored or extended onto the connected monitor. You can now enjoy a larger workspace, watch videos, give presentations, or engage in other activities with enhanced visibility and convenience.
If you encounter any issues with the display settings or the iPad’s screen not appearing on the monitor, double-check the adapter and monitor connections, restart both devices, and ensure that the correct input source is selected on the monitor.
By adjusting the display settings on your iPad, you have completed an essential step to ensure a seamless and optimized connection between your iPad and the monitor.
Step 7: Adjust Display Settings on the Monitor
Now that you have successfully adjusted the display settings on your iPad, the next step is to configure the display settings on the connected monitor. This will ensure that the monitor recognizes the input from your iPad and displays it correctly.
To adjust the display settings on the monitor, follow these steps:
- On the monitor’s physical controls, locate the menu or settings button. The exact location and appearance may vary depending on the monitor model.
- Press the menu or settings button to access the monitor’s on-screen display (OSD) menu.
- Within the OSD menu, navigate to the options related to input or source settings.
- Select the input source that corresponds to the port or adapter you have connected your iPad to (e.g., HDMI, VGA, DisplayPort).
- Ensure that the input source you selected matches the adapter or cable you are using for the connection.
- Adjust any additional display settings, such as brightness, contrast, or color calibration, to your liking.
- Save the changes and exit the OSD menu.
It’s important to note that the exact menu options and settings available on your monitor may vary depending on the brand and model. Consult the monitor’s user manual or refer to the manufacturer’s website if you need specific instructions or assistance with adjusting the display settings.
If the monitor does not recognize the connected iPad or you encounter any issues with the display, double-check that all the connections are secure, including the adapter and cables. Restarting both the iPad and the monitor can also help resolve any connectivity problems.
By adjusting the display settings on the monitor, you ensure that the iPad’s screen is properly displayed and optimized for the connected monitor. This step allows you to enjoy a clear and vibrant viewing experience, whether you’re working, watching videos, or engaging in other activities.
Remember to familiarize yourself with the monitor’s features and options to make the most out of your connected iPad’s display on the larger screen.
Step 8: Troubleshooting Common Issues
While connecting an iPad to a monitor is typically a straightforward process, there may be instances where you encounter certain issues. Understanding and troubleshooting common problems can help you overcome any obstacles and ensure a successful connection. Here are some common issues you might encounter and their potential solutions:
1. No Display on the Monitor: If you don’t see anything on the monitor after connecting the iPad, ensure that both devices are powered on and the connections are secure. Try restarting both the iPad and the monitor. If using an adapter, double-check that you have chosen the correct input source on the monitor.
2. Distorted or Flickering Display: If the display on the monitor appears distorted or flickering, check the adapter and cable connections. Make sure they are inserted securely and not damaged. Try using a different adapter or cable if available. Adjust the display settings on both the iPad and the monitor to ensure compatibility.
3. Unsupported Resolution or Aspect Ratio: If the resolution or aspect ratio on the monitor does not match the iPad’s screen, adjust the display settings on the iPad to a supported resolution. Refer to the monitor’s user manual to check for supported resolutions and adjust the monitor settings accordingly.
4. Audio Not Playing Through the Monitor: If you are using an HDMI adapter or cable and the audio is not playing through the monitor’s speakers, check the audio settings on the iPad. Make sure the audio output is set to the monitor or HDMI. Additionally, verify that the monitor’s speakers are not muted and the volume is turned up.
5. Adapter Compatibility Issues: In certain cases, adapters from third-party manufacturers may not be fully compatible with your iPad or the monitor. If you encounter issues, consider using adapters from reputable brands or consult the Apple store for certified adapters. Updating your iPad’s software to the latest version might also resolve compatibility issues.
6. Inconsistent or Intermittent Connection: If the connection between the iPad and the monitor is unstable, check for any loose or damaged cables. Ensure that all connections are secure and tightly plugged in. If possible, try using a different adapter or cable to rule out any hardware issues.
If you are still experiencing difficulties or encounter unique problems, consult the user manuals for your iPad and monitor, visit the manufacturer’s support website, or consider reaching out to customer support for further assistance.
Remember to remain patient and methodical in troubleshooting. With perseverance, you can resolve any issues and enjoy a seamless and productive connection between your iPad and the monitor.