
Why Clearing the Cache on Facebook is Important
When it comes to using Facebook, whether on the web or mobile devices, clearing the cache regularly is an important practice. The cache is a temporary storage location where Facebook stores data such as images, videos, and browsing history to make subsequent visits faster and more efficient. However, over time, this cache can become bloated and outdated, which can lead to various issues. Here are several reasons why clearing the cache on Facebook is important:
- Improved Performance: Clearing the cache helps eliminate any accumulated junk files and temporary data that may be slowing down your Facebook experience. By freeing up space and removing unnecessary data, you can enjoy a faster and smoother browsing experience.
- Refreshed Content: Clearing the cache ensures that you see the most updated content on Facebook. Since the cache stores images and other elements of web pages, outdated cache files may cause you to view older versions of Facebook profiles, posts, or comments. Clearing the cache ensures you see the latest updates on your News Feed and other sections of the platform.
- Fixing Display Issues: Sometimes, Facebook may not display properly due to corrupted or outdated cache files. Clearing the cache helps resolve display issues such as distorted images, missing buttons, or broken layouts, allowing you to navigate Facebook more effectively.
- Enhanced Privacy: Clearing the cache removes stored login credentials and other sensitive data from your browser or mobile device. This helps to protect your privacy and prevent unauthorized access to your Facebook account.
- Troubleshooting Problems: When encountering issues on Facebook, such as error messages, slow loading times, or freezing, clearing the cache is often recommended as a troubleshooting step. By clearing the cache, you can eliminate potential conflicts or errors caused by cached data.
Overall, clearing the cache on Facebook is crucial for optimizing performance, staying up to date with the latest content, resolving display issues, maintaining privacy, and troubleshooting problems. It’s a simple and effective way to ensure you have a seamless and secure Facebook experience.
How to Clear the Cache on Facebook on the Web
If you’re using Facebook on a web browser, clearing the cache is a straightforward process. Follow these simple steps to clear the cache on Facebook:
- Open your preferred web browser (e.g., Google Chrome, Mozilla Firefox, Safari).
- Log in to your Facebook account by entering your credentials.
- Click on the small downward arrow in the top-right corner of the Facebook page.
- In the dropdown menu, select “Settings & Privacy” and then click on “Settings.”
- On the left-hand side, click on “Your Facebook Information.”
- Scroll down to the “Activity Log” section and click on “View” next to “Clear History.”
- A dialog box will appear with options to clear browsing history and cookies. Choose the time range you want to clear (e.g., last hour, last day, last week).
- Check the box that says “Browsing History” and any other relevant options.
- Click on the “Clear” button to confirm your selection and clear the cache.
- Facebook will then clear your browsing history and cookies, which includes clearing the cache. It may take a few moments to complete the process.
- After the cache is cleared, refresh the Facebook page, and you will notice a difference in loading times and possibly see the latest content.
Please note that clearing the cache will log you out of Facebook on that particular web browser, so you will need to log in again if you want to continue using Facebook.
By following these steps, you can easily clear the cache on Facebook and enjoy a refreshed and optimized browsing experience on the web.
How to Clear the Cache on Facebook on Mobile Devices
If you’re using Facebook on your mobile device, whether it’s an iOS or Android device, clearing the cache can help improve performance and resolve any issues you may be encountering. Here’s how you can clear the cache on Facebook on mobile:
Clearing Cache in the Facebook App:
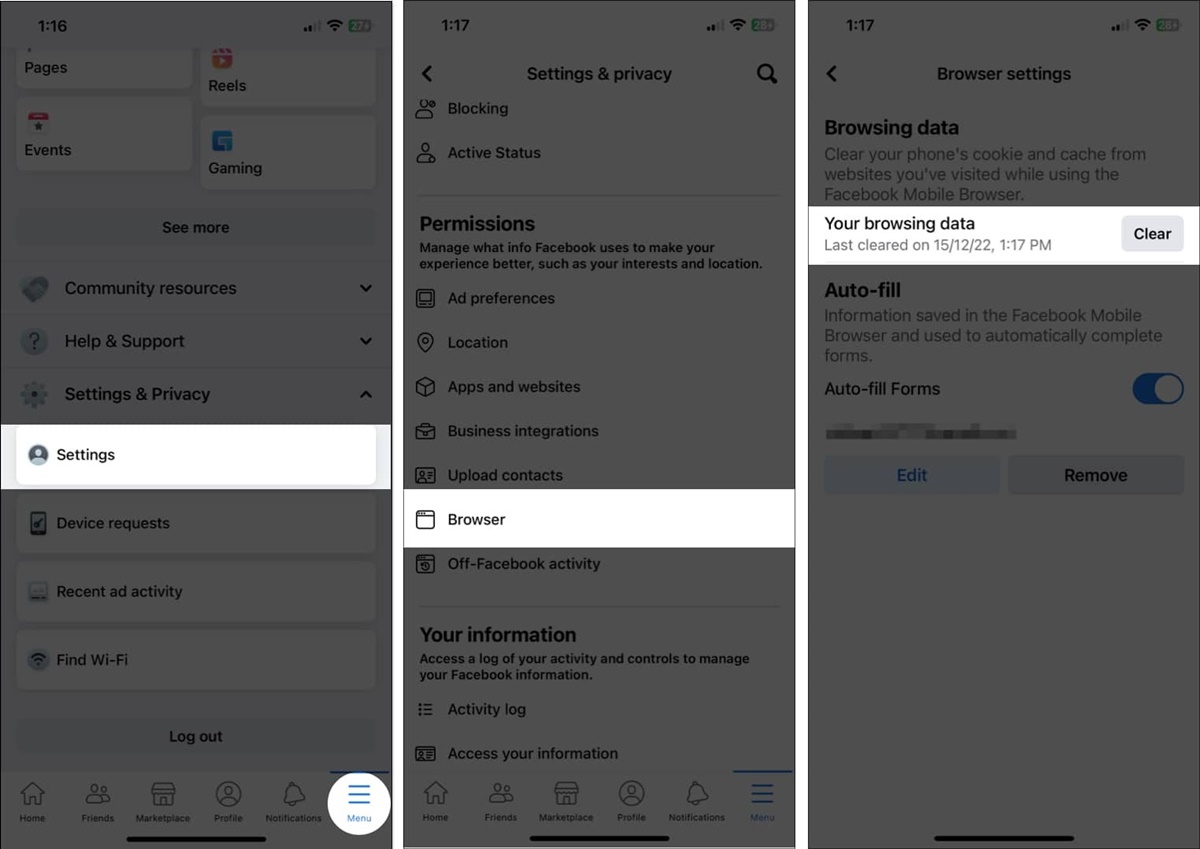
- Open the Facebook app on your mobile device and log in, if necessary.
- Tap on the three horizontal lines at the top-right corner of the screen (Android) or bottom-right corner (iOS).
- Scroll down and tap on “Settings & Privacy.”
- Next, tap on “Settings.”
- Scroll down and tap on “Media and Contacts.”
- Under the “Storage” section, tap on “Clear Cache.”
- A confirmation dialog box will appear. Tap on “Clear Cache” again to proceed.
Clearing Cache in Different Web Browsers (Chrome, Firefox, Safari, etc.):
If you access Facebook through a mobile web browser instead of the app, clearing the cache is slightly different. Here’s how you can do it:
- Open the web browser app on your mobile device.
- Visit the Facebook website and log in, if necessary.
- Tap on the options or settings menu (typically represented by three dots or lines).
- Look for the “Settings” or “History” section in the menu and tap on it.
- Find and tap on “Clear Browsing Data” or “Clear Cache.”
- Select the desired time range or check the options for cache and cookies.
- Tap on “Clear” or “Delete” to confirm.
After clearing the cache, it’s advisable to relaunch the Facebook app or refresh the browser for the changes to take effect. You should notice an improvement in the app’s performance and the display of the most up-to-date content.
By clearing the cache on your mobile device, you can keep your Facebook app or browser running smoothly, ensuring a better user experience.
Clearing Cache in the Facebook App
If you primarily use the Facebook app on your mobile device, clearing the cache can help optimize its performance and resolve any issues you may be experiencing. Here’s how you can clear the cache in the Facebook app:
- Open the Facebook app on your mobile device and log in, if necessary.
- Tap on the three horizontal lines at the top-right corner of the screen (Android) or bottom-right corner (iOS).
- Scroll down and tap on “Settings & Privacy.”
- Next, tap on “Settings.”
- Scroll down and tap on “Media and Contacts.”
- Under the “Storage” section, tap on “Clear Cache.”
- A confirmation dialog box will appear. Tap on “Clear Cache” again to proceed.
By following these steps, the cache in the Facebook app will be cleared, freeing up storage space and removing temporary files that could potentially cause performance issues. It is important to note that clearing the cache will not log you out of the app or delete your personal data, such as messages or photos.
After clearing the cache, relaunch the Facebook app and you should notice an improvement in its speed and functionality. Additionally, clearing the cache can help resolve display issues, such as missing images or slow-loading content, by ensuring that the app retrieves the latest data from the Facebook servers.
Clearing the cache in the Facebook app is a simple and effective way to keep the app running smoothly and enhance your overall Facebook experience on your mobile device.
Clearing Cache in Different Web Browsers (Chrome, Firefox, Safari, etc.)
If you access Facebook through a web browser on your computer or mobile device, clearing the cache can help improve performance and resolve any issues you may be encountering. Here’s how you can clear the cache in different web browsers:
Google Chrome:
- Click on the three-dot menu icon at the top-right corner of the browser window.
- In the dropdown menu, hover over “More Tools” and select “Clear Browsing Data.”
- Choose the time range you want to clear, such as the past hour, day, week, or all time.
- Make sure the “Cached images and files” option is checked.
- Click on the “Clear data” button to clear the cache.
Mozilla Firefox:
- Click on the three-line menu icon (hamburger icon) at the top-right corner of the browser window.
- In the dropdown menu, select “Options” (Windows) or “Preferences” (Mac).
- In the left-hand sidebar, click on “Privacy & Security.”
- Scroll down to the “Cookies and Site Data” section and click on the “Clear Data” button.
- Make sure the “Cached Web Content” option is checked.
- Click on the “Clear” button to clear the cache.
Apple Safari:
- Click on “Safari” in the top menu bar and select “Clear History.”
- Choose the time range you want to clear, such as the past hour, day, or all history.
- Click on the “Clear History” button to clear the cache.
Microsoft Edge:
- Click on the three-dot menu icon at the top-right corner of the browser window.
- In the dropdown menu, hover over “History” and select “Clear browsing data.”
- Choose the time range you want to clear.
- Make sure the “Cached images and files” option is checked.
- Click on the “Clear” button to clear the cache.
Remember to close and reopen your web browser after clearing the cache to ensure the changes take effect. By clearing the cache in your preferred web browser, you can optimize your Facebook browsing experience, resolve display issues, and improve overall performance.
How Frequently Should You Clear the Cache on Facebook?
The frequency with which you should clear the cache on Facebook will depend on various factors, including your usage patterns and preferences. While there is no strict rule, here are some factors to consider when deciding how often to clear the cache:
- Device Memory and Storage: If you’re using a device with limited memory or storage capacity, clearing the cache more frequently can help free up valuable space and prevent performance issues.
- Performance and Speed: If you notice that Facebook or your browser is slowing down, taking longer to load, or experiencing display problems, it may be a good idea to clear the cache to improve performance and speed.
- Regular Updates to Facebook: Facebook frequently releases updates, introducing new features, bug fixes, and performance enhancements. Clearing the cache periodically ensures that you have the most updated version of Facebook, potentially resolving any compatibility issues with old cache files.
- Privacy and Security: Clearing the cache can help protect your privacy by removing stored login credentials and sensitive data. If you’re concerned about potential privacy breaches, clearing the cache more frequently can be a proactive measure.
- Preference for Fresh Content: If you want to ensure that you’re always seeing the latest posts, comments, and images on Facebook, clearing the cache regularly will help refresh the content and prevent you from viewing outdated information.
Considering these factors, it is recommended to clear the cache on Facebook every few weeks or whenever you encounter performance issues or display problems. This frequency strikes a balance between maintaining optimal performance and storage capacity without excessively impacting your browsing experience.
Ultimately, the choice of how frequently to clear the cache on Facebook is a personal one. You can experiment with different intervals and assess how it affects your browsing experience. Additionally, keep in mind that clearing the cache will log you out of Facebook on that particular device or browser, so make sure you’re prepared to log in again if necessary.
By clearing the cache regularly, you can ensure a smoother and more efficient Facebook experience, keeping your device optimized and up to date with the latest features and content.
Benefits of Regularly Clearing the Cache on Facebook
Regularly clearing the cache on Facebook offers several benefits that can enhance your overall browsing experience and optimize the performance of the platform. Here are some key advantages of clearing the cache on a regular basis:
- Improved Performance: Clearing the cache frees up storage space and removes temporary files, which can lead to faster loading times, smoother navigation, and improved responsiveness on Facebook.
- Optimized Storage: Over time, the cache accumulates a significant amount of data, taking up valuable storage space on your device. By clearing the cache regularly, you can reclaim storage and ensure your device operates efficiently.
- Up-to-Date Content: Clearing the cache ensures that you see the most recent content on Facebook. By removing outdated cache files, you can view the latest posts, comments, and images without any discrepancies or missing elements.
- Resolved Display Issues: If you are experiencing display issues, such as distorted images or broken layouts, clearing the cache can help resolve these problems. It refreshes the cache and retrieves fresh data, eliminating any potential conflicts that may be causing display inconsistencies.
- Enhanced Privacy: As cache files often store login credentials and other sensitive data, regularly clearing the cache helps protect your privacy by preventing unauthorized access to your Facebook account. It ensures that your personal information is not stored on the device.
- Troubleshooting Tool: Clearing the cache is an effective troubleshooting step if you encounter issues on Facebook, such as slow loading times, error messages, or freezing. It can help resolve glitches or conflicts caused by corrupted cache files.
- Refreshed User Experience: By clearing the cache, you can approach Facebook with a clean slate. This can give you a fresh and rejuvenated user experience, ensuring that you start each visit with a smoother, more responsive, and updated platform.
Overall, regularly clearing the cache on Facebook is crucial for optimizing performance, resolving display issues, maintaining privacy, and ensuring that you are viewing the most up-to-date content. It is a simple yet effective practice that can significantly enhance your overall Facebook experience.
Consider making clearing the cache on Facebook a routine task to keep your browsing experience running smoothly, improve performance, and enjoy the platform at its best.
What Happens When You Clear the Cache on Facebook?
When you clear the cache on Facebook, several things happen that can improve your browsing experience and optimize the performance of the platform:
- Removal of Temporary Files: Clearing the cache deletes temporary files that are stored on your device. These files include images, videos, and other website data that are stored to enhance the loading speed of Facebook. By removing these temporary files, you free up storage space on your device.
- Refreshed Content: Clearing the cache ensures that you see the most up-to-date content on Facebook. The cache stores various elements of web pages, including images, CSS stylesheets, and JavaScript files. By clearing the cache, Facebook will fetch new versions of these files, guaranteeing that you see the latest posts, comments, and images.
- Improved Performance: Clearing the cache can significantly improve the performance of Facebook. Over time, the cache can become bloated with outdated or corrupted files, leading to slow loading times, display issues, and general sluggishness. By clearing the cache, you refresh the data and enable Facebook to operate more efficiently, resulting in faster page loads and smoother navigation.
- Resetting of Preferences: The cache also stores certain user preferences and login credentials. When you clear the cache, these preferences are reset, and any saved login information is removed. This can be beneficial for privacy reasons, as it ensures that your personal data is not stored locally on the device.
- Log Out from Facebook: It’s important to note that clearing the cache on Facebook will log you out of your account on that specific device or browser. This means that you will need to log back in when you revisit the site. Clearing the cache does not delete your account or any of your Facebook data; it only removes temporary files stored locally on your device.
Clearing the cache is a routine maintenance task that helps optimize your Facebook experience. It ensures that you are seeing the most updated content and allows Facebook to run more smoothly and efficiently. It’s particularly useful when you encounter display issues, slow loading times, or when you want to refresh your browsing experience.
By regularly clearing the cache on Facebook, you can enjoy a streamlined and improved experience on the platform.
Troubleshooting Common Issues When Clearing the Cache on Facebook
While clearing the cache on Facebook is generally a simple and effective way to optimize performance, it can occasionally lead to certain issues. Here are some common problems that may occur when clearing the cache on Facebook and their corresponding troubleshooting steps:
- Login Issues: After clearing the cache, you may be logged out of your Facebook account and encounter difficulties logging back in. Make sure you have the correct login credentials and try logging in again. If you still cannot access your account, reset your password through the password recovery process.
- Missing Data: Occasionally, clearing the cache may lead to the loss of certain data, such as saved passwords or preferences. If this happens, you will need to re-enter your passwords and reset any customized settings or preferences.
- Slow Loading Times: While clearing the cache is intended to improve loading speed, it is possible that you might experience temporary slowdowns immediately after clearing the cache. This is because Facebook needs to retrieve new data and rebuild the cache. Give it some time, and the loading speed should improve.
- Display Issues: In some cases, clearing the cache can cause display issues on Facebook, such as misaligned images or broken layouts. To troubleshoot this problem, try refreshing the page or clearing the cache again. If the issue persists, try accessing Facebook on a different browser or device to see if it’s specific to your current setup.
- Error Messages: After clearing the cache, you might encounter error messages or problematic behavior on Facebook. If this happens, refresh the page or close and reopen the browser to see if the issue resolves itself. If the problem persists, clear the cache again or try accessing Facebook from a different browser.
- Difficulty Clearing Cache: If you are having trouble clearing the cache on Facebook, ensure that you are following the correct steps for your device and browser. Double-check your internet connection and make sure you have the latest version of your browser installed. If the issue persists, consult online resources or seek technical support.
If you encounter any of these issues when clearing the cache on Facebook, don’t panic. Most issues can be resolved by following the recommended troubleshooting steps. Remember to be patient and give the platform some time to rebuild the cache and adapt to the cleared data.
If the problems persist or are particularly persistent, you can reach out to Facebook support for further assistance.
Clearing the cache on Facebook is generally a safe and useful practice, but it’s important to be aware of these potential issues and how to address them. With proper troubleshooting, you can overcome any obstacles and enjoy a smooth and optimized Facebook experience.
Alternative Methods to Optimize Facebook Performance
In addition to clearing the cache, there are alternative methods you can utilize to optimize the performance of Facebook. These methods can help improve speed, responsiveness, and overall user experience. Here are some alternative approaches to consider:
- Update Your App or Browser: Ensure that you are using the latest version of the Facebook app or web browser. Updates often contain bug fixes, performance enhancements, and new features that can improve your Facebook experience.
- Disable Unnecessary Extensions and Plugins: If you’re using Facebook on a web browser, disable any unnecessary extensions or plugins that could be affecting performance. Some extensions or plugins can consume system resources and slow down the browsing experience.
- Manage Your Friends List: If you have a large number of friends on Facebook, it may impact performance. Consider reviewing and unfriending inactive accounts or individuals you no longer interact with. This can help streamline your News Feed and improve load times.
- Limit the Number of Active Tabs: If you tend to have multiple tabs open while using Facebook, it can strain your device’s resources. Close any unnecessary tabs to free up memory and improve overall performance.
- Manage Notifications: Adjust your notification settings to reduce the number of notifications you receive. Excessive notifications can cause distractions and impact the loading time of Facebook. Prioritize essential notifications to stay informed without overwhelming your device.
- Clear up Device Storage: Aside from clearing the cache, make sure your device has sufficient free storage space. Delete unnecessary files, apps, or media to optimize performance and create more room for Facebook to operate smoothly.
- Limit Background App Refresh: If you’re using Facebook on a mobile device, go to your device settings and manage the background app refresh option. Restricting unnecessary background activity can help conserve battery life and improve the performance of Facebook.
- Use a Stable Internet Connection: A stable and reliable internet connection is crucial for optimal Facebook performance. Ensure you’re on a secure and high-speed network to prevent intermittent loading, buffering, or other connectivity issues.
By incorporating these alternative methods into your Facebook routine, you can further optimize the platform’s performance and enjoy a smoother and more responsive user experience. Experiment with different approaches and find what works best for you and your device.
Remember that optimizing Facebook performance is an ongoing process, and it may require periodic adjustments as the platform evolves and your usage patterns change. Stay proactive in maintaining optimal performance to make the most out of your Facebook browsing experience.
Recommended Tools for Clearing Browser Cache Efficiently
Clearing browser cache is a beneficial practice for optimizing performance and resolving issues on various websites, including Facebook. While most browsers offer built-in functionality to clear the cache, there are also third-party tools available that can help streamline the process and ensure efficient cache clearance. Here are some recommended tools for clearing the browser cache:
- CCleaner: CCleaner is a popular utility tool that allows you to clean up temporary files, including browser cache, cookies, and browsing history. It supports multiple browsers and provides an easy-to-use interface for clearing cache efficiently.
- BleachBit: BleachBit is a cross-platform system cleaner that can help you delete unnecessary files and clear cache from various browsers. It offers advanced features and customization options, allowing you to target specific cache files and optimize your browsing experience.
- Browser Extensions: Many browsers have extensions or add-ons specifically designed for clearing cache. These extensions provide a quick and convenient way to clear cache with just a few clicks. Examples include “Clear Cache” for Chrome and “Clear Cache Button” for Firefox.
- Browser Developer Tools: Most modern browsers have built-in developer tools that allow you to inspect and manipulate various aspects of a website, including the cache. By accessing the developer tools, you can clear the cache directly from the browser’s interface.
- Cache Clearing Apps: Some browser cache clearing apps, such as “Cache Cleaner” or “CacheClearer,” are available for mobile devices. These apps provide a hassle-free way to clear cache quickly and efficiently, optimizing your mobile browsing experience.
When using third-party tools or extensions, it’s important to ensure that they are reputable and trusted. Be cautious when downloading and installing software from unknown sources, as it might contain malware or compromise your privacy. Stick to well-known tools or those recommended by trusted sources. Always verify the authenticity and reviews of the tools before using them.
Remember that clearing cache is just one aspect of browser maintenance. Regularly updating your browser, keeping your operating system up to date, and employing good browsing practices, such as limiting the number of open tabs, can also contribute to a smoother and more efficient browsing experience.
By utilizing these recommended tools and incorporating them into your regular maintenance routine, you can efficiently clear browser cache and optimize the performance of your browsing experience, including Facebook.
Final Thoughts on Clearing the Cache for a Better Facebook Experience
Clearing the cache on Facebook is a valuable practice that can significantly enhance your browsing experience on the platform. By removing temporary files and outdated data, you can improve performance, ensure up-to-date content, and troubleshoot common issues. Here are some final thoughts on clearing the cache for a better Facebook experience:
Regular Maintenance: Clearing the cache should be part of your regular maintenance routine for Facebook. Consider setting reminders to clear the cache every few weeks or whenever you encounter performance issues or display inconsistencies. By making it a habit, you can keep your Facebook experience running smoothly.
Combined Efforts: Clearing the cache is just one aspect of optimizing your Facebook experience. It’s essential to combine cache clearance with other best practices, such as updating your app or browser, managing your friends list, and minimizing background activities. These efforts work together to create a more seamless and enjoyable Facebook experience.
Patience with Changes: After clearing the cache, it’s normal to experience minor adjustments as Facebook rebuilds the cache and retrieves fresh data. Be patient during this process and allow the platform some time to adapt. You will likely notice improvements in loading speeds, display, and overall performance shortly after the cache has been cleared.
Customization and Preferences: Remember that clearing the cache will reset certain preferences and settings on Facebook. Take the opportunity to customize your experience, adjust notification settings, and fine-tune the platform to your preferences after clearing the cache. This way, you can tailor Facebook to suit your specific needs and preferences.
Regular Updates: Stay updated with the latest versions of the Facebook app or web browser. Updates often address bugs, security vulnerabilities, and performance enhancements. By keeping your software up to date, you can ensure compatibility with Facebook’s features and improvements.
Technical Support: If you encounter persistent issues after clearing the cache or have difficulty resolving any problems, don’t hesitate to seek technical support. Facebook support forums, community groups, and official resources can provide valuable insights and guidance to troubleshoot and resolve any lingering issues.
Overall, clearing the cache on Facebook is a simple yet effective practice that can greatly enhance your browsing experience. By enjoying faster loading times, refreshed content, improved performance, and resolving common issues, you can make the most out of your Facebook interactions and stay connected with friends and family with ease.
Make clearing the cache a regular part of your Facebook maintenance routine, and you’ll be rewarded with a smoother, more optimized, and enjoyable experience on the platform.