
What is Purgeable Space on Mac
When it comes to managing storage on your Mac, you may come across the term “purgeable space.” But what exactly does it mean? Purgeable space refers to the amount of storage on your Mac that the system deems safe to delete if necessary. It includes files and data that are not immediately essential but can be removed to free up storage when needed.
MacOS has a built-in feature called optimized storage that automatically identifies and classifies files as purgeable. This includes items such as system caches, logs, temporary files, and even unused applications. By marking these files as purgeable, your Mac can intelligently manage storage and ensure that essential files and data are given priority.
The concept of purgeable space is dynamic, meaning the amount of space classified as purgeable can change based on your usage and storage needs. For example, if you have limited available storage, macOS will automatically start purging files to create more space for your important data.
One important point to note is that purgeable space is different from the space occupied by your macOS system files and applications. These files are essential for the operating system to function and cannot be deleted without causing harm to your Mac. Purgeable space, on the other hand, consists of files that can be safely removed without affecting the core functionality of your system.
MacOS uses various algorithms and techniques to determine which files are eligible for purgeability. This ensures that your important files are not deleted, and the system can intelligently manage storage without compromising performance or user experience.
Reasons to Clear Purgeable Space
Clearing purgeable space on your Mac can bring several benefits. Here are a few reasons why you might want to consider doing so:
- Free up storage: As purgeable space consists of files that are not immediately essential, clearing it can help reclaim valuable storage on your Mac. This is especially useful if you are running low on disk space and need to make room for new files and applications.
- Improve performance: When your Mac’s storage is nearly full, it can start to slow down. By clearing purgeable space, you can alleviate the strain on your system and enhance overall performance. This is particularly important if you frequently work with resource-intensive applications or perform tasks that require a significant amount of disk space.
- Organize your files: Clearing purgeable space allows you to have better control over your files and data. You can review and delete unnecessary temporary files, cached data, and unused applications, thereby keeping your Mac clutter-free and organized.
- Optimize system stability: By removing purgeable files, you can optimize the stability of your Mac’s operating system. This is because purgeable files, such as system caches and logs, can accumulate over time and potentially cause issues, like system errors or crashes. Clearing them ensures a clean slate, reducing the chances of technical glitches and improving system reliability.
- Prepare for system updates: Before installing major system updates, it’s a good idea to clear purgeable space. Updates often require a significant amount of free storage to install properly. By clearing purgeable space in advance, you can ensure that you have enough room to accommodate the update and avoid any installation errors.
Overall, clearing purgeable space on your Mac is a proactive step to maintain optimal performance, maximize storage capacity, and keep your system running smoothly. It offers the added benefits of improved organization, stability, and preparedness for future updates.
Checking Purgeable Space on Mac
Before you can clear the purgeable space on your Mac, it’s helpful to know how much of it is currently occupied. Thankfully, macOS provides a few methods to check the amount of purgeable space on your system. Here are a couple of ways you can do this:
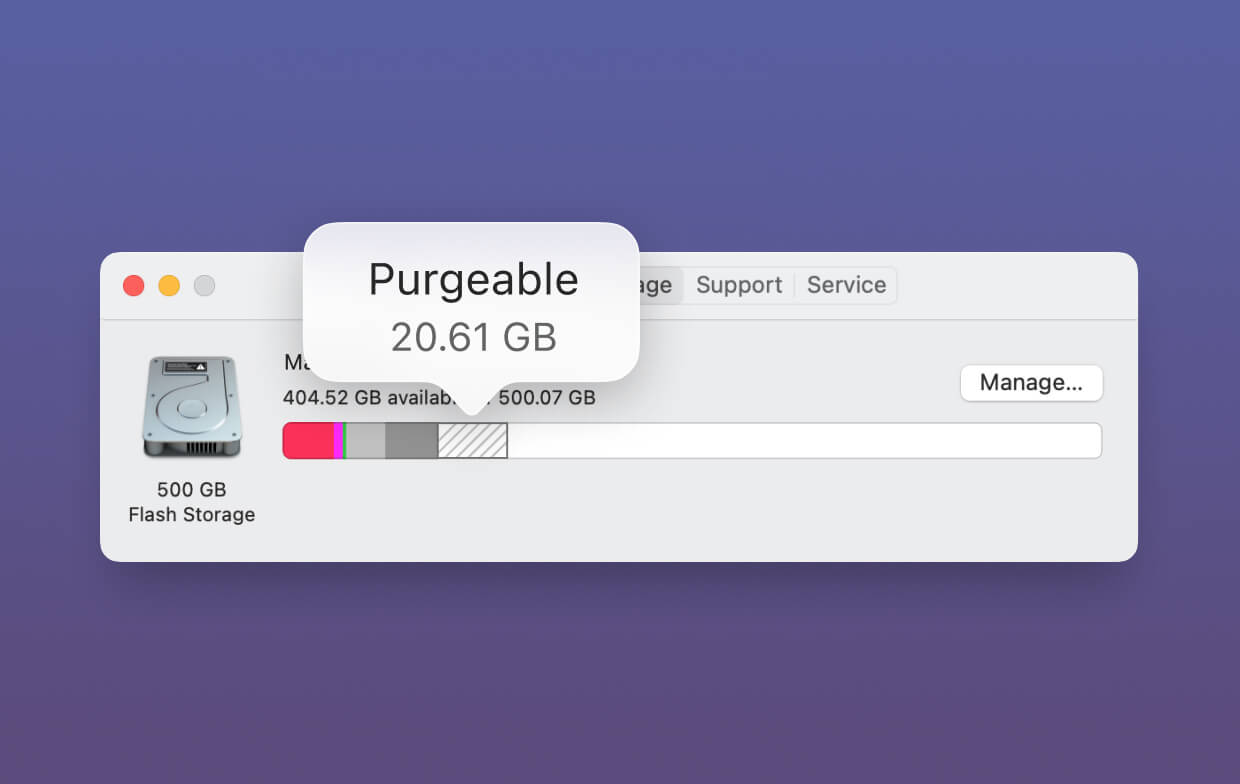
1. Storage Management: macOS includes a built-in feature called “Storage Management” that provides a detailed breakdown of your Mac’s storage usage, including purgeable space. To access Storage Management, follow these steps:
- Click on the Apple menu in the top-left corner of your screen and select “About This Mac.”
- In the window that appears, click on the “Storage” tab.
- Click the “Manage” button to open Storage Management.
- In the Storage Management window, you’ll see a graphical representation of your storage usage. The “Purgeable” category will display the amount of purgeable space on your Mac.
2. About This Mac: Another way to check the amount of purgeable space is through the “About This Mac” window. Here’s how:
- Click on the Apple menu in the top-left corner of your screen and select “About This Mac.”
- In the window that appears, click on the “Storage” tab.
- You’ll see a breakdown of your storage usage, including the amount of purgeable space. It will be displayed as a colored portion within the storage chart.
By checking the purgeable space on your Mac, you can get an understanding of how much storage is occupied by files that can be safely removed. This information will help you decide how to proceed with clearing purgeable space, whether through optimizing storage, deleting temporary files, or removing unused applications.
Clearing Purgeable Space using Optimized Storage
MacOS offers a convenient feature called “Optimized Storage” that can automatically clear purgeable space and optimize your storage usage. By enabling Optimized Storage, your Mac will manage and remove unnecessary files, making it easier to free up space. Here’s how you can use Optimized Storage to clear purgeable space:
- Click on the Apple menu in the top-left corner of your screen and select “About This Mac.”
- In the window that appears, click on the “Storage” tab.
- Click the “Manage” button to open Storage Management.
- In the Storage Management window, you’ll see various categories of files such as Documents, Apps, Photos, and more.
- Click on any of the categories to view a breakdown of the files within that category.
- For each category, you’ll notice options to review and delete files. Select the category where you want to clear out purgeable space.
- Review the files within that category and select the ones you want to delete. You can also choose the “Recommendations” option to let macOS suggest files that can be safely removed to free up space.
- Click the “Delete” button to remove the selected files from your Mac and clear purgeable space.
Enabling Optimized Storage and regularly using the Storage Management feature allows your Mac to automatically clear purgeable space and manage storage effectively. It offers a hassle-free way to make more room for essential files and applications without having to manually search for and delete purgeable files.
Keep in mind that files deleted through Optimized Storage are moved to the Trash and can be recovered within a specific timeframe. To permanently remove these files and free up space, remember to empty the Trash on your Mac regularly.
Optimized Storage is a powerful tool that not only helps you clear purgeable space but also provides insights into your storage usage. By leveraging this feature, you can maintain an organized and efficient storage system on your Mac.
Clearing Purgeable Space using Terminal Commands
If you prefer a more hands-on approach, you can also clear purgeable space on your Mac using Terminal commands. Terminal allows you to execute commands directly on your Mac’s operating system, providing more control over the cleaning process. Here’s how you can clear purgeable space using Terminal:
- Open the Terminal application, either by searching for it in Spotlight or navigating to “Applications” > “Utilities” > “Terminal.”
- Once the Terminal window is open, you can start entering commands. Before proceeding, it’s important to exercise caution and ensure that you enter commands correctly.
- To clear purgeable space, you can use the “diskutil” command along with the “apfs” parameter. Enter the following command in Terminal:
- Terminal will prompt you to enter your administrator password. Note that when typing the password, you won’t see any characters on the screen. Press Enter once you’ve entered your password.
- The purgeable space will be cleared, and the process may take a few moments to complete.
sudo diskutil apfs purge [volume]Note: Replace [volume] with the name of your Mac’s startup disk. You can find the name of your disk by running the command “diskutil list” in Terminal.
Using Terminal commands to clear purgeable space requires a basic understanding of command line syntax. It provides a more direct way to remove purgeable files and can be especially useful for advanced users who prefer a command-line interface.
However, exercise caution when using Terminal, as entering incorrect commands or modifying system files can potentially cause harm to your Mac. It’s always a good practice to create backups and double-check commands before executing them.
Clearing purgeable space using Terminal commands gives you more flexibility and control over the cleaning process, but it’s important to use this method responsibly and exercise caution.
Clearing Purgeable Space by Removing Temporary Files
Temporary files can accumulate on your Mac over time and contribute to the purgeable space. These files are generated by apps and the system itself for various purposes, such as caching, temporary storage, and system updates. Clearing out these temporary files can help free up valuable space and reduce the amount of purgeable storage. Here’s how you can remove temporary files on your Mac:
- Open a Finder window and click on “Go” in the menu bar.
- While holding the “Option” key on your keyboard, click on “Library.”
- In the Library folder, you’ll find various subfolders. Look for folders such as “Caches,” “Logs,” “Saved Application State,” and “Application Support.”
- Open each of these subfolders and review their contents.
- Select the files or folders that you deem unnecessary and delete them by dragging them to the Trash or using the “Move to Trash” option.
- Once you have finished deleting the temporary files, remember to empty the Trash to permanently remove them from your system.
In addition to manually deleting temporary files, you can also use third-party cleaning apps such as CleanMyMac, CCleaner, or Onyx to automate the process. These tools can scan your Mac for temporary files and purgeable data, making it easier to clear out purgeable space and optimize storage.
It’s important to exercise caution when deleting files manually, as removing the wrong files can potentially harm system functionality or cause issues with certain apps. If you’re unsure about a specific file, it’s best to seek guidance or use a reputable cleaning app.
By regularly removing temporary files, you can effectively clear purgeable space and ensure better storage management on your Mac.
Clearing Purgeable Space by Deleting Cached Files
Cached files are data stored by your Mac to improve the performance and efficiency of certain applications and processes. While caching can be beneficial, it can also contribute to purgeable space over time. Clearing out cached files can help reclaim storage and reduce the amount of purgeable space on your Mac. Here’s how you can delete cached files:
- Open a Finder window and click on “Go” in the menu bar.
- While holding the “Option” key on your keyboard, click on “Library.”
- In the Library folder, navigate to the “Caches” folder.
- Within the “Caches” folder, you’ll find various subfolders that correspond to different applications and system components.
- Open each of these subfolders and review their contents.
- Select the cached files or folders that you deem unnecessary and delete them by dragging them to the Trash or using the “Move to Trash” option.
- Remember to empty the Trash to permanently remove the cached files from your Mac.
Deleting cached files can be a manual process, but it is worth noting that some applications may recreate cache files as you use them. However, deleting older cached files can help free up significant storage space.
In addition to manually deleting cached files, you can also use dedicated cleaning apps like CleanMyMac or Onyx, which can automate the process for you. These tools can scan your Mac for cached files and help clear out purgeable space with a few clicks.
Deleting cached files helps optimize your Mac’s performance and storage capacity. By removing unnecessary cache data, you can reduce the amount of purgeable space and ensure a more efficient system.
Clearing Purgeable Space by Removing Unused Apps
Over time, you may accumulate numerous apps on your Mac that you no longer use or need. These unused apps can take up valuable storage space, contributing to the amount of purgeable space on your system. Clearing out these unused apps can help free up storage and reduce purgeable space. Here’s how you can remove unused apps:
- Open a Finder window and click on “Applications” in the sidebar.
- Review the list of installed applications and identify the ones you no longer need.
- Select the app you want to remove, either by clicking on it once or highlighting multiple apps using the “Shift” or “Command” key.
- Drag the selected app(s) to the Trash in the Dock.
- Alternatively, you can right-click on the selected app(s) and choose “Move to Trash” from the contextual menu.
- Once you have removed the unused apps, remember to empty the Trash to permanently delete them from your Mac.
Removing unused apps not only clears up purgeable space but also helps declutter your Mac and streamline your application library. It ensures that your storage is dedicated to apps you actively use, improving overall organization and ease of access.
Keep in mind that some apps may leave behind associated files or folders even after being removed from the Applications folder. To thoroughly uninstall an app and remove all associated files, you can use third-party uninstaller apps like AppCleaner or CleanMyMac. These tools scan for leftover files and remove them along with the app, ensuring a complete clean-up.
Regularly evaluating and removing unused apps is a good practice to keep your Mac’s storage optimized and minimize the amount of purgeable space.
Clearing Purgeable Space by Optimizing iCloud Storage
If you have iCloud enabled on your Mac, optimizing your iCloud storage can help clear purgeable space and free up local storage on your device. By managing your iCloud storage efficiently, you can reduce the amount of data stored locally and minimize the impact on purgeable space. Here’s how you can optimize iCloud storage:
- Click on the Apple menu in the top-left corner of your screen and select “System Preferences.”
- In the System Preferences window, click on “Apple ID” or “iCloud” (depending on your macOS version).
- In the iCloud preferences, you’ll see a list of apps and services that are synced to iCloud.
- Review the options and identify the ones that are using a significant amount of storage.
- Click on each app or service and consider disabling iCloud syncing for files that you don’t need to access locally.
- You can also use the “Manage…” button to further refine the data stored in each app and delete unnecessary files.
- Additionally, you can adjust your iCloud storage plan if it’s nearing its limit. Upgrading to a larger storage plan will allow more of your data to be stored in the cloud, reducing the amount of local storage used.
By optimizing your iCloud storage, you can offload data from your Mac’s local storage and reduce the amount of purgeable space. This can be particularly helpful if you have limited local storage capacity.
It’s important to note that optimizing iCloud storage only affects files stored in iCloud, and not local files or data stored outside of iCloud. If you have files that are exclusively stored locally and are marked as purgeable, you may need to clear them separately using methods mentioned earlier, such as removing temporary files or unused apps.
Managing your iCloud storage allows you to strike a balance between storing files in the cloud and on your local device, helping optimize storage capacity and reduce purgeable space on your Mac.
Clearing Purgeable Space by Emptying Trash
One of the simplest ways to clear purgeable space on your Mac is by emptying the Trash. When you delete files, they are moved to the Trash, where they remain stored on your disk until you empty the Trash. These files are considered purgeable until they are permanently removed. Here’s how you can empty the Trash:
- Locate the Trash icon in the Dock, which resembles a waste bin.
- Right-click (or Ctrl-click) on the Trash icon to open the contextual menu.
- From the menu, select “Empty Trash.”
- A confirmation dialog box will appear, asking if you want to permanently delete the files in the Trash. Click “Empty Trash” to confirm.
Alternatively, you can also empty the Trash by clicking on the Finder icon in the Dock, selecting “Empty Trash” from the Finder menu, and confirming the action in the dialog box.
Emptying the Trash permanently deletes all the files within it, including any purgeable files. It frees up storage space on your Mac and reduces the amount of purgeable space. However, it’s important to note that once you empty the Trash, the deleted files cannot be recovered, so make sure to review the contents of the Trash before performing this action.
It’s a good practice to regularly empty the Trash to keep your storage optimized and minimize the accumulation of purgeable files. You can also enable the “Automatically empty Trash” option in the Finder preferences to have the Trash emptied automatically at regular intervals, ensuring that purgeable space is constantly cleared.
By emptying the Trash, you not only clear purgeable space but also permanently remove unnecessary files, freeing up valuable storage on your Mac.