
Types of Speaker Wire Connectors
When it comes to choosing the right speaker wire connectors, there are several options available, each with its own advantages and considerations. Here are some of the most common types of speaker wire connectors:
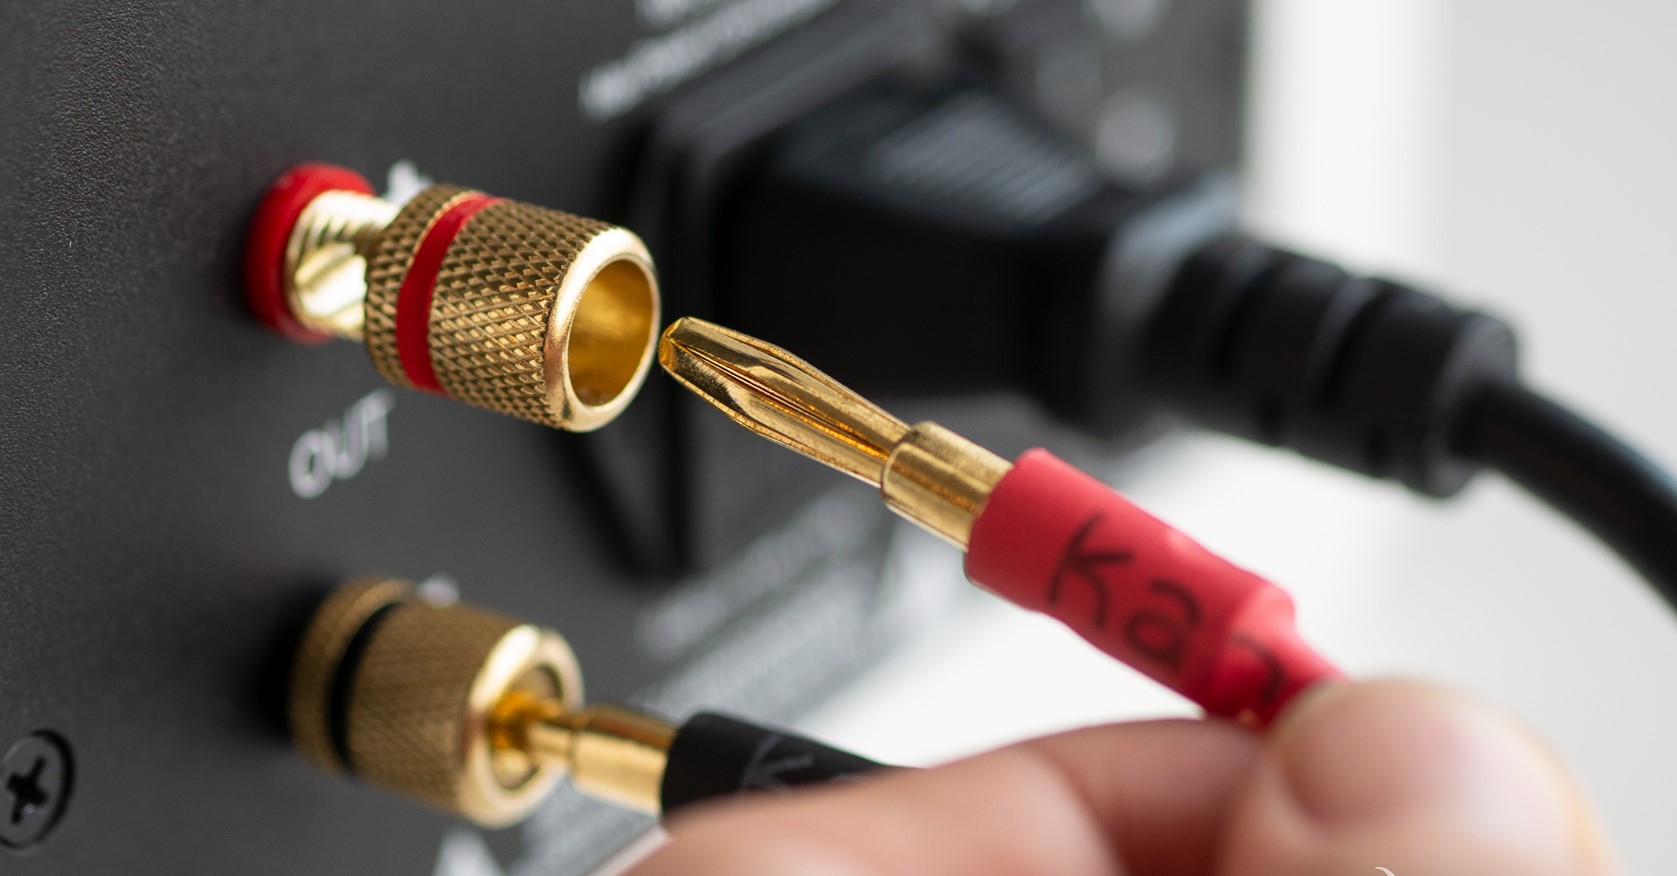
- Banana Plugs: Banana plugs are arguably the most popular choice for speaker wire connectors. They are easy to install and provide a secure and reliable connection. These plugs have a small pin in the middle and are typically connected to the speaker terminals by inserting them into the corresponding binding posts. Banana plugs are known for their ability to reduce signal loss and offer a clean and professional-looking setup.
- Spade Connectors: Spade connectors are another popular option, especially for higher-end speaker systems. These connectors feature a U-shaped metal piece that can be attached to the speaker terminal by tightening the screw on the binding post. Spade connectors provide a solid and stable connection and are an excellent choice when dealing with heavier gauge speaker wire.
- Pin Connectors: Pin connectors, also known as pin tips or straight tips, are simple yet effective speaker wire connectors. They consist of a single metal pin that can be inserted into the binding post. Pin connectors are easy to install and offer a reliable connection, although they may not be as sturdy as banana plugs or spade connectors. They are often used with spring clip-type speaker terminals.
- Twist Connectors: Twist connectors, also called wire nuts, are commonly used for home theater and other DIY speaker installations. These connectors feature a twist-on design, where the speaker wire is stripped and twisted together with the corresponding wire from the speaker or amplifier. It is then secured with the twist connector. While twist connectors are easy to use, they may not provide the same level of connection quality as other types.
- Bare Wire Connections: In some cases, bare wire connections may be used, especially when dealing with older speaker systems or certain types of connectors that do not support other connector types. With bare wire connections, the speaker wire is stripped of insulation, and the bare wire is inserted directly into the speaker terminal or binding post. While this method can work, it is generally less preferred due to its potential for signal loss and lack of stability.
When choosing the right speaker wire connector, it is important to consider factors such as the type of speaker terminals, the gauge of the speaker wire, and personal preferences for ease of installation and aesthetics. Each type of connector has its pros and cons, so it’s essential to assess your specific needs and make an informed decision.
Banana Plugs
Banana plugs are one of the most commonly used speaker wire connectors, known for their convenience, reliability, and professional appearance. These plugs are designed with a small pin in the center, resembling the shape of a banana, hence the name. Here are some key things to know about banana plugs:
- Easy Installation: One of the main advantages of banana plugs is their ease of installation. They are designed to fit into the binding posts of speakers and amplifiers effortlessly. Simply insert the plug into the corresponding terminal, tighten the screw or clip, and you’re good to go. This makes banana plugs a popular choice for both professional installers and DIY enthusiasts.
- Secure Connection: Banana plugs provide a secure and robust connection between the speaker wire and the speaker terminal. The metal pin in the plug ensures a snug fit, minimizing the risk of loose connections that can result in signal loss or audio distortion. This secure connection is especially important for high-quality audio setups where maintaining signal integrity is crucial.
- Reduces Signal Loss: Banana plugs are designed to minimize signal loss by reducing the chance of oxidation or corrosion on the exposed wire ends. The plug covers the exposed wire, protecting it from environmental factors that could degrade the audio signal. This helps to maintain the integrity of the audio transmission and ensures optimal performance.
- Aesthetically Pleasing: In addition to their functional benefits, banana plugs also offer a neat and professional appearance. With banana plugs, you can neatly and uniformly connect multiple speakers without the messiness of bare wire connections. This clean and organized setup is visually appealing and adds a touch of sophistication to your audio system.
- Compatibility: Banana plugs are compatible with various speaker terminals and binding posts. They are commonly found in home theater systems, stereo setups, and professional sound installations. However, it’s important to ensure that your speakers or devices have binding posts that can accept banana plugs. Some speakers may require additional adapters or have proprietary connectors that are not compatible with standard banana plugs.
Overall, banana plugs offer a practical and effective solution for connecting your speaker wire to audio devices. They provide a secure connection, reduce signal loss, and enhance the aesthetics of your setup. When considering speaker wire connectors, banana plugs are a popular choice that combines functionality and convenience.
Spade Connectors
Spade connectors are a popular choice for speaker wire connections, particularly in higher-end audio systems. These connectors feature a U-shaped metal piece that resembles a spade, hence the name. Here are some key features and considerations when it comes to spade connectors:
- Sturdy and Secure Connection: Spade connectors are known for providing a solid and secure connection between the speaker wire and the speaker terminal. The U-shaped design allows the connector to be easily slipped over the binding post, and the screw or clamp can be tightened to ensure a tight fit. This level of connection stability is beneficial, especially when dealing with heavier gauge speaker wire.
- Compatibility with Various Binding Posts: Spade connectors are versatile and can be used with a wide range of speaker terminals and binding posts. Most speakers and amplifiers have binding posts with holes or screws that can accommodate spade connectors. It’s crucial to check the compatibility of your devices before choosing spade connectors as your connection method.
- Reduced Risk of Short Circuits: The design of spade connectors minimizes the chance of accidental short circuits. The U-shaped metal piece allows the connector to be securely fastened to the binding post, protecting the wire from coming into contact with other terminals or components. This helps ensure a safe and reliable connection, reducing the risk of damage to your audio system.
- Support for Heavy Gauge Wire: Spade connectors are particularly suitable for thicker and heavier gauge speaker wire. The larger surface area of the spade connector provides a stronger grip on the wire, ensuring that it remains securely connected to the binding post. This is especially important for high-power audio setups where the wire needs to handle significant amounts of current.
- Professional Appearance: In addition to their functional benefits, spade connectors offer a professional and tidy appearance. They provide a clean and organized connection, enhancing the overall visual aesthetics of your audio system. This makes them a popular choice for audio enthusiasts who prioritize both performance and aesthetics.
When using spade connectors, it’s essential to choose the appropriate size to match your speaker terminals and wire gauge. It’s also crucial to ensure a proper and secure connection by tightening the screw or clamp adequately. By considering these factors, you can enjoy the benefits of a reliable and visually appealing speaker wire connection with spade connectors.
Pin Connectors
Pin connectors, also known as pin tips or straight tips, are a straightforward yet effective option for speaker wire connections. These connectors consist of a single metal pin that can be inserted into the binding post. Here’s what you need to know about pin connectors:
- Simple Installation: Pin connectors are easy to install, making them a popular choice for quick and hassle-free speaker wire connections. Simply insert the pin into the corresponding hole in the binding post, and you’re good to go. This simplicity makes them a convenient option, particularly for those who frequently disconnect and reconnect their audio equipment.
- Reliable and Secure Connection: Despite their simplistic design, pin connectors offer a reliable and secure connection. The metal pin fits snugly into the binding post, ensuring minimal movement and a stable connection. This reduces the risk of signal loss or audio distortion, allowing for quality audio playback.
- Versatility: Pin connectors are compatible with various speaker terminals and binding posts. They are commonly used with spring clip-type speaker terminals, where the pin is inserted into the hole or slot and pressed down to create a secure connection. This versatility makes pin connectors suitable for a wide range of audio systems and setups.
- Cost-Effective: Pin connectors are often an affordable option for speaker wire connections. They are readily available and come in various sizes to accommodate different wire gauges. If you are on a budget or need a cost-effective solution for your speaker wire connections, pin connectors can be a great choice.
- Compact Design: Another advantage of pin connectors is their compact size. The small metal pin takes up minimal space, allowing for a more compact and organized setup. This can be particularly beneficial when dealing with limited space or when you want to keep your audio system looking sleek and clutter-free.
While pin connectors offer simplicity and convenience, it’s essential to choose the appropriate size to match your speaker wire and binding posts. Additionally, ensure a secure and proper connection by inserting the pin fully and verifying that it is securely in place. By doing so, you can enjoy a reliable and hassle-free speaker wire connection with pin connectors.
Twist Connectors
Twist connectors, also known as wire nuts, are a common choice for speaker wire connections, particularly in DIY installations and home theater setups. These connectors utilize a twist-on design, where the speaker wire is stripped and twisted together with the corresponding wire from the speaker or amplifier. Here’s what you need to know about twist connectors:
- Simple Installation: Twist connectors are straightforward to use, making them a popular choice for those who prefer a DIY approach to their speaker wire connections. To install a twist connector, strip the ends of the speaker wire and twist them together with the corresponding wires from the speaker or amplifier. Then, twist the connector onto the twisted wires until it is securely fastened.
- Secure Connection: When properly installed, twist connectors provide a secure connection between the speaker wire and the audio device. The twisting action helps to create a tight and reliable bond, reducing the risk of loose connections or signal loss. However, it’s important to ensure that the wires are twisted tightly together before attaching the connector for the best results.
- Cost-Effective: Twist connectors are an affordable option for speaker wire connections. They are readily available and often come in multipacks, making them a cost-effective choice, especially for installations that require multiple connectors.
- Suitability for DIY Installations: Twist connectors are commonly used in DIY installations due to their simplicity and ease of use. They do not require specialized tools or equipment, making them accessible for individuals who may not have extensive electrical knowledge or experience. This makes twist connectors a go-to option for those who prefer to set up their audio systems on their own.
- Limitations: While twist connectors are easy to use and cost-effective, they may not provide the same level of connection quality as other types of connectors. The twisting action can result in some signal loss or impedance mismatch, which may impact audio performance. Additionally, twist connectors may not offer the same level of stability as connectors that are mechanically secured to the binding post.
When using twist connectors, ensure that you twist the wires securely together and that the connector is tightened adequately. Testing the connection by gently tugging on the wires can help ensure a reliable connection. While twist connectors offer simplicity and affordability, it’s important to be aware of their limitations and consider the specific requirements of your audio system before choosing them as your preferred connector type.
Bare Wire Connections
Bare wire connections are a basic method of connecting speaker wire to audio devices. With this type of connection, the insulation is stripped from the ends of the speaker wire, and the exposed bare wire is inserted directly into the speaker terminal or binding post. Here’s what you need to know about bare wire connections:
- Simplicity: Bare wire connections are the simplest and most straightforward method of speaker wire connection. There are no connectors or additional components required, as the bare wire is inserted directly into the speaker terminal or binding post. This simplicity can be convenient for quick setups or situations where connectors are not readily available.
- Compatibility: Bare wire connections are compatible with a wide range of speaker terminals and binding posts, as long as they have openings or screws to accommodate the bare wire. This flexibility makes them suitable for various types of speakers and amplifiers.
- Cautions: While bare wire connections can work, they have some limitations and potential drawbacks. First, they may be less stable than connections made with connectors, as the bare wire can potentially come loose from the speaker terminal or binding post. Additionally, bare wire connections are more susceptible to oxidation and corrosion, which can lead to signal degradation over time.
- Signal Loss: Bare wire connections have the potential to experience more signal loss compared to connections made with connectors, especially if the wire is not tightly secured or if oxidation occurs. This can result in diminished audio quality and reduced performance.
- Security Measures: To improve stability and decrease the risk of the bare wire coming loose, you can twist the wire strands together or use electricity-safe tape or heat shrink tubing to hold them in place. This can provide a more reliable connection and reduce the likelihood of signal loss or accidental short circuits.
Bare wire connections are often used in older audio systems or situations where connectors are not readily available or compatible. However, due to their potential drawbacks and the availability of various connector options, bare wire connections may not be the preferred choice for most modern audio setups. It’s important to consider the stability, signal loss, and potential risks associated with bare wire connections before deciding to use them for your speaker wire connections.
Determining the Correct Connector Type
Choosing the correct speaker wire connector type is essential for a proper and reliable audio connection. Here are some factors to consider when determining the right connector type for your speaker wire:
- Speaker Terminal Compatibility: First and foremost, check the type of speaker terminals or binding posts on your speakers and audio devices. Different connectors are designed to work with specific types of terminals. Ensure that the connector type you choose is compatible with your equipment to achieve a secure and proper connection.
- Wire Gauge: Consider the gauge (thickness) of your speaker wire. Some connector types are more suitable for thicker gauge wire, while others may be better suited for thinner gauge wire. It’s important to select connectors that can accommodate your wire’s gauge to ensure a secure and reliable connection.
- Convenience and Ease of Installation: Depending on your preferences and level of expertise, you may prioritize connectors that are easy to install and require minimal effort. Connectors like banana plugs and pin connectors are generally quick and convenient to use, making them popular choices. However, if you are comfortable with twisting wires together or prefer a more DIY approach, twist connectors may be a suitable option.
- Cable Management: Consider the cable management aspect of your speaker wire setup. If you want a clean and organized appearance with minimal exposed wires, connectors like banana plugs and spade connectors provide a neat and professional look. On the other hand, if aesthetics are not a major concern, bare wire connections or twist connectors can be simpler and more cost-effective options.
- Future Flexibility: Think about your future needs and any potential changes to your audio setup. If you anticipate frequently connecting and disconnecting your speakers or devices, connectors like banana plugs or pin connectors offer convenience and ease of use. These connector types allow for quick and hassle-free connections, making them suitable for setups that may require frequent changes or reconfigurations.
By considering these factors, you can determine the correct connector type for your speaker wire connections. It’s essential to ensure compatibility with your speaker terminals, consider the wire gauge, and select connectors that meet your installation preferences and future needs. Taking the time to choose the right connectors will help optimize your audio performance and provide a reliable and hassle-free connection for your speaker wire.
Considerations for Speaker Wire Gauge
Speaker wire gauge refers to the thickness or diameter of the wire and plays a crucial role in the performance of your audio system. Here are some considerations when determining the appropriate speaker wire gauge:
- Distance: The length of the speaker wire is a crucial factor in determining the required gauge. As the wire length increases, resistance also increases, potentially leading to signal loss and reduced audio quality. For longer wire runs, thicker gauge wire is recommended to minimize resistance and ensure optimal audio transmission.
- Power Requirements: Consider the power requirements of your speakers. Higher-powered speakers require thicker wire to handle the electrical current without significant voltage drop. If you have powerful speakers or plan to drive them with a high-power amplifier, it’s advisable to select a thicker gauge wire to accommodate the power demands.
- Speaker Impedance: The impedance rating of your speakers is another factor to consider when selecting the appropriate wire gauge. Lower impedance speakers (4 ohms, for example) draw more current than higher impedance speakers (8 or 16 ohms). Thicker wire helps to ensure sufficient current flow, reducing the risk of overheating or damage to the wire and maintaining optimal speaker performance.
- Budget: Keep your budget in mind when choosing speaker wire gauge. Thicker gauge wire is generally more expensive than thinner gauge wire due to the increased material cost. Balancing your audio needs with your budget is important to ensure an appropriate choice that meets your requirements without overspending.
- Future Upgrades: Consider any potential future upgrades or changes to your audio system. If you anticipate upgrading to more powerful speakers or amplifiers in the future, it may be wise to choose a thicker gauge wire from the start. This can help future-proof your setup, preventing the need for rewiring when making upgrades.
When selecting the speaker wire gauge, it’s important to strike a balance between cost, practicality, and audio performance. Consider factors such as the length of the wire run, power requirements, speaker impedance, budget, and potential future upgrades. By carefully assessing these considerations, you can choose the appropriate speaker wire gauge that will provide optimal audio performance for your specific setup.
Steps for Installing Speaker Wire Connectors
Properly installing speaker wire connectors ensures a secure and reliable connection between your speakers and audio devices. Here are the steps to follow when installing speaker wire connectors:
- Prepare the Speaker Wire: Start by preparing the speaker wire. Measure the required length, leaving some extra for flexibility, and cut the wire to the desired length using wire cutters. Ensure that both ends of the wire are free of any kinks or damage.
- Strip the Wire: Use wire strippers to carefully remove the insulation from the ends of the speaker wire. Strip off approximately half an inch of insulation to expose the bare wire. Be cautious not to cut or damage the actual wire strands during this process.
- Attach the Connector: Depending on the type of connector you’re using, follow the specific instructions for attachment. For banana plugs, insert the stripped end of the wire into the plug and ensure that the wire makes a solid connection with the metal pin inside. For spade connectors, crimp or secure the connector onto the stripped end of the wire. For pin connectors, insert the bare wire into the pin and ensure a snug fit. For twist connectors, twist the stripped wire ends together with the corresponding wires and secure the connector over the twisted wires.
- Testing the Connection: Once the connectors are securely attached, it’s crucial to test the connection. Gently tug on the wire near the connector to ensure that it is firmly in place and does not come loose. Test the audio by playing music or audio through the speakers to verify that there is a consistent and clear sound without any distortion or loss of signal.
- Organize and Manage the Wires: After confirming the successful installation, take the time to organize and manage the wires. Utilize cable management techniques such as cable ties, clips, or cable conduits to keep the wires neat and prevent them from tangling or getting tangled with other equipment.
By following these steps, you can properly install speaker wire connectors and ensure a secure and reliable connection between your speakers and audio devices. Taking the time to install the connectors correctly helps maintain optimal audio performance and reduces the chances of signal loss or audio distortion.
Preparing the Speaker Wire
Properly preparing the speaker wire is an important step in the installation process to ensure a successful and reliable connection. Here are the steps to follow when preparing the speaker wire:
- Measure the Required Length: Begin by measuring the length of speaker wire needed for your specific setup. Consider the distance between your speakers and audio devices, ensuring that you have enough wire to comfortably reach each connection point. It’s always better to have a little extra wire than not enough, as you can trim down the excess later.
- Cut the Wire: Using a pair of wire cutters or a sharp utility knife, carefully cut the speaker wire to the desired length. Make a clean and straight cut, ensuring that there are no frayed or damaged wire ends.
- Inspect the Wire: Before proceeding, inspect the wire for any signs of damage or defects. Look for cuts, splits, or exposed wire strands. If you notice any damage, it’s best to cut off that section and start with a fresh length of wire to ensure optimal performance.
- Separate the Wire Ends: Depending on the terminal connectors you’ll be using, separate the ends of the speaker wire. Loosely twist the strands of wire within each end tightly together. This process helps prevent any stray strands from causing issues during the stripping and installation process.
- Identify Polarity: Determine and label the polarity of the wire ends. One end of the speaker wire may have a stripe or other identifying marker to indicate polarity. If not, you can use a marker or piece of tape to differentiate the positive and negative ends. Maintaining consistent polarity throughout your setup is crucial for accurate audio reproduction.
By properly preparing the speaker wire, you ensure that it is the correct length, free from damage, and properly identified for polarity. This sets the foundation for a successful installation and helps prevent any potential issues that may arise due to faulty wire or improper identification of the positive and negative connections. Take the time to ensure the speaker wire is in optimal condition before proceeding to the next steps of the installation process.
Stripping the Wire
Stripping the wire is a crucial step in preparing the speaker wire for installation. By carefully removing the insulation from the wire ends, you create a clean and exposed area to make a secure connection. Here are the steps to follow when stripping the wire:
- Gather the Required Tools: To strip the wire, you will need a pair of wire strippers. These tools have various-sized cutting holes that can accommodate different wire gauges. Ensure you have the appropriate wire strippers for your wire gauge to ensure a clean and precise cut.
- Identify the Proper Hole Size: Most wire strippers have multiple cutting holes designed for different wire gauges. Select the cutting hole that matches the gauge of your speaker wire. The hole should allow for a proper fit, ensuring that you cut through the insulation without damaging the wire strands.
- Hold the Wire Securely: Grip the speaker wire firmly near the end you will be stripping. Ensure you have a stable grip to prevent any movement that may lead to an uneven cut or accidental damage to the wire.
- Place the Wire in the Cutting Hole: Insert the wire into the selected cutting hole on the wire strippers. Position the wire deep enough so that the insulation extends slightly above the cutting hole.
- Apply Pressure and Rotate: Firmly squeeze the wire strippers, applying enough pressure to cut through the insulation. While maintaining pressure, rotate the wire strippers around the wire in a smooth motion. This rotation allows the cutting edges to slice through the insulation evenly.
- Remove the Insulation: Release the pressure on the wire strippers and carefully pull them away from the wire. The insulation should remain caught and come off in one piece. If any additional insulation remains on the wire, repeat the stripping process using the same hole or a larger one if necessary.
- Inspect the Stripped Wire: After stripping the wire, inspect the exposed wire strands. Ensure there are no nicks or cuts that may impact the integrity of the wire. Straighten any bent or twisted strands and remove any loose insulation that may still be attached.
By correctly stripping the wire, you create clean and exposed ends ready for attachment to the speaker wire connectors. Take care to use the appropriate wire strippers for your wire gauge and maintain a stable grip to ensure a precise and even cut. With properly stripped wire, you can proceed to the next step of the installation process with confidence.
Attaching the Connector
Attaching the connector to the stripped end of the speaker wire is a critical step in the installation process. This ensures a secure and reliable connection between the wire and the speaker terminal or binding post. Here are the steps to follow when attaching the connector:
- Select the Appropriate Connector: Choose the connector type that is compatible with your speaker terminals or binding posts. This may include banana plugs, spade connectors, pin connectors, twist connectors, or bare wire connections. Refer to the instructions provided with your chosen connector to ensure correct installation.
- Prepare the Speaker Wire End: Double-check that the speaker wire has been properly stripped and the wire strands are neatly twisted together. Straighten any bent strands to ensure a clean fit into the connector.
- Insert the Wire into the Connector: Depending on the type of connector, follow the specific instructions for attachment. For banana plugs, insert the stripped end of the wire into the plug and ensure that the wire makes a solid connection with the metal pin inside. For spade connectors, crimp or secure the connector onto the stripped end of the wire. For pin connectors, insert the bare wire into the pin and ensure a snug fit. For twist connectors, twist the stripped wire ends together with the corresponding wires and secure the connector over the twisted wires.
- Verify a Secure Connection: After connecting the wire to the connector, check for a secure and tight connection. For connectors like banana plugs, spade connectors, and pin connectors, ensure that the wire is firmly seated and there is no wiggle or movement. For twist connectors or bare wire connections, ensure that the wires are tightly twisted and securely held together.
- Repeat for Additional Connectors: If you are installing multiple connectors on the same speaker wire, repeat the process for each connector. Take care to maintain the same polarity throughout, ensuring consistency in how the connectors are attached to the wire.
By carefully attaching the connector to the stripped end of the speaker wire, you establish a secure and reliable connection. Follow the instructions provided with your specific connector type to ensure proper installation. Double-check the connection’s security and repeat the process for any additional connectors needed. With the connectors properly attached, you are ready to proceed to the next step of the installation process.
Testing the Connection
After installing the speaker wire connectors, it is crucial to test the connection to ensure that it is secure and functional. Testing the connection will help verify that there is proper continuity and that the audio signal can flow seamlessly. Here are the steps to follow when testing the connection:
- Gently Tug the Wire: Start by giving the wire a gentle tug near the connector to ensure that it is securely in place. The connector should remain firmly attached to the wire and not come loose. Any movement or looseness could lead to a poor connection or signal interruption during use.
- Listen for Audio: Play some audio through the connected speakers and listen carefully for any irregularities or issues. Check for clear and balanced sound reproduction without any distortion, crackling, or intermittent audio drops. Keep in mind that if the issue persists, it may not be related to the wire connections and could be attributable to other factors in the audio setup.
- Inspect Visual Indicators: If your connectors have any visual indicators, such as LEDs or color-coding, observe them for confirmation. Some connectors, like banana plugs, have color-coded rings (typically red for positive and black for negative) that aid in proper polarity identification. Ensure that the colors match the appropriate terminals and verify that the positive and negative connections align with your audio devices.
- Check Surrounding Connections: While testing, also inspect other connections in your audio setup. Examine the connections at the amplifier or receiver end as well as the speaker terminals. Ensure that there are no loose or faulty connections that could impact overall audio performance.
- Recheck and Adjust as Needed: If you encounter any issues during testing, double-check the connectors, wire stripping, and overall wire connectivity. Adjust any loose or misaligned connections and repeat the testing process. It is crucial to address any concerns promptly to achieve optimal audio performance.
By thoroughly testing the connection, you can verify that the speaker wire installation is successful and that the audio signal flows smoothly. This ensures that you can enjoy high-quality sound reproduction without any interruptions or issues. Take the time to perform a comprehensive test to address and resolve any potential problems before finalizing your audio setup.
Troubleshooting Common Issues
While installing speaker wire connectors, you may encounter some common issues that can affect the performance of your audio system. Here are some troubleshooting steps to help address these issues:
- Poor Connection: If you experience intermittent sound or poor audio quality, it may indicate a loose or faulty connection. Check that the wire is securely attached to the connector and that the connector is fully inserted into the speaker terminal or binding post. Tighten any screws or clips if necessary, ensuring a solid and stable connection.
- Reverse Polarity: If the audio sounds distorted or unbalanced, it may be due to reversed polarity. Double-check that the positive and negative connections are accurately aligned. Ensure that the color-coded rings on connectors, such as banana plugs, match the appropriate terminals on both the speaker and amplifier or receiver.
- Wire Damage: Examine the wire for any visible signs of damage, such as cuts, nicks, or frayed strands. Damaged wire can disrupt the audio signal and lead to poor sound quality. If you notice any damage, trim the wire and strip a fresh section to ensure a clean and undamaged connection.
- Signal Loss: If you notice a significant decrease in volume or overall sound output, it may indicate signal loss. Check for loose connections, especially at the connectors or binding posts. Ensure that the speaker wire is inserted securely and that the wire strands make full contact with the metal contacts in the connectors.
- Compatibility Issues: Verify that the chosen connectors are compatible with your specific speaker terminals or binding posts. Some speakers or amplifiers may have proprietary connectors or require specific adapters. Ensure that the connectors you selected can properly fit and make a solid connection with your equipment.
- Impedance Mismatch: An impedance mismatch between the speakers and the amplifier can result in distorted or inefficient sound reproduction. Refer to the specifications of both your speakers and amplifier to ensure they are compatible in terms of impedance. Using speakers with impedances that fall within the recommended range of your amplifier can help mitigate this issue.
By troubleshooting these common issues, you can diagnose and resolve any problems that may arise during the installation of speaker wire connectors. Take the time to carefully inspect the connections, wires, and overall compatibility to ensure optimal audio performance. Addressing these issues promptly will allow you to enjoy high-quality sound from your audio system.