
How to Open Google Maps
Google Maps is a powerful navigation tool that provides real-time traffic information, directions, and much more. Opening Google Maps is a simple process that can be done on both mobile devices and desktop computers. Follow these steps to open Google Maps:
- On your mobile device, locate the Google Maps app. It is typically pre-installed on Android devices, while iPhone users can download it from the App Store. Alternatively, if you are using a desktop computer, open your preferred web browser and visit www.google.com/maps.
- If you’re using an app, tap on the Google Maps icon to open it. If you’re using a web browser, enter www.google.com/maps in the address bar and hit Enter.
- Once the app or web page loads, you will be presented with a map of your current location or a default location if your device’s location services are disabled or the web version of Google Maps is being used.
Opening Google Maps is the initial step to accessing its wide range of features and functionalities. Whether you’re looking for directions to a particular destination, checking traffic conditions, or exploring nearby places, Google Maps has you covered. So, open up Google Maps and let it guide you wherever you need to go.
How to Enable Location Services on your Device
Enabling location services on your device allows Google Maps to access your current location accurately, providing you with accurate directions and real-time traffic information. Here’s how you can enable location services on different types of devices:
For Android Devices:
- Open the Settings app on your Android device.
- Scroll down and tap on “Location” or “Location Services” (the exact wording may vary depending on the device and Android version).
- Make sure the toggle switch for “Location” or “Use location” is turned on.
- To enable more precise location services, tap on “Mode” or “Locating method” and select “High accuracy” (this may use GPS, Wi-Fi, and mobile networks to determine your location).
For iPhone and iPad:
- Open the Settings app on your iPhone or iPad.
- Scroll down and tap on “Privacy”.
- Select “Location Services”.
- Make sure the toggle switch for “Location Services” is turned on.
- Scroll down and find “Google Maps” in the list of apps. Ensure it is set to “While Using the App” to allow Google Maps to access your location when you are actively using it.
Enabling location services is essential to fully utilize the features of Google Maps. It ensures accurate positioning, real-time traffic updates, and precise directions. However, if you have concerns about privacy, you may choose to enable location services only when using Google Maps or adjust the settings according to your preferences.
How to Select the Destination
Selecting the destination in Google Maps is the first step towards getting accurate directions. Whether you’re going to a specific address, a nearby landmark, or a general area, Google Maps makes it easy to set your destination. Here’s how:
- Open Google Maps on your device or visit the website www.google.com/maps on your computer.
- In the search bar at the top of the screen, click or tap on it to activate it.
- Type in the address, city, or landmark of your destination. As you type, Google Maps will offer suggestions based on your input.
- Once you see the correct destination in the suggested results, click or tap on it to select it.
In addition to manually entering the destination, Google Maps also allows you to select a location from your saved favorites, recent searches, or even by dropping a pin on the map. This flexibility makes it convenient to set your destination based on your personal preferences.
If you’re unsure about the exact address, you can enter a general location or a point of interest. Google Maps will provide options for you to choose from and give directions accordingly.
After selecting the destination, Google Maps will display various options for transportation modes (e.g., driving, public transit, walking, and cycling) based on the distance and availability in your area. Choose the appropriate mode and let Google Maps guide you accurately to your destination.
How to Start the Navigation
Once you have selected your desired destination, you can start the navigation process in Google Maps to receive step-by-step directions. Follow these simple steps to begin your journey:
- After selecting the destination, Google Maps will display the route overview on the screen.
- Look for the blue “Start” button located at the bottom of the screen or on the side panel (on desktop).
- Click or tap on the “Start” button to initiate navigation.
- The map view will transition to the turn-by-turn navigation view, indicating the estimated arrival time, distance, and upcoming maneuvers.
- Follow the voice-guided instructions and the on-screen prompts to navigate your way.
During the navigation, Google Maps will provide real-time updates on traffic conditions and alternative routes, ensuring that you stay on the fastest and most efficient path. It will notify you about upcoming turns, exits, and any potential delays along the way.
It’s important to keep your device’s volume turned up or utilize Bluetooth connectivity to receive audible directions, especially when driving. However, if you prefer a quiet experience, you can always rely on the visual prompts displayed on the screen.
If you need to make a pit stop or deviate from the suggested route, you can tap on the “Search” icon within the navigation screen to find nearby gas stations, restaurants, or other points of interest. Google Maps will adjust the directions accordingly based on your selection.
Starting the navigation in Google Maps ensures that you have a hassle-free and guided journey to your destination, allowing you to focus more on the road and less on the directions.
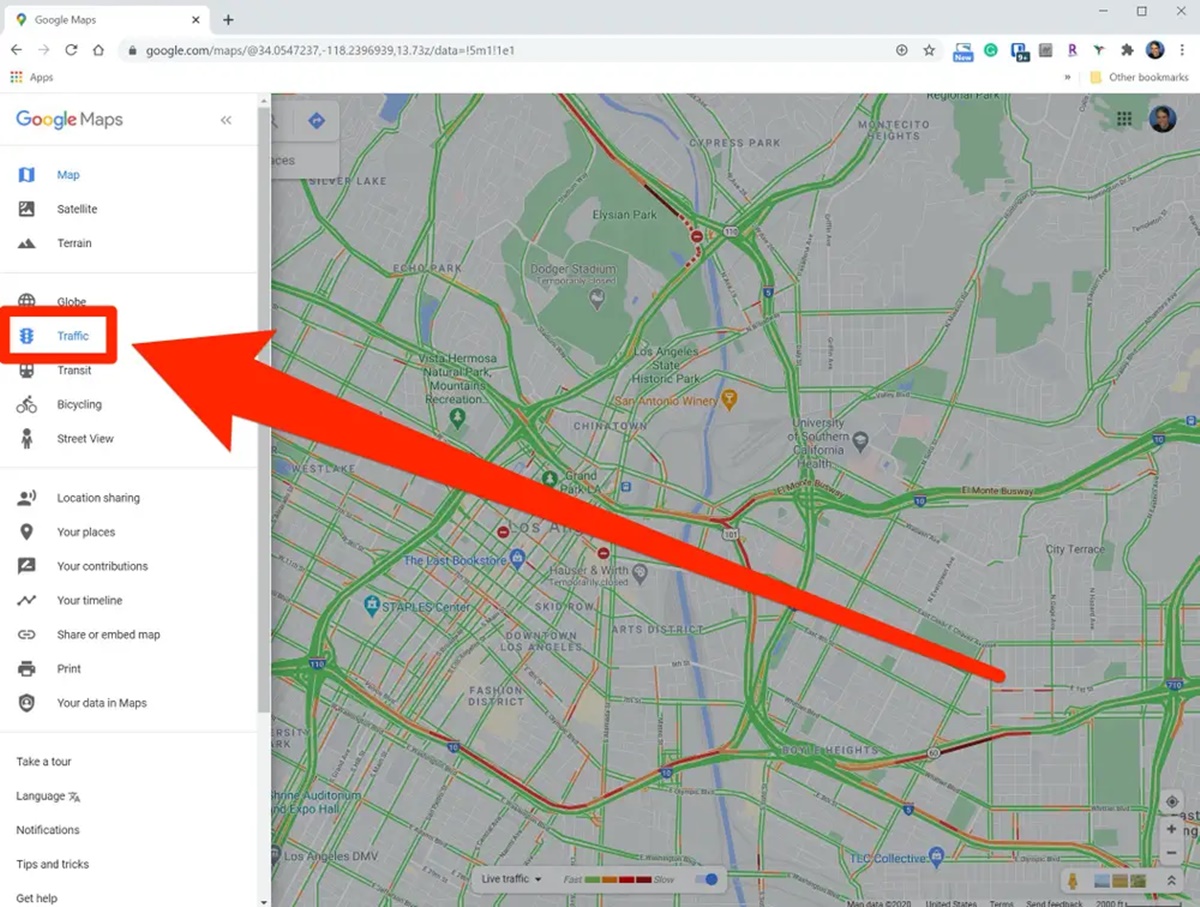
How to View Real-Time Traffic
One of the most useful features of Google Maps is the ability to view real-time traffic information. By checking traffic conditions, you can make informed decisions about your route, saving time and avoiding congestion. Follow these steps to view real-time traffic on Google Maps:
- Open Google Maps on your device or visit the website www.google.com/maps on your computer.
- If you haven’t already done so, enter your desired destination using the search bar at the top of the screen.
- Once your destination is set, look for the “Layers” button located in the top-right corner of the screen (it looks like a square made up of three stacked squares).
- Tap or click on the “Layers” button to reveal a dropdown menu.
- In the dropdown menu, select “Traffic”.
After selecting the “Traffic” option, you will see color-coded lines and overlays on the map, indicating the relative traffic speed in different areas. Here’s how to interpret the traffic colors:
- Green: Free-flowing traffic with no major delays.
- Yellow: Moderate traffic with some delays and slower speeds.
- Orange: Heavy traffic with significant slowdowns and potential delays.
- Red: Very heavy traffic with congestion and long delays.
- Dark Red: Standstill traffic or extremely slow-moving with severe congestion.
In addition to the color-coded traffic lines, you can also view traffic incidents such as accidents, road closures, and construction. These incidents will be marked with icons on the map, allowing you to quickly identify potential roadblocks or areas to avoid.
By checking real-time traffic on Google Maps, you can plan your journey more efficiently and select the best routes to reach your destination. It’s a valuable tool for avoiding traffic congestion and ensuring a smoother travel experience.
How to Interpret Traffic Colors
When viewing real-time traffic on Google Maps, the color-coded lines and overlays on the map provide valuable information about the current traffic conditions. Understanding how to interpret these traffic colors will help you plan your routes more effectively. Here’s a breakdown of what each color represents:
- Green: Green lines indicate free-flowing traffic with no major delays. This means you can expect to travel at or near the speed limit without encountering significant congestion.
- Yellow: Yellow lines represent moderate traffic. While there may be some delays and slower speeds, traffic is still moving relatively smoothly. It’s advisable to anticipate minor slowdowns and plan accordingly.
- Orange: When you see orange lines on the map, it indicates heavy traffic. Commuters can expect significant slowdowns and potential delays. Allow extra time for your journey or consider alternative routes if possible.
- Red: Red lines indicate very heavy traffic. This means there is congestion and long delays along the route. It’s crucial to be prepared for slower speeds and consider alternate routes to save time and avoid frustration.
- Dark Red: Dark red lines represent standstill traffic or extremely slow-moving traffic with severe congestion. Traveling on these routes may result in extensive delays, and it’s advisable to find alternative paths to reach your destination.
It’s important to note that the traffic colors on Google Maps are based on real-time data and can change as traffic conditions fluctuate. Therefore, it’s recommended to check the traffic colors periodically, especially before setting off on a journey or when planning your route to ensure you have the most up-to-date information.
By understanding and interpreting the traffic colors on Google Maps, you can make informed decisions about which routes to take, helping you avoid heavy traffic and reach your destination more efficiently.
How to View Traffic Incident Reports
Google Maps provides valuable information about traffic incidents such as accidents, road closures, and construction, allowing you to stay informed and adjust your route accordingly. Here’s how you can view traffic incident reports on Google Maps:
- Open Google Maps on your device or visit the website www.google.com/maps on your computer.
- If you haven’t already done so, enter your desired destination in the search bar at the top of the screen.
- Once your destination is set, look for the “Layers” button located in the top-right corner of the screen (it looks like a square made up of three stacked squares).
- Tap or click on the “Layers” button to reveal a dropdown menu.
- In the dropdown menu, select “Traffic”.
- On the map, you will see various icons marking traffic incidents, such as accidents, road closures, construction zones, and more. These icons represent areas where there are disruptions or hazards affecting traffic flow.
- Click or tap on the icons to view more information about the incident, including its nature, severity, and any alternative routes suggested by Google Maps.
By viewing traffic incident reports, you can anticipate potential roadblocks, delays, or hazards along your selected route. This information allows you to make informed decisions about whether to stick to the current route or consider alternative paths to reach your destination more smoothly.
In addition to traffic incident reports, Google Maps also provides real-time updates on live traffic conditions, route changes, and estimated arrival times. Stay vigilant and be sure to check for any updates during your journey to stay one step ahead of possible disruptions.
By utilizing the traffic incident reports feature in Google Maps, you can navigate around traffic obstacles and arrive at your destination with minimal delays and disruptions.
How to Avoid Traffic Congestion
Traffic congestion can be a major source of frustration and delay during your commute. Fortunately, Google Maps offers several features to help you avoid traffic and find alternate routes. Here’s how you can use Google Maps to steer clear of traffic congestion:
- Open Google Maps on your device or visit the website www.google.com/maps on your computer.
- Enter your destination in the search bar at the top of the screen, or select a saved location from your favorites.
- Review the suggested route and check the traffic conditions displayed by the color-coded lines on the map.
- If a specific route shows heavy traffic or congestion, look for alternative routes highlighted by gray lines on the map. These alternative routes may take longer or cover a greater distance but can help you avoid traffic congestion.
- Click or tap on the alternative route to select it and update your navigation.
- Follow the new route as guided by Google Maps to bypass the congested areas and reach your destination with fewer delays.
In addition to choosing alternative routes, you can also benefit from real-time updates and notifications by enabling traffic alerts in Google Maps. Here’s how:
- Open Google Maps and tap on the three stacked lines in the top-left corner of the screen to open the side menu (on mobile devices) or click on the menu icon (three horizontal lines) in the top-left corner (on desktop).
- Scroll down and tap on “Settings” (on mobile) or “Settings” followed by “Notifications” (on desktop).
- Under the “Traffic” section, ensure that the “Traffic alerts” option is turned on.
By enabling traffic alerts, you will receive notifications about traffic conditions along your route, allowing you to make real-time decisions to avoid congested areas and potential delays.
Remember, traffic conditions can change dynamically, and it’s advisable to check Google Maps and traffic updates periodically during your journey to stay updated and adjust your route as needed.
By utilizing Google Maps’ alternative routes and traffic alert features, you can proactively avoid traffic congestion, save time, and enjoy a smoother and more stress-free commute.
How to Switch between Map and Satellite View
Google Maps offers two distinct viewing options: the traditional map view and the satellite view. The map view presents a stylized representation of roads, landmarks, and other features, while the satellite view displays aerial imagery of the selected location. Here’s how you can easily switch between these views:
- Open Google Maps on your device or visit the website www.google.com/maps on your computer.
- Ensure that you have selected a location or entered an address in the search bar at the top of the screen.
- Look for the “Layers” button located in the top-right corner of the screen (it looks like a square made up of three stacked squares).
- Tap or click on the “Layers” button to reveal a dropdown menu.
- In the dropdown menu, you will see options such as “Traffic”, “Transit”, and “Cycling”. Below these options, you will find “Satellite”.
- To switch to satellite view, click or tap on the “Satellite” option. The map will now display the selected location using satellite imagery.
- If you wish to switch back to the map view, simply click or tap on the “Layers” button again and select “Map” from the dropdown menu.
Switching between map and satellite view allows you to explore a location from different perspectives. The map view offers a traditional, easy-to-interpret layout, while the satellite view provides a more realistic and detailed visualization. You can choose the view that best suits your needs or preferences.
In addition to the regular satellite view, Google Maps also offers a “Google Earth” view, which provides a more immersive and interactive 3D experience. To access Google Earth, follow these steps:
- Open Google Maps on your device or computer and navigate to the desired location.
- Click or tap on the “Earth” button located in the bottom-left corner of the screen.
- Google Maps will transition to a 3D mode, allowing you to explore the selected location from various angles and perspectives.
- To switch back to the regular map or satellite view, simply click or tap on the “Earth” button again.
Switching between map, satellite, and Earth views in Google Maps provides a versatile and engaging experience, enabling you to explore and visualize locations in unique ways.
How to Get Directions for Alternative Routes
When planning your journey, Google Maps provides the option to explore and select alternative routes. These alternate routes can help you avoid traffic congestion, road closures, or other obstacles, ensuring a smoother and more efficient travel experience. Here’s how you can get directions for alternative routes on Google Maps:
- Open Google Maps on your device or visit the website www.google.com/maps on your computer.
- Enter your starting point and destination in the search bar at the top of the screen.
- Once your route is calculated, you will see the default route displayed on the map, along with the estimated travel time.
- Look for gray lines on the map that represent alternative routes.
- Click or tap on one of the alternative routes to view its details and compare it to the default route.
- Google Maps will update the route instructions and provide the estimated travel time for the selected alternative route.
- If you decide to take the alternative route, click or tap on the “Start” button to begin the navigation for the selected route.
By exploring different routes, you can evaluate the options available to you and choose the one that best suits your preferences or avoids potential traffic congestion.
It’s important to note that the suggested alternative routes may vary based on current traffic conditions and the selected departure time. Google Maps takes real-time data into account to provide the most optimal choices.
In addition to alternative routes, Google Maps also offers the option to add multiple stops to your journey. If you need to make detours or visit specific places along the way, you can easily add these stops to your route, and Google Maps will adjust the directions accordingly.
By utilizing the ability to get directions for alternative routes, you have the flexibility to adapt your journey based on current conditions, saving time and avoiding potential roadblocks along the way.
How to Use the “Explore” Feature to Check Traffic at Different Times
Google Maps offers a powerful feature called “Explore” that allows you to check traffic conditions at different times of the day. This feature helps you plan your journeys more effectively, enabling you to avoid peak traffic hours and potential delays. Here’s how you can use the “Explore” feature on Google Maps:
- Open Google Maps on your device or visit the website www.google.com/maps on your computer.
- Enter your starting point and destination in the search bar at the top of the screen.
- Once your route is calculated, you will see an information bar at the bottom of the screen that displays the estimated travel time and distance.
- Next to the estimated travel time, you will find a clock icon. Click or tap on it to access the “Explore” feature.
- A graph will appear, representing the typical traffic patterns for different times of the day.
- Move the slider along the graph to see the predicted traffic conditions at specific times.
- As you move the slider, Google Maps will update the estimated travel time based on the selected time.
- Review the graph to identify the time slots with lighter traffic and shorter travel times.
- Based on the information provided by the “Explore” feature, you can plan your departure time to avoid peak traffic hours.
The “Explore” feature takes into account historical traffic data to provide estimates for typical travel times at different times of the day. Keep in mind that actual traffic conditions may vary, especially during special events, holidays, or unforeseen incidents on the road.
By utilizing the “Explore” feature on Google Maps, you can make informed decisions about the best time to start your journey, ensuring a smoother and more efficient travel experience.
How to Report Traffic Incidents
In addition to accessing real-time traffic information, Google Maps allows users to contribute to the community by reporting traffic incidents. By reporting incidents, you can help fellow commuters stay informed and navigate around roadblocks or hazards. Here’s how you can report traffic incidents on Google Maps:
- Open Google Maps on your device or visit the website www.google.com/maps on your computer.
- Make sure you have your current location displayed on the map or search for the location where the incident occurred.
- Tap and hold on the location where the incident occurred (on mobile) or right-click on the location (on desktop).
- A small menu will appear. Look for the “Add a missing road” option and tap on it (on mobile) or click on it (on desktop).
- A form will open where you can select the type of incident you want to report, such as an accident, road closure, construction, or a speed trap.
- Fill in the details about the incident as accurately as possible, including any additional information that may be helpful to other users.
- Click or tap on the “Submit” or “Send” button to report the incident.
It’s important to note that the accuracy and reliability of reported incidents depend on user contributions. While Google Maps takes measures to validate and confirm such reports, it’s always advisable to exercise caution on the road and use your judgment when encountering reported incidents.
By reporting traffic incidents on Google Maps, you contribute to the community’s collective knowledge and help fellow users make more informed decisions regarding their routes and travel plans.
How to Optimize Your Route in Real-Time
Google Maps is equipped with powerful features that allow you to optimize your route based on real-time traffic conditions. By utilizing these features, you can make informed decisions and choose the most efficient path to your destination. Here’s how you can optimize your route in real-time on Google Maps:
- Open Google Maps on your device and enter your desired destination in the search bar.
- Once the route is displayed, tap on the “Directions” button to view the step-by-step directions.
- At the top of the directions list, you will find the estimated travel time and distance for the selected route.
- Below the estimated travel time, look for the “Options” button and tap on it.
- A menu will appear, offering various options for your journey, such as avoiding tolls, highways, or ferries.
- Toggle the switches on or off based on your preferences and the road conditions you want to avoid.
- As you make changes to the route options, Google Maps will recalculate the route and display the new estimated travel time.
- Review the updated route and directions to ensure it aligns with your desired preferences.
- Tap on the “Start” button to begin navigation with the optimized route.
During your journey, Google Maps will continue to monitor real-time traffic conditions and dynamically adjust your route if a faster or more efficient path becomes available. You may receive notifications about the updated route while on the road.
Keep in mind that optimizing your route in real-time may result in longer travel distances or minor detours to avoid congested areas or road hazards. However, the benefits of a smoother and faster journey usually outweigh these minor inconveniences.
By taking advantage of Google Maps’ route optimization features, you can navigate through traffic and reach your destination in the most efficient way possible, saving time and minimizing frustrations along the way.
How to Share Your Real-Time Location with Others
Google Maps offers a convenient feature that allows you to share your real-time location with friends, family, or colleagues. By sharing your location, you can keep others updated about your whereabouts and provide them with an estimated arrival time. Here’s how you can share your real-time location using Google Maps:
- Open Google Maps on your device and ensure that your location services are enabled.
- Tap on the “Menu” icon (three horizontal lines) in the top-left corner of the screen to open the side menu.
- Scroll down and select “Location sharing” from the menu options.
- In the “Location sharing” screen, tap on the “Get Started” button.
- You will see a list of contacts from your device’s contact list. Select the person you want to share your location with or tap on the “+” button to add a new contact.
- Choose the duration for how long you want to share your location with that person, such as an hour, until you arrive at your destination, or indefinitely.
- Tap on the “Share” button to send a notification to the recipient, informing them that you are sharing your real-time location.
- The recipient will receive a notification and can view your real-time location on their Google Maps app or website.
During the sharing period, the recipient will be able to see your location on the map as you move, and they can track your progress in real-time. They can also view the estimated time of arrival (ETA) based on your current location and the destination provided.
It’s important to note that you have control over your location sharing and can stop sharing at any time. Additionally, you can adjust your settings to share your location with specific individuals or groups for added privacy and security.
By sharing your real-time location with others through Google Maps, you can ensure better coordination, meetups, or simply provide peace of mind to your loved ones about your whereabouts while on the move.
How to Check Traffic Conditions for a Specific Time
Google Maps allows you to check traffic conditions for a specific time, helping you plan your journeys in advance and anticipate potential congestion or delays. By accessing this feature, you can make informed decisions about the best time to travel. Here’s how you can check traffic conditions for a specific time on Google Maps:
- Open Google Maps on your device or visit the website www.google.com/maps on your computer.
- Enter your desired destination in the search bar at the top of the screen and press Enter.
- Once the route is displayed, look for the information bar at the bottom of the screen.
- Next to the estimated travel time, you will see a clock icon. Click or tap on it to access the traffic conditions for a specific time.
- A date and time picker will appear, allowing you to select the desired date and time for checking traffic conditions.
- Move the sliders or manually enter the date and time to set your desired timeframe.
- Google Maps will update the estimated travel time and display the predicted traffic conditions for that specific time.
- Review the traffic information to gauge the expected congestion levels and travel durations.
The traffic conditions for a specific time are based on historical data and patterns, and are subject to change. Keep in mind that unforeseen incidents or events may impact actual traffic conditions.
By checking traffic conditions for a specific time on Google Maps, you can plan your journeys in advance, choosing the most convenient and efficient travel periods to avoid peak traffic hours and potential delays.
How to Save Favorites for Regularly Visited Locations
Google Maps provides a convenient way to save your favorite and frequently visited locations, allowing you to quickly access them for navigation or reference. By saving favorites, you can easily find directions to places you visit often without having to search for them every time. Here’s how you can save favorites for regularly visited locations on Google Maps:
- Open Google Maps on your device or visit the website www.google.com/maps on your computer.
- Search for the location you wish to save as a favorite using the search bar at the top of the screen.
- Once the location is displayed on the map, click or tap on the location’s name or icon.
- A card will appear with more details about the location. Look for the “Save” button and click or tap on it.
- A menu will appear, allowing you to choose a list to save the location to or create a new list.
- Select an existing list or create a new one by entering a name for the list.
- Once you’ve chosen a list or created a new one, click or tap on the “Save” button to add the location to your favorites.
After saving a location as a favorite, you can easily access it in the future by following these steps:
- Open Google Maps on your device or computer.
- Tap on the “Menu” icon (three horizontal lines) in the top-left corner of the screen to open the side menu.
- Scroll down and select “Your places”.
- In the “Your places” screen, select the “Saved” tab.
- You will see a list of your saved favorites, including the locations you have saved.
- Tap on a favorite to view its details or get directions to that location.
By saving your favorite and frequently visited locations, you can streamline your navigation process and quickly find directions to places you visit regularly, such as your home, workplace, or favorite restaurants.
Google Maps also allows you to create and organize different lists for your favorites, such as “Work”, “Home”, “Vacation Spots”, or any category that suits your needs. This makes it even easier to access locations based on specific contexts or preferences.
Take advantage of the favorite feature in Google Maps to personalize your navigation experience and save time when searching for locations you visit frequently.
How to Use Voice Commands to Check Traffic
Google Maps offers the convenience of using voice commands to check traffic conditions and get real-time updates while keeping your hands free and eyes on the road. By utilizing voice commands, you can easily access traffic information, navigate, and stay informed without manually interacting with the app. Here’s how to use voice commands to check traffic on Google Maps:
- Ensure that your device has Google Maps installed and open.
- Activate the voice command feature by either saying the trigger phrase or tapping the microphone icon within the Google Maps app.
- Wait for the audio cue or the visual prompt indicating that Google Maps is listening for your command.
- Speak clearly and say commands like “Check traffic conditions”, “What’s the traffic like?”, or “Show me traffic”.
- Google Maps will process your voice command and display the traffic conditions on the map or provide the information audibly.
- You can also ask for specific details, such as “What’s the traffic like on [specific road or highway]?” or “How long will it take to get to [destination]?”
- If you have a preferred route in mind, you can ask for directions using voice commands. For example, say “Navigate to [destination] using [specific route or landmark]”.
- Google Maps will guide you with turn-by-turn directions and provide real-time updates on traffic conditions along your chosen route.
Using voice commands with Google Maps helps you stay focused on the road while still accessing important traffic information. It is important to note that voice commands may vary depending on your device and language settings. Experiment with different voice commands to see what works best for you.
By utilizing voice commands to check traffic on Google Maps, you can stay informed, plan your routes, and make smarter decisions without distractions or compromising safety.
How to Check Traffic on Specific Roads or Highways
With Google Maps, you can easily check the traffic conditions on specific roads or highways to ensure a smooth and efficient journey. Whether you want to avoid congestion or plan your route accordingly, here’s how you can check traffic on specific roads or highways:
- Open Google Maps on your device or visit the website www.google.com/maps on your computer.
- In the search bar at the top of the screen, enter the name of the road or highway you want to check the traffic for.
- Google Maps will display the road or highway on the map, and you can zoom in to see more details.
- Look for the colored lines overlaying the road or highway. These lines represent the traffic conditions, with colors indicating the level of congestion.
- Green lines indicate free-flowing traffic, while yellow, orange, and red represent increasing levels of congestion.
- Dark red lines signify heavy congestion or standstill traffic. Avoid these areas if possible.
- If you want more detailed information about the traffic on a specific road or highway, click or tap on the colored line.
- A small window will appear, providing additional details such as the average speed, incidents, or delays along that road or highway.
- By checking the traffic conditions on specific roads or highways, you can plan your route to avoid heavy congestion and potential delays.
In addition to checking the traffic conditions on specific roads or highways, Google Maps also offers real-time updates and alternative route suggestions to help you navigate around traffic obstacles effectively.
Remember, traffic conditions can change rapidly, so it’s advisable to check the traffic information on your desired roads or highways just before you start your journey. This will ensure that you have the most up-to-date information and help you make informed decisions regarding your route.
By utilizing Google Maps to check traffic on specific roads or highways, you can optimize your travel route, save time, and avoid unnecessary frustration caused by heavy traffic.
How to Customize Google Maps for Traffic Notifications
Google Maps allows you to customize your settings to receive traffic notifications, ensuring that you stay informed about traffic conditions and any relevant updates. By customizing your notifications, you can receive real-time alerts and efficiently plan your journeys. Here’s how you can customize Google Maps for traffic notifications:
- Open the Google Maps app on your device or visit the website www.google.com/maps on your computer.
- Tap on the “Menu” icon (three horizontal lines) in the top-left corner of the screen to open the side menu.
- Scroll down and select “Settings”.
- In the “Settings” menu, tap on “Notifications”.
- Under the “Traffic” section, you will find a range of customization options for traffic notifications.
- Toggle the switches to enable or disable different types of traffic notifications based on your preferences.
- For example, you can choose to receive notifications for traffic jams, accidents, road closures, or construction.
- You can also set the frequency of notifications, such as “Always” or “High priority” for immediate updates, or “Less often” for fewer notifications.
- Adjust the specific settings according to your needs and preferences.
- Once you have customized your traffic notification settings, Google Maps will send you relevant notifications based on the selected criteria.
Customizing Google Maps for traffic notifications ensures that you receive the information that is most valuable to you. By tailoring the notifications to your specific preferences, you can stay updated on traffic conditions that are relevant to your routes and locations of interest.
Remember to enable the notification settings that you find most useful, as too many notifications may cause distractions during your journey.
By customizing Google Maps for traffic notifications, you can proactively stay informed and make necessary adjustments to your travel plans based on real-time traffic updates.
How to Check Traffic on Google Maps Web Version
Checking traffic conditions on the web version of Google Maps provides you with a comprehensive view of real-time traffic and allows you to plan your routes accordingly. Here’s how you can check traffic on the Google Maps web version:
- Visit the Google Maps website by entering www.google.com/maps in your web browser.
- In the search bar at the top left corner of the screen, enter the location or address you want to check the traffic for.
- Google Maps will display the map with the selected location and surrounding areas.
- On the map, you will see color-coded lines indicating traffic conditions. Green lines represent free-flowing traffic, while yellow, orange, and red lines indicate increasing levels of congestion.
- To obtain more detailed information about traffic conditions, click on the “Menu” icon (three horizontal lines) in the top left corner of the screen to open the side menu.
- In the side menu, select “Traffic”. This will display additional information about traffic conditions on the map.
- You can also view traffic incidents such as accidents, road closures, or construction zones on the map. Click on the corresponding icons to see more details.
- By zooming in or out on the map, you can get a closer look at traffic conditions in specific areas.
- Google Maps on the web version also allows you to switch between map view, satellite view, or the combination of both.
- Ensure that you periodically refresh the page to get the latest updates on traffic conditions.
Checking traffic on the Google Maps web version is a helpful tool for planning your routes, avoiding congestion, and making informed decisions about your journeys. It provides a detailed and interactive view of traffic conditions to help you navigate efficiently.
Remember to exercise caution when using Google Maps on the web version while driving – it’s recommended to utilize the mobile app or have a passenger assist you with checking traffic information.
By utilizing the web version of Google Maps to check traffic, you can stay informed about current road conditions and choose the best routes for your travels.
How to Check Traffic in Google Maps Offline Mode
Although Google Maps is primarily an online service, there is a feature that allows you to check traffic conditions even when you’re offline. This can be particularly useful when you have limited or no internet access but still want to stay informed about the traffic situation. Here’s how you can check traffic in Google Maps offline mode:
- Make sure you have the Google Maps app installed on your device and have downloaded the offline maps for the areas you want to check traffic in advance.
- Open the Google Maps app on your device.
- Tap on the “Menu” icon (three horizontal lines) in the top-left corner of the screen to open the side menu.
- Select “Offline maps” from the menu options.
- In the “Offline maps” section, you will see a list of the areas you have downloaded for offline use.
- Tap on the specific offline map area that you want to check traffic in.
- Once the offline map area is displayed, you will notice that the traffic information is not available in real-time.
- However, you can still view the general traffic conditions based on past data by looking at the color-coded lines on the map. Green lines indicate free-flowing traffic, while yellow, orange, and red lines represent increasing levels of congestion.
- Keep in mind that the traffic conditions displayed in offline mode may not be as accurate or up-to-date as in online mode, as they are based on previously collected data.
While the offline mode in Google Maps allows you to access downloaded maps and get a general sense of traffic conditions, it’s important to note that it doesn’t provide real-time updates or dynamic traffic information. For the most accurate and up-to-date traffic conditions, it is recommended to have an internet connection and use Google Maps in online mode.
By using the offline mode in Google Maps to check traffic, you can still get a rough idea of congestion levels and plan your routes accordingly when internet access is limited or not available.