
Choose a New Username
When it comes to changing your Skype username, the first step is to choose a new one that reflects your identity or business. Your username acts as your unique identifier on Skype, so it’s essential to select something that is memorable and aligns with your personal or professional brand.
When brainstorming potential usernames, consider using a combination of your name, initials, or a related keyword. It’s best to avoid overly complex or confusing usernames that may be difficult for others to remember or spell correctly. Opt for something concise and easy to pronounce, as this will make it easier for your contacts to find and interact with you on Skype.
Remember that your chosen username should also project the right image for your personal or business brand. If you’re using Skype for professional purposes, it’s recommended to select a username that is both professional and credible. On the other hand, if you’re using Skype primarily for personal communication, you can opt for something that showcases your personality or interests.
Additionally, it’s crucial to ensure that the username you choose is not offensive, inappropriate, or infringing on someone else’s trademark or copyright. Skype has strict guidelines and policies regarding usernames, and violating them can lead to your account being suspended or permanently disabled.
Lastly, take some time to research and check the availability of your preferred username. It would be disappointing to settle on a username only to find that someone else is already using it. You can try various combinations of your preferred username or add numbers or underscores to make it unique.
By taking the time to choose a thoughtful and appropriate username, you’ll make it easier for others to connect with you on Skype and leave a memorable impression. So let your creativity flow and select a username that truly represents who you are or what your business stands for.
Create a Microsoft Account
In order to change your Skype username, you’ll need to have a Microsoft account. A Microsoft account serves as a centralized login for various Microsoft services, including Skype. If you already have a Microsoft account, you can skip this step and move on to the next section.
If you don’t have a Microsoft account yet, don’t worry! Creating one is a simple and straightforward process. Just follow these steps:
- Visit the Microsoft account creation page on your web browser.
- Click on the “Create one” link to start the account creation process.
- You’ll be asked to provide some personal information, such as your first name, last name, desired username, and password. Make sure to choose a strong and secure password to protect your account.
- Next, provide an alternate email address or a phone number. This information will be used to verify your identity and help you recover your account in case you forget your password.
- Complete the security verification process by entering the characters shown on the screen. This step ensures that you’re a real person creating the account.
- Once you’ve filled in all the required information, click on the “Create account” button to proceed.
- You may be asked to review and accept the terms of service and privacy policy. It’s important to read and understand these terms before agreeing to them.
- Congratulations! You have successfully created your Microsoft account.
Now that you have a Microsoft account, you can proceed to the next steps to change your Skype username. Having a Microsoft account not only allows you to change your username but also provides you with access to other Microsoft services and features.
Remember to keep your Microsoft account login details secure and avoid sharing your password with anyone. This will help protect your account and ensure that only you can make changes to your Skype username or other account settings.
Link Your Skype Account to Your Microsoft Account
Now that you have a Microsoft account, the next step is to link your Skype account to it. This linking process will allow you to access Skype using your Microsoft account credentials and make changes to your Skype profile, including your username.
Follow these steps to link your Skype account to your Microsoft account:
- Open your web browser and visit the Skype website.
- Click on the “Sign in” button or link located at the top right corner of the page.
- You’ll be redirected to the Microsoft sign-in page. Enter your Microsoft account email address and password and click on the “Sign in” button.
- After signing in, you’ll see a prompt asking you to link your Skype account. Click on the “Link account” or similar button to proceed.
- If you already have a Skype account, enter the username and password associated with it. This will connect your existing Skype account to your Microsoft account. If you don’t have a Skype account, you can create one by following the on-screen instructions.
- Once you’ve provided the necessary information, click on the “Link accounts” or similar button to complete the linking process.
By linking your Skype account to your Microsoft account, you’ll have the convenience of using a single set of login credentials for both services. This makes it easier to manage and access your Skype account while leveraging the security features provided by Microsoft.
It’s important to note that once the linking process is completed, changes made to your Microsoft account, including your username, will be reflected in your Skype profile. This means that changing your username on Skype will require you to update your Microsoft account username as well.
Now that your Skype account is successfully linked to your Microsoft account, you’re ready to proceed with changing your username. The next sections will guide you through the necessary steps to customize your Skype profile and set a new username that better represents you or your business.
Sign In to Skype
Once you have linked your Skype account to your Microsoft account, the next step in changing your username is to sign in to Skype using your Microsoft account credentials. By doing so, you’ll have access to your Skype profile where you can make the necessary edits.
Here’s how you can sign in to Skype:
- Open the Skype application on your computer or mobile device.
- On the sign-in screen, click on the “Sign in with Microsoft” or similar button.
- Enter your Microsoft account email address and password in the provided fields.
- Click on the “Sign in” button to proceed.
Once you’ve signed in, you will be logged into your Skype account using your Microsoft account credentials. This ensures a seamless integration between the two services.
If you encounter any issues while signing in, double-check that you are entering your Microsoft account credentials correctly. Also, ensure that your internet connection is stable and that you have the latest version of the Skype application installed.
Signing in to Skype allows you to access your contacts, chat conversations, call history, and other settings. It provides you with a personalized Skype experience tailored to your preferences.
Now that you’re signed in to Skype, you’re ready to navigate to your profile and make the necessary changes to your username. The following sections will guide you through the process step-by-step.
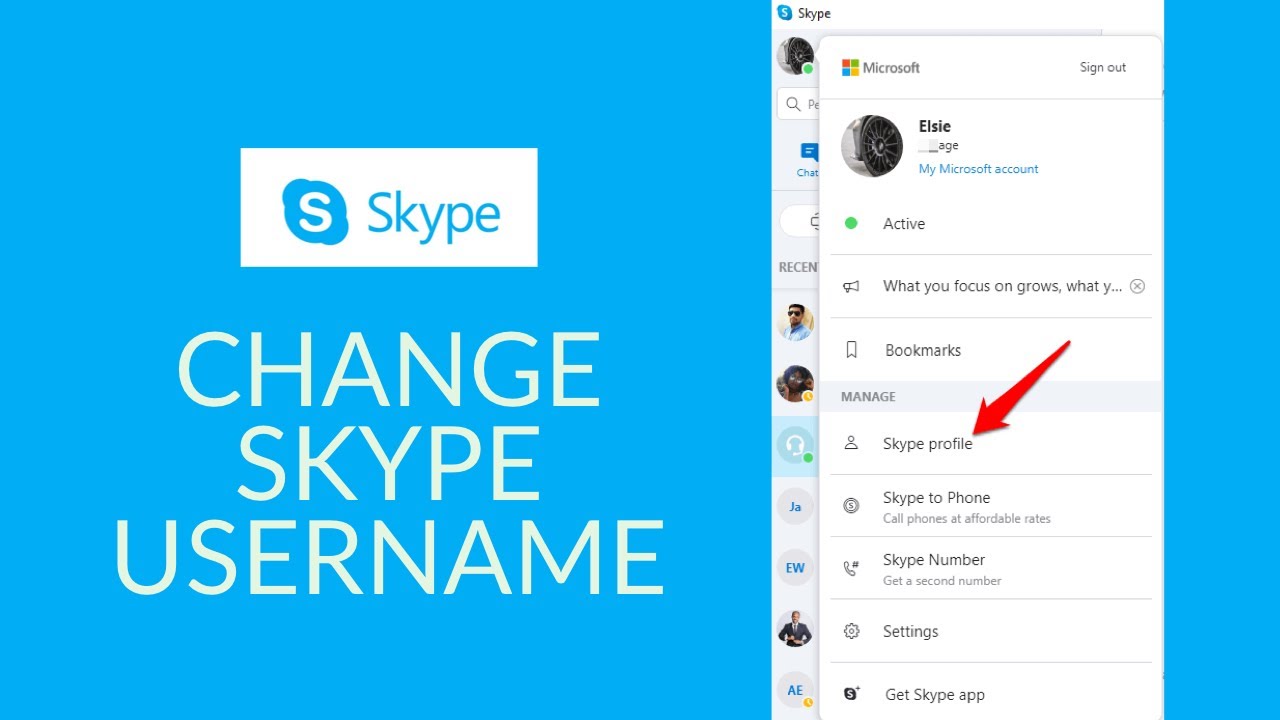
Navigate to Your Profile
After signing in to Skype, the next step in changing your username is to navigate to your profile page. Your profile contains all the information associated with your Skype account, including your display name and username.
Follow these steps to navigate to your profile on Skype:
- Open the Skype application on your computer or mobile device.
- Once you are signed in, you’ll be directed to the main Skype interface.
- Look for your profile picture or avatar in the top left or right corner of the screen.
- Click or tap on your picture or avatar to open the profile dropdown menu.
- In the dropdown menu, select the “Profile” or “Your Profile” option.
By selecting the “Profile” or “Your Profile” option, you will be taken to your Skype profile page, where you can view and edit various details, including your display name and username.
If you’re using Skype on a computer, you may also be able to locate your profile by clicking on your profile picture or avatar located in the navigation menu on the left side of the screen. Look for an option that says “View Profile” or something similar.
It’s worth mentioning that the steps may vary slightly depending on the version of the Skype application you are using and the device you are using it on. However, the general concept remains the same – locate your profile section within the application to access the necessary settings for changing your username.
Now that you have successfully navigated to your profile page, you’re ready to proceed with editing your display name and changing your username. The next section will guide you through the necessary steps to make these modifications.
Click on “Edit Profile”
Once you have accessed your Skype profile, the next step in changing your username is to click on the “Edit Profile” option. This will allow you to modify your display name and make the necessary changes to your username.
Follow these steps to find and click on the “Edit Profile” option:
- On your Skype profile page, look for an option or button that says “Edit Profile” or something similar. It is usually located near your display name or username.
- Click or tap on the “Edit Profile” option to proceed.
By clicking on this option, you will be taken to the section where you can customize your profile settings, including your display name and username.
If you are using Skype on a computer, you might find the “Edit Profile” option under a dropdown menu associated with your profile picture or avatar. Look for a menu that gives you options like “Change Profile” or “Edit Profile”.
On mobile devices, the “Edit Profile” option may be accessible through an icon or button located in the top right or left corner of your profile page.
Remember, the exact placement and appearance of the “Edit Profile” option may vary depending on the version of Skype you are using and the device you are using it on. However, the purpose remains the same – to provide you with the means to modify your profile settings.
Now that you have successfully clicked on the “Edit Profile” option, you can proceed to the next steps to edit your display name and change your username. The following sections will guide you through these modifications.
Edit Your Display Name
Once you’ve clicked on the “Edit Profile” option in Skype, you can now proceed to edit your display name. Your display name is the name that will be shown to other Skype users when they interact with you.
Follow these steps to edit your display name in Skype:
- In the profile editing section, locate the field or input box that corresponds to your display name.
- Click or tap on the field to make it editable.
- Enter your desired display name in the field. You can use your actual name, a nickname, or any name that you want to be recognized by on Skype.
- After entering your desired display name, review it to ensure its accuracy and appropriateness.
- If you’re satisfied with the entered display name, save the changes by clicking on the “Save” or “Apply” button.
By following these steps, you will successfully modify your display name in Skype. It’s important to choose a display name that is professional, appropriate, and represents you accurately.
Remember that changing your display name in Skype does not change your actual Skype username, which is the unique identifier associated with your account. However, the new display name will be visible to other Skype users, making it easier for them to recognize and address you.
Before saving the changes, take a moment to review your new display name and ensure that it reflects the image you want to portray on Skype. Once you are satisfied with the changes, click on the “Save” or “Apply” button to update your display name.
Keep in mind that your display name can be edited multiple times, so if you ever decide to change it again in the future, you can always repeat these steps.
Now that you’ve successfully edited your display name, you can proceed to the next steps to change your Skype username. The following sections will guide you through the necessary steps to make this modification.
Save Changes
After editing your display name in Skype, the next step is to save the changes you’ve made. Saving the changes ensures that your updated display name is applied and visible to other Skype users.
Follow these steps to save the changes in Skype:
- After entering your desired display name, review it to ensure its accuracy and appropriateness.
- If you’re satisfied with the entered display name, locate the “Save” or “Apply” button.
- Click or tap on the “Save” or “Apply” button to save the changes.
By following these steps, your updated display name will be saved in Skype. The changes will be reflected in your profile and will be visible to other Skype users when they interact with you.
It’s important to note that saving your display name does not automatically change your Skype username, which is the unique identifier associated with your account. If you also want to change your Skype username, continue following the steps provided in the upcoming sections.
Before finalizing the changes, take a moment to review your updated display name and ensure that it accurately represents you or your brand. Making a habit of regularly reviewing and updating your display name can help maintain a consistent and professional online presence.
Now that you’ve successfully saved the changes to your display name, you’re one step closer to changing your Skype username. The following sections will guide you through the remaining necessary steps to complete the process.
Log Out and Log Back In to Skype
After saving the changes to your display name and if you have also changed your Skype username, the next step is to log out of Skype and then log back in. This step ensures that the updated changes are fully applied and that your new username is reflected throughout the Skype platform.
Follow these steps to log out and log back in to Skype:
- In the Skype application, locate the “Settings” or “Options” menu. This is typically represented by a gear icon.
- Click or tap on the “Settings” or “Options” menu to access the settings panel.
- Within the settings panel, look for the “Sign out” or “Log out” option. Select this option to log out of your Skype account.
- Once you’ve successfully logged out, close the Skype application completely.
- Restart the Skype application.
- On the sign-in screen, enter your Microsoft account email address and password to sign back in.
- After signing back in, navigate to your profile page to confirm that the changes you made to your display name and username are fully applied.
By logging out and logging back in to Skype, you ensure that all the updated changes, including your new username, are properly synchronized with the platform. This step helps to avoid any caching or display issues that may occur if you simply continue using Skype without logging out and back in.
It’s important to note that logging out and logging back in will not affect your contact list or call history. All your previous conversations and contacts will still be available after you log back in.
Now that you’ve successfully logged out and logged back into Skype, you can verify and confirm that your new username is displayed correctly. The next step is to check your new username to ensure it is updated as desired.
Check Your New Username
After logging out and logging back in to Skype, it’s important to check your new username to ensure that it has been successfully updated. Verifying your new username ensures that your contacts can find and interact with you using the correct identifier.
Follow these steps to check your new username in Skype:
- Open the Skype application on your computer or mobile device.
- Sign in to your Skype account using your Microsoft account credentials.
- Navigate to your profile or account information page within the Skype application.
- Locate the section that displays your username or profile details.
- Verify that the displayed username matches the new one you had chosen and saved.
- If the displayed username matches your new one, congratulations! Your Skype username has been successfully updated.
- If the displayed username is not what you expected, double-check that you followed all the previous steps correctly. If necessary, repeat the process to change your Skype username.
By checking your new username, you ensure that it is accurately reflected on your Skype profile. This verification step is crucial to prevent any confusion or miscommunication with your contacts.
If your new username is displayed correctly, you can proceed to use Skype as usual. Your contacts will be able to find and connect with you using your updated username.
However, if the displayed username is not what you expected or if you encounter any issues, it’s important to review the steps you followed and ensure that you made the changes correctly. If needed, you may need to repeat the process to adjust your Skype username until it reflects your desired choice.
Now that you have checked and confirmed your new username, you can confidently continue using Skype with your updated profile information. Enjoy connecting with friends, family, and colleagues using your newly personalized Skype account.