
Choosing a Profile Picture
When it comes to creating an appealing presence on Twitch, one of the most essential steps is choosing a profile picture that accurately represents you or your brand. Your profile picture is the first impression viewers have of you, so it’s crucial to make it visually striking and relevant. Here are some tips to help you choose the perfect profile picture for your Twitch channel:
- Reflect your personality: Your profile picture should showcase your individuality and give viewers a sense of who you are. Whether you prefer a professional image or something more creative and out-of-the-box, make sure your picture aligns with your overall brand image.
- Ensure relevance: When selecting a profile picture, consider the niche or content category of your Twitch channel. Incorporate elements that are associated with your content to attract the right audience. For example, if you focus on gaming, using a gaming-related image or a character from your favorite game can help establish a connection with viewers.
- Keep it visually appealing: Choose a profile picture that is visually appealing and stands out from the crowd. Opt for high-quality images with good contrast and vibrant colors, as they tend to catch the eye. Avoid using blurry or pixelated pictures that might appear unprofessional or detract from your channel’s credibility.
- Consider the size and format: Twitch has specific guidelines for profile picture dimensions. Ensure that your image is in a square format with optimal resolution (usually 800×800 pixels or higher) to maintain clarity and avoid distortion. It’s a good idea to preview how your picture will appear in different sizes to ensure it looks great across different devices.
- Test with your target audience: If you’re unsure about which profile picture to choose, consider seeking feedback from your community or target audience. Share a few options and gather their opinions to help you make an informed decision.
Remember, your profile picture is a representation of your channel and can make a lasting impression on viewers. Take the time to select an image that accurately reflects your brand and resonates with your target audience. With a visually appealing and relevant profile picture, you’ll have a better chance of attracting and retaining viewers on Twitch.
Creating or Finding the Right Image
Once you have an idea of what you want your profile picture to represent, it’s time to either create or find the perfect image that fits your vision. Here are some methods to help you create or find the right image for your Twitch profile:
- Create your own artwork: If you have design skills, consider creating your own profile picture from scratch. Use graphic design software like Adobe Photoshop or Canva to unleash your creativity and design an image that captures your unique style. This option allows you to have complete control over the final result and ensures that your profile picture is original.
- Commission an artist: If you lack design skills but have a specific concept in mind, hiring an artist to create a custom profile picture can be a great option. Look for illustrators or graphic designers who specialize in character design or digital art. Provide them with a detailed brief describing your vision, and they will bring it to life. Be sure to check their portfolio and discuss pricing and timelines beforehand.
- Use stock images: If you don’t have the resources or time to create your own image, stock image websites can be a valuable resource. These platforms offer a wide variety of high-quality images that you can purchase or use for free. Be mindful of the copyright and licensing restrictions when selecting a stock image to avoid any legal issues.
- Customize existing images: If you have a suitable image but want to add a personal touch, consider customizing it to align with your branding. You can use photo editing software or online tools to modify the colors, add overlays, or incorporate text or logos into the image. Just make sure not to alter the image in a way that violates any copyright or licensing agreements.
When creating or finding the right image, keep in mind the specifications provided by Twitch for profile pictures. Aim for an image that is visually appealing, clear, and easy to recognize, even at smaller sizes. Additionally, ensure that the image represents your channel and resonates with your target audience. Remember, your profile picture is an opportunity to make a lasting impression, so invest time and effort into finding or creating an image that truly represents you or your brand on Twitch.
Uploading Your Profile Picture
Now that you have chosen or created the perfect profile picture for your Twitch channel, it’s time to upload it and make it visible to your audience. Follow these steps to upload your profile picture:
- Sign in to Twitch: Visit the Twitch website and sign in to your account using your username and password. If you don’t have an account yet, you’ll need to create one before proceeding.
- Access the Creator Dashboard: Once you are signed in, click on your profile icon at the top-right corner of the screen. From the dropdown menu, select “Creator Dashboard.”
- Navigate to Settings: In the Creator Dashboard, locate the left sidebar and click on “Settings.”
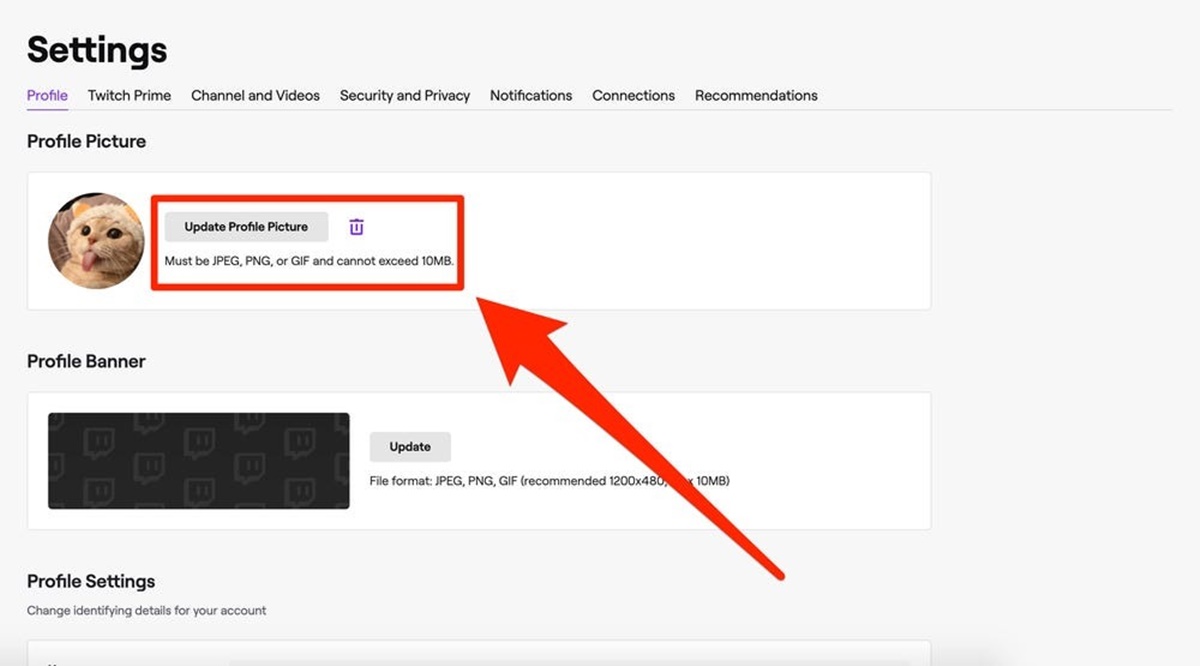
- Choose “Profile Picture”: Within the Settings menu, find the “Profile Picture” option and click on it.
- Upload your image: On the Profile Picture page, click on the “Choose File” or “Browse” button to select the image file from your computer. Ensure that the image meets Twitch’s guidelines regarding dimensions and file type.
- Preview and confirm: Once the image is uploaded, you will see a preview of how it will appear on your channel. Take this opportunity to ensure the picture looks how you intended. If you’re satisfied with the preview, click on the “Save Changes” button to confirm your new profile picture.
After saving your changes, your new profile picture will be visible to anyone who visits your Twitch channel. Keep in mind that it may take a few minutes for the changes to take effect site-wide.
Remember, your profile picture is a crucial element of your Twitch channel branding, so choose one that accurately represents you or your brand. Regularly updating your profile picture can also help keep your channel fresh and engaging. Take the time to upload a high-quality image that resonates with your target audience, and enjoy connecting with viewers through your visually striking profile picture.
Adjusting the Profile Picture
After uploading your profile picture on Twitch, you may realize that it doesn’t fit perfectly or looks slightly off. Don’t worry – Twitch provides options to help you adjust and fine-tune your profile picture. Follow these steps to make any necessary adjustments:
- Access the Creator Dashboard: Sign in to your Twitch account and navigate to the Creator Dashboard by clicking on your profile icon and selecting “Creator Dashboard” from the dropdown menu.
- Navigate to Settings: In the Creator Dashboard, locate and click on the “Settings” option in the left sidebar.
- Select “Profile Picture”: Within the Settings menu, find the “Profile Picture” option and click on it.
- Adjust the crop: On the Profile Picture page, you will have the option to adjust the crop of your profile picture. Drag and resize the selection box to focus on the desired area of the image. Ensure that the essential elements of the picture are fully visible within the preview box.
- Preview and confirm: Once you have made the necessary adjustments, take a moment to preview how the profile picture will appear on your channel. If you are satisfied with the changes, click on the “Save Changes” button to update your profile picture.
By adjusting the crop of your profile picture, you can ensure that the most relevant and visually appealing part of the image is visible to viewers. This can be particularly useful if your initial upload did not perfectly fit Twitch’s recommended profile picture dimensions or if you want to focus on a specific element of the image.
Remember to keep the overall image quality intact while making adjustments. Avoid excessive resizing or cropping that may compromise the visual clarity or impact of your profile picture. Regularly review your profile picture to ensure it still accurately represents you or your brand and makes a strong impression on your Twitch community.
Testing Your Profile Picture
Once you have uploaded and adjusted your profile picture on Twitch, it’s important to test how it appears to viewers. Testing your profile picture allows you to ensure that it looks great across different devices and accurately represents your brand. Here are some steps to help you effectively test your profile picture:
- Visit your Twitch channel: Sign out of your Twitch account or open a new browser window and visit your Twitch channel as a viewer. This will give you a preview of how your profile picture appears to others.
- Test on different devices: View your channel using various devices, such as desktop computers, laptops, tablets, and smartphones. Pay attention to how your profile picture scales and appears on different screen sizes. Ensure that the image is clear and recognizable, even at smaller sizes.
- Ask for feedback: Reach out to friends, colleagues, or members of your Twitch community to gather feedback on your profile picture. Ask them how well the image represents you or your brand and if it effectively catches their attention. Consider their suggestions and make any necessary adjustments if the feedback is consistent.
- Compare against competitors: Take a look at other Twitch channels within your niche and compare your profile picture with theirs. Consider how your image stands out or blends in with the competition. Identify any areas where you can differentiate yourself and make your profile picture more compelling.
- Monitor viewer engagement: Observe the impact of your profile picture on viewer engagement. Pay attention to metrics like follower growth, average concurrent viewers, and chat interaction. If you see positive trends after updating your profile picture, it can be an indication that it is resonating well with your target audience.
Testing your profile picture is an ongoing process. As your channel grows and evolves, you may need to revisit and update your profile picture to reflect changes in your branding or content. Remember that your profile picture plays a vital role in creating a memorable and professional image on Twitch, so invest time and effort in testing and refining it.
By regularly testing and optimizing your profile picture, you can ensure that it accurately represents your brand, attracts and engages viewers, and contributes to the overall success of your Twitch channel.
Troubleshooting Common Issues
While uploading and adjusting your profile picture on Twitch, you may encounter some common issues that can hinder the process. Here are a few troubleshooting steps to help you overcome these challenges:
- Image format and size: Make sure that your profile picture meets Twitch’s guidelines in terms of format and size. Twitch supports JPEG, PNG, and GIF formats, with a maximum file size of 10MB. If your image exceeds these limits, you may need to resize or compress it using image editing software or online tools.
- Resolution and image quality: If your profile picture appears blurry or pixelated after uploading, it may be due to low resolution or poor image quality. Ensure that you are using a high-resolution image that is clear and sharp. Consider using editing tools or reuploading the image in a higher quality format.
- Cutting off important elements: During the adjustment process, you may unintentionally crop out important elements of your profile picture. Double-check the crop selection and preview to ensure that crucial parts of the image are fully visible. Make adjustments as needed to include all vital elements within the visible area.
- Profile picture not appearing: If your new profile picture is not appearing on your Twitch channel, it may be due to caching. Refresh the page or try clearing your browser’s cache and cookies. Additionally, make sure you have saved the changes to your profile picture in the Twitch settings.
- Wrong image displaying: If a different image is appearing instead of your intended profile picture, it could be a caching issue or an error in the upload process. Clear your browser’s cache and cookies, and revisit your profile picture settings to ensure that the correct image is uploaded and saved.
- Aspect ratio issues: If your profile picture appears distorted or stretched, it may be due to an incorrect aspect ratio. Twitch recommends using a square image (1:1 ratio) for profile pictures. Resize or crop your image to match the recommended dimensions to avoid any distortion.
If you have gone through the troubleshooting steps and are still experiencing issues with your profile picture, consider reaching out to Twitch support for further assistance. They can provide specific guidance based on your situation and help resolve any technical difficulties you may be facing.
Remember, having a properly functioning and visually appealing profile picture is crucial for making a strong impression on Twitch. By addressing and troubleshooting common issues, you can ensure that your profile picture accurately represents you or your brand and enhances your overall presence on the platform.