
Why Change the Color of Your Name on Twitch?
Twitch is a popular live streaming platform where millions of people connect, interact, and watch their favorite streamers. One way to stand out and personalize your Twitch experience is by changing the color of your name in chat. This simple customization can make your username more eye-catching and unique, allowing you to express your individuality and make a memorable impression on other Twitch users.
By changing the color of your name, you can create a visual distinction that helps you stand out in the chat window. This can be especially useful if you’re a streamer or content creator looking to build your brand and attract more viewers. A colored username can make it easier for your audience to recognize you and engage with your content, leading to increased interactions and potentially more followers.
Another reason to change the color of your name on Twitch is to make it easier for moderators and streamers to identify you. In larger chat rooms with active conversations, it can be challenging to keep track of individual users. A unique color for your username can help create a visual cue that sets you apart, making it easier for moderators and streamers to address your comments or answer your questions.
Furthermore, changing the color of your name adds a touch of personalization to your Twitch experience. It allows you to showcase your personality and preferences, making your username more reflective of who you are. Whether you prefer a bold and vibrant color scheme or a subtle and muted one, customizing the color of your name gives you the freedom to express yourself and make your mark in the Twitch community.
Overall, changing the color of your name on Twitch has both practical and personal benefits. It helps you stand out in a crowded chat, improves visibility and recognition, and adds a personal touch to your username. So if you’re looking to make a statement, grab attention, and enhance your Twitch experience, don’t hesitate to explore the option of customizing the color of your name.
Step 1: Understand the Limitations
Before you dive into changing the color of your name on Twitch, it’s important to understand the limitations of this customization feature. Twitch provides certain guidelines and restrictions to ensure a safe and enjoyable experience for all users.
First, it’s important to note that changing the color of your name is only possible if you have a Twitch account. If you haven’t created an account yet, you’ll need to sign up and go through the registration process before you can proceed with customizing your username’s color.
Additionally, the option to change the color of your name is not available to all Twitch users. This feature is typically reserved for Twitch Partners and Affiliates, who have achieved a certain level of engagement and audience size on the platform. If you’re just starting out or don’t meet the criteria, you may not have access to this customization option at the moment.
Another limitation to keep in mind is that customizing your name’s color is only applicable in chat. The color change won’t be visible on other areas of Twitch, such as your profile page or video player. It’s important to understand that this customization is specific to the chat interface and won’t affect the overall appearance of your Twitch account.
Furthermore, Twitch has some restrictions on the colors you can choose for your name. These restrictions are in place to maintain chat readability and prevent certain colors from being used that may be disruptive or offensive. You should avoid using very bright or neon colors that may strain the eyes or make it difficult for other users to read your messages. Stick to more legible and visually appealing colors that enhance your username without causing any discomfort or distractions.
Now that you understand the limitations associated with changing the color of your name on Twitch, you’re ready to proceed with the next steps in the process. By keeping these limitations in mind, you can ensure that your customization efforts align with Twitch’s guidelines and create a positive and engaging chat experience for yourself and other users.
Step 2: Sign in to Twitch
To begin the process of changing the color of your name on Twitch, you’ll need to sign in to your Twitch account. If you don’t have an account yet, you can easily create one by visiting the Twitch homepage and clicking on the “Sign Up” button.
Once you’re on the Twitch homepage, locate the “Log In” button at the top right corner of the screen. Click on it, and you’ll be directed to the login page where you can enter your account credentials.
If you’ve previously logged into Twitch using your email address, simply enter your email and password in the corresponding fields. Alternatively, you can log in using your Twitch username or through your connected social media accounts like Facebook or Google.
After entering your login information, click on the “Log In” button to proceed. If your credentials are correct, you will be successfully logged in to your Twitch account.
It’s important to note that having a Twitch account is necessary to change the color of your name. If you don’t have an account, take a few minutes to create one so that you can access the necessary settings and customization options.
Once you’re logged in, you’ll have access to various features and settings within Twitch. From here, you can continue with the next steps to customize the color of your name and make it stand out in chat. Ensure that you’re signed in throughout the entire process to avoid any interruptions and to save your changes successfully.
With the login step complete, you’re now ready to move on to the next step of changing the color of your name on Twitch. Keep following the remaining steps to make your Twitch username truly unique and visually distinctive.
Step 3: Access Your Profile Settings
Now that you’re logged in to your Twitch account, it’s time to access your profile settings to make the necessary changes to the color of your name.
To access your profile settings, click on your avatar or profile picture located at the top right corner of the Twitch homepage. This will open a drop-down menu with various options.
From the drop-down menu, select “Settings” to proceed to your account settings page.
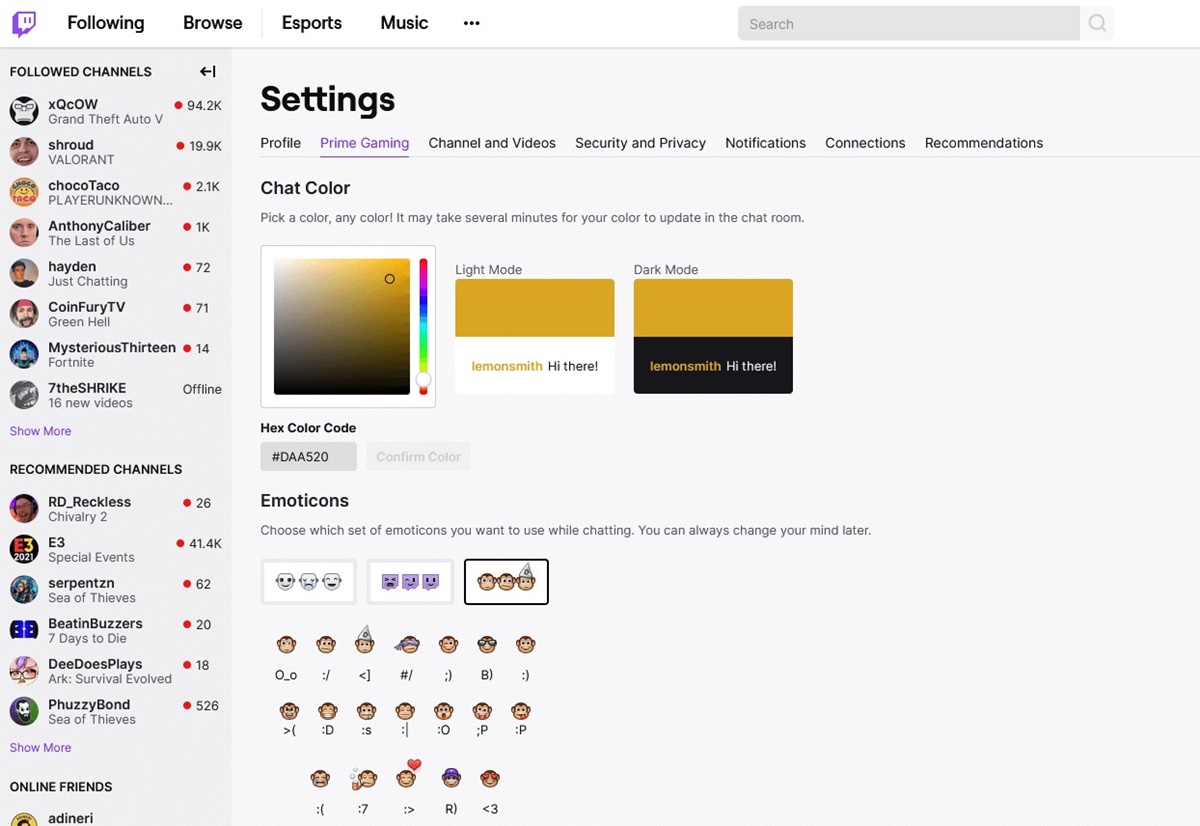
On the settings page, you’ll find different sections related to your Twitch account, including your personal information, connections, notifications, and more. Look for the “Profile” section, as this is where you can make changes to your username and associated details.
Click on the “Profile” section to expand it and reveal the available options.
Within the “Profile” section, you can customize various aspects of your Twitch account, such as your profile picture, bio, and banner. However, for the purpose of changing the color of your name, we’ll be focused on the chat settings.
Scroll down within the “Profile” section until you see the “Chat Settings” category. This is where you can find the option to customize the color of your name in Twitch chat.
Now that you’ve accessed the necessary profile settings, it’s time to move on to the next step and navigate to the specific chat settings to make the desired color changes to your name.
Step 4: Navigate to the Chat Settings
After accessing your profile settings, the next step is to navigate to the chat settings where you can make the desired color changes to your Twitch username.
Scroll down within the “Profile” section of your account settings until you reach the “Chat Settings” category. This is where you’ll find the options specific to customizing the appearance of your name in Twitch chat.
Click on the “Chat Settings” category to expand it and reveal the available options.
Within the “Chat Settings” category, you may find various customization options related to chat behavior, emotes, and display settings. Look for the specific option related to changing the color of your name, which may be labeled as “Username Color” or “Name Color.”
Once you have located the appropriate option, click on it to access the color customization settings.
The color customization settings may appear as a pop-up window or a drop-down menu, depending on the design and layout of Twitch’s interface.
Take a moment to familiarize yourself with the available color options and settings. This is where you’ll be able to select your preferred color for your Twitch username.
Keep in mind that Twitch may have some restrictions on color choices to ensure readability and user experience. It’s advised to choose a color that stands out and is visually appealing, but not overly bright or neon, as it may be difficult for other users to read your messages.
Now that you’ve successfully navigated to the chat settings and accessed the color customization options, you’re ready to proceed to the next step and make the actual color changes to your Twitch username.
Step 5: Hover Over Your Username
Once you have accessed the color customization settings in the chat settings, the next step is to locate your username in the chat window and hover over it.
To do this, navigate to any Twitch channel’s chat where you would like to see the color change applied to your username.
Look for your own username in the chat window, which is typically displayed as a hyperlink. It may appear as a different color or style compared to other usernames in the chat.
Hover your cursor over your username, and a small pop-up or tooltip should appear.
Depending on the Twitch interface, the pop-up or tooltip may display various information about your account, such as your follower count, join date, or even a brief bio.
What you’re specifically looking for in the pop-up or tooltip is a color picker, which allows you to select your preferred color for your username.
If you don’t see the color picker in the pop-up or tooltip, try hovering over your username for a few seconds to see if it reveals the color selection option. In some cases, the color picker is hidden until you hover over your username for a short period.
Once you have located the color picker, you’ll see a spectrum of colors to choose from. You can either click and drag the selector to choose a color or directly click on a color from the spectrum.
As you hover over different colors in the spectrum, the preview of your username color in the chat window may change in real-time, allowing you to see how it would look before making a final selection.
Take your time to explore different color options and find the one that best suits your preferences and stands out in the chat.
Once you’re satisfied with your color selection, you’re ready to move on to the next step and save your changes to apply the new color to your Twitch username.
Step 6: Click on the Color Picker
After hovering over your username and locating the color picker in the pop-up or tooltip, the next step is to click on the color picker to make your selection.
With the color picker visible, you’ll see a spectrum of colors ranging from vibrant hues to more subtle shades. The color picker allows you to choose a color that best represents your style and personality on Twitch.
To select a color, simply click on the desired shade within the color picker. You can either directly click on the color or click and drag the selector to a specific position within the spectrum.
As you click on different colors, you’ll notice that the preview of your username color in the chat window may change in real-time. This allows you to see a live preview of how your chosen color will appear to other Twitch users.
Experiment with different colors to find the one that stands out and is visually appealing to you. Consider how the color complements your Twitch channel’s branding or your personal preferences.
If you’re having trouble finding the perfect color from the spectrum, some color pickers also provide additional customization options. These may include options to enter specific values for hue, saturation, and brightness, allowing you to fine-tune your color selection even further.
Once you’re satisfied with your color choice, you’re one step closer to applying the new color to your Twitch username. However, remember to proceed to the next step and save your changes to ensure that your selected color is applied successfully.
Step 7: Select Your Preferred Color
After clicking on the color picker and exploring the variety of shades available, it’s time to select your preferred color for your Twitch username.
Take a moment to consider the overall look and feel you want to portray with your username color. Think about your personal style, the theme of your Twitch channel, or any branding elements you may want to incorporate.
Click on the color within the color picker that resonates with you the most. Whether it’s a bold and vibrant color, a subtle and muted tone, or something in between, choose the color that represents you and aligns with your preferences.
As you click on the color, you’ll notice that the preview of your username color in the chat window will update in real-time. This allows you to see how the selected color will appear to other Twitch users.
Don’t be afraid to experiment with different color options to find the perfect one. Test out various shades and consider how they harmonize with the chat background and other usernames in the chat room.
Remember that legibility is crucial, so try to choose a color that stands out and is easy to read without straining the eyes. Avoid extremely bright or neon colors that may be difficult for others to distinguish, and opt for colors with good contrast against the chat background.
Once you’re satisfied with your color selection and confident that it represents your style and preferences, you’re ready to proceed to the next step and save your changes.
Step 8: Save Your Changes
Now that you have selected your desired color for your Twitch username, it’s important to save your changes to ensure that the new color is applied successfully.
After choosing your preferred color, look for the “Save” or “Apply” button within the color picker or the chat settings interface. This button is usually located at the bottom or the side of the color picker.
Click on the “Save” or “Apply” button to save your color selection and apply it to your Twitch username.
Once you click the button, you may see a confirmation message indicating that your changes have been saved successfully. This means that your Twitch username will now appear with the newly selected color in chat.
It’s important to note that you may need to refresh the chat window or reload the Twitch page to see the color change take effect. This allows the Twitch interface to update and reflect the new color of your username.
After refreshing the chat window or page, navigate back to the chat where you initially located your username. You should now see your Twitch username displayed in the newly selected color, making it more distinct and visually appealing.
Take a moment to ensure that the applied color looks as expected and that it aligns with your overall vision for your Twitch username.
With your changes saved and the color successfully applied to your Twitch username, you can now enjoy the personalized touch and unique appearance of your name in the Twitch chat room.
If you ever want to change the color again in the future, you can follow the same steps from accessing the chat settings to selecting a new color and saving your changes.
Congratulations! You have successfully saved your changes and customized the color of your Twitch username. Now, let’s move on to the next step and test the color change to ensure everything is working as expected.
Step 9: Test the Color Change
After saving the changes to your Twitch username’s color, it’s essential to test the color change to ensure that it has been applied correctly and is visible to other users in the chat.
Open a chat window in any Twitch channel where you can view your username alongside other users’ messages.
Scan the chat and locate your Twitch username. It should now be displayed in the newly selected color.
Take a moment to observe how your colored username stands out and catches the attention of other users. Note how the color choice complements the chat background and other usernames in the chat room.
Try sending a test message in the chat to see how your colored username appears to others. This will allow you to confirm that the color change is visible and distinguishable to everyone in the chat.
If your colored username is clearly visible and distinguishable from other usernames, congratulations! The color change has been successfully applied, and you can now enjoy the personalized look of your Twitch username.
However, if you find that the color change is not visible or doesn’t appear as expected, double-check the steps you followed to ensure everything was done correctly.
Make sure that you saved the changes properly and that you refreshed the chat window or reloaded the Twitch page after saving the color selection.
If the issue persists, you may need to revisit the color customization settings and repeat the process from selecting a color to saving the changes.
Remember, it may take a moment for the color change to propagate across all chat windows, so give it some time if you have recently made the modifications.
Once you are satisfied with the visibility and appearance of your colored username, you can proceed to the next step and consider experimenting with different colors to further customize your Twitch experience.
Step 10: Experiment with Different Colors
Now that you have successfully changed the color of your Twitch username and confirmed its visibility in chat, you can take the opportunity to experiment with different colors to further personalize your Twitch experience.
Consider trying out various colors to find the one that best suits your style and captures the attention of other users. You can repeat the steps outlined earlier to access the color picker and select a new color for your username.
As you explore different colors, think about how they align with your Twitch channel’s theme, your personality, or your branding. Does a vibrant and bold color represent your energetic and dynamic content? Or perhaps a more subdued and elegant color better reflects your calm and mature style.
Take the time to test each color in the chat window and observe how it stands out among other usernames. Pay attention to legibility and readability to ensure that your messages remain easily visible to other users.
Don’t be afraid to experiment with color combinations as well. Some users like to incorporate gradients, blend multiple colors, or even use a different color for their badges or emotes in addition to their username.
Remember, Twitch’s chat settings allow for customization, so take advantage of this feature to make your username truly unique and reflect your individuality.
While experimenting, it’s helpful to keep a record or note of the colors you try, so you can easily revert back to a previously chosen color or switch between different colors based on your mood or preferences.
As you continue to explore different color options, you’ll not only enhance the visual appeal of your Twitch username but also ensure that it represents your personality and creates a memorable presence within the Twitch community.
Once you’re satisfied with your color selection or want to return to a previous color, simply follow the previously outlined steps, save your changes, and test the new color in the chat window.
Have fun experimenting with different colors and enjoy the versatility that Twitch provides in customizing your username. Make it uniquely yours and build a recognizable presence in the Twitch community.
Step 11: Consider Using Browser Extensions
While Twitch offers built-in options to change the color of your username, another option to consider is using browser extensions specifically designed for Twitch customization.
Browser extensions can provide additional features and customization options that go beyond the capabilities of Twitch’s native settings. These extensions allow you to further personalize your Twitch experience and have more control over the appearance of your username in chat.
Some popular browser extensions for Twitch customization include BetterTTV (Better Twitch TV) and FrankerFaceZ. These extensions offer a wide range of customization options, including custom emotes, chat enhancements, and, most relevant to this guide, the ability to change the color of your username.
By installing and enabling these extensions, you’ll gain access to a broader color spectrum and more advanced customization features. This allows you to experiment with unique colors, gradients, or even animated effects for your username, making it stand out even more in chat.
To use browser extensions, you’ll need to install them on your preferred web browser. They are available for popular browsers like Chrome, Firefox, and Safari. Simply search for the respective extension in the browser’s extension store, install it, and follow any setup or configuration instructions provided.
Once the extension is installed, you can access its settings or customization options typically through a dedicated icon or menu. Explore the available settings to find the color customization options for your username. From there, you can select the desired color or explore more advanced customization features, depending on the extension.
It’s important to note that when using browser extensions, compatibility and stability may vary. Ensure that you download extensions from trusted sources and keep them updated to avoid any performance issues or conflicts with Twitch’s interface.
Using browser extensions can add an extra layer of customization and creativity to your Twitch experience. However, keep in mind that not all viewers may have the same extensions installed, so it’s good practice to choose colors that are still readable even without the extensions enabled.
Consider using browser extensions as a way to enhance your Twitch customization journey and make your username truly unique and visually captivating.
With this final step, you’ve reached the end of the process to change the color of your name on Twitch. Whether you choose to stick with the built-in options provided by Twitch or explore the additional features of browser extensions, you now have the knowledge and tools to customize your Twitch username to your liking. Have fun, be creative, and enjoy your personalized Twitch experience!