
Why Set Up Donations on Twitch?
Twitch has grown into one of the most popular platforms for streaming and content creation, attracting millions of viewers and dedicated communities. If you are a Twitch streamer or content creator, setting up donations can be a valuable way to support your channel and enhance your viewers’ experience. Here are some compelling reasons to consider setting up donations on Twitch:
- Monetize your content: Creating and maintaining high-quality content requires time, effort, and sometimes financial investments. By setting up donations, you can monetize your Twitch channel and generate income while doing what you love.
- Show appreciation to your viewers: Twitch donations provide a way for your viewers to directly support your channel and show their appreciation for your content. It allows them to contribute to your success and feel more connected to you and your community.
- Invest in channel improvements: Donations can be used to improve your stream quality, upgrade your equipment, purchase new games, or even attend gaming events. Having financial support from your viewers can help you take your content creation to the next level.
- Build a sense of community: Donations on Twitch create a sense of community and involvement. They encourage viewers to actively participate and engage with your channel. Donors may feel a sense of pride and ownership in contributing to the success of your channel.
- Unlock additional features: Donations can unlock additional perks and benefits for your viewers. For example, you may offer exclusive emotes, badges, or access to subscriber-only chats. These rewards can incentivize viewers to donate and support your channel.
Setting up donations on Twitch can provide numerous benefits for both you and your viewers. It allows you to generate income, improve your content quality, and foster a stronger and more engaged community. In the following sections, we will explore the steps to set up donations on Twitch and provide tips for maximizing your donation potential.
Choosing a Donations Platform
When it comes to setting up donations on Twitch, choosing the right donations platform is crucial. You want a platform that is reliable, secure, and provides a seamless donation experience for your viewers. Here are some factors to consider when selecting a donations platform:
- Integration with Twitch: Look for donations platforms that have seamless integration with Twitch. This ensures that the donation alerts and notifications are displayed on your stream, creating a more interactive experience for your viewers.
- Payment options: Consider the payment options offered by the donations platform. It’s important to provide your viewers with a variety of options to make donations, such as PayPal, credit cards, or cryptocurrency. This gives them the flexibility to choose the payment method that is most convenient for them.
- Transaction fees: Pay attention to the transaction fees charged by the donations platform. Some platforms may charge a percentage of each donation, while others may have fixed fees. Take into account the fees associated with each platform to ensure that you are maximizing your earnings.
- Customization options: Look for donations platforms that offer customization options. This allows you to personalize your donation alerts and panels to match your branding and engage your viewers. Customization options can include changing colors, text, fonts, and adding your channel logo.
- Analytics and tracking: Consider platforms that provide analytics and tracking features. These features allow you to monitor and track your donations, including the total amount received, top donors, and donation trends. Having access to this data can help you make informed decisions and optimize your donation strategies.
- Support and community: Look for platforms that offer reliable customer support and have an active community. If you encounter any issues or have questions during the setup process, having a responsive support system can be invaluable. Additionally, being part of an active community can provide you with resources, tips, and advice on maximizing your donations.
By carefully considering these factors, you can choose a donations platform that best suits your needs as a Twitch streamer. In the next section, we will guide you through the process of setting up a PayPal account, which is a popular and widely used payments platform for streamers.
Setting Up a PayPal Account
PayPal is a widely used and trusted online payment platform that allows you to receive donations from your viewers on Twitch. Setting up a PayPal account is a straightforward process. Here’s how you can do it:
- Go to the PayPal website: Visit the PayPal website and click on the “Sign Up” button to create a new account.
- Select the account type: Choose between a “Personal” or “Business” account. For Twitch donations, it’s recommended to select the “Business” account as it offers additional features tailored for businesses and content creators.
- Provide your email and password: Enter your email address and create a strong password for your PayPal account.
- Complete the verification process: Follow the prompts to provide additional information such as your name, address, and contact details. You may also need to verify your account through email or phone verification.
- Link your bank account or credit/debit card: To receive donations, you’ll need to link your PayPal account to a valid bank account or credit/debit card. This allows PayPal to transfer the funds received to your preferred payment method.
- Set up your donation button: PayPal provides a donation button feature that you can integrate into your Twitch channel or website. Customize your donation button by adding a name, donation amount, and any additional details you’d like to include.
- Generate your donation link or button code: Once your button is set up, PayPal will provide you with a donation link or button code. Copy this code and keep it handy for the next steps.
Setting up a PayPal account is a crucial step in accepting donations on Twitch. It allows your viewers to securely donate funds directly to you, ensuring a smooth and reliable donation process. In the next section, we will guide you through the process of creating a Streamlabs account, a popular donations platform that seamlessly integrates with Twitch.
Creating a Streamlabs Account
Streamlabs is a popular donations platform that offers a range of tools and features to enhance your Twitch streaming experience. It provides customizable donation alerts, overlays, and more. To set up donations using Streamlabs, follow these steps to create a Streamlabs account:
- Go to the Streamlabs website: Visit the Streamlabs website and click on the “Sign Up” button to create a new account.
- Connect with your Twitch account: Streamlabs offers a seamless integration with Twitch. Click on the “Connect with Twitch” button to link your Twitch account to Streamlabs. This allows Streamlabs to access your Twitch channel and display donation alerts during your streams.
- Complete the registration: Follow the prompts to provide the necessary information, such as your email address and a password, to complete the registration process.
- Grant permissions: Streamlabs may require you to grant certain permissions to access your Twitch channel and display donation alerts. Make sure to grant the necessary permissions to enable the full functionality of Streamlabs.
- Customize your Streamlabs settings: Once you’ve created your Streamlabs account, you can customize various settings such as donation alerts, overlays, and appearance. Explore the different options and customize them to align with your branding and preferences.
- Set up your donation settings: Within your Streamlabs account, navigate to the donation settings section. Here, you can configure donation options such as the minimum donation amount, custom alerts, and donation goals.
- Integrate your PayPal account: To receive donations, you’ll need to link your PayPal account to Streamlabs. Navigate to the integration settings and follow the instructions to connect your PayPal account. This ensures that the donations you receive are deposited into your PayPal account.
- Test your donation alerts: Before going live with your donation alerts, it’s essential to test them. Streamlabs provides a test donation feature that allows you to simulate a donation and ensure that the alerts are functioning correctly.
Creating a Streamlabs account is a crucial step in setting up donations on Twitch. It provides you with a range of customization options and features to enhance the donation experience for your viewers. In the next section, we will guide you through the process of connecting Streamlabs to your Twitch account.
Connecting Streamlabs to Twitch
To enable donation alerts and integrate Streamlabs with your Twitch channel, you need to connect Streamlabs to your Twitch account. This allows Streamlabs to display donation notifications and alerts during your streams. Here’s how you can connect Streamlabs to Twitch:
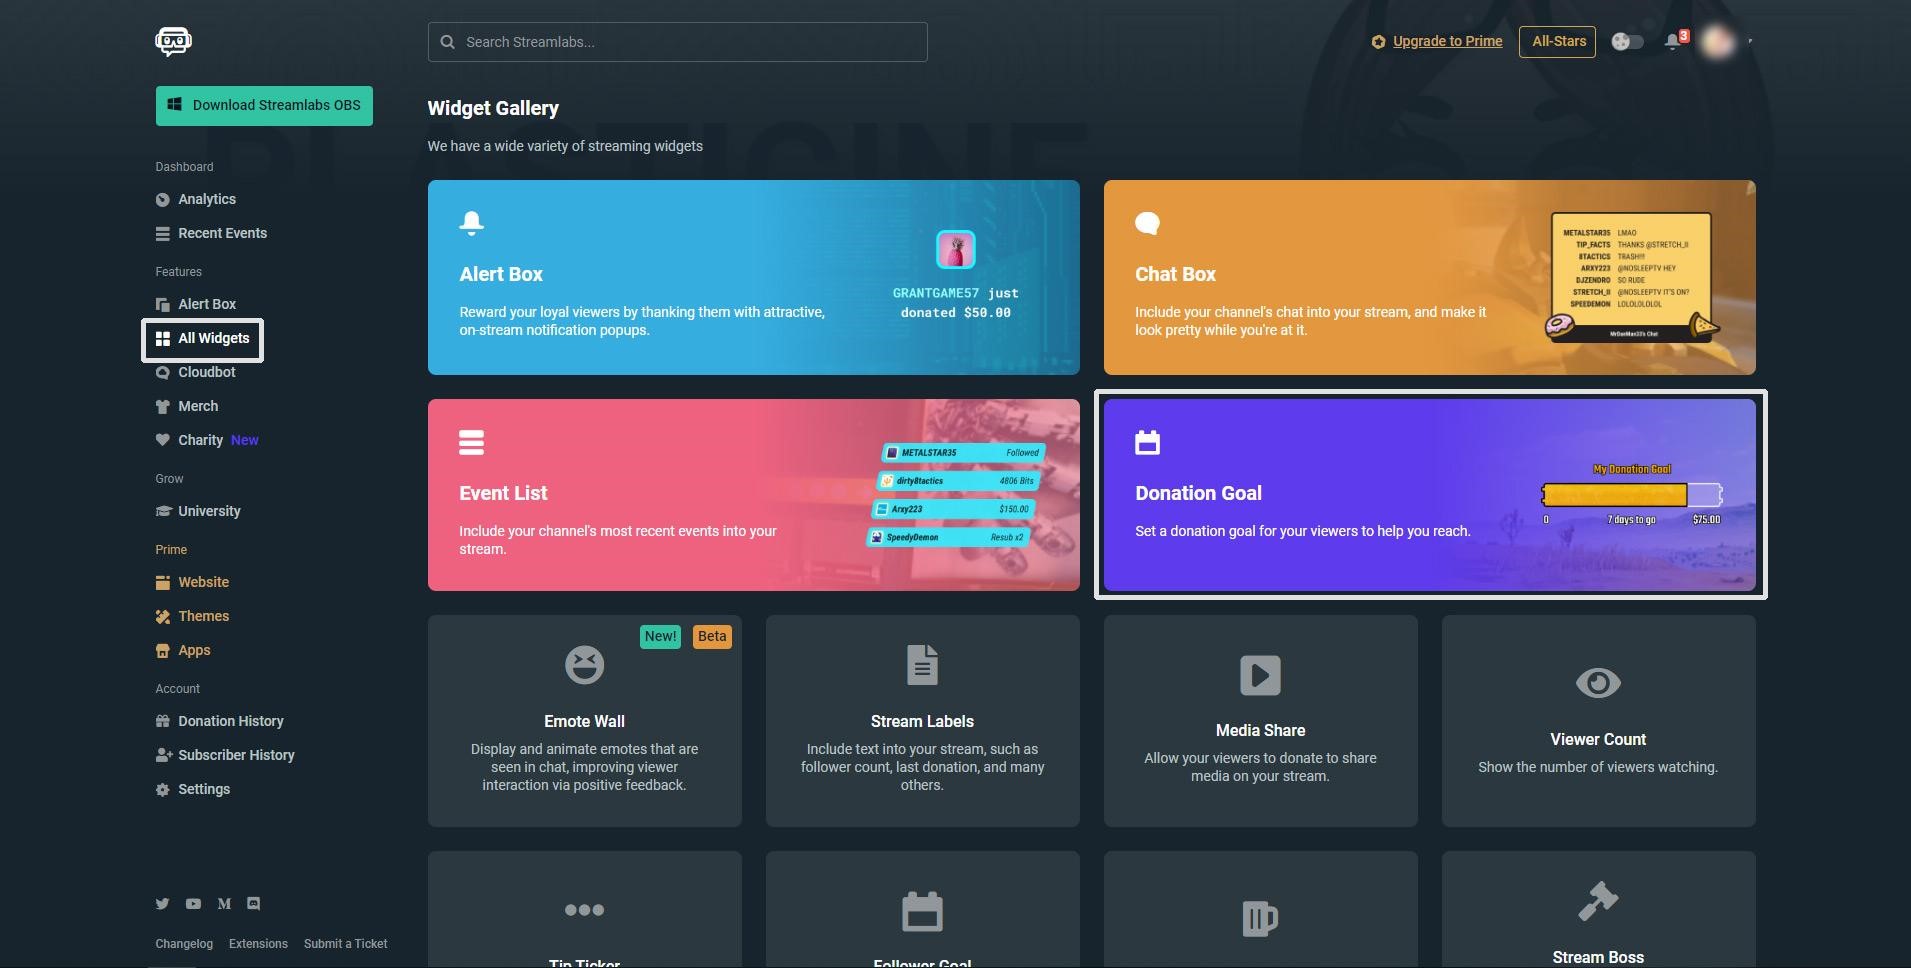
- Open Streamlabs Dashboard: Log in to your Streamlabs account and navigate to the Streamlabs dashboard. This is where you can manage and customize your donation settings.
- Click on “All Widgets”: In the Streamlabs dashboard, click on the “All Widgets” tab located on the left-hand side of the screen. Here, you’ll find various donation-related widgets and features.
- Select “Alert Box”: From the list of widgets, select the “Alert Box” option. This is the feature that will display your donation alerts on your Twitch stream.
- Authorize Streamlabs with Twitch: To connect Streamlabs to your Twitch account, click on the “Authorize” button. This will open a new window where you’ll be prompted to log in to your Twitch account and grant permission for Streamlabs to access your channel.
- Choose your Twitch channel: Once you’ve authorized Streamlabs to access your Twitch account, you’ll be redirected to the Streamlabs dashboard. Select your Twitch channel from the drop-down menu to ensure that the alerts are displayed correctly for your channel.
- Customize your alert settings: Within the Alert Box settings, you can customize the appearance and behavior of your donation alerts. Adjust settings such as the alert duration, sound effects, and visual effects to create a unique and engaging donation experience for your viewers.
- Preview your alerts: Before going live with your donation alerts, take advantage of the preview feature provided by Streamlabs. This allows you to see how the alerts will appear on your Twitch stream and make any necessary adjustments before broadcasting them to your viewers.
Connecting Streamlabs to Twitch is a vital step in enabling donation alerts for your Twitch channel. By following these steps, you can ensure that your donation notifications are seamlessly integrated into your streams, enhancing viewer engagement and interaction. In the next section, we will guide you through the process of configuring your Streamlabs donation settings.
Configuring Streamlabs Donation Settings
Configuring your Streamlabs donation settings is crucial to ensure that your viewers have a smooth and rewarding donation experience. Here’s how you can configure your Streamlabs donation settings:
- Access Streamlabs Dashboard: Log in to your Streamlabs account and navigate to the Streamlabs dashboard.
- Click on “Donation Settings”: In the Streamlabs dashboard, locate and click on the “Donation Settings” tab. This is where you can customize various aspects of your donation settings.
- Set up your currency and minimum donation: Choose the currency you want to receive donations in and set a minimum donation amount if desired. This ensures that donations are processed correctly and meets your preferences.
- Configure alerts and notifications: Customize the alerts and notifications that will be displayed when a donation is received. You can choose different sound effects, visual themes, and even add a custom message to appear with each donation alert.
- Enable donation goal feature: Streamlabs allows you to set up donation goals to track the progress of specific fundraising campaigns or milestones. Enable this feature and customize the goal amount and description to encourage viewer participation.
- Set up text-to-speech feature: Streamlabs offers a text-to-speech feature that reads aloud the donation messages during your stream. You can choose to enable or disable this feature and adjust the voice and volume settings as per your preferences.
- Test your donation settings: Before going live, it’s essential to test your donation settings to ensure that everything is set up correctly. Use Streamlabs’ test donation feature to simulate a donation and verify that the alerts, notifications, and donation goals are functioning as expected.
- Save your settings: Once you have configured all your donation settings, don’t forget to click on the “Save Settings” button to save your changes.
By properly configuring your Streamlabs donation settings, you can provide a more personalized and engaging experience for your viewers. Customizing alerts, setting goals, and enabling features such as text-to-speech can enhance viewer interaction and encourage donations. In the next section, we will explore how you can design custom donation alerts to further amplify the donation experience on Twitch.
Designing Custom Donation Alerts
Designing custom donation alerts adds a unique and visually appealing touch to the donation experience on Twitch. With Streamlabs, you can create personalized donation alerts that align with your branding and engage your viewers. Here’s how you can design custom donation alerts:
- Access Streamlabs Alert Box: Log in to your Streamlabs account and navigate to the Streamlabs dashboard.
- Click on “Alert Box”: In the dashboard, select the “Alert Box” feature from the list of available widgets.
- Customize your alerts: In the Alert Box settings, you can customize various elements of your donation alerts, such as the appearance, animation, sound effects, and duration. Use the customization options provided by Streamlabs to create a unique and captivating style that resonates with your brand.
- Add custom images and animations: Streamlabs allows you to upload custom images and animations to be displayed in your donation alerts. You can create personalized graphics, animations, or even use GIFs to add flair to your alerts. Ensure that the images are eye-catching and relevant to your channel’s theme.
- Set up different alerts for different donation amounts: To make the donation experience more exciting, consider setting up different alert variations based on the donation amount. For example, you can have a special alert for larger donations or create different themes for different tiers of donations. This adds a sense of progression and differentiation for your donors.
- Preview your alerts: Before going live, use the preview feature provided by Streamlabs to see how your custom donation alerts will appear on your stream. Make any necessary adjustments to ensure that the visuals and effects are displaying correctly and capturing attention.
- Save your settings: Once you are satisfied with your custom donation alerts, remember to save your settings to apply them to your Twitch channel.
Designing custom donation alerts enhances the overall viewer experience and adds a professional touch to your Twitch channel. By incorporating your branding elements and creating visually appealing animations, you can create a memorable and engaging donation experience for your viewers. In the next section, we will explore how to add donation panels to your Twitch profile to provide more information about your donations and encourage donations.
Adding Donation Panels to Your Twitch Profile
Donation panels are a valuable addition to your Twitch profile as they provide viewers with more information about your donations and make it easier for them to contribute. These panels act as clickable links that direct viewers to your donation page or platform. Here’s how you can add donation panels to your Twitch profile:
- Access your Twitch Channel Dashboard: Log in to Twitch and navigate to your channel’s dashboard.
- Click on “Edit Panels”: In the dashboard, locate the “Panels” tab and click on “Edit Panels”. This will allow you to manage and customize the panels displayed on your Twitch profile.
- Create a new panel: Click on the “+” (plus) icon to create a new panel. A popup will appear where you can enter a title and description for the panel.
- Design your donation panel: Customize your donation panel by adding images, text, and links. You can use graphic design software or online tools to create visually appealing images that represent your donations. It’s recommended to include your donation platform’s logo or a call-to-action button to encourage viewers to donate.
- Add the donation link: In the panel description, include the direct link to your donation page or the platform you’re using to receive donations. This allows viewers to easily access your donation page with a single click.
- Order and position the panels: Arrange and position the panels to your liking. You can drag and drop them to rearrange the order or change the appearance of your Twitch profile.
- Save your changes: Once you’re satisfied with the placement and design of your donation panels, click on the “Save” or “Update” button to save your changes. The donation panels will now be visible to viewers on your Twitch profile.
Adding donation panels to your Twitch profile provides a convenient way for viewers to access your donation page and contribute to your channel. By customizing the panels with appealing graphics and clear call-to-action buttons, you can increase the visibility and effectiveness of your donation efforts. In the next section, we will explore tips for promoting your donations on Twitch and maximizing your donation potential.
Promoting Your Donations on Twitch
Promoting your donations on Twitch is essential to maximize your donation potential and encourage viewers to support your channel. Here are some effective ways to promote your donations and increase engagement with your viewers:
- Use overlays: Utilize stream overlays to display your donation goal progress, recent donations, or special donation incentives. These visual cues not only create a sense of urgency but also showcase the support you receive from your community.
- Add donation alerts: Enable donation alerts through Streamlabs or other donation platforms to showcase your viewers’ donations in real-time. These on-screen notifications create excitement and recognition for your donors, encouraging others to contribute.
- Verbally acknowledge donors: During your streams, make it a point to verbally acknowledge and thank your donors. This personal recognition adds a human touch and demonstrates your gratitude for their support.
- Create themed donation events: Host special streams or events dedicated to fundraising for a specific cause or goal. For example, you could have a charity stream where you pledge to donate a percentage of the funds raised to a charitable organization, motivating your viewers to contribute.
- Offer donation incentives: Provide added value to your donors by offering incentives or rewards based on their donation level. This could include shoutouts, exclusive access to subscriber-only content, or priority in joining multiplayer games.
- Cross-promote on social media: Use your social media platforms, such as Twitter, Facebook, or Instagram, to highlight and promote your donations. Share updates, stream schedules, and donation milestones to encourage your followers to participate.
- Include donation information in your channel panels: Mention donations and their benefits in your Twitch channel panels. Clearly explain how donations contribute to your channel’s growth, improvements, and future plans, encouraging viewers to support your efforts.
- Highlight your donation link during intermissions: When taking breaks or transitioning between games, display your donation link or QR code on your stream overlay. This provides a visible reminder for viewers to contribute during these opportunities.
- Create donation goals: Set specific and attainable donation goals and share them with your viewers. Update your audience on the progress and celebrate milestones reached to foster a sense of community achievement.
- Express appreciation to donors: Show genuine gratitude to your donors by sending personalized thank-you messages or shoutouts. Consider creating a dedicated “Donor Wall” on your Twitch profile or stream overlays to publicly recognize their support.
Promoting your donations on Twitch requires an active and engaging approach to encourage viewer participation. By implementing these strategies, you can create a supportive community and maximize the impact of your donation efforts. In the next section, we will discuss tips for maximizing the donation potential on your Twitch channel.
Tips for Maximizing Donation Potential
Maximizing the donation potential on your Twitch channel requires a thoughtful and proactive approach. Here are some tips to help you increase donations and create a more sustainable revenue stream:
- Engage with your audience: Interact with your viewers during streams, respond to chat messages, and create a welcoming and inclusive atmosphere. Building strong connections with your audience increases the likelihood of receiving donations.
- Create compelling content: Deliver high-quality, entertaining, and informative content that keeps viewers engaged and wanting more. The better the overall experience, the more likely viewers will feel inclined to support your channel through donations.
- Be transparent and honest: Clearly communicate how donations contribute to the growth and improvement of your channel. By being transparent about how funds are used, viewers are more likely to feel confident in supporting your endeavors.
- Offer unique rewards for donors: Incentivize donations by providing exclusive perks or rewards to donors. This could include access to subscriber-only content, custom emotes, or personalized shoutouts during streams.
- Set realistic donation goals: Create achievable donation goals that resonate with your audience. Break these goals down into smaller milestones and celebrate each achievement to keep motivation high.
- Recognize donors publicly: Show appreciation for your donors by giving them public recognition during your streams. This can be done through on-screen shoutouts, dedicated panels on your Twitch profile, or by displaying their names in your stream overlays.
- Create urgency and scarcity: Promote limited-time donation campaigns or events to create a sense of urgency and encourage immediate action. Communicate that this is a unique opportunity for viewers to support your channel and be part of something special.
- Stream consistently: Establish a regular streaming schedule and stick to it. Consistency builds trust and loyalty with your audience and makes it easier for them to plan and support your streams through donations.
- Collaborate with other creators: Partnering with other Twitch streamers or content creators can help expand your reach and access new viewers who may be inclined to donate. Collaborative efforts can also generate excitement and increased engagement.
- Show gratitude: Always express gratitude and appreciation to your donors, whether during the stream or through personalized thank-you messages. Letting your donors know that their support is valued strengthens the bond between you and encourages continued support.
Implementing these tips can help maximize your donation potential on Twitch. Remember, building a supportive community and fostering genuine connections with your audience are key in encouraging viewers to contribute through donations. In the next sections, we will cover important aspects such as ensuring transparency and compliance, thanking and acknowledging donors, enabling donation goals and incentives, dealing with trolls and inappropriate donations, monitoring and tracking donations, and maintaining donor privacy and security.
Ensuring Transparency and Compliance
Transparency and compliance are essential when setting up and accepting donations on Twitch. By maintaining a transparent and compliant donation process, you build trust with your viewers and ensure that you are meeting legal and ethical obligations. Here are some guidelines to help you ensure transparency and compliance with your Twitch donations:
- Provide clear donation information: Clearly communicate how donations are used and what benefits donors can expect. Be transparent about any fees or costs associated with receiving donations and ensure that this information is easily accessible to your viewers.
- Comply with regulations: Familiarize yourself with the laws and regulations pertaining to accepting donations in your jurisdiction. These may include tax requirements, financial reporting, and compliance with anti-money laundering regulations. Consult with a legal professional if necessary to ensure full compliance.
- Disclose sponsorships or relationships: If you have sponsorships or partnerships that involve donations or financial arrangements, make proper disclosures to your viewers. Being transparent about these relationships helps maintain trust and ensures compliance with advertising and endorsement guidelines.
- Display donation alerts: Display donation alerts prominently on your stream, ensuring they are visible and legible to your viewers. This transparency allows everyone to see and acknowledge the support you receive during your broadcasts.
- Keep accurate records: Maintain detailed records of your donations, including donor names, amounts, and dates. This record-keeping helps with transparency, financial reporting, and ensures compliance with any auditing requirements.
- Protect donor privacy: Safeguard the personal information of your donors in accordance with privacy laws and regulations. Clearly communicate your privacy policy and assure donors that their personal information will be handled securely and confidentially.
- Regularly update your community: Keep your viewers informed about the impact of their donations. Provide updates on how the funds have been used and the progress made towards achieving your channel goals. This transparency helps maintain viewer trust and encourages continued support.
- Be responsive to donor inquiries: Promptly address any inquiries or concerns from your donors regarding their donations. Responding in a timely and respectful manner demonstrates your commitment to transparency, and builds trust with your donors.
- Monitor and address fraudulent activities: Be vigilant about detecting and addressing any fraudulent or suspicious donation activities. Implement security measures to safeguard against fraudulent donations and take immediate action if you encounter any fraudulent transactions.
- Regularly review your donation policies: Periodically review and update your donation policies to ensure they remain compliant with current laws and regulations. Stay informed about any changes in the legal landscape regarding online donations and adapt your practices accordingly.
Ensuring transparency and compliance with your Twitch donations is crucial to maintain trust with your viewers and protect the integrity of your channel. By following these guidelines, you create a secure and ethical donation process that benefits both you and your donors. In the next section, we will discuss the importance of thanking and acknowledging your donors.
Thanking and Acknowledging Donors
Thanking and acknowledging your donors is a vital part of building a strong relationship with your Twitch community. By expressing your genuine appreciation, you not only show gratitude for their support but also encourage continued donations. Here are some effective ways to thank and acknowledge your donors:
- On-stream shoutouts: Give your donors a special mention during your streams. Use their Twitch usernames or real names to acknowledge their support and express your gratitude in real-time. This personal recognition makes donors feel valued and appreciated.
- Thank-you messages: Reach out to your donors with personalized thank-you messages. This can be done through direct messages on Twitch, social media platforms, or even via email. Taking the time to send a heartfelt thank-you can go a long way in strengthening the bond between you and your donors.
- Create a donor wall: Dedicate a section on your Twitch profile or stream overlays to display the names or usernames of your top donors. This public display of appreciation serves as a constant reminder of their support and encourages others to contribute.
- Send exclusive content: Offer exclusive content or behind-the-scenes access to your donors as a way of showing gratitude. This could include early access to videos, exclusive streams, or special merchandise. Providing exclusive perks builds a sense of exclusivity and appreciation for your donors.
- Showcase the impact of their donations: Regularly update your viewers on how their donations have made an impact. Share success stories, milestones reached, or goals accomplished as a direct result of their contributions. Demonstrating the tangible outcomes of their support reinforces the value and importance of their donations.
- Hold donor events or streams: Organize dedicated streams or events specifically for your donors as a way to express gratitude. This could involve playing games with them, hosting Q&A sessions, or creating unique content based on their suggestions or preferences.
- Highlight donor contributions on social media: Share posts or highlights on your social media platforms, showcasing the generosity and support of your donors. Tagging and mentioning them publicly helps extend gratitude beyond your Twitch community and can potentially attract new donors.
- Create a thank-you video: Record a special video expressing your gratitude to your donors. Personalize the message, share stories of how their support has impacted your channel, and emphasize the role they play in your success. Upload this video to Twitch or your other social media channels to reach a wider audience.
- Host a dedicated donor appreciation stream: Set aside a stream specifically to thank and celebrate your donors. This can involve playing games with them, sharing memories, or even conducting giveaways as a token of gratitude.
- Make thanking a regular practice: Integrate expressing gratitude into your regular streaming routine. Whether it’s a dedicated segment at the beginning or end of each stream or periodic updates during the broadcast, make it a habit to acknowledge your donors consistently.
Thanking and acknowledging your donors is essential for maintaining a strong relationship with your Twitch community. By implementing these strategies, you can foster a sense of appreciation, encourage continued support, and strengthen the bond between you and your dedicated donors. In the next section, we will discuss enabling donation goals and incentives to drive engagement and motivate viewers to donate.
Enabling Donation Goals and Incentives
Setting donation goals and offering incentives is an effective way to drive engagement, motivate viewers, and encourage donations on Twitch. By creating a sense of progress and reward, you can inspire your community to contribute towards specific milestones. Here’s how you can enable donation goals and incentives:
- Set realistic donation goals: Determine specific and attainable donation goals that align with your channel’s needs or aspirations. Whether it’s upgrading your equipment, attending a gaming event, or supporting a charity, make sure the goals are feasible and relevant to your community.
- Showcase progress visually: Display visual representations of your donation goals during your streams. This can be in the form of a progress bar, a graphic overlay, or even a physical object that fills up with each donation milestone reached. Visual cues offer a tangible sense of advancement and motivate viewers to contribute.
- Share updates on your goals: Regularly update your viewers on the progress towards your donation goals. Share the current status, celebrate milestones reached, and express gratitude for the support received. Keeping your community informed and engaged fosters a sense of involvement and collective achievement.
- Offer milestone incentives: Create incentives or rewards that correspond to specific donation milestones. For example, you could promise a special stream, a marathon gaming session, or a giveaway once a certain donation threshold is reached. Incentives give your community an extra reason to donate and feel a part of the journey.
- Run donation challenges: Introduce donation challenges to spice up your streams and encourage donations. This can involve setting unique, entertaining tasks or goals that you’ll undertake once a specific donation target is met. For instance, you could initiate a challenge to eat spicy food, attempt a difficult gaming achievement, or perform a dare requested by viewers.
- Show appreciation for donors: Express gratitude to donors who contribute towards your donation goals by giving them special recognition or rewards. This can be shoutouts during streams, exclusive access to subscriber-only content, or personalized thank-you messages. Providing extra perks for donors reinforces their importance and encourages further contributions.
- Create a leaderboard: Maintain a leaderboard that highlights your top donors. This publicly displays their contributions and encourages healthy competition among donors to secure a higher rank. Regularly update the leaderboard to recognize new donors and to give them well-deserved attention.
- Collaborate with your community: Involve your community in setting donation goals and incentives. Ask for suggestions or feedback on what they would like to see or what goals they find most exciting. Collaborating with your viewers fosters a sense of ownership and investment in the donation process.
- Recognize contributions during streams: Give special recognition and appreciation to donors who contribute towards your goals. Whether it’s through on-screen alerts, personalized shoutouts, or dedicated segments during your streams, acknowledgment in real-time adds a sense of accomplishment and motivates others to join in.
- Share the impact of donations: Continuously communicate how donations have made a difference and contributed to your channel’s growth and success. Show how funds have been utilized to upgrade equipment, improve content quality, or support new initiatives. By sharing these success stories, you inspire your community and encourage ongoing support.
Enabling donation goals and incentives adds excitement and motivation to the donation process on Twitch. By implementing these strategies and creating a sense of progress and reward, you can drive engagement, foster generosity within your community, and make the donation experience even more meaningful. In the next section, we will discuss dealing with trolls and inappropriate donations.
Dealing with Trolls and Inappropriate Donations
As a Twitch streamer, it’s important to be prepared for trolls and inappropriate donations that may occur on your channel. While it’s unfortunate, encountering these situations is not uncommon. Here are some strategies to effectively deal with trolls and inappropriate donations:
- Establish chat moderation: Implement chat moderation tools to prevent and handle inappropriate comments or messages. Assign moderators who can actively monitor the chat and remove or block disruptive individuals.
- Set donation guidelines: Clearly outline your donation guidelines and communicate them to your viewers. Specify the types of donations you will accept and any limitations or restrictions. This helps set expectations and discourages inappropriate donations.
- Monitor and review donations: Regularly review donations and refund any that are explicitly inappropriate or violate your guidelines. This demonstrates your commitment to maintaining a positive and respectful community.
- Disable offensive words in alerts: Utilize the word filtering features provided by donation platforms to automatically block offensive or inappropriate words from appearing in donation alerts or chat messages. This helps prevent inappropriate content from being displayed on your stream.
- Respond appropriately: If faced with an inappropriate donation or message on your stream, respond professionally and swiftly. Acknowledge the situation, denounce the behavior, and reinforce that it is not welcome in your community. Your firm response sends a clear message and discourages future instances.
- Have rules in place: Clearly define and enforce community guidelines that prohibit and discourage inappropriate behavior. Display these rules on your Twitch channel and remind viewers of them regularly to maintain a positive and respectful environment.
- Block and ban repeat offenders: If trolls or individuals persistently engage in disruptive or inappropriate behavior, take action by blocking or banning them from your channel. This protects the integrity of your community and sends a strong message that such behavior will not be tolerated.
- Report severe instances: In extreme cases where inappropriate behavior goes beyond the boundaries of your Twitch channel, report the offender to the appropriate authorities or the platform’s moderation team. Your actions can help safeguard not only your community but also others from harmful behavior.
- Seek support from your community: Let your community know that you do not tolerate inappropriate behavior and ask for their support in maintaining a positive atmosphere. Encourage viewers to report any trolls or inappropriate donations they come across during your streams.
- Maintain open communication: Foster open communication with your viewers to address concerns or questions related to inappropriate behavior. Let them know that you take their feedback seriously and are committed to creating a safe and welcoming environment for everyone.
Dealing with trolls and inappropriate donations requires a proactive and vigilant approach. By implementing these strategies, setting clear expectations, and taking appropriate action, you can foster a positive and respectful community on your Twitch channel. In the next section, we will explore the importance of monitoring and tracking donations.
Monitoring and Tracking Donations
Monitoring and tracking donations on your Twitch channel is essential for several reasons. It allows you to stay informed about your channel’s financial growth, understand donor trends, and ensure the transparency and accuracy of your donation records. Here are some key aspects to consider when monitoring and tracking donations:
- Use a donations platform with tracking capabilities: Utilize a donations platform like Streamlabs or other available tools that provide comprehensive tracking features. These platforms can help you monitor the total amount of donations received, individual donor contributions, and other valuable metrics.
- Review donation records regularly: Frequently review your donation records to ensure accuracy and reconcile them with your financial statements. Keeping detailed and up-to-date records helps with financial reporting, tax compliance, and maintaining transparency with your community.
- Analyze donor trends: Examine donation patterns and trends to identify peak donation times, popular campaigns, or recurring donors. Understanding donor behavior can help you tailor your fundraising efforts and create targeted strategies to encourage ongoing support.
- Track donation goals: Keep track of the progress towards your donation goals and milestones. Monitor how close you are to reaching each target and share updates with your community to maintain their engagement and motivation.
- Identify top donors: Recognize and show appreciation for your top donors, those who contribute significant amounts or donate frequently. This insight allows you to prioritize their recognition efforts and maintain a strong relationship with these dedicated supporters.
- Monitor donation alerts: Regularly check the functionality and accuracy of your donation alerts during streams. Ensure that alerts are appearing correctly and displaying the relevant donor information. Testing your alerts periodically helps maintain a seamless donation experience for your viewers.
- Use analytics and reporting: Utilize the analytics and reporting features offered by donations platforms to gain insights into overall donation performance. Analyze metrics such as donation frequency, average donation amount, and donation growth over time to inform your donation strategies.
- Benchmark your progress: Compare your current donation performance against previous periods to assess growth and improvement. This helps you evaluate the effectiveness of your donation campaigns and strategies and make informed adjustments as needed.
- Track expenses related to donations: Keep a record of any expenses associated with receiving or promoting donations. This includes transaction fees charged by donations platforms, costs incurred for donation incentives, or expenses for managing and processing donations. Tracking expenses allows for accurate financial reporting and analysis of the true impact of donations.
- Stay compliant with financial regulations: Ensure that your donation tracking and financial processes align with legal and financial regulations. Familiarize yourself with any tax reporting requirements or obligations related to accepting donations and consult with professionals if needed.
Monitoring and tracking donations on your Twitch channel provides valuable insights into your financial performance, donor behavior, and allows for accurate and transparent reporting. By implementing effective monitoring practices, you can optimize your fundraising efforts and maintain a strong connection with your supportive community. In the next section, we will discuss maintaining donor privacy and security to ensure a safe donation experience.
Maintaining Donor Privacy and Security
When accepting donations on your Twitch channel, maintaining donor privacy and security is of utmost importance. Respecting the privacy of your donors not only builds trust but also ensures that their personal information is handled securely. Here are some key practices to maintain donor privacy and security:
- Implement data protection measures: Take necessary steps to protect the personal information of your donors. This includes maintaining secure systems and utilizing encryption technologies to safeguard sensitive data.
- Use a reputable donation platform: Select a reputable donation platform with a proven track record for data security. Research the platform’s security measures and ensure they comply with industry standards.
- Communicate your privacy policy: Clearly communicate your privacy policy to donors. Provide information on how their personal data will be collected, used, stored, and protected. Transparency about your data handling practices builds trust and confidence.
- Collect only necessary information: When collecting donor information, only request what is necessary for donation processing. Avoid asking for excessive personal details that are unrelated to the purpose of the donation.
- Secure donation transaction processes: Ensure that donation transactions occur through secure channels, such as encrypted payment gateways or reputable third-party processors. This protects donor payment information and prevents unauthorized access or data breaches.
- Limit access to donor information: Restrict access to donor information to authorized individuals only. Grant access privileges on a need-to-know basis and train your staff or volunteers on data protection practices.
- Obtain explicit consent: Seek explicit consent from donors before using their personal information for any purpose beyond the donation processing. This includes obtaining permission to send marketing communications or disclose their names publicly.
- Regularly update security measures: Continuously assess and update your security measures to stay ahead of potential threats. Stay informed about emerging data security trends, implement software patches, and perform routine security audits.
- Review third-party integrations: Ensure that any third-party tools or plugins you integrate into your donation process comply with data security and privacy regulations. Always review and vet these integrations to protect donor information.
- Handle sensitive information with care: If donors share sensitive information with you, such as financial details or identification documents, handle it with utmost care and adhere to applicable legal requirements for data protection and storage.
- Provide donor support: Offer appropriate channels for donors to reach out with privacy-related inquiries or concerns. Respond promptly and provide assistance in addressing any donor privacy or security issues.
- Comply with data protection regulations: Stay informed about data protection regulations applicable to your jurisdiction, such as the General Data Protection Regulation (GDPR). Familiarize yourself with the requirements and ensure compliance to safeguard donor privacy.
Maintaining the privacy and security of your donors’ information is crucial for cultivating trust and protecting their sensitive data. By implementing robust data protection measures and adhering to privacy best practices, you can provide donors with a safe and secure donation experience on your Twitch channel. In the next section, we will discuss the importance of future growth and expanding donation options.
Future Growth and Expanding Donation Options
Continued growth and expansion of your donation options are essential for sustaining and enhancing support for your Twitch channel. By exploring new avenues and adapting to changing trends, you can attract a wider audience and provide more opportunities for viewers to contribute. Here are some strategies for future growth and expanding donation options:
- Explore alternative donation platforms: Research and consider alternative donation platforms to provide more options for your viewers. Different platforms may appeal to different donors, so offering multiple options can increase the likelihood of receiving donations.
- Integrate additional payment methods: Expand your payment options beyond the traditional methods. Consider supporting cryptocurrency payments or alternative digital wallets to accommodate donors who prefer these emerging forms of payment.
- Engage with affiliate programs: Explore affiliate programs that align with your content niche. By becoming an affiliate, you can earn additional income from qualified purchases made by your viewers, providing another avenue for supporters to contribute to your channel.
- Diversify your content: Consider diversifying your content to attract a wider audience and potentially gain more donations. Expand your streaming repertoire to include different games or incorporate new forms of content such as creative streams, talk shows, or educational sessions.
- Collaborate with other creators: Collaborating with other Twitch streamers or content creators can expand your reach and expose you to new audiences. Collaborative fundraising events or joint donation campaigns can help attract more donations and foster a sense of community among diverse fan bases.
- Offer merchandise or branded merchandise: Create branded merchandise that your viewers can purchase to support your channel. This can include t-shirts, hats, mugs, or custom-designed products that resonate with your community. Promote these items during streams and on your Twitch profile.
- Host sponsored donation drives: Collaborate with sponsors or brands to organize sponsored donation drives. These events can boost participation, attract additional donations, and provide mutually beneficial exposure for both your channel and the sponsoring organization.
- Support charitable causes: Consider aligning your donations with charitable causes that resonate with your community. Encouraging viewers to join you in supporting charities not only strengthens your impact but also attracts donors who are passionate about giving back.
- Engage with your community: Foster an interactive and inclusive community where viewers feel motivated to contribute. Encourage feedback and suggestions to understand their preferences, and involve them in decision-making processes related to donation goals or future initiatives on your channel.
- Regularly evaluate and adapt: Continuously evaluate the effectiveness of your donation strategies and make necessary adaptations. Monitor donation trends, feedback from your community, and emerging opportunities to refine your approach and ensure continued growth.
Embracing future growth and expanding your donation options is crucial to sustain and enhance support for your Twitch channel. By remaining open to new possibilities, engaging with your community, and aligning with evolving trends, you can create new opportunities for donations and cultivate a thriving community of supporters. In the next section, we will wrap up with a summary of the key points discussed throughout the article.