Why is Twitch Chat Important in Oculus Rift VR?
Twitch Chat integration in Oculus Rift VR brings a whole new level of interactivity and immersion to the Twitch streaming experience. By allowing users to view and interact with the live chat while immersed in their virtual reality environment, it creates a sense of connection and engagement that traditional streaming setups lack.
First and foremost, Twitch Chat enables real-time communication between streamers and their viewers. It allows viewers to express their thoughts, ask questions, provide feedback, and engage in lively discussions during live streams. This adds a dynamic element to the viewing experience, making it more interactive and engaging.
For streamers, Twitch Chat is a direct line of communication with their audience. It provides them with instant feedback and helps them gauge the viewers’ reactions to their content. Streamers can address specific viewers by responding to their messages and answering their questions, fostering a sense of community and connection.
Twitch Chat also amplifies the social aspect of live streaming. By displaying the chat overlay within the Oculus Rift VR environment, streamers can see and engage with the chat in real-time while they play games or perform activities. This enhances the streamer’s ability to connect with their audience on a deeper level, creating a more personalized and exciting experience for both parties.
Moreover, Twitch Chat integration in Oculus Rift VR allows viewers to communicate with one another. By reading and responding to each other’s messages, viewers can create a shared experience and form connections with fellow viewers who are also immersed in the VR environment. This builds a sense of community and fosters a supportive and engaging atmosphere.
Additionally, Twitch Chat in Oculus Rift VR offers streamers and viewers the opportunity for collaborative gameplay. Streamers can solicit input from the chat and involve viewers in decision-making processes, creating a more participatory and cooperative gaming experience.
Overall, Twitch Chat integration in Oculus Rift VR enhances the streaming experience by promoting interactivity, communication, and community-building. By bringing the chat overlay directly into the VR environment, it allows streamers and viewers to engage with each other in real-time, fostering a sense of connection and immersion that is unparalleled in traditional streaming setups.
Step 1: Setting up Your Oculus Rift VR
Before you can enjoy Twitch Chat integration in your Oculus Rift VR, you need to ensure that your Oculus Rift headset is properly set up and connected to your PC. Here are the steps to get started:
- Connect the Oculus Rift headset: Plug the Oculus Rift headset into your PC using the USB and HDMI cables provided. Make sure that the cables are securely connected.
- Install the Oculus software: Visit the official Oculus website and download the Oculus software. Follow the on-screen instructions to complete the installation process.
- Set up the Oculus sensors: Depending on the model of your Oculus Rift, you may have one or two sensors. Place the sensors in an optimal position, preferably on opposite corners of your play area. Make sure they are securely mounted and oriented towards the center of your play area.
- Configure the Oculus Rift: Launch the Oculus software on your PC and follow the on-screen instructions to set up your Oculus Rift. This includes calibrating the sensors, defining your play area, and configuring your preferences.
- Check for updates: Once your Oculus Rift is set up, check for any available firmware or software updates. Keeping your Oculus software up to date ensures optimal performance and compatibility.
- Adjust the headset: Put on the Oculus Rift headset and adjust the straps to ensure a snug and comfortable fit. Make sure the lenses are properly aligned with your eyes.
- Set up audio: Connect headphones or earphones to the Oculus Rift headset if desired. Alternatively, you can also use the built-in audio capabilities of the headset.
- Launch the Oculus app: Open the Oculus app on your PC and familiarize yourself with the different options and settings available.
Once your Oculus Rift VR is set up and ready to use, you can proceed to the next step of enabling Twitch Chat integration to enhance your streaming experience.
Step 2: Creating a Twitch Account (if you don’t have one)
If you are new to Twitch and do not have an account yet, creating one is a simple and straightforward process. Follow these steps to create a Twitch account:
- Visit the Twitch website: Open a web browser and go to the official Twitch website at www.twitch.tv.
- Click on “Sign up”: On the Twitch homepage, locate and click on the “Sign up” button at the top-right corner of the screen.
- Fill out the sign-up form: You will be redirected to the account creation page. Fill out the required information, including your desired username, password, email address, and date of birth. Make sure to choose a username and password that you will easily remember.
- Complete the verification: You may be asked to verify your account through an email confirmation. Check your email inbox for a verification email from Twitch and follow the instructions to complete the verification process.
- Set up your Twitch profile: Once your account is verified, you can customize your Twitch profile by adding a profile picture, a bio, and other optional details. This step is not mandatory but can help personalize your Twitch experience.
- Agree to the terms of service: Read through the Twitch terms of service and, if you agree with them, check the box to confirm your acceptance.
- Complete the sign-up process: After reviewing the information you provided and confirming your agreement with the terms of service, click on the “Sign Up” button to complete the account creation process.
- Verify your identity (optional): Twitch offers the option to verify your identity by providing additional information, such as your phone number or enabling two-factor authentication. This can provide an added layer of security to your account.
Once you have successfully created your Twitch account, you can proceed to the next step of configuring OBS Studio for Twitch Chat integration in your Oculus Rift VR.
Step 3: Configuring OBS Studio for Twitch Chat Integration
In order to integrate Twitch Chat with your Oculus Rift VR, you will need to configure OBS Studio, a popular streaming software. Follow these steps to set up OBS Studio for Twitch Chat integration:
- Download and install OBS Studio: Visit the official OBS Studio website at obsproject.com and download the software for your operating system. Follow the on-screen instructions to install OBS Studio on your computer.
- Launch OBS Studio: Once installed, launch OBS Studio on your computer.
- Add a source: In the Sources panel within OBS Studio, click on the “+” button and choose “Browser” from the drop-down menu.
- Configure the browser source: In the Browser Source settings, give your source a name (e.g., “Twitch Chat Overlay”).
- Set the URL: Next, enter the URL of the Twitch Chat overlay. This overlay can be generated using various tools or browser extensions specifically designed for Twitch Chat integration.
- Customize the size and position: Adjust the width, height, and position of the Twitch Chat overlay to fit your Oculus Rift VR display. This ensures that the chat is visible and accessible while you are immersed in the VR environment.
- Preview and test: Use the preview feature in OBS Studio to ensure that the Twitch Chat overlay appears correctly on your VR display. Make any necessary adjustments to the size or position until you are satisfied with the result.
- Save and apply settings: Once you are happy with the Twitch Chat overlay settings, click on the “OK” or “Apply” button to save and apply the changes.
- Ensure the Twitch Chat overlay is visible: Make sure that the Twitch Chat overlay is visible in the preview pane of OBS Studio and is positioned correctly in relation to the VR display.
- Start streaming: Now that OBS Studio is properly configured for Twitch Chat integration, you can start streaming your VR content to Twitch with the chat overlay included in your Oculus Rift VR display.
By following these steps, you will be able to seamlessly integrate Twitch Chat into your Oculus Rift VR experience, enhancing the interactivity and connection with your viewers.
Step 4: Enabling Twitch Chat Overlay in Oculus Rift VR
Once you have configured OBS Studio for Twitch Chat integration, it’s time to enable the Twitch Chat overlay in your Oculus Rift VR. Here’s how you can do it:
- Launch Oculus Rift software: Start by launching the Oculus Rift software on your PC.
- Put on your Oculus Rift headset: Wear your Oculus Rift headset and adjust it comfortably on your head.
- Open the virtual desktop: From the Oculus Home, open the virtual desktop by selecting it from the available app menu.
- Launch OBS Studio: In the virtual desktop, find and launch OBS Studio.
- Activate the Twitch Chat overlay: Ensure that the OBS Studio window is visible within the virtual desktop environment. Activate the Twitch Chat overlay by clicking on the “Start Streaming” or “Start Recording” button in OBS Studio.
- Enter VR mode: Go back to the Oculus Home and select the option to enter VR mode. This will switch your display to the Oculus Rift VR environment.
- Adjust the Twitch Chat overlay: Within the VR environment, you should now see the Twitch Chat overlay integrated into your Oculus Rift display. Use the Oculus Touch controllers or other input methods to adjust the position, size, and opacity of the overlay to your preference.
- Interact with the Twitch Chat overlay: Once you have positioned the Twitch Chat overlay, you can interact with it using the Oculus Touch controllers. Use gestures and buttons to scroll, reply, or view different sections of the chat.
- Enjoy Twitch Chat in Oculus Rift VR: With the Twitch Chat overlay enabled and properly configured in your Oculus Rift VR, you can now fully experience the interactivity and engagement of Twitch streaming while immersed in virtual reality.
By following these steps, you can seamlessly bring Twitch Chat into your Oculus Rift VR world, enhancing the streaming experience and connecting with your audience in a more immersive and interactive way.
Step 5: Joining Twitch Chat in Oculus Rift VR
Now that you have enabled the Twitch Chat overlay in your Oculus Rift VR, it’s time to join the chat and start interacting with your viewers. Follow these steps to join Twitch Chat in Oculus Rift VR:
- Launch the Twitch app: Within the Oculus Rift VR environment, navigate to the Twitch app and launch it.
- Sign in to your Twitch account: If you haven’t already signed in to your Twitch account, enter your login credentials in the Twitch app to gain access to your account.
- Select the live stream: Browse the available live streams or enter the name of the channel you want to join. Once you’ve selected the live stream, the stream’s chat will be displayed in the Twitch Chat overlay within your VR environment.
- Interact with the Twitch Chat overlay: Use your Oculus Touch controllers or other input methods to engage with the Twitch Chat overlay. You can scroll through the chat, reply to messages, or participate in the ongoing conversation.
- Integrate Twitch Chat with your gameplay: If you are streaming your own gameplay, you can use the Twitch Chat overlay to interact with your viewers while playing. Engage in discussions, answer questions, or respond to viewer comments, enhancing the interactive experience for both you and your audience.
- Customize the Twitch Chat overlay: Depending on the tools or extensions you are using to generate the Twitch Chat overlay, you may have options to customize its appearance, such as changing the font, color scheme, or transparency. Explore these customization options to make the chat overlay suit your preferences and enhance your VR experience.
- Stay engaged with the chat: Throughout your VR session, keep an eye on the Twitch Chat overlay and take advantage of the real-time communication it provides. Respond to viewer messages, acknowledge new viewers, and foster a sense of community and interaction.
- Enjoy the immersive Twitch Chat experience: By joining Twitch Chat in your Oculus Rift VR, you can truly immerse yourself in the Twitch streaming experience, connecting with your viewers in a more intimate and interactive way.
By following these steps, you can seamlessly join Twitch Chat in your Oculus Rift VR and fully engage with your viewers during your live streams.
Step 6: Customizing Your Twitch Chat Overlay in Oculus Rift VR
Customizing your Twitch Chat overlay in Oculus Rift VR allows you to personalize the appearance and functionality of the chat display. Follow these steps to customize your Twitch Chat overlay:
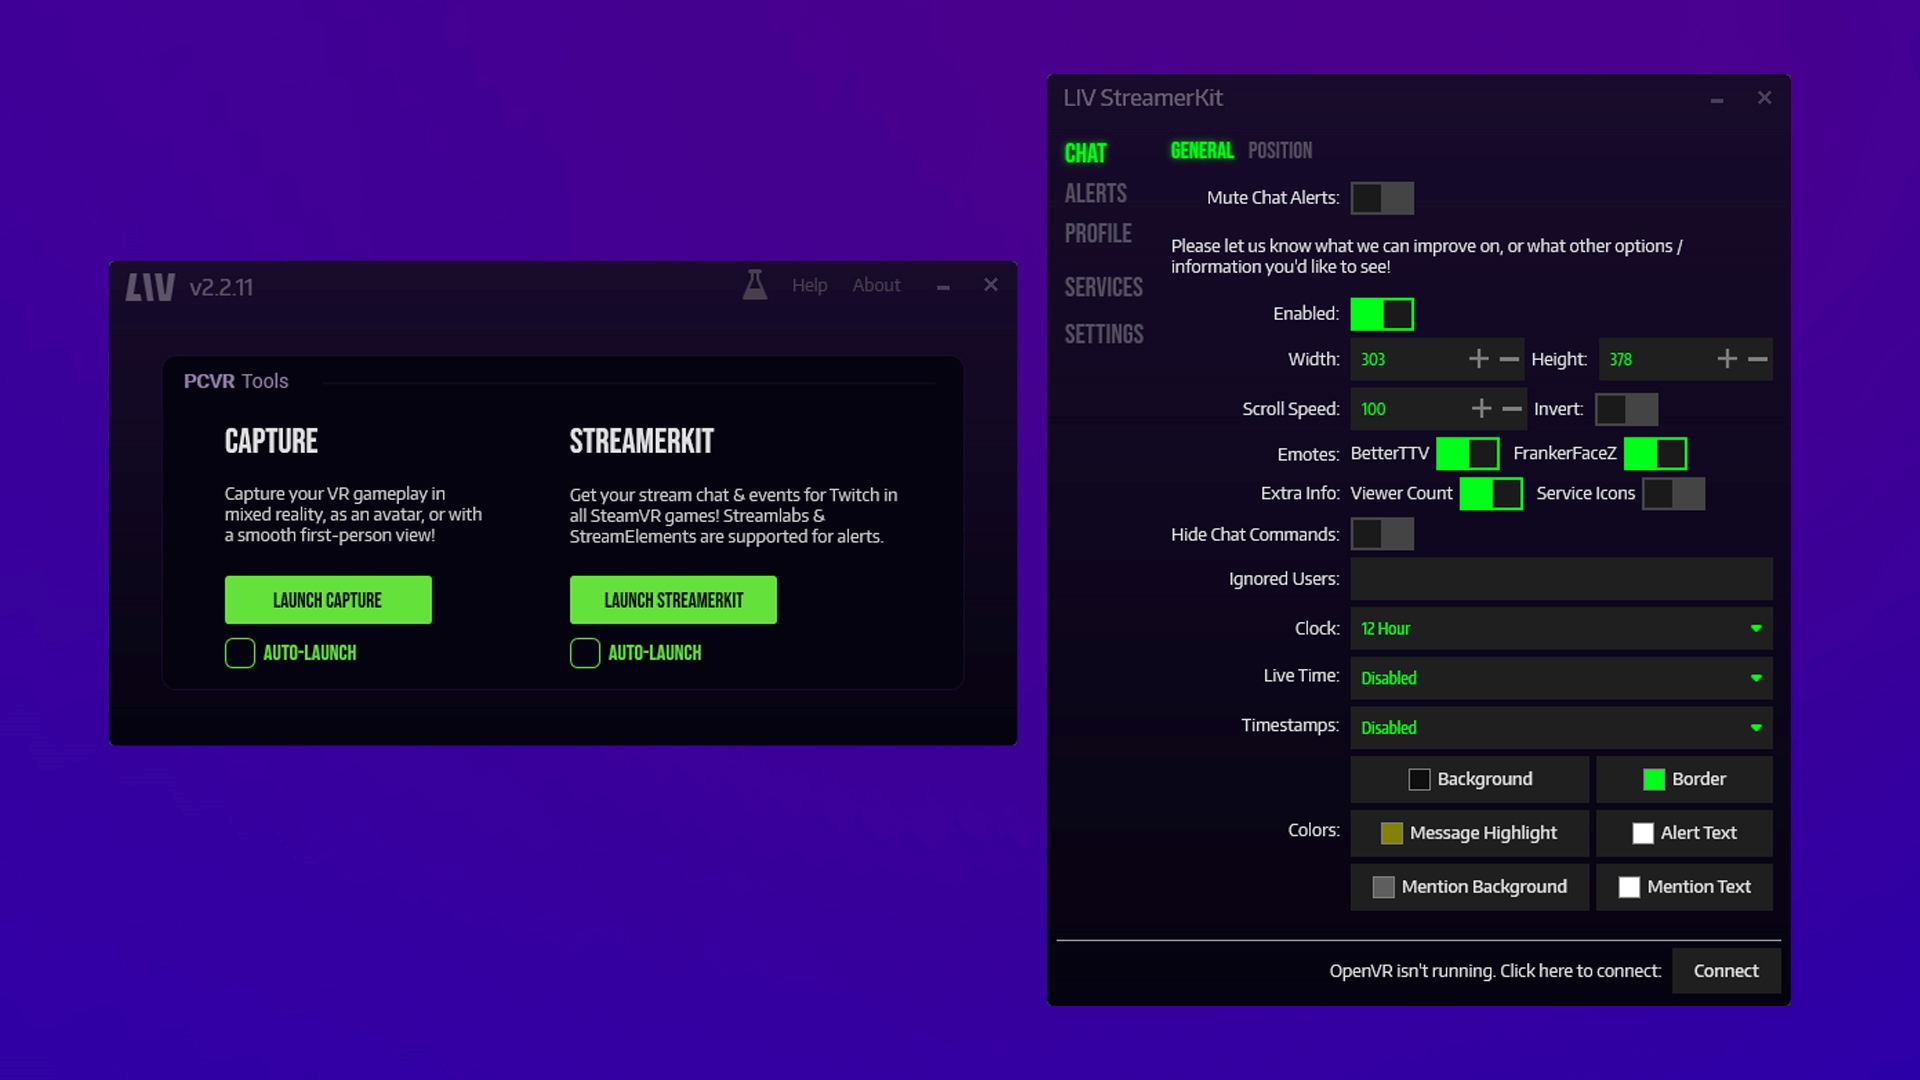
- Access the Twitch Chat overlay settings: Depending on the tools or extensions you are using, there may be different ways to access the Twitch Chat overlay settings. Look for a settings menu or icon within the overlay or on the OBS Studio interface.
- Modify the visual appearance: Explore the available options to customize the visual aspects of the Twitch Chat overlay. You may be able to change the font style, size, and color, as well as adjust the background opacity or add custom backgrounds.
- Set up moderation tools: If you are a streamer, you can enable moderation tools in the Twitch Chat overlay to help manage the chat. This includes options like filtering out inappropriate language, highlighting messages from certain users, or blocking specific users.
- Configure chat display settings: Depending on your preferences, you may want to configure how the chat messages are displayed in the Twitch Chat overlay. This could include adjusting the number of messages shown at once, setting up scroll speed, or enabling timestamps.
- Integrate additional features: Some Twitch Chat overlay tools or extensions offer additional features that you can integrate into your Oculus Rift VR experience. This could include displaying channel emotes, viewer statistics, or even mini-games for the chat participants.
- Test and preview: After making changes to the Twitch Chat overlay, take the time to test and preview how it appears within your Oculus Rift VR environment. Ensure that the customization settings are applied correctly and that the chat is still visible and legible.
- Save and apply the changes: Once you are satisfied with the customization options, save and apply the changes to your Twitch Chat overlay. This ensures that your preferred settings are applied every time you use the overlay in Oculus Rift VR.
- Experiment and iterate: Don’t be afraid to experiment with different customization options for your Twitch Chat overlay. Take note of the feedback from your viewers and make adjustments as necessary to create an engaging and visually appealing chat display.
By customizing your Twitch Chat overlay in Oculus Rift VR, you can enhance the visual appeal, functionality, and overall experience of the chat display. Make it uniquely yours and create a chat environment that aligns with your streaming style and preferences.
Step 7: Interacting with Twitch Chat in Oculus Rift VR
Interacting with Twitch Chat in Oculus Rift VR allows you to engage with your viewers and create a more immersive streaming experience. Here’s how you can effectively interact with Twitch Chat in Oculus Rift VR:
- Stay engaged and responsive: Make it a priority to respond to viewer messages and comments in real-time. Engage in conversations, answer questions, and acknowledge your viewers to foster a sense of community and connection.
- Use gestures and controllers: Utilize the Oculus Touch controllers or other input methods to navigate through the Twitch Chat overlay. Use gestures to scroll, select messages, and reply to viewers.
- Address viewers by name: Whenever possible, interact directly with viewers by addressing them by their usernames. This personal touch can make viewers feel seen and valued, enhancing their connection with you and the stream.
- Ask for input and feedback: Encourage viewers to provide feedback, suggestions, or input during your stream. This can create a more interactive experience and make viewers feel involved in the decision-making process.
- Moderate the chat: In case of any inappropriate or disruptive behavior in the chat, use the moderation tools available to you to maintain a positive and respectful environment. Timeouts, bans, or warnings may be necessary to ensure a smooth streaming experience.
- Utilize chat commands: Familiarize yourself with Twitch chat commands and shortcuts that can simplify your interaction with viewers. Commands like !uptime, !songrequest, or !social can provide quick information or perform specific actions.
- Encourage chat participation: Actively encourage viewers to participate and interact with each other in the chat. Ask questions, start discussions, and create opportunities for viewers to engage with one another, fostering a sense of community.
- Show gratitude: Take the time to express genuine appreciation for your viewers. Thank them for their support, contributions, and their presence in the chat. This gesture can go a long way in cultivating a positive and loyal community.
- Balance interaction with gameplay: Find the right balance between engaging with the Twitch Chat and focusing on your gameplay or content. It’s important to provide an interactive experience, but not at the expense of the main content that you are streaming.
- Experiment and adapt: Pay attention to viewer feedback, experiment with different interaction strategies, and adapt your approach to suit the needs and preferences of your audience. The more you engage with the chat, the better you’ll understand how to interact effectively.
By actively engaging with Twitch Chat in Oculus Rift VR, you can create a more immersive and interactive streaming experience, building a loyal and engaged community of viewers.
Step 8: Troubleshooting Twitch Chat Integration in Oculus Rift VR
While Twitch Chat integration in Oculus Rift VR can enhance your streaming experience, you may encounter issues or challenges along the way. Here are some troubleshooting steps to help you resolve common problems:
- Check your internet connection: Ensure that you have a stable and reliable internet connection. Twitch Chat relies on a stable internet connection for real-time communication.
- Verify Twitch Chat overlay settings: Double-check the settings within OBS Studio or the specific Twitch Chat overlay tool you are using. Make sure the correct URL is entered, the overlay is properly positioned, and the appropriate customization options are enabled.
- Restart OBS Studio and Oculus Rift software: Sometimes, restarting the streaming software and the Oculus Rift software can resolve minor issues. Close both applications, then relaunch them to see if the Twitch Chat overlay appears correctly.
- Update OBS Studio and Twitch app: Ensure that you are using the latest versions of OBS Studio and the Twitch app. Check for updates and install them if available, as updates often include bug fixes and improvements.
- Adjust Twitch Chat overlay position and size: If the Twitch Chat overlay is not positioned properly or appears too small or too large within your Oculus Rift VR display, adjust the position and size settings within OBS Studio or the overlay tool.
- Reset Oculus Rift tracking: If you are experiencing tracking issues with your Oculus Rift headset, try resetting the tracking configuration. This can be done through the Oculus software settings.
- Ensure compatibility with VR games: Some VR games may not display the Twitch Chat overlay correctly or may not be compatible with it. Check the compatibility of the games you are playing and seek alternative solutions if needed.
- Check for conflicts with other software: Verify that there are no conflicts or compatibility issues between the Twitch Chat overlay, OBS Studio, and any other software running on your computer. Close any unnecessary applications that could be interfering with the overlay.
- Contact support: If you have tried all troubleshooting steps and are still experiencing issues with the Twitch Chat integration in Oculus Rift VR, reach out to the support channels of the overlay tool or OBS Studio for further assistance.
By following these troubleshooting steps, you can identify and resolve common issues encountered when integrating Twitch Chat into your Oculus Rift VR environment. Remember, every setup is unique, and it may take some trial and error to find the best solution for your specific configuration.