
Reasons to Change Your Mac User Name
Changing your Mac user name can be a practical choice for several reasons. Whether you want to personalize your computer, update your username to align with your online presence, or simply make your Mac user name more professional, here are some compelling reasons to consider making the change:
- Personalization: Your user name is a reflection of your identity and personality. Changing it to something that resonates with you can make your Mac experience more enjoyable and unique.
- Professionalism: If you originally created your Mac user account with a casual or inappropriate username, it might be time to switch to a more professional or appropriate name. This is particularly important if you use your Mac for work-related tasks or presentations.
- Consistency: It’s common to use the same username across different online platforms. If you have recently updated your username on social media, email accounts, or other online services, changing your Mac user name can help maintain consistency and avoid confusion.
- Privacy and Security: If your current user name contains personally identifiable information, it’s a good idea to change it for privacy and security reasons. Using your real name or other sensitive information as your user name can make you more vulnerable to identity theft or online scams.
- Family Sharing: If you share your Mac with family members, changing your user name can help differentiate your profile from others. This makes it easier for everyone to identify their own files, settings, and preferences.
Keep in mind that changing your Mac user name does not affect your files, applications, or settings. It only updates the name associated with your user account. Before proceeding with the changes, make sure to prepare and follow the necessary steps to prevent any issues or data loss.
Preparing to Change Your Mac User Name
Before diving into the process of changing your Mac user name, it’s essential to take a few preliminary steps to ensure a smooth transition. Here are the key aspects to consider:
- Create a Backup: Before making any changes to your user name, it’s crucial to back up your important files and data. This way, you can easily restore your information in case of any unforeseen issues or complications.
- Admin Privileges: Ensure that you have administrative privileges on your Mac. You need administrative access to make changes to your user account name.
- Close Applications and Log Out: Close all open applications and sign out of your Mac user account. This will prevent any potential conflicts or disruptions when making the user name change.
- Check Permissions: Verify that your current user account has the necessary permissions to modify user names. You can do this by going to “System Preferences” > “Users & Groups” and ensuring that your account has “Administrator” privileges.
- Make a List of Associated Accounts: Take note of any associated accounts, such as email addresses, online services, or software licenses, that are linked to your current user name. This will help you update your information across different platforms and prevent any account-related inconveniences.
Taking the time to properly prepare for the user name change will minimize the chances of encountering difficulties during the process. It’s always better to be proactive and have all the necessary precautions in place.
Changing Your Mac User Name
Once you have completed the preparatory steps, you can proceed with changing your Mac user name. Follow these instructions to make the necessary modifications:
- Open System Preferences: Click on the Apple menu in the top left corner of your screen and select “System Preferences.”
- Select Users & Groups: In the System Preferences window, click on “Users & Groups.”
- Unlock the Settings: If the lock icon at the bottom left corner of the Users & Groups window is locked, click on it and enter your administrator password to unlock it and make changes.
- Select Your User Account: In the left-hand sidebar, click on your user account name that you want to change.
- Click on the “Change…” Button: Below your user account name, click on the “Change…” button.
- Enter the New User Name: A dialog box will appear. Type in your desired new user name.
- Verify and Apply the Change: Double-check the new user name for accuracy. Once you are sure, click on the “OK” button to apply the changes.
- Restart Your Mac: To complete the process, restart your Mac. After the restart, your user account will reflect the new user name.
It is important to note that changing your user name will not affect your files, applications, or any other data on your Mac. The modification only pertains to the name associated with your user account.
After completing these steps, make sure to update any login credentials on your Mac that require your user name, such as accessing email accounts or other apps, to ensure a seamless transition.
Updating Your User Home Folder Name
Changing your Mac user name also involves updating your user home folder name to match the new user name. Follow these steps to ensure that your user home folder name reflects the recent changes:
- Open System Preferences: Click on the Apple menu in the top left corner of your screen and select “System Preferences.”
- Select Users & Groups: In the System Preferences window, click on “Users & Groups.”
- Unlock the Settings: If the lock icon at the bottom left corner of the Users & Groups window is locked, click on it and enter your administrator password to unlock it and make changes.
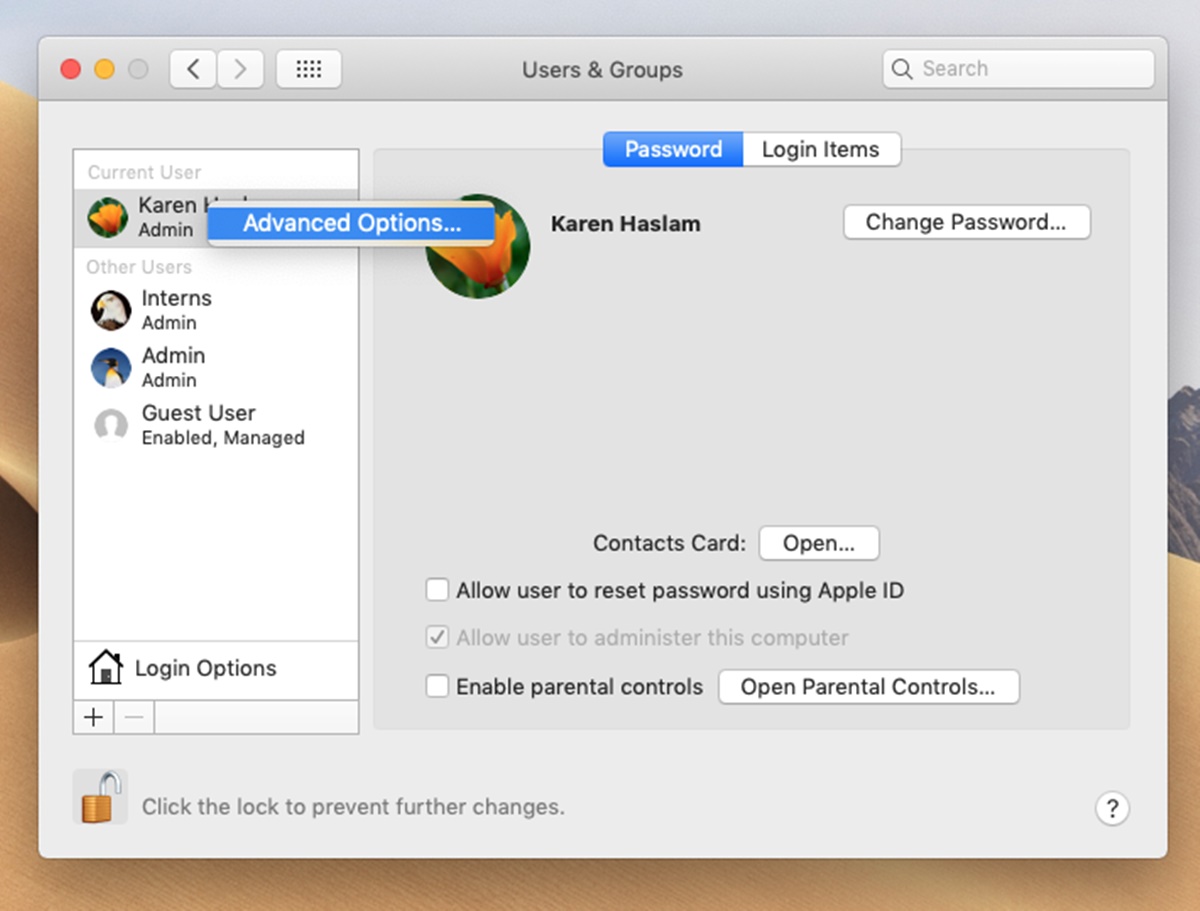
- Control-Click Your User Account: Control-click (or right-click) on your user account name in the left-hand sidebar and select “Advanced Options” from the context menu.
- Update the Home Directory: In the Advanced Options window, locate the “Home Directory” field. Change the current home directory name to match your new user name.
- Click on “OK” to Save: After updating the home directory name, click on the “OK” button to save the changes.
- Restart Your Mac: To finalize the update, restart your Mac. Once your Mac restarts, the user home folder name will be changed to match your new user name.
By updating your user home folder name, you ensure that it aligns with your new user name, providing consistency across your Mac system.
Remember to update any file shortcuts or application preferences that may reference your previous user home folder name to ensure seamless access to your files and data.
Updating Your Apple ID and iCloud Account
When changing your Mac user name, it’s important to update your Apple ID and iCloud account to reflect the new changes. This will ensure that your Apple services and iCloud data remain aligned with your new user name. Follow these steps to update your Apple ID and iCloud account:
- Open System Preferences: Click on the Apple menu in the top left corner of your screen and select “System Preferences.”
- Select Apple ID: In the System Preferences window, click on “Apple ID.” If you don’t see this option, click on “iCloud” and proceed to the next step.
- Sign Out of iCloud: In the Apple ID window, click on the “Overview” tab and then click on the “Sign Out” button. This will sign you out of your iCloud account.
- Sign In with Your New User Account: After signing out, sign back into your Apple ID and iCloud account using your new user name and updated credentials.
- Update Your Apple ID: If your Apple ID email address contains your previous user name, consider updating your Apple ID to match your new user name. This can be done by clicking on the “Edit” button next to your email address in the Apple ID window.
- Sync iCloud Data: Once you’ve signed back into your iCloud account, ensure that your iCloud data, such as contacts, calendars, and documents, is syncing properly with your new user name.
By updating your Apple ID and iCloud account, you maintain consistency across your devices and ensure that your Apple services function seamlessly with your new user name.
Take this opportunity to review your iCloud settings and make any necessary adjustments, such as enabling or disabling specific iCloud features, to suit your preferences and needs.
Updating Your Keychain Passwords
After changing your Mac user name, it’s important to update your Keychain passwords to prevent any potential authentication issues or password conflicts. Follow these steps to update your Keychain passwords:
- Open Keychain Access: Go to the “Applications” folder, then open the “Utilities” folder, and launch “Keychain Access.”
- Unlock Keychain: In the Keychain Access window, click on “Keychain Access” in the menu bar and select “Preferences.” Go to the “General” tab and enable the option that says “Show keychain status in menu bar.” This will allow you to easily access and manage your keychains.
- Choose the Correct Keychain: From the menu bar, click on the keychain icon and select the keychain that matches your new user name. Typically, it will have the same name as your new user account.
- Find and Update Passwords: In the Keychain Access window, locate any saved passwords or login credentials associated with your previous user name. Double-click on each item, and a new window will appear. Update the “Account” or “User Name” field to reflect your new user name, and click on the “Save Changes” button.
- Repeat for Other Keychains: If you have multiple keychains, follow the same process to update the passwords in each of them. It’s important to ensure consistency across all keychains.
- Restart Your Mac: After updating the Keychain passwords, restart your Mac to ensure that the changes take effect.
Updating your Keychain passwords is essential to ensure seamless access to your accounts and to prevent any login issues or password conflicts. By keeping your passwords up to date, you enhance the security and functionality of your Mac.
Remember to stay organized and maintain a secure backup of your passwords, either using a password manager or securely storing them in a separate location.
Updating Other Associated Accounts
Changing your Mac user name may require updating other accounts and services that are associated with your previous user name. Here are some important accounts to consider:
- Email Accounts: If you have email accounts associated with your old user name, update the account settings with your new user name. This ensures that your email address reflects the changes across all your devices.
- Online Services: Review the online platforms and services that you use regularly. Update your user name on social media, online shopping, banking, and any other websites where your previous user name is linked.
- Software Licenses: If you have licensed software installed on your Mac, check if the license is linked to your user name and update it accordingly. This prevents any licensing issues and ensures that you can access and activate the software using your new user name.
- Wi-Fi and Network Settings: Update your Wi-Fi and network settings to reflect your new user name. This ensures that all network connections and settings are consistent across your devices.
- File Sharing and Collaboration: If you share files or collaborate with others using sharing services or cloud storage platforms, update your user name to maintain consistency across those platforms and make it easier for others to identify your shared files and contributions.
Remember to document all the accounts and services that require updating to ensure that no accounts are overlooked during the transition. Keep a checklist or note to track your progress and mark off each account as you update it.
Taking the time to thoroughly update these associated accounts will ensure that your online presence remains consistent and that you avoid any potential confusion or access issues.
Troubleshooting Common Issues
While changing your Mac user name is a relatively straightforward process, you may encounter some common issues along the way. Here are troubleshooting tips to help you overcome these challenges:
- Permission Errors: If you receive a permission error message when trying to change your user name, make sure that you are logged in with an account that has administrative privileges. If necessary, consult with the system administrator or user account owner to grant the appropriate permissions.
- File Access Issues: After changing your user name, you may experience difficulty accessing your files or applications. In this case, ensure that the file paths in your applications and preferences are updated to match the new user name. If specific files or folders remain inaccessible, manually update the permissions by right-clicking on the file or folder, selecting “Get Info,” and adjusting the permissions under the “Sharing & Permissions” section.
- Keychain Access Problems: If you encounter issues with Keychain Access, such as being unable to access stored passwords or encountering repeated permission prompts, consider resetting your Keychain. To do this, go to “Utilities” > “Keychain Access,” select “Keychain Access” in the menu bar, and choose “Preferences.” Click on the “Reset My Default Keychain” button, enter your new user name and password, and confirm the reset.
- Syncing and Account Issues: If you experience difficulties with syncing your iCloud data, email accounts, or other online services after changing your user name, double-check that you have updated the account information with your new user name in the respective settings. Ensure that you have signed out and signed back in to each account with the updated credentials.
- Network Connection Problems: If you encounter issues with Wi-Fi or network connections, verify that the network settings on your Mac match your new user name. Go to “System Preferences” > “Network” and update any relevant settings to reflect the changes. Additionally, restart your router to ensure a fresh connection.
If you are experiencing persistent issues that you cannot resolve, consider reaching out to Apple Support or consulting with an IT professional for further assistance. They will be able to provide more specific guidance based on your unique situation.
Remember to remain patient throughout the troubleshooting process, and always keep backups of your important files and data to avoid any potential data loss.