
Why Configure the Workgroup Name?
Configuring the workgroup name on your computer is an important step in establishing a network environment. A workgroup name is a unique identifier that allows computers to connect and communicate with one another. When you have multiple computers on the same network, having a consistent workgroup name ensures seamless file and printer sharing, as well as enhances collaboration and resource accessibility.
By configuring the workgroup name, you enable your computer to join a specific workgroup and interact with other devices in that same workgroup. This is particularly useful in both home and office environments, where multiple computers need to share documents, access shared folders, and use common resources. Without a properly configured workgroup name, you may encounter connectivity issues and difficulties in sharing files and resources across the network.
Having a customized workgroup name also adds a layer of security to your network. By default, each operating system comes with a generic workgroup name, which makes it easier for hackers to identify and infiltrate your network. By changing the workgroup name to something unique, you make it more challenging for unauthorized users to gain access to your network resources.
Additionally, configuring the workgroup name allows for better organization and management of your network environment. It enables you to categorize and group your computers into distinct workgroups, making it easier to locate specific devices and establish connections. This is particularly beneficial in large office settings or households with multiple computers.
Configuring the Workgroup Name on Mac
If you are using a Mac, configuring the workgroup name is a straightforward process. Follow these simple steps to change the workgroup name:
Step 1: Open System Preferences
Click on the Apple menu in the top-left corner of your screen and select “System Preferences” from the drop-down menu.
Step 2: Go to Network Settings
In the System Preferences window, click on the “Network” icon.
Step 3: Click Advanced
In the Network settings, click the “Advanced” button in the lower-right corner.
Step 4: Change the Workgroup Name
In the Advanced Network settings, select the “WINS” tab at the top. Here, you will find a field labeled “Workgroup.” Enter the desired workgroup name in this field.
Step 5: Save the Changes
After entering the new workgroup name, click the “OK” button to save the changes. The new workgroup name will now be applied to your Mac.
It’s important to note that changing the workgroup name will require administrative privileges on your Mac. Therefore, you may need to enter your administrator username and password to make the changes.
Once the workgroup name is updated, your Mac will be part of the new workgroup, allowing for seamless network sharing and collaboration with other devices in that workgroup.
If you encounter any issues or the workgroup name change doesn’t take effect, refer to the troubleshooting section below for possible solutions.
Step 1: Open System Preferences
The first step to configure the workgroup name on your Mac is to open the System Preferences. This is where you can access various settings and preferences for your computer.
To open System Preferences, follow these simple instructions:
- Click on the Apple menu icon located at the top-left corner of your screen. It’s the Apple logo.
- A drop-down menu will appear. Select “System Preferences” from the menu by clicking on it.
Alternatively, you can also access System Preferences by clicking on the “System Preferences” icon in your dock. It looks like a set of gears.
After selecting “System Preferences,” a window will open, displaying a range of settings categories such as Personal, Hardware, Internet & Wireless, and System.
System Preferences is a powerful tool that allows you to customize various aspects of your Mac, including network settings, display preferences, sound options, and much more. It is an essential component for managing and configuring your Mac to suit your specific needs.
Once you have successfully opened System Preferences, you are ready to move on to the next step and configure the workgroup name for your Mac. Keep following the steps outlined in the subsequent sections to complete the process.
Step 2: Go to Network Settings
After opening System Preferences on your Mac, the next step in configuring the workgroup name is to navigate to the Network settings. This is where you can manage and customize your network connections.
To access the Network settings, follow these steps:
- Within the System Preferences window, locate and click on the “Network” icon. It is represented by a globe with network lines.
By clicking on the Network icon, you will be taken to the Network settings panel, which provides you with options to configure your network connections and settings.
The Network settings panel on a Mac offers various options to manage and customize your network preferences. You can connect to different types of networks, such as Wi-Fi, Ethernet, Bluetooth, and VPN. Additionally, you can configure advanced network settings, set up network proxies, and manage network interfaces.
By accessing the Network settings, you are one step closer to changing the workgroup name on your Mac. From here, you can proceed to the next step and continue with the configuration process.
If you encounter any difficulties or have questions regarding the Network settings, consult the built-in Help resources on your Mac for further guidance. The Network settings provide a flexible and user-friendly interface to manage your network connections and ensure a smooth networking experience.
Step 3: Click Advanced
Once you have accessed the Network settings in System Preferences on your Mac, the next step in configuring the workgroup name is to click on the “Advanced” button. This will allow you to access advanced network settings and make the necessary changes to your network configuration.
Follow these simple instructions to navigate to the Advanced settings:
- Within the Network settings panel, locate and click on the “Advanced” button. It is usually located in the lower-right corner of the window.
Clicking on the Advanced button will open a new window where you can adjust advanced network settings and access additional configuration options.
The Advanced settings window provides you with a range of options to fine-tune your network preferences. It allows you to configure DNS (Domain Name System) settings, manage TCP/IP (Transmission Control Protocol/Internet Protocol) parameters, set up WINS (Windows Internet Name Service) settings, and more.
By clicking on the Advanced button, you are ready to proceed with changing the workgroup name on your Mac. In the upcoming step, you will find the specific location within the Advanced settings where you can modify the workgroup name.
If you have any concerns, questions, or are unsure about any of the advanced network settings, you can refer to the Help resources provided by macOS for assistance. The Advanced settings offer a comprehensive range of configuration options to personalize and optimize your network experience on your Mac.
Step 4: Change the Workgroup Name
Once you have accessed the Advanced settings in the Network preferences on your Mac, you are now ready to change the workgroup name. Follow these steps to modify the workgroup name:
- Within the Advanced settings window, locate and select the “WINS” tab. WINS stands for Windows Internet Name Service, which is responsible for resolving and managing names on a Windows-based network.
- Under the “Workgroup” field, enter your desired workgroup name. Make sure to choose a unique and memorable name that aligns with your network’s purpose or organization.
The workgroup name is typically composed of alphanumeric characters, with no spaces or special characters allowed. It is recommended to use all uppercase letters or a combination of uppercase and lowercase letters.
By changing the workgroup name, you are customizing the identification of your Mac within the network. This allows for easier recognition and facilitates seamless communication and file sharing with other devices in the same workgroup.
Once you have entered the new workgroup name, you are ready to save the changes and apply the new configuration to your Mac.
Continue to the next step to learn how to save the changes and complete the process of configuring the workgroup name on your Mac.
Step 5: Save the Changes
After you have successfully changed the workgroup name in the WINS tab of the Advanced settings, the final step is to save the changes. Saving the changes ensures that the new workgroup name is applied to your Mac’s network configuration.
To save the changes and complete the configuration process, follow these simple instructions:
- Within the Advanced settings window, click on the “OK” button. This will save the modified workgroup name and close the window.
Upon clicking “OK,” your Mac will automatically update its network settings with the new workgroup name. This means that your computer is now part of the specified workgroup and can seamlessly communicate and share resources with other devices in that workgroup.
It’s worth noting that changing the workgroup name on your Mac may require administrative privileges. If prompted, make sure to enter your administrator username and password to authorize the changes.
Once the changes have been saved, you can close the System Preferences window. Your Mac is now configured with the updated workgroup name, enhancing its compatibility and collaboration capabilities within your network environment.
Congratulations! You have successfully completed the process of configuring the workgroup name on your Mac. Your computer is now ready to participate in the specified workgroup and enjoy seamless file sharing, resource accessibility, and collaboration with other devices on the network.
If you encounter any issues following these steps or have further questions, consult the Help resources on your Mac or seek assistance from an IT professional for guidance.
Configuring the Workgroup Name on Windows
If you are using a Windows operating system, configuring the workgroup name is a straightforward process. Follow these steps to change the workgroup name:
- Step 1: Open Control Panel
To begin, click on the “Start” button located at the bottom-left corner of your screen. In the Start menu, select “Control Panel” from the list of options. This will open the Control Panel window, which allows you to access various system settings and configurations.
- Step 2: Go to System and Security
In the Control Panel window, locate and click on the “System and Security” option. This category provides access to system-related settings and security options.
- Step 3: Click System
In the System and Security window, you will find several subsections. Click on the “System” option, which is typically labeled with a computer icon. This will open the System settings window, where you can view and modify information about your computer.
- Step 4: Click on the “Change settings” link
Within the System settings window, you will see various system-related information. Look for the “Computer name, domain, and workgroup settings” section. Under this section, click on the “Change settings” link. This will open the System Properties window, specifically on the “Computer Name” tab.
- Step 5: Go to the “Computer Name” tab
Inside the System Properties window, you will find several tabs. Click on the “Computer Name” tab, which is located on the top of the window. This tab allows you to manage various computer name settings, including the workgroup name.
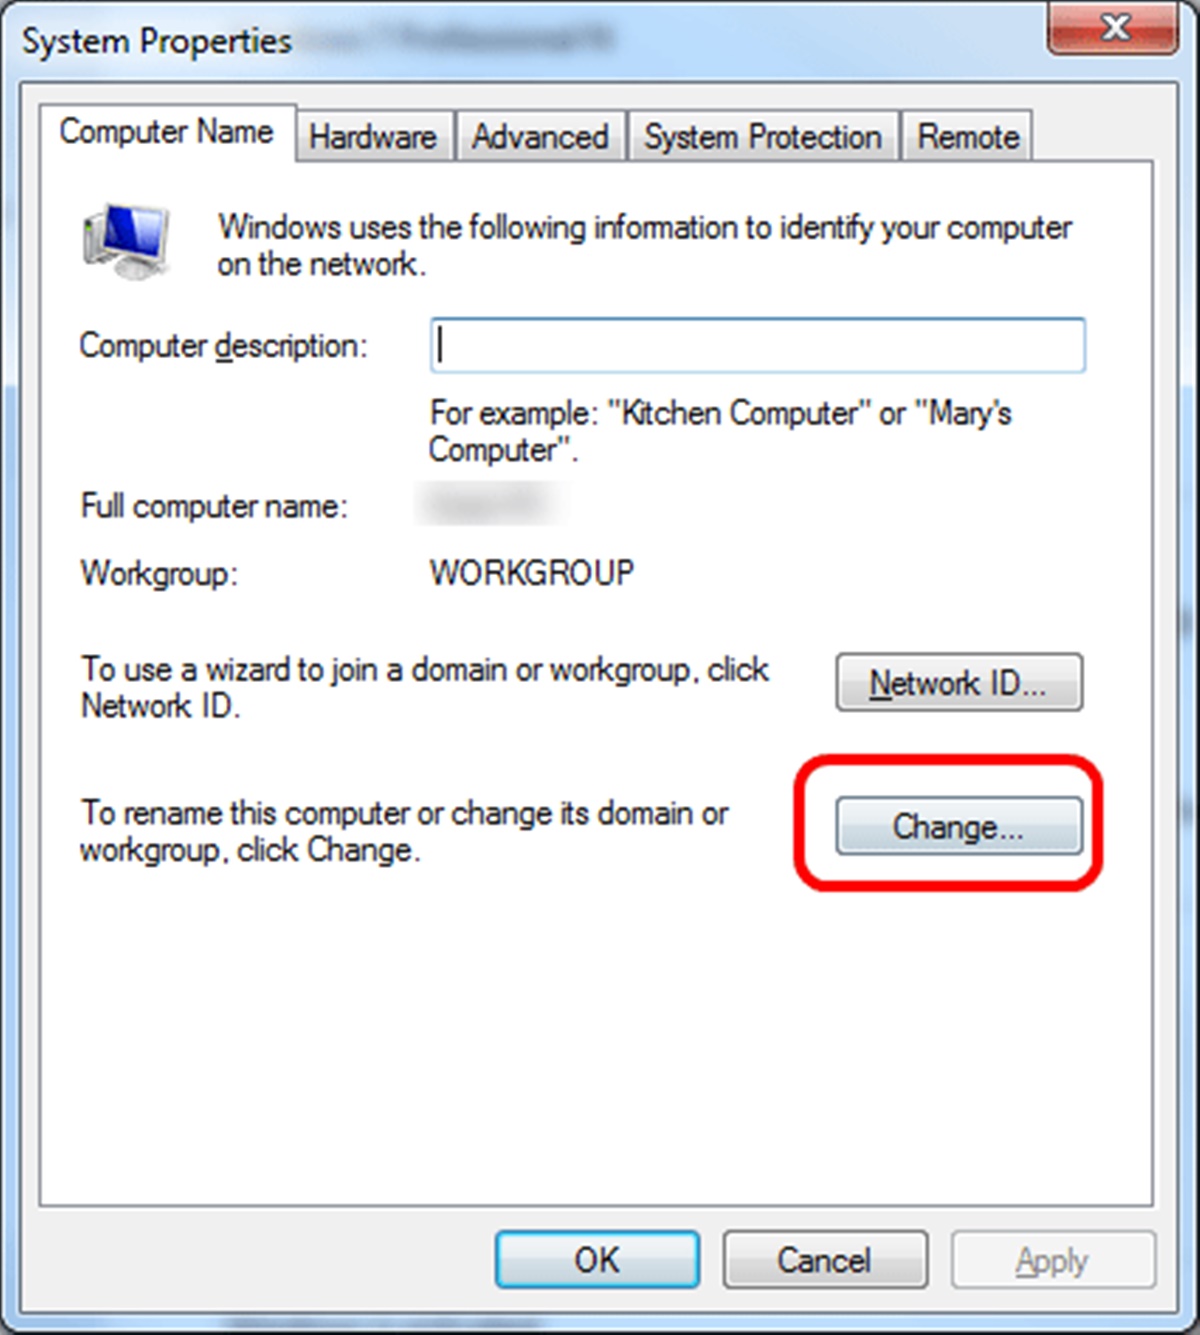
- Step 6: Change the Workgroup Name
Under the “Computer Name” tab, click on the “Change” button. This will open a dialog box where you can modify the workgroup name. Enter your desired workgroup name in the “Workgroup” field. Ensure you choose a unique and meaningful name for your workgroup.
- Step 7: Save the Changes
After entering the new workgroup name, click the “OK” button to save the changes. You may be prompted to restart your computer to apply the new workgroup name. Follow any additional on-screen instructions to complete the process.
Once the changes are saved and your computer is restarted (if needed), the workgroup name will be successfully configured on your Windows system. Your computer is now part of the specified workgroup, allowing for seamless file sharing, printer access, and collaboration with other devices in that workgroup.
If you encounter any issues or have further questions during the workgroup name configuration process, consult Microsoft’s documentation or seek assistance from an IT professional for guidance.
Step 1: Open Control Panel
To start configuring the workgroup name on your Windows operating system, the first step involves opening the Control Panel. The Control Panel provides access to various settings and configurations on your computer.
Follow these simple instructions to open the Control Panel:
- Click on the “Start” button located in the bottom-left corner of your desktop screen. It is represented by the Windows logo.
- In the Start menu, locate and click on the “Control Panel” option. The Control Panel icon may vary based on the version of Windows you are using.
Alternatively, you can also directly search for “Control Panel” in the search bar located next to the Start button, and select the “Control Panel” option from the search results.
After selecting the Control Panel option, a new window will open, displaying a range of system settings and configurations.
The Control Panel is a centralized location where you can customize and manage various aspects of your Windows operating system, including network settings, display preferences, user accounts, and much more.
Once you have successfully opened the Control Panel, you are ready to move on to the next step and configure the workgroup name on your Windows computer. Continue following the subsequent steps to complete the workgroup name configuration process on your system.
Step 2: Go to System and Security
After opening the Control Panel on your Windows computer, the next step in configuring the workgroup name is to navigate to the System and Security options. This section allows you to manage system-related settings and security configurations.
To access the System and Security settings, follow these steps:
- Within the Control Panel window, look for the “System and Security” option and click on it. The icon for System and Security may vary depending on the version of Windows you are using, but it is typically represented by a shield or a combination of a computer and a padlock icon.
Clicking on System and Security will open a new window with a range of system-related settings and security options for your computer.
Within the System and Security section, you can find various subsections that allow you to manage aspects such as system updates, Windows Firewall settings, backup and restore options, and more. This section is essential for maintaining the security and integrity of your Windows system.
By accessing the System and Security settings, you are one step closer to configuring the workgroup name on your Windows computer. From here, you can proceed to the next step and continue the configuration process.
If you encounter any difficulties or have questions regarding the System and Security settings, refer to the Windows Help resources provided or seek assistance from a knowledgeable individual or IT professional.
Step 3: Click System
Once you have accessed the System and Security settings in the Control Panel on your Windows computer, the next step in configuring the workgroup name is to click on the “System” option. This section provides you with information about your computer and allows you to modify various system-related settings.
To proceed, follow these steps:
- Within the System and Security window, look for the “System” option and click on it. The System icon is usually represented by a computer or a combination of a computer and a gear icon.
By clicking on the System option, a new window will open, displaying details about your computer such as the operating system version, processor information, and system specifications.
The System section provides you with insights into your computer’s hardware configuration and allows you to manage certain system settings. It’s a useful place to check your system’s basic information and make adjustments to suit your preferences.
Besides viewing system details, the System section also provides links to other related tasks. These include Device Manager, Remote settings, and Advanced system settings. These options allow for more advanced configurations and customization of your Windows system.
Clicking on the System option is an essential step towards configuring the workgroup name on your Windows computer. By proceeding to the next step, you can continue the configuration process and make necessary changes.
If you have any concerns or questions regarding the System settings or need assistance in making specific changes, refer to the Windows Help resources or consult an experienced individual or IT professional.
Step 4: Click on the “Change settings” link
After accessing the System settings in the Control Panel on your Windows computer, the next step in configuring the workgroup name is to click on the “Change settings” link. This will allow you to modify various settings related to your computer’s name, domain, and workgroup.
To proceed with this step, follow these instructions:
- Within the System settings window, locate the “Computer name, domain, and workgroup settings” section.
- Under this section, you will find a link labeled “Change settings.” Click on this link to open the System Properties window, specifically on the “Computer Name” tab.
By clicking on the “Change settings” link, you are granted access to a range of configurations for your computer’s name, domain, and workgroup settings.
The System Properties window provides you with options to modify your computer’s name, join a domain (in a business network environment), or change the workgroup (in a workgroup network environment).
Clicking on the “Change settings” link takes you directly to the “Computer Name” tab, which allows you to make changes related to the computer name, domain, or workgroup.
Proceed to the next step to learn more about how to change the workgroup name and complete the configuration process.
If you have any concerns or questions regarding the system settings or need assistance in making specific changes, consult the Windows Help resources or seek guidance from an experienced individual or IT professional.
Step 5: Go to the “Computer Name” tab
Once you have clicked on the “Change settings” link in the System Properties window, the next step in configuring the workgroup name is to navigate to the “Computer Name” tab. This tab allows you to modify various computer name settings, including the workgroup name.
To proceed with this step, follow these instructions:
- Within the System Properties window, you will find several tabs at the top. Click on the “Computer Name” tab to access the relevant settings.
Clicking on the “Computer Name” tab will display the current computer name along with other configuration options related to your computer’s identity within the network.
Under the Computer Name tab, you will find options to change the computer name, join a domain, or change the workgroup. In this particular step, our focus is on changing the workgroup name.
The workgroup name is a unique identifier that helps your computer communicate and collaborate with other devices in the same workgroup on a network. Changing the workgroup name allows you to align your computer with a specific workgroup and enhance networking functionality.
By accessing the “Computer Name” tab, you are one step closer to configuring the workgroup name on your Windows computer. Proceed to the next step to learn how to change the workgroup name and complete the configuration process.
If you have any concerns or questions regarding the computer name settings or need assistance in making specific changes, refer to the Windows Help resources or seek guidance from an experienced individual or IT professional.
Step 6: Change the Workgroup Name
After accessing the “Computer Name” tab in the System Properties window, the next step in configuring the workgroup name is to actually change the workgroup name. This is a crucial step in aligning your Windows computer with a specific workgroup on the network.
To change the workgroup name, follow these steps:
- Under the “Computer Name” tab of the System Properties window, click on the “Change” button. This will open the “Computer Name/Domain Changes” dialog box.
- Within the “Computer Name/Domain Changes” dialog box, you will see a field labeled “Workgroup.” This is where you can modify the workgroup name.
- Enter your desired workgroup name in the “Workgroup” field. Choose a unique and meaningful name that reflects the purpose or organization of your network.
The workgroup name should consist of alphanumeric characters, without spaces or special characters. It is recommended to use all uppercase letters or a combination of uppercase and lowercase letters.
By changing the workgroup name, you are customizing the identification and collaboration capabilities of your Windows computer within the network. This enables smooth communication, file-sharing, and resource accessibility with other devices in the same workgroup.
Once you have entered the new workgroup name, click the “OK” button to save the changes and return to the System Properties window. Your workgroup name will be updated and applied to your Windows computer.
Keep in mind that you may be prompted to restart your computer for the changes to take effect. Follow any additional on-screen instructions that may appear.
Congratulations! You have successfully changed the workgroup name on your Windows computer. Your computer is now part of the specified workgroup, allowing for enhanced networking functionality and collaboration with other devices on the network.
If you encounter any issues or have further questions during the workgroup name configuration process, consult the Windows Help resources or seek assistance from an experienced individual or IT professional.
Step 7: Save the Changes
After you have changed the workgroup name on your Windows computer, the final step is to save the changes. Saving the changes ensures that the new workgroup name is applied and active on your system, allowing for smooth networking and collaboration within the specified workgroup.
To save the changes and complete the workgroup name configuration, follow these steps:
- Within the System Properties window, click the “OK” button to apply the changes and close the window.
By clicking “OK,” your Windows computer will automatically save the new workgroup name and update its network settings accordingly. The computer will now be a member of the specified workgroup, allowing for seamless file sharing, printer access, and other collaborative actions with other devices in that workgroup.
It’s important to note that changing the workgroup name on your Windows computer may require administrative privileges. If prompted, enter your administrator username and password to authorize the changes.
Once you have successfully saved the changes, your Windows computer is now configured with the updated workgroup name. Feel free to close the Control Panel window and continue using your computer as usual.
If you encounter any issues or the workgroup name change doesn’t take effect, double-check the steps followed and ensure the workgroup name was entered correctly. Additionally, consult the Windows Help resources or seek assistance from an IT professional if needed.
Congratulations! You have completed the process of configuring the workgroup name on your Windows computer. Enjoy the enhanced networking capabilities and seamless collaboration within the specified workgroup.
Troubleshooting if Workgroup Name Change Doesn’t Take Effect
While configuring the workgroup name on your computer, there may be instances where the changes you made do not take effect immediately. In such cases, troubleshooting the issue can help resolve the problem and ensure that the updated workgroup name is applied successfully. Here are a few troubleshooting steps you can follow:
- Restart your computer: Sometimes, changes to the workgroup name require a system restart to take effect fully. Restart your computer and check if the new workgroup name is applied after the restart.
- Verify the workgroup name: Double-check that the workgroup name you entered is correct. Ensure that there are no spelling mistakes, spaces, or special characters in the name. Workgroup names are case-sensitive, so ensure the appropriate capitalization is used.
- Check for conflicting workgroup names: Ensure that there are no other devices on the network with the same workgroup name. Duplicate workgroup names can cause conflicts and prevent the changes from being applied. Choose a unique workgroup name if necessary.
- Test network connectivity: Verify that your computer is properly connected to the network. Check the network cables, Wi-Fi settings, or any other relevant connections to ensure that your computer can communicate with other devices in the workgroup.
- Update network drivers: Outdated or malfunctioning network drivers can disrupt network settings. Update the drivers for your network adapter by visiting the manufacturer’s website or using Windows Update.
- Reset network settings: If all else fails, you can try resetting the network settings on your computer. Go to the Network and Internet settings in the Control Panel, choose “Network Reset,” and follow the prompts to reset the network components. Be aware that this action will remove any custom network settings you have configured.
If none of these troubleshooting steps resolve the issue, it is advisable to seek assistance from an IT professional who can provide further guidance and support.
By following these troubleshooting steps, you can increase the chances of successfully applying the new workgroup name and experiencing seamless collaboration and resource sharing within your network workgroup.