
Why Change Windows Update Settings
Windows Update is a crucial feature of the Windows operating system. It helps keep your computer secure by regularly downloading and installing updates that patch vulnerabilities and address software issues. However, there may be situations where you want to customize the Windows Update settings to suit your needs. Here are a few reasons why you might consider changing these settings:
1. Control Over Updates: By changing the Windows Update settings, you can have more control over when and how updates are installed on your computer. This is particularly useful if you want to avoid automatic updates that may cause interruptions or conflicts with other software.
2. Bandwidth Management: Windows updates can be large and may consume a significant amount of your internet bandwidth. By adjusting the settings, you can schedule updates during off-peak hours or limit the amount of bandwidth used by Windows Update.
3. Compatibility Concerns: Sometimes, new updates may introduce compatibility issues with certain software or drivers on your computer. By customizing the Windows Update settings, you can prevent certain updates from being installed automatically and avoid potential conflicts.
4. Stability and Reliability: While updates are essential for system security, they can sometimes introduce new bugs or instability. By configuring the Windows Update settings, you can choose to manually install updates after they have been tested and verified, ensuring a more stable and reliable system.
5. System Performance: In some cases, Windows updates may consume system resources, leading to slower performance. By adjusting the settings, you can choose to install updates at times when you are not actively using your computer to minimize any impact on performance.
It’s important to note that while customization options are available, it is generally recommended to keep your system up to date with the latest patches and security updates. By understanding the reasons for changing Windows Update settings, you can strike a balance between security, control, and the smooth operation of your computer.
Accessing Windows Update Settings
Changing the Windows Update settings is a straightforward process that can be done through the Windows Settings app. Here’s how you can access the Windows Update settings:
1. Using the Start Menu: Click on the Start button located at the bottom left corner of the screen. In the Start Menu, select the gear-shaped icon to open the Windows Settings app.
2. Using the Keyboard Shortcut: Press the Windows key + I on your keyboard. This will directly open the Windows Settings app.
3. Navigating to Windows Update: In the Windows Settings app, click on the “Update & Security” option.
4. Selecting Windows Update: In the left-hand navigation pane, click on the “Windows Update” tab. This will bring up the Windows Update settings page.
Once you have accessed the Windows Update settings, you will have various options to customize how updates are downloaded and installed on your computer. These options provide you with flexibility and control over the update process. Let’s explore some common configuration options.
Choosing the Update Type
When it comes to Windows Update, you have the flexibility to choose how updates are installed on your computer. Here are the different update types available:
1. Automatic Updates: With this option selected, Windows will automatically download and install updates in the background. This is the recommended setting for most users as it ensures that your system stays up to date with the latest security patches and bug fixes. Automatic updates can be further customized to install updates at a specific time or day.
2. Download Updates, But Let Me Choose When to Install Them: This option allows Windows to download updates in the background, but it gives you the flexibility to choose when to install them. You will receive notifications when updates are available, and you can decide when to initiate the installation. This option is useful if you want to review the updates before installing them.
3. Check for Updates, But Let Me Choose Whether to Download and Install Them: With this option, Windows will check for updates and provide you with a list of available updates. You can then choose which updates to download and install. This gives you full control over the update process but requires you to actively check for updates regularly.
4. Never Check for Updates: This option completely disables Windows Update and prevents any automatic updates from being downloaded or installed. It is not recommended to choose this option unless you have another reliable way of keeping your system up to date with the latest security patches.
To change the update type, simply select the desired option in the Windows Update settings page. It’s important to strike a balance between convenience and system security when choosing the update type. Regularly checking for updates or opting for automatic updates ensures that your computer remains protected against emerging threats while avoiding any unwanted interruptions.
Manual Update Installation
In some cases, you may prefer to manually install updates on your computer. This allows you to review the updates and have more control over the installation process. Here’s how you can manually install updates:
1. Check for Updates: Open the Windows Update settings as mentioned earlier. Click on the “Check for updates” button. Windows will then search for any available updates for your system.
2. Review Available Updates: Once the search is complete, Windows will display a list of available updates. You can review the details of each update, including its description, size, and importance.
3. Select Updates to Install: Choose the updates you want to install by selecting the checkboxes next to them. You can install all updates at once or select specific updates you want to install.
4. Initiate Installation: After selecting the desired updates, click on the “Install” or “Install updates” button. Windows will begin the installation process, downloading and installing the selected updates on your computer.
5. Restart if Required: Some updates may require a system restart to complete the installation. If prompted, save your work and allow your computer to restart. Make sure to close any open programs before the restart.
6. Monitor Installation Progress: Windows will provide on-screen progress indicators while installing the updates. This may involve multiple restarts, depending on the updates being installed.
By manually installing updates, you can have more control over the timing and selection of updates. This is particularly useful if you want to ensure that your system remains stable and avoids any potential compatibility issues that might arise from automatic updates. However, it is essential to regularly check for updates and install them in a timely manner to keep your system secure and up to date.
Configuring Automatic Updates
Configuring automatic updates allows Windows to download and install updates in the background, keeping your system up to date without requiring manual intervention. Here are the steps to configure automatic updates:
1. Open Windows Update Settings: Access the Windows Update settings as described earlier.
2. Click on “Change active hours”: Active hours are the times when you typically use your computer. Windows will avoid installing updates during these hours to prevent disruption. Click on the “Change active hours” option to set the start and end times for your active hours.
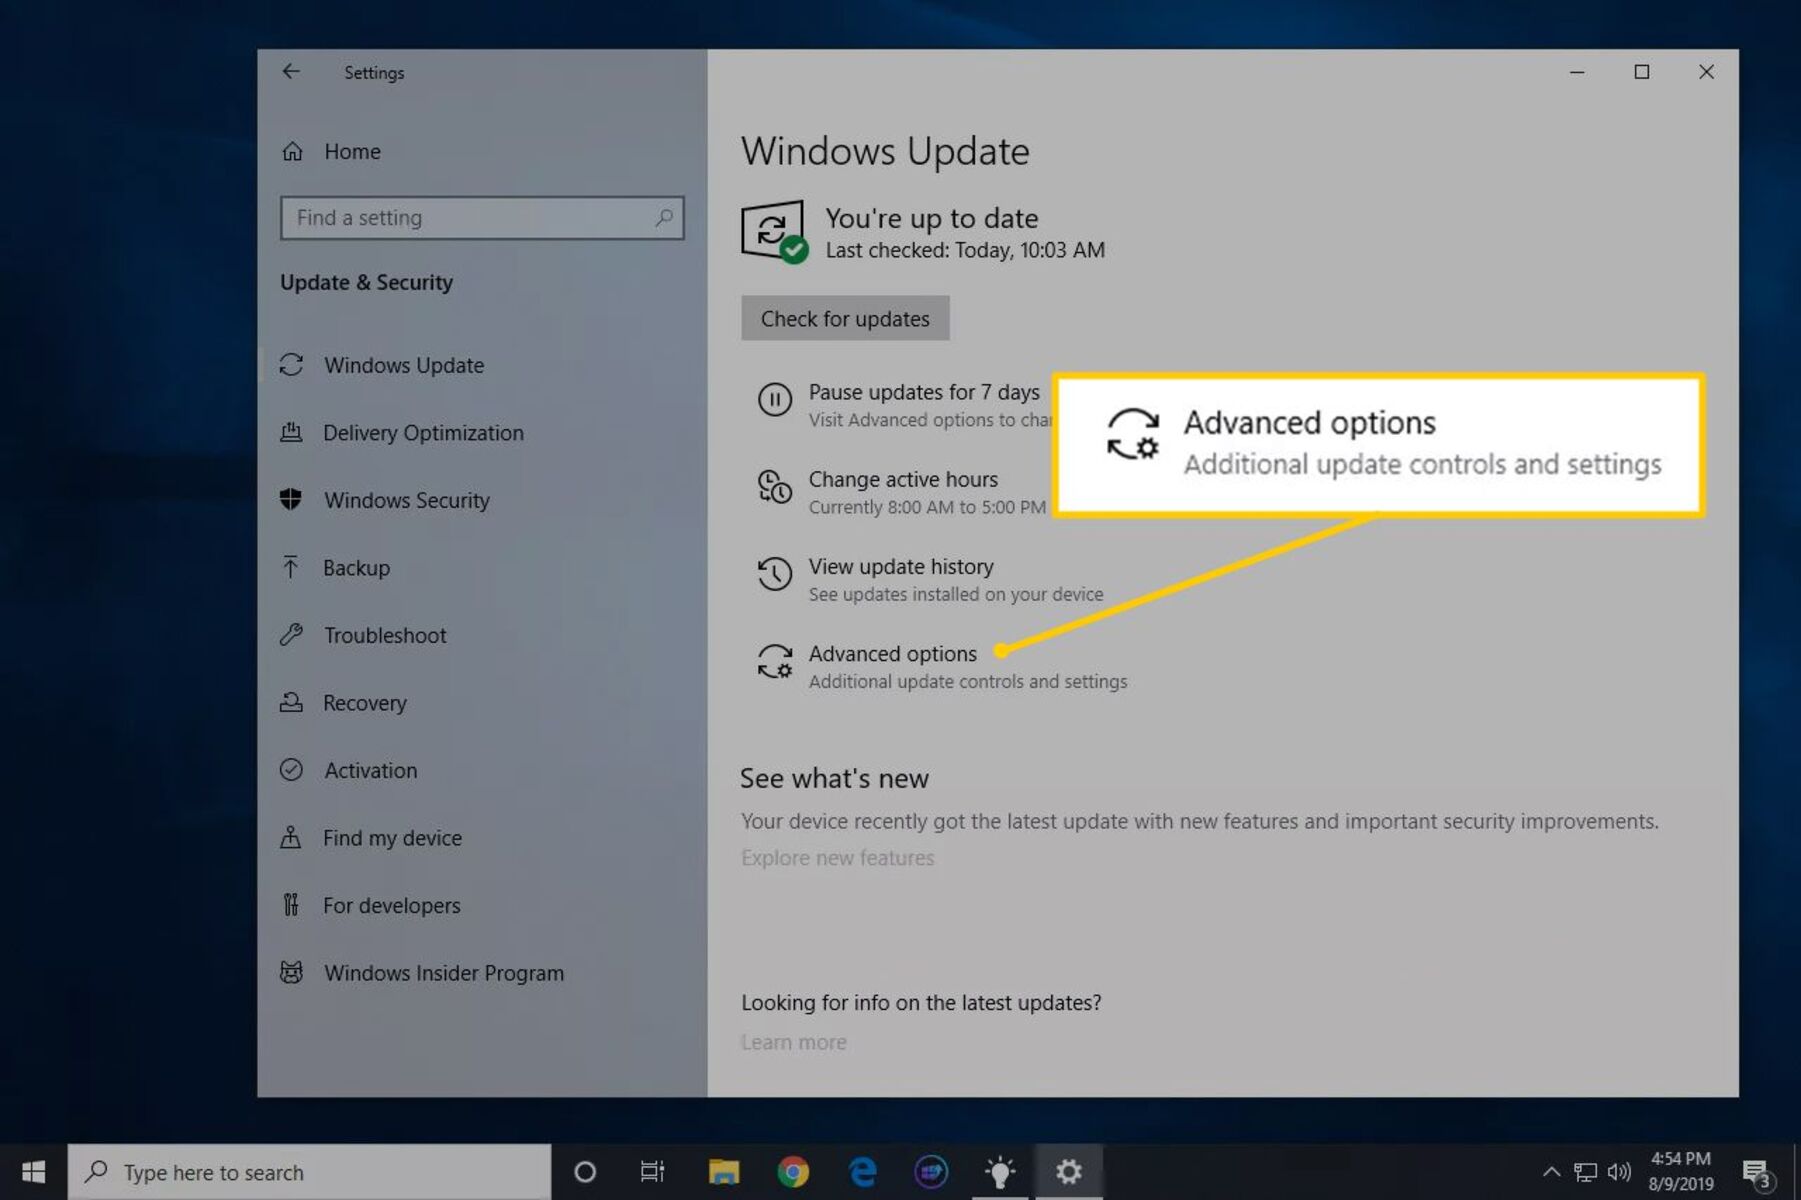
3. Enable Automatic Updates: Under the “Windows Update” tab, click on the “Advanced options” link. This will take you to the advanced update options page. Look for the “Automatic updates” section and toggle the switch to enable automatic updates.
4. Select the Update Schedule: Once you’ve enabled automatic updates, you can choose the update schedule that works best for you. The available options include:
a. Automatic (recommended): This option installs updates as soon as they become available, ensuring that your system remains up to date and secure.
b. Notify to schedule restart: With this option, Windows will download and install updates but prompt you to schedule a restart. This allows you to choose a convenient time to restart your computer when it won’t interrupt your work.
c. Notify to download and notify to install: This option prompts you to manually initiate the download and installation of updates. Windows will notify you when updates are available, giving you control over when to install them.
5. Save Changes: Once you have configured the automatic update settings and selected the desired update schedule, click on the “Apply” or “Save” button to save your changes.
By configuring automatic updates, you ensure that your system receives critical updates and security patches without manual intervention. This helps keep your computer protected against the latest threats while minimizing the risk of missing important updates. Remember to regularly check for updates and install them to ensure your system remains secure and performance optimized.
Selecting Active Hours for Updates
Windows allows you to specify your active hours, which are the times when you typically use your computer. During these hours, Windows will avoid installing updates to prevent any disruption. Here’s how you can select your active hours:
1. Access Windows Update Settings: Open the Windows Update settings as described previously.
2. Click on “Change active hours”: Look for the “Change active hours” option and click on it. This will open the active hours selection screen.
3. Select Start and End Times: On the active hours selection screen, you will see a graphical representation of a 24-hour timeline. Drag the sliders to set your preferred start and end times for the active hours. This should be the period when you usually work or use your computer.
4. Save Changes: Once you have selected your active hours, click on the “Save” or “Apply” button to save the changes.
By selecting your active hours, you can ensure that Windows doesn’t interrupt your work or usage by automatically installing updates during those times. Instead, it will schedule updates outside of your active hours, such as during periods of inactivity or when your computer is idle.
It’s important to choose your active hours wisely to avoid any inconvenience. Consider your regular usage patterns and select a time range when you are least likely to be actively using your computer. For example, if you work from 9 AM to 5 PM, setting your active hours from 8 AM to 6 PM would be ideal.
Keep in mind that even though you specify your active hours, Windows may still install critical security updates during those times if necessary to protect your system. However, it will try to minimize interruptions to your workflow during your specified active hours.
Regularly reviewing and adjusting your active hours based on changes in your usage patterns can help ensure that updates are installed at the most convenient times for you.
Pausing Updates Temporarily
Sometimes, you may need to temporarily pause Windows updates to avoid interruptions during critical tasks or when you have limited internet connectivity. Windows provides an option to pause updates for a specific period. Here’s how you can pause updates temporarily:
1. Access Windows Update Settings: Open the Windows Update settings as mentioned earlier.
2. Pause Updates: Look for the “Pause updates” section on the Windows Update settings page. Click on the “Pause updates for 7 days” (or a similar option) to temporarily pause updates for a week. Note that the available pause duration may vary based on the version of Windows you are using.
3. Verify Pause Status: Once you have paused updates, Windows will display a confirmation message indicating that updates are paused. You can also verify the pause status in the Windows Update settings page.
4. Resume Updates: After the specified pause period ends, Windows will automatically resume downloading and installing updates. However, you can also resume updates manually by clicking on the “Resume updates” or a similar option in the Windows Update settings.
Pausing updates temporarily provides you with the flexibility to control when updates are installed on your system. This can be beneficial in situations where you need uninterrupted access to your computer or have limited internet connectivity.
It’s important to note that pausing updates should be done judiciously, as it can leave your computer vulnerable to security risks during the pause period. To ensure the security of your system, it is recommended to regularly check for updates and install them as soon as possible.
Furthermore, the pause feature only offers a temporary respite from updates and does not provide a permanent solution to managing updates. It is essential to stay vigilant and maintain an up-to-date system by regularly installing the latest updates and patches provided by Windows.
By utilizing the pause updates feature when necessary, you can strike a balance between ensuring uninterrupted use of your computer and keeping your system secure and up to date.
Advanced Update Options
In addition to the basic update settings, Windows provides advanced options that allow you to further customize the update experience on your computer. These advanced update options offer more control and flexibility. Here are some of the key advanced update options:
1. Delivery Optimization: Delivery Optimization allows you to control how updates are downloaded and shared on your local network or the internet. You can choose to share updates with other devices on your network or limit the upload bandwidth used for sharing updates.
2. Pause Quality Updates: In addition to pausing updates temporarily, Windows allows you to specifically pause quality updates, which include non-security updates and feature enhancements. Pausing quality updates can be useful if you want to focus on critical security updates and avoid feature updates for a certain period.
3. Pause Feature Updates: Similar to pausing quality updates, you can also pause feature updates, which are major Windows releases that introduce new features and significant changes to the operating system. Pausing feature updates can be beneficial if you prefer to have more control over when these major updates are installed.
4. View Update History: Windows keeps a log of all the installed updates on your computer. You can access the update history to view which updates have been installed, their installation dates, and any related error messages.
5. Reset Windows Update Components: If you encounter issues with Windows Update, such as failed installations or update errors, you can use the built-in “Reset Windows Update Components” feature. It helps reset and repair the Windows Update components, resolving common update-related problems.
6. Advanced Troubleshooting: Windows provides advanced troubleshooting options for update-related issues. You can access the Windows Update troubleshooter, which can automatically diagnose and fix common update problems. Additionally, there are other advanced troubleshooting tools and methods that can be utilized for more complex update issues.
Access and modify these advanced update options by navigating to the Windows Update settings page and selecting the relevant options. It’s important to note that these options should be modified with caution, as incorrect settings or modifications can adversely affect the update process or the stability of your system.
By exploring and utilizing these advanced update options, you can tailor the update experience to your preferences and troubleshoot any update-related issues effectively.
Troubleshooting Windows Update Issues
Windows Update is a critical component of the Windows operating system. However, there may be instances where you encounter issues with the update process. Fortunately, Windows provides several troubleshooting tools and methods to help resolve these issues. Here are some tips for troubleshooting Windows Update problems:
1. Run Windows Update Troubleshooter: Windows includes a built-in troubleshooter specifically designed to diagnose and fix common Windows Update issues. To run the Windows Update troubleshooter, open the Windows Settings app, go to “Update & Security,” and click on “Troubleshoot.” Select the Windows Update troubleshooter and follow the on-screen instructions to resolve any identified problems.
2. Check Your Internet Connection: Ensure that you have a stable and reliable internet connection. Windows Update requires a consistent connection to download and install updates. If your internet connection is slow or intermittent, consider troubleshooting your network connection or contacting your internet service provider for assistance.
3. Restart Your Computer: Sometimes, a simple restart can resolve update-related issues. Restart your computer and try running Windows Update again.
4. Delete Temporary Files: Clearing temporary files on your system can help resolve update problems. Open the Disk Cleanup utility, select the drive where Windows is installed (usually C:), and choose the option to clean up system files. Check the “Temporary files” box and click “OK” to delete them.
5. Manually Reset Windows Update Components: If Windows Update continues to encounter issues, you can try manually resetting its components. This involves stopping certain services, renaming folders, and restarting services. Instructions for manually resetting Windows Update components can be found on Microsoft’s support website.
6. Scan for Malware: Malware infections can interfere with the Windows Update process. Run a full system scan using a reliable antivirus or antimalware software to detect and remove any malicious programs from your computer.
7. Check for Available Disk Space: Ensure that you have enough free disk space on your system drive for the updates to be downloaded and installed. If your drive is running low on space, consider removing unnecessary files or applications to free up disk space.
If you continue to experience problems with Windows Update after trying these troubleshooting steps, it may be helpful to seek assistance from Microsoft support or browse their online community forums. Remember to provide as much detail as possible about the issue you are facing for a more accurate diagnosis and resolution.