
Update USB Driver
One of the common reasons for a USB drive not showing up is an outdated or corrupted driver. The USB driver allows your computer to recognize and communicate with the connected USB devices. If the driver is outdated or incompatible, it may prevent the USB drive from being detected. Updating the USB driver can often resolve this issue.
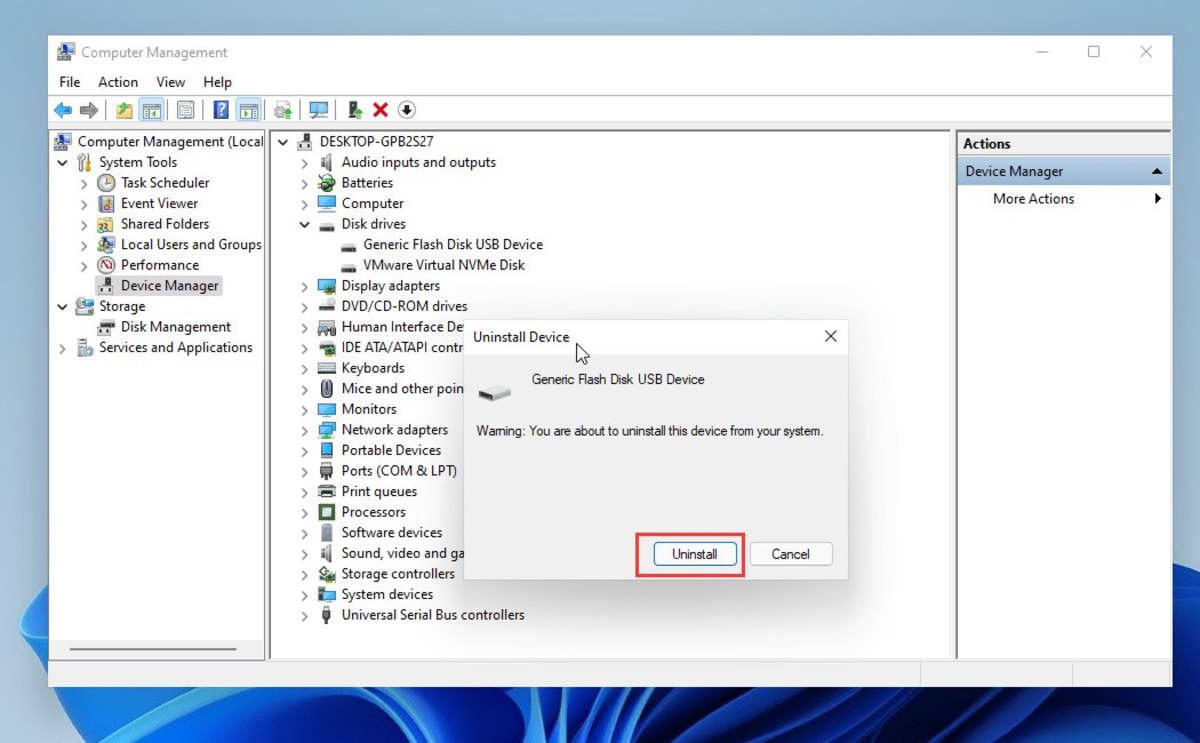
To update the USB driver, follow these steps:
- Open the Device Manager by right-clicking on the Start button and selecting “Device Manager” from the menu.
- In the Device Manager window, expand the “Universal Serial Bus controllers” category.
- Right-click on the USB driver and select “Update driver” from the context menu.
- Choose the option to search automatically for updated driver software. Windows will then search your computer and the internet for the latest driver updates and install them if available.
- Once the driver update process is complete, restart your computer and check if the USB drive is now showing up.
If Windows fails to find and install the updated driver or you prefer to manually install it, you can visit the manufacturer’s website and download the latest driver for your specific USB device model. Make sure to follow the installation instructions provided by the manufacturer.
Updating the USB driver is an effective troubleshooting step that can resolve compatibility issues and ensure your USB drive is recognized by your computer. If the USB drive is still not showing up after updating the driver, proceed to the next troubleshooting method.
Change USB Port
Sometimes, the USB port you are using may be the culprit behind your USB drive not showing up. Faulty or damaged USB ports can prevent proper communication between the device and your computer, resulting in the drive not being detected. To determine if a faulty port is the issue, try connecting the USB drive to a different USB port on your computer.
Follow these steps to change the USB port:
- Disconnect the USB drive from the current port.
- Locate another available USB port on your computer.
- Insert the USB drive into the new USB port.
- Wait for a few seconds to allow your computer to detect the USB drive.
If the USB drive is now showing up in File Explorer or Disk Management, then the problem was with the previous USB port. However, if the issue persists and the drive is still not being recognized, try connecting it to another computer to check if the problem lies with the USB drive itself.
Changing the USB port can often solve issues related to faulty ports or loose connections. However, if the issue persists even after changing the USB port, it’s time to explore other troubleshooting methods.
Check for Drive in Disk Management
If your USB drive is not showing up in File Explorer, it is worth checking if it appears in Disk Management. Disk Management is a built-in Windows utility that allows you to manage and configure disk drives on your computer. It can help identify any issues with the USB drive and facilitate troubleshooting.
To access Disk Management and check for the USB drive, follow these steps:
- Press the Windows key + R to open the Run dialog box.
- Type “diskmgmt.msc” (without quotes) and press Enter. This will open the Disk Management utility.
- In the Disk Management window, look for the USB drive. It will be displayed as a disk without a drive letter.
- If the USB drive appears in Disk Management, right-click on it and select “Change Drive Letter and Paths.”
- Click “Add” and choose a drive letter from the drop-down menu. Then click “OK” to assign the drive letter to the USB drive.
- Once the drive letter is assigned, close Disk Management and check if the USB drive is now visible in File Explorer.
If the USB drive is not visible in Disk Management or you encounter any errors while trying to assign a drive letter, it could indicate a more complex issue with the drive. In such cases, it is recommended to try other troubleshooting methods or contact a professional data recovery service for further assistance.
Checking for the USB drive in Disk Management can provide valuable insights into the drive’s status and enable you to take appropriate measures to resolve the issue. If the USB drive is still not showing up after assigning a drive letter, proceed to the next troubleshooting step.
Assign a Drive Letter
If your USB drive is not showing up with a drive letter in File Explorer, assigning a drive letter to the device can often solve the issue. Drive letters are essential for Windows to recognize and access storage devices such as USB drives. Here’s how you can assign a drive letter to the USB drive:
- Open Disk Management by pressing the Windows key + R, typing “diskmgmt.msc” (without quotes), and then pressing Enter.
- In the Disk Management window, locate the USB drive. It will be listed as a disk without a drive letter.
- Right-click on the USB drive and select “Change Drive Letter and Paths.”
- In the dialog box, click “Add.”
- Choose a drive letter from the drop-down menu and click “OK.”
- Close Disk Management and check if the USB drive now appears with the assigned drive letter in File Explorer.
Assigning a drive letter to the USB drive helps Windows recognize it as a valid storage device. If the USB drive still does not show up with a drive letter, proceed to the next troubleshooting step.
It’s important to note that if the USB drive contains important data, assigning a drive letter should not affect the existing data. However, it is always recommended to create backups of your important files before attempting any troubleshooting steps.
If the USB drive is now showing up with the assigned drive letter, you should be able to access it in File Explorer and perform operations such as copying, moving, or deleting files. If the issue persists or the drive encounters additional errors, further troubleshooting methods may be necessary.
Format the Drive
If your USB drive is still not showing up in File Explorer or Disk Management, formatting the drive may help resolve the issue. Formatting erases all data on the drive and prepares it for future use. However, please note that formatting will result in the loss of any existing data on the USB drive. Therefore, it is crucial to perform this step only if you have a backup of your files or if the drive does not contain any important data.
To format the USB drive, follow these steps:
- Open Disk Management by pressing the Windows key + R, typing “diskmgmt.msc” (without quotes), and then pressing Enter.
- In the Disk Management window, locate your USB drive.
- Right-click on the USB drive and select “Format.”
- Choose the desired file system for the drive (such as NTFS or exFAT) and adjust the volume label if desired.
- Ensure that the “Quick Format” option is selected to speed up the formatting process.
- Click “OK” to begin the formatting process.
- Wait for the formatting to complete and check if the USB drive now appears in File Explorer.
Formatting the USB drive prepares it for use and eliminates any potential file system errors that may be preventing it from being recognized. After formatting, the USB drive should be visible and accessible in File Explorer. If it still doesn’t appear, proceed to the next troubleshooting step.
Remember to exercise caution and ensure you have a backup of your important data before formatting the USB drive, as formatting will erase all existing files on it.
If the USB drive is now showing up after formatting it, you can begin using it to store files and perform other tasks. However, if the issue persists, further troubleshooting methods may be required to identify and resolve the problem.
Update Windows
Outdated operating systems can sometimes lead to compatibility issues with USB drives and result in them not showing up. To ensure that your computer is up to date with the latest bug fixes and device compatibility updates, it is important to regularly update Windows.
Follow these steps to update Windows and potentially resolve the USB drive not showing up issue:
- Click on the Start button and select “Settings.”
- In the Settings window, click on “Update & Security.”
- Click on “Windows Update” in the left-hand menu.
- Click on the “Check for updates” button and allow Windows to search for available updates.
- If updates are available, click on “Download” and let them install.
- Restart your computer if prompted to complete the update process.
Once Windows is updated, check if the USB drive now shows up in File Explorer. If the problem persists, further troubleshooting methods may be necessary.
Updating Windows not only ensures your computer has the latest security patches but also improves the overall system functionality and device compatibility. It can help address any underlying issues that prevent the USB drive from being recognized.
If the USB drive continues to be undetectable even after updating Windows, proceed to the next troubleshooting step to rule out other potential causes.
Disable USB Selective Suspend
USB Selective Suspend is a power-saving feature in Windows that can sometimes interfere with the proper functioning of USB devices, including USB drives. When enabled, it allows the operating system to suspend USB devices to conserve power. Disabling this feature can sometimes resolve the issue of a USB drive not showing up.
To disable USB Selective Suspend, follow these steps:
- Click on the Start button and select “Settings.”
- In the Settings window, click on “System.”
- Click on “Power & sleep” in the left-hand menu.
- Scroll down and click on “Additional power settings.”
- In the Power Options window, click on “Change plan settings” next to your selected power plan.
- Click on “Change advanced power settings.”
- In the Power Options dialog box, expand the “USB settings” category.
- Expand the “USB selective suspend setting” option.
- Disable both “On battery” and “Plugged in” options by setting them to “Disabled.”
- Click “Apply” and then “OK” to save the changes.
Once USB Selective Suspend is disabled, restart your computer and check if the USB drive is now showing up in File Explorer. If the issue persists, there may be other factors contributing to the problem.
Disabling USB Selective Suspend prevents the operating system from suspending USB devices and ensures uninterrupted communication between your computer and the USB drive. It can help overcome power-related issues that might be preventing the USB drive from being detected.
If disabling USB Selective Suspend does not resolve the issue, proceed to the next troubleshooting step to explore other potential solutions.
Disable Fast Startup
Fast Startup is a feature in Windows that allows your computer to boot up quickly by saving some system information to a hibernation file. However, this feature can sometimes cause issues with USB devices, such as a USB drive not showing up. By disabling Fast Startup, you can potentially resolve the problem and allow your USB drive to be recognized by your computer.
To disable Fast Startup, follow these steps:
- Click on the Start button and select “Settings.”
- In the Settings window, click on “System.”
- Click on “Power & sleep” in the left-hand menu.
- Scroll down to the “Related settings” section and click on “Additional power settings.”
- In the Power Options window, click on “Choose what the power buttons do.”
- Click on “Change settings that are currently unavailable.”
- Scroll down to the “Shutdown settings” section.
- Uncheck the box next to “Turn on fast startup (recommended).”
- Click “Save changes.”
After disabling Fast Startup, restart your computer and check if the USB drive is now recognized by your computer. If the issue persists, additional troubleshooting steps may be required.
Disabling Fast Startup allows your computer to perform a full boot instead of using the hibernation file. This can help eliminate potential conflicts with USB devices and ensure proper detection and functioning of your USB drive.
If disabling Fast Startup does not resolve the issue, proceed to the next troubleshooting method to explore other potential solutions.
Scan for Hardware Changes
When a USB drive is not showing up in File Explorer, scanning for hardware changes can prompt your computer to detect and recognize the device. This process forces Windows to search for any new hardware connected to the system, which may include the USB drive that is not being detected.
To scan for hardware changes, follow these steps:
- Press the Windows key + X on your keyboard and select “Device Manager” from the menu that appears.
- In the Device Manager window, click on “Action” in the menu bar.
- Click on “Scan for hardware changes.”
- Wait for Windows to scan for any new hardware and attempt to detect the USB drive.
- Once the scanning process is complete, check if the USB drive shows up in File Explorer.
If the USB drive is still not visible after scanning for hardware changes, there may be other underlying issues causing the problem. Proceed to the next troubleshooting step to further investigate and resolve the issue.
Scanning for hardware changes initiates a refresh of the device manager and can help in resolving issues related to unrecognized USB drives. It forces Windows to re-detect the USB drive, potentially resolving any conflicts or communication errors.
If scanning for hardware changes does not resolve the issue, continue to the next troubleshooting method to explore other potential solutions.
Use Command Prompt to Fix Issues
If you’re experiencing issues with a USB drive not showing up, using the Command Prompt can be a helpful way to attempt to fix the problem. Command Prompt is a built-in command-line interpreter in Windows that allows you to execute various commands and perform advanced troubleshooting tasks.
To fix USB drive issues using Command Prompt, follow these steps:
- Press the Windows key and type “cmd” (without quotes) in the search bar.
- Right-click on “Command Prompt” and select “Run as administrator” to open Command Prompt with administrative privileges.
- Type the command “diskpart” and press Enter to launch the DiskPart utility.
- Type “list disk” and press Enter to view all the disks connected to your computer.
- Identify the disk number that corresponds to your USB drive.
- Type “select disk X” (replace X with the disk number of your USB drive) and press Enter.
- Type “clean” and press Enter to remove all partitions and volumes from the USB drive.
- Type “create partition primary” and press Enter to create a new primary partition on the USB drive.
- Type “format fs=ntfs” (or “format fs=fat32” if you prefer FAT32 file system) and press Enter to format the USB drive with the specified file system.
- Wait for the formatting process to complete.
- Once the process is finished, type “assign” and press Enter to assign a drive letter to the USB drive.
- Close Command Prompt and check if the USB drive is now recognized by your computer.
Using Command Prompt to fix USB drive issues involves advanced tasks such as disk cleaning, partition creation, and formatting. It’s important to be cautious and ensure you select the correct disk to avoid unintended data loss.
If the USB drive is still not showing up after performing these steps, there may be more complex issues at play. Proceed to the next troubleshooting method to explore additional solutions.
Check for Physical Damage
If your USB drive is not showing up, there is a possibility that it may have suffered physical damage. Physical damage can occur due to mishandling, improper insertion or removal, exposure to extreme temperatures, or physical impact. Checking for physical damage is an important step in troubleshooting the issue.
To check for physical damage on the USB drive, follow these steps:
- Inspect the USB drive physically for any visible signs of damage, such as bent or broken connectors, cracks, or loose components.
- Check the USB port on your computer for any physical issues, such as bent or damaged pins.
- Try connecting the USB drive to a different computer or USB port to see if it is recognized.
- If possible, use a different USB cable to connect the drive to your computer.
If you find any physical damage on the USB drive or the USB port, it may be the cause of the issue. In such cases, professional assistance or data recovery services may be required to recover the data or repair the drive.
If the USB drive is not physically damaged, but still not showing up, proceed to the next troubleshooting method to explore other potential solutions.
Checking for physical damage is crucial to identify any visible issues that may be causing the USB drive not to be recognized. However, it is important to exercise caution and seek professional help if you are unsure about handling physical repairs or data recovery.
Use a Different USB Cable
If your USB drive is not showing up, the issue could be related to a faulty USB cable. USB cables can wear out over time or become damaged, resulting in connection issues and preventing the drive from being recognized. Trying a different USB cable can help determine if the problem lies with the cable itself.
To troubleshoot the issue using a different USB cable, follow these steps:
- Disconnect the USB drive from your computer.
- Locate another USB cable that is compatible with your drive.
- Connect the USB drive to your computer using the new cable.
- Wait for a few seconds to see if the USB drive is now detected by your computer.
If the USB drive is now recognized with the new cable, it indicates that the original USB cable was faulty. You can continue using the USB drive with the new cable. However, if the issue persists and the drive is still not showing up, proceed to the next troubleshooting step.
Using a different USB cable helps eliminate cable-related issues that may be causing the drive not to be detected. USB cables can deteriorate over time due to wear and tear or physical damage, so it’s important to try a different cable to rule out this possibility.
If using a different USB cable does not resolve the issue, proceed to the next troubleshooting method to explore other potential solutions.
Test the USB Drive on Another Device
If your USB drive is not showing up on your computer, it’s possible that there may be compatibility issues or problems with the USB port on your computer. To determine if the issue is specific to your computer or the USB drive itself, you can try connecting the drive to another device.
To test the USB drive on another device, follow these steps:
- Eject the USB drive from your computer.
- Connect the USB drive to a different computer or device.
- Wait for a few seconds to see if the USB drive is detected and appears in File Explorer or similar file management software on the other device.
If the USB drive shows up and is recognized on the other device, it indicates that the drive itself is functioning properly. In this case, the issue may be related to your computer’s USB ports or drivers. It’s recommended to proceed with further troubleshooting on your computer.
However, if the USB drive is not appearing on the other device either, it suggests that the drive might be experiencing hardware or firmware-related issues. In such cases, it may be necessary to seek professional help to recover data or repair the USB drive.
Testing the USB drive on another device helps determine whether the issue lies with the USB drive itself or the computer it was originally connected to. By trying a different device, you can rule out device-specific compatibility problems and focus on addressing the issue accordingly.
If the USB drive is still not showing up on any device, there may be more complex issues at play. Proceed to the next troubleshooting method to explore additional solutions.
Use Data Recovery Software
If your USB drive is not showing up and you have important data on it, using data recovery software can be a viable option to retrieve your files. Data recovery software can scan the USB drive for lost or deleted files and help recover them, even if the drive is not being recognized by the computer.
To use data recovery software to recover files from your USB drive, follow these steps:
- Download and install a reputable data recovery software tool on your computer.
- Connect the USB drive to your computer.
- Launch the data recovery software and select the USB drive as the target location for the recovery process.
- Follow the prompts provided by the software to initiate the scanning process.
- Wait for the software to scan the USB drive and display the recoverable files.
- Select the files you want to recover and choose a safe location on your computer to save the recovered files.
- Start the data recovery process and wait for the software to complete the retrieval of your files.
Data recovery software can often recover files even from inaccessible or unrecognized USB drives. However, it is important to note that the success of data recovery depends on various factors, such as the extent of the damage to the USB drive and the condition of the files. In some cases, professional data recovery services may be required for more complex situations.
Using data recovery software is a valuable option if your USB drive is not showing up and you need to retrieve important files. It can be an effective way to recover your data even when other troubleshooting methods have failed.
If the data recovery process does not yield satisfactory results, or if the USB drive remains undetected, it may be necessary to seek professional assistance or consider more advanced data recovery techniques.