
Why Would You Want to Change the Time on Your Fitbit?
Fitbit is a popular fitness tracker that not only monitors your physical activity but also displays the time to help you keep track of your day. However, there may be instances where you need to change the time on your Fitbit device. Here are a few reasons why you might want to do so:
- Accurate timekeeping: Ensuring that your Fitbit displays the correct time is essential for managing your schedule and staying on track with your daily activities.
- Time zone changes: If you’re traveling to a different time zone, you’ll want to update your Fitbit to reflect the local time. This allows you to maintain accuracy in tracking your progress and daily goals.
- Daylight saving time: When daylight saving time begins or ends, it’s important to adjust the time on your Fitbit accordingly. This ensures that your device remains synchronized with the correct time and prevents any confusion.
- No automatic syncing: Fitbit devices do not always automatically sync with your smartphone or computer to update the time. Therefore, manual adjustments may be necessary from time to time.
- Troubleshooting: In certain situations, such as when your Fitbit is experiencing syncing issues or displaying an incorrect time, manually changing the time can help resolve these problems.
Now that you understand why you might need to change the time on your Fitbit, let’s explore the steps to do so. Depending on your specific situation, you can either sync your Fitbit with your smartphone, manually change the time on your device, or adjust the time zone settings. Understanding these options will empower you to confidently update the time on your Fitbit whenever necessary.
Syncing Your Fitbit with Your Smartphone
One of the easiest ways to change the time on your Fitbit is by syncing it with your smartphone. By doing so, your Fitbit will automatically update the time to match the time on your phone. Here’s how you can sync your Fitbit with your smartphone:
- Make sure that your smartphone and Fitbit are connected via Bluetooth. Keep your Fitbit in close proximity to your smartphone to ensure a strong and stable connection.
- Open the Fitbit app on your smartphone. If you haven’t already, you’ll need to download and install the app from your device’s app store.
- Log into your Fitbit account or create a new account if you don’t already have one. Make sure that you’re using the same account that is linked to your Fitbit device.
- In the Fitbit app, go to the “Account” or “Profile” tab, depending on your Fitbit model.
- Look for the “Sync” or “Sync Now” option and tap on it. Your Fitbit will start syncing with your smartphone.
- Wait for the sync to complete. This process may take a few moments, depending on the amount of data that needs to be transferred between your Fitbit and smartphone.
- Once the sync is finished, check the time on your Fitbit. It should now display the correct time based on the time settings of your smartphone.
If your Fitbit fails to sync with your smartphone or the time does not update automatically, you may need to manually change the time on your device. The following section will explain how to do this.
Manually Changing the Time on Your Fitbit
If your Fitbit device is not syncing with your smartphone or you prefer to manually change the time, you can directly adjust the time on your Fitbit. Here’s how to manually change the time on your Fitbit:
- On your Fitbit device, navigate to the “Settings” or “Device” menu. The specific location may vary depending on your Fitbit model.
- Scroll through the options until you find the “Clock” or “Time” setting.
- Select the “Clock” or “Time” option to access the time settings.
- Depending on your Fitbit model, you may have different options for adjusting the time. You can typically use the physical buttons or touchscreen to make changes.
- Follow the on-screen prompts or use the buttons to manually set the correct time on your Fitbit. Pay attention to the hours, minutes, and, if applicable, AM/PM indications.
- Once you have set the desired time, save the changes and exit the settings menu.
After manually changing the time on your Fitbit, double-check the display to ensure that the time is now correct. If the time does not update or you encounter any difficulties, consider reaching out to Fitbit support for further assistance.
Now that you know how to manually change the time on your Fitbit, let’s explore how to handle time zone changes on your device.
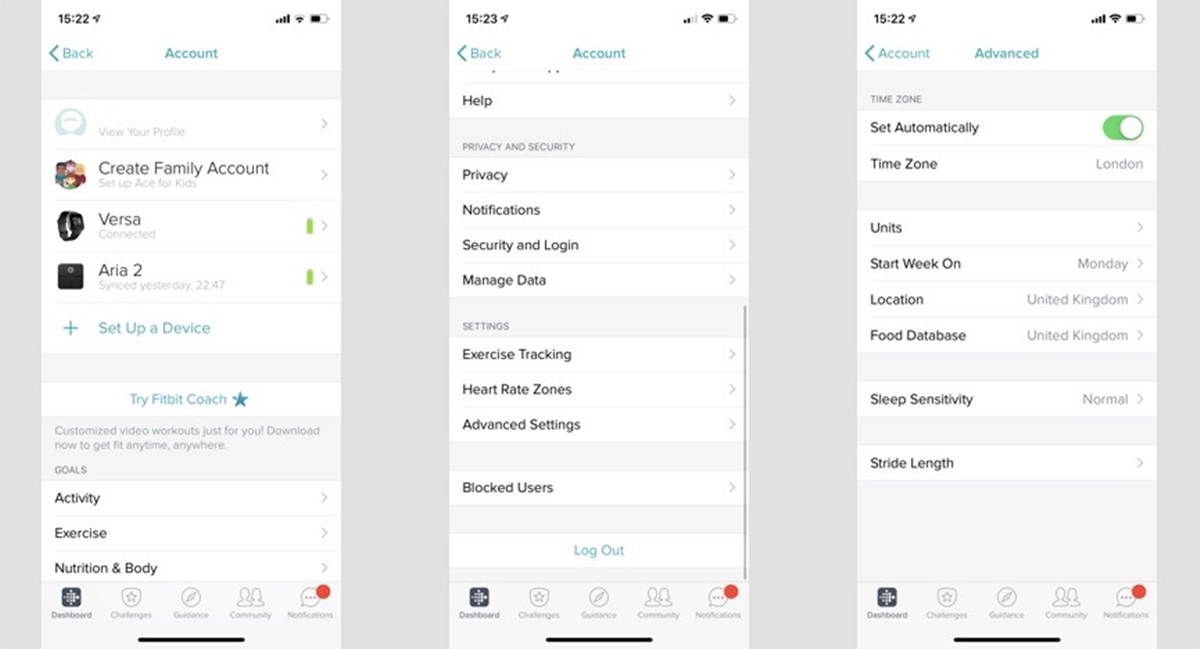
Changing Time Zones on Your Fitbit
If you’re traveling to a different time zone, it’s important to update the time zone on your Fitbit to ensure accurate tracking and timekeeping. Here’s how you can change the time zone on your Fitbit:
- On your Fitbit device, navigate to the “Settings” or “Device” menu. The exact location of this menu may vary depending on your Fitbit model.
- Scroll through the options until you find the “Clock” or “Time Zone” setting.
- Select the “Clock” or “Time Zone” option to access the time zone settings.
- Depending on your Fitbit model, you may be able to choose the time zone manually or have the option to enable automatic time zone updates based on your smartphone’s location.
- If you want to manually set the time zone, use the buttons or touchscreen to scroll through the available time zone options until you find the correct one for your current location. Select and save the desired time zone.
- If you prefer to enable automatic time zone updates, make sure the feature is turned on and your Fitbit is connected to your smartphone. This allows your Fitbit to update its time zone based on your smartphone’s location. Keep in mind that this feature requires a stable internet connection.
- Once you have made the necessary changes, exit the settings menu and check the display to ensure that the time zone is now updated.
By changing the time zone on your Fitbit, you can ensure that your device accurately reflects the local time of your current location. This is particularly useful when traveling or when daylight saving time affects your time zone.
Next, let’s explore how to set the time format on your Fitbit to suit your preferences.
How to Set the Time Format on Your Fitbit
Fitbit offers the flexibility to customize the time format according to your preference. Whether you prefer a 12-hour clock or a 24-hour clock, you can easily adjust the time format on your Fitbit device. Here’s how:
- On your Fitbit device, navigate to the “Settings” or “Device” menu. The location of this menu may vary depending on your specific Fitbit model.
- Scroll through the options until you find the “Clock” or “Time” setting.
- Select the “Clock” or “Time” option to access the time settings.
- Look for the “Time Format” or “Clock Format” option and choose between “12-hour” or “24-hour” format, based on your preference.
- Save the changes and exit the settings menu.
Once you have set the time format on your Fitbit, the display will reflect the chosen format. This allows you to conveniently read the time on your Fitbit in the format that you find most comfortable.
Now that you know how to set the time format on your Fitbit, let’s explore what you can do if you encounter any issues with the time display on your device.
What to Do if Your Fitbit Time is Incorrect
If you notice that the time on your Fitbit is incorrect or not updating as expected, here are a few steps you can take to troubleshoot the issue:
- Ensure that your Fitbit is properly synced with your smartphone. Follow the steps mentioned earlier to sync your Fitbit and check if the time updates correctly.
- Restart your Fitbit device. Sometimes, a simple restart can resolve minor software glitches that may be causing the incorrect time display.
- Check your smartphone’s time settings. Make sure that the time on your smartphone is accurate and set to the correct time zone. If the time on your smartphone is incorrect, it may affect the time displayed on your Fitbit.
- Toggle the automatic time zone feature. If you have enabled automatic time zone updates on your Fitbit, try disabling it and manually setting the time zone. Then, enable the feature again to see if it resolves the issue.
- If none of the above steps work, consider resetting your Fitbit device to its factory settings. Keep in mind that this will erase all data and settings on your Fitbit, so it should be used as a last resort.
- If the problem persists, contact Fitbit customer support for further assistance. They can provide specific troubleshooting steps or guide you through any necessary repairs or replacements.
Remember, it’s important to have the correct time displayed on your Fitbit to ensure accurate tracking and syncing. Following these troubleshooting steps should help you resolve any issues with the time display on your device.
Lastly, let’s explore some additional tips and tricks for changing the time on your Fitbit.
Other Tips and Tricks for Changing the Time on Your Fitbit
Here are some additional tips and tricks to help you effectively change the time on your Fitbit:
- Regularly sync your Fitbit: To ensure that your Fitbit displays the most accurate time, make it a habit to regularly sync your device with your smartphone. This will help keep the time updated and synchronized.
- Use the Fitbit mobile app: The Fitbit mobile app offers additional features and options for managing your device. This includes easily changing the time format, time zone, and other settings. Make sure to explore the app’s settings and customization options.
- Set a silent alarm: Fitbit devices often come with built-in alarms that you can set directly on your device or through the Fitbit app. Take advantage of this feature to set an alarm for waking up or as a reminder for important tasks.
- Keep spare batteries: If your Fitbit device requires batteries, it’s a good idea to keep some spares on hand. This way, should the battery run out and you need to reset the time, you can quickly replace the batteries without any interruptions.
- Adjust for daylight saving time: When daylight saving time begins or ends, make sure to adjust the time on your Fitbit accordingly. This will ensure that your device remains in sync with the updated time and prevents any discrepancies in tracking or timekeeping.
- Check for firmware updates: It’s important to keep your Fitbit device up to date by installing any available firmware updates. These updates often include bug fixes and improvements, which can help maintain accurate timekeeping on your Fitbit.
By following these tips and tricks, you can ensure that the time on your Fitbit is always accurate and up to date. This will allow you to make the most of your Fitbit device and enjoy seamless time tracking along with your fitness journey.